Nikon D70 Quick Start Manual
Hide thumbs
Also See for D70:
- Manual (218 pages) ,
- Quicktour (22 pages) ,
- Firmware upgrading instruction (10 pages)
Advertisement
Quick Links
Digital Camera
Quick Start Guide
Quick Start Guide
Read this guide for a basic introduction to taking
pictures with your D70 in
default "point-and-shoot" settings.
The reverse side provides instructions for installing
PictureProject and transferring pictures to your
computer.
Complete information on using your Nikon digital
camera can be found in the Nikon Guide to Digital
Photography with the D70 or the PictureProject
Reference Manual (on CD).
Unpack the camera
Be sure all items listed here were included with your camera.
NOTE: Memory cards are sold separately.
DK-16 Viewfi nder
(attached to camera)
BM-4 LCD monitor cover
Body cap
(attached to camera)
(attached to camera)
D70 digital camera
En
The Nikon Guide to Digital Photography
with the
Quick Start Guide
DIGITAL CAMERA
Warranty
Quick Start Guide
Nikon Guide to
Warranty
DK-5
(this guide)
Digital Photography
eyepiece cap
camera strap
Rechargeable EN-EL3 Li-ion Battery
MH-18 quick charger
MS-D70 holder for
with terminal cover
with power cable
CR2 batteries
(instruction manual included)
(instruction manual included)
PictureProject CD Book
- PictureProject Software CD-ROM
- PictureProject Reference Manual
CD-ROM
EG-D100 video cable
UC-E4 USB cable
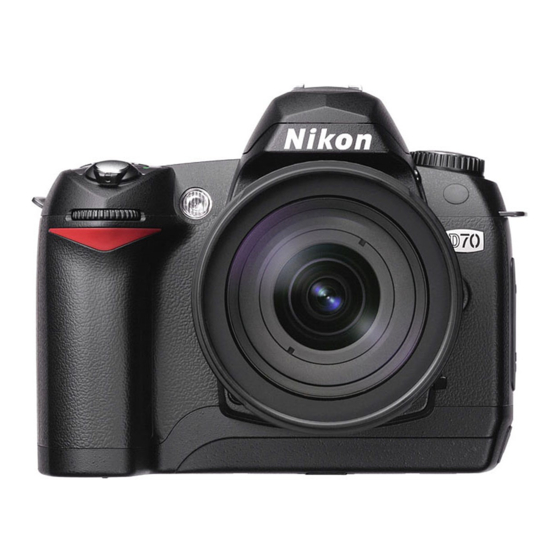
Parts of the Camera
Shutter-release button
Focus-mode
selector
Power switch
Viewfi nder eyepiece
Sub-command
Diopter adjustment
dial
control
Multi selector
Battery-chamber
cover latch
Main command dial
Shooting mode ( ) button
Format (
) button
Playback (
) button
Battery-chamber
Menu (
) button
cover
Sensitivity (ISO) button /
Thumbnail (
) button
Mode dial
Image quality/size (QUAL)
button /
Playback zoom ( ) button /
Memory card access lamp
Enter (
) button
Delete (
Monitor
LCD illuminator ( ) button
Format (
) button
Control panel
To Users of Digital Cameras with Interchangeable Lenses: Foreign Matter on the Low-Pass Filter
Nikon takes every possible precaution to prevent foreign matter from coming into contact with the low-pass fi lter during production
and shipping. The D70, however, is designed to be used with interchangeable lenses, and foreign matter may enter the camera
when lenses are removed or exchanged. Once inside the camera, this foreign matter may adhere to the low-pass fi lter, where it
may appear in photographs taken under certain conditions. To prevent foreign matter from entering the camera, do not exchange
lenses in dusty environments. To protect the camera when no lens is in place, be sure to replace the body cap provided with the
camera, being careful to fi rst remove all dust and other foreign matter that may be adhering to the body cap.
Should foreign matter fi nd its way onto the low-pass fi lter, clean the low-pass fi lter as instructed on pages 194–195 of the Guide
to Digital Photography, or have the low-pass fi lter cleaned by authorized Nikon service personnel. Photographs affected by the
presence of foreign matter on the low-pass fi lter can be retouched using Nikon Capture 4 version 4.1 or later (available separately)
or the clean image options available in some third-party imaging software.
En
Ready the camera
Ready the camera
1
Attach the camera strap
Attach the camera strap as shown. Repeat for the second eyelet.
(auto) mode using
2
Charge the battery
Charge the EN-EL3 battery using the MH-18 quick charger provided with your camera.
1 Connect the AC adapter plug to the battery charger ( ).
2 Plug the wall plug into a power outlet.
3 With the arrow on top of the battery toward the CHARGE
lamp, place the EN-EL3 in the battery bay, matching the bat-
tery indentations with the charger projections, and slide it
towards the CHARGE lamp ( ).
4 Slide the EN-EL3 toward the CHARGE lamp until you hear it
click into place ( ). The lamp will start to blink orange, indi-
cating that charging has begun. Charging is complete when
the lamp glows steadily.
An exhausted battery will take approximately two
CHARGE lamp
hours to recharge.
For details, see the documentation provided with
eyepiece cup
your battery and charger.
3
Insert the battery
1 Turn the camera off.
2 Slide the battery-chamber cover latch to the
position and open the battery-chamber cover ( ). Slide the
EN-EL3 battery into the battery chamber as shown ( ).
3 Close the battery-chamber cover ( ).
AN-D70
Battery-chamber
Insert battery fully and close
cover latch
battery-chamber cover
4
Choose a language and set the clock
The fi rst time the camera is turned on, a language-selection dialog will be displayed. Choose a language and set
the time and date. For details, see the Guide to Digital Photography, page 16.
1
2
Language
OK
Deutsch
Italiano
English
Español
Nederlands
Français
Svenska
Language selection dialog displayed.
Select language.
3
Date
4
Set
OK
Y M
D
2004
01 01
H M
S
00
00 00
Display DATE menu.
Edit Year, Month, Day, Hour, Minute, and Second. Press
multi selector left or right to select item, up or down to
change. Press the
No operations can be performed until a language has been selected and the clock has been set.
If you exit the menus without pressing the
button, the language-selection dialog will be dis-
played the next time the camera is turned on.
Memory card
5
slot cover
Attach a lens
Mounting
1 Turn the camera off.
marks
2 Keeping the mounting marks aligned as shown left, position
the lens in the camera's bayonet mount. Being careful not to
press the lens-release button, rotate the lens counterclock-
wise until it clicks into place.
3 Lock aperture at the minimum setting (highest f/-number).
This step is not required with type G lenses.
To take full advantage of the features offered by
Memory card slot
the D70, use a type G or D CPU Nikkor lens.
cover latch
) button
6
Insert a memory card
Eject button
1 Turn the camera off.
2 Press the card-slot cover latch ( ) and open the cover ( ).
3 Insert the memory card (available separately) with the rear
label toward the monitor. When the memory card is fully
inserted ( ), the access lamp (green) will light briefl y and
the eject button will pop up ( ).
4 Close the card slot cover.
The memory card slot slopes slightly toward the
monitor. Match the angle of the memory card slot
when inserting memory cards.
Memory card
slot cover latch
Top view
7
Format the memory card
Number of exposures
remaining
Control panel
Viewfi nder
Take a picture
Take a picture
1
Select
mode
2
Set the shooting mode to
Control panel
3
Set sensitivity (ISO equivalency) to ISO 200 equivalent
Control panel
Language
OK
4
Set image quality to NORM (JPEG Normal)
Deutsch
Italiano
English
Español
Nederlands
Français
Svenska
Date
Set
OK
Y M
D
2004 01 07
H M
S
13
45
46
Control panel
button when setup is complete.
5
Set image size to L (Large)
Control panel
6
Rotate the focus-mode selector to AF (autofocus)
DC IN
VIDEO
OUT
7
Adjust viewfi nder focus
8
Frame your photograph and shoot
Note that formatting memory cards permanently deletes any
data they may contain.
1 Turn the camera on.
2 Hold the
(
and
) buttons down simultaneously
for approximately two seconds. A
blinking will ap-
pear in the shutter-speed display and the number of expo-
sures remaining will blink.
3 Push the
(
and
) buttons again to format the
card. During formatting, the letters
will be appear
in the frame-count display. When formatting is complete,
the frame-count display will show the number of exposures
remaining.
Playing Photographs Back
Playing Photographs Back
Viewing photographs
Photographs are displayed in the monitor during recording and when the
Rotate the mode dial to
(auto). In this automatic, "point-
and-shoot" mode, the majority of settings are controlled by
•
Photographs are automatically displayed
the camera in response to shooting conditions.
while being recorded to memory card.
For more information on the mode dial, see page 10 of the
Guide to Digital Photography.
(single-frame photography)
The D70 offers a choice of fi ve shooting modes: single-frame,
continuous, self-timer, delayed remote, and quick-response
remote. To select single-frame mode, press the
button
and rotate the main command dial until
appears in the
control panel. In this mode, one picture will be taken each
time the shutter-release button is fully pressed.
For more information on shooting modes, see page 62 of the
Guide to Digital Photography.
Sensitivity (the digital equivalent of fi lm speed) can be set to
values between 200 and 1600 (ISO equivalent) in steps of
1
/
EV. After making sure that the monitor is off, press the
3
ISO button and rotate the main command dial until 200 is
displayed in the control panel.
For more information on sensitivity, see page 46 of the Guide
Thumbnail playback
to Digital Photography.
To view four or nine photographs at a time, press the
to Digital Photography for details.
After making sure that the monitor is off, press the QUAL
button and rotate the main command dial until NORM (JPEG
Normal) is displayed in the control panel.
For more information on image quality, see page 41 of the
Guide to Digital Photography.
The number of photos that can be recorded de-
pends on the capacity of the memory card.
Zooming in for a closer look
Press the
( ) button to zoom in on the im age displayed in single-image playback or on the im age currently high-
lighted in thumbnail playback. Press the
After making sure that the monitor is off, press the QUAL
button and rotate the sub-command dial until L (Large) is
displayed in the control panel.
For more information on image size, see page 43 of the
Guide to Digital Photography.
The number of photos that can be recorded de-
pends on the capacity of the memory card.
+
+
In autofocus mode, the camera focuses automatically when
the shutter-release button is pressed halfway. Rotate the fo-
cus mode selector until it clicks into place pointing to AF.
For more information on focus, see page 64 of the Guide to
Digital Photography.
Deleting photographs
To adjust viewfi nder focus, slide the diopter adjustment con-
trol up and down until the focus area in the viewfi nder are
To delete a photograph displayed in single-image playback, or the photograph highlighted in thumbnail playback, press
in sharp focus.
the
button. Once deleted, photographs can not be recovered.
If necessary, you can remove the rubber viewfi nder eyepiece
cup when adjusting diopter; when replacing the cup, the let-
tered face should be down.
When operating the diopter control with your eye
to the viewfi nder, care should be taken to avoid
accidentally putting your fi ngers or fi ngernails in
your eye.
Frame the photograph and press the shutter-release button
halfway ( ). The camera will automatically select the focus
area containing the subject closest to the camera. Once the
camera has focused on this subject, the active focus area will
be highlighted, a beep will sound, and the in-focus indicator
(●) will appear in the viewfi nder ( ). If the subject is dark or
backlit, the built-in Speedlight will pop up automatically, and
fi re when the photograph is taken. Smoothly press the shut-
ter-release button the rest of the way down to shoot ( ).
While the photograph is being recorded to the memory card,
the card access lamp next to the memory card slot will light
( ).
Do not turn the camera off or remove the memory
card until the lamp has gone out.
Memory card access lamp
button is pressed.
•
Press
button at any time to display most
recent photograph.
9/9
9/9
100
NCD70
/DSC_0009.JPG
NORMAL
100
NCD70
/DSC_0009.JPG
NORMAL
8/9
To view additional photographs, press the multi selector up or
down. Press the multi selector down to view photographs in the
order recorded, up to view photographs in reverse order. Pressing
the multi selector down when the last photograph on the memory
card is displayed returns you to the fi rst photograph. When the
100
NCD70
/DSC_0008.JPG
NORMAL
fi rst photograph in memory is displayed, the last photograph can
1/9
be viewed by pressing the multi selector up. Keep the multi selec-
tor pressed to scroll rapidly through the photographs.
To turn the monitor off and return to shooting mode, press the
100
NCD70
/DSC_0001.JPG
NORMAL
button or press the shutter-release button halfway. The monitor
will turn off automatically if no operations are performed for 20 s
(default setting).
Photographs taken in "tall" (portrait) orientation will be displayed
10/10
in portrait orientation in the monitor.
100
NCD70
/DSC_0010.JPG
NORMAL
button. See page 118 of the Guide
1/9
1
2
3
1
2
4
5
6
3
4
7
8
9
100
NCD70
/DSC_0001.JPG
NORMAL
button again to cancel zoom.
1/9
1 If no image is displayed in the monitor, press the
button.
100
NCD70
/DSC_0001.JPG
NORMAL
2 Press the
( ) button to zoom in on the image displayed in
+
single-image playback or on the image currently highlighted in
thumbnail playback.
Use the multi selector to view areas of the image not visible in
the monitor.
3 You can also zoom the image in or out using the
button.
+
When the
button is pressed, the area of the image currently
displayed will be framed in a navigation window at the bottom
right corner of the monitor. Press the
button and rotate the
main command dial to change the size of the frame, or press
the
button and use the multi selector to move the frame to
a new part of the image. The selected area will be displayed in
the monitor when the
button is released.
1/9
4 Press
to cancel zoom.
100
NCD70
/DSC_0001.JPG
NORMAL
1/9
1 Press the multi selector up or down to display the photo you
want to delete.
Delete?
2 Press the
button.
Yes
3 A confi rmation dialog will be displayed. Press the
button
100
NCD70
/DSC_0001.JPG
NORMAL
again to delete the image and return to playback. Press any
other button to exit without deleting the photograph.
Advertisement

Related Manuals for Nikon D70


Summary of Contents for Nikon D70
- Page 1 NORMAL again to delete the image and return to playback. Press any presence of foreign matter on the low-pass fi lter can be retouched using Nikon Capture 4 version 4.1 or later (available separately) your eye. other button to exit without deleting the photograph.
- Page 2 EN-EL3 battery. If in doubt, charge the battery before beginning transfer or use an EH-5 Users of Mac OS 9.0–9.2, and versions 10.1.2–10.1.4 of Mac OS X can download Nikon View 6 at http://nikonimaging.com/ . AC adapter (available separately). Do not, under any circumstances, use another make or model of AC adapter.
Need help?
Do you have a question about the D70 and is the answer not in the manual?
Questions and answers