Table of Contents
Advertisement
Quick Links
RTX
RTX
• Hardware-based AES 256-bit Encryption – Offers affordable military-grade AES 256-bit data protection
that encrypts the entire hard drive–including boot sector, OS, temp, and swap files.
• Meets Industry Standards – All CRU Secure 256-bit product architecture and encryption engine
designs meet FIPS140-2, level 3 per certification number 1471, and all CRU AES 256-bit security chips
are NIST & CSE validated (FIPS PUB 197).
• Easy-to-Use Security – One physical Security Key is used for all bays and the Security Key can be
stored separately from the unit to make the RTX Secure less vulnerable to attack if the unit is lost or
stolen. No PINs or passwords are needed.
• TrayFree
Trayless Technology for RTX – TrayFree bays make installing drives a breeze. It really is as
™
easy as opening the door, sliding the drive in, and closing the door. No screws, no trays, it just works.
A7-680-0001 Revision: 1.2
Secure IR User Manual
™
TM
Models Covered:
RTX Secure 610-IR
RTX Secure 810-IR
Advertisement
Table of Contents

Related Manuals for CRU Dataport RTX Secure 610-IR


Summary of Contents for CRU Dataport RTX Secure 610-IR
- Page 1 Secure IR User Manual ™ Models Covered: RTX Secure 610-IR RTX Secure 810-IR • Hardware-based AES 256-bit Encryption – Offers affordable military-grade AES 256-bit data protection that encrypts the entire hard drive–including boot sector, OS, temp, and swap files. • Meets Industry Standards – All CRU Secure 256-bit product architecture and encryption engine designs meet FIPS140-2, level 3 per certification number 1471, and all CRU AES 256-bit security chips are NIST &...
-
Page 2: Table Of Contents
Table of Contents 1. Default GUI Login Information 8.5 System Configuration (cont.) 2. Pre-Installation Steps 8.5.4 Mail Settings 2.1 Accessories 8.5.5 Notification Settings 2.2 Identifying Parts of the RTX Secure 8.6 iSCSI Configuration 2.3 Warnings and Notices 8.6.1 Entity Property 2.4 Terminology 8.6.2 NIC 3. Introduction to RAID 8.6.3 Node 3.1 Summary of RAID Levels 8.6.4 Session... -
Page 3: Default Gui Login Information
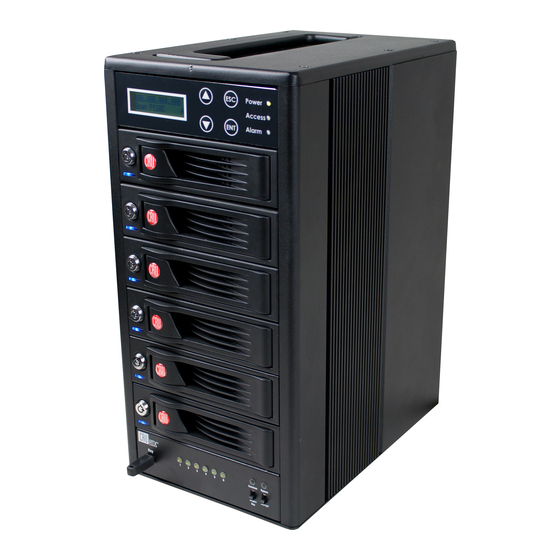
1. Default GUI Login Information Front of the RTX Secure* The following login and password information can be used to easily log *RTX Secure 610-IR into the GUI (See Section 8 for instructions on how to log in to and use model shown here. Number of bays the GUI). Key Lock available will be different depending on Administrator Account the specific model. -
Page 4: Terminology
• To avoid overheating, the RTX Secure should be operated in a Physical Disk (PD) Belongs to the member disk of one specific RAID group. well-ventilated area and in such a way that sufficient airflow is RAID Group (RG) A collection of removable media. One RG consists of a set maintained across the controller chips. of VDs and owns one RAID level attribute. • Remove the drives before transporting the RTX Secure to Virtual Disk (VD) Each RG can be divided into several VDs. The VDs from prevent damage to the drive interfaces. -
Page 5: Introduction To Iscsi
4. Introduction to iSCSI Data RAID Min. Data Description Transfer Level Drives Redundancy Rate 4.1 What is iSCSI? iSCSI is a technology that allows a data storage device to be Also known as Bit-Interleaved Par- 1 drive Reads accessed over a TCP/IP network using SCSI protocols. When your ity. -
Page 6: Setting The Encryption Mode
Key. Flip the left switch on the bottom panel up to “Common” and j. Configure your drives with at least one RAID set. Follow the the right switch down to “Encrypted.” The Common Key LED will appropriate setup instructions in Section 8. CRU DataPort illuminate. recommends manually creating the RAID set (Section 8.3) or using the Volume Creation Wizard (Section 8.7.1). -
Page 7: Hot Swapping Encrypted Hard Drives
6.2 Hot Swapping Encrypted Hard Drives 7.2.1 Navigating the LCD menu Hot swapping of hard drives is supported by the RTX Secure as a Use the four function keys, ▲(Up), ▼(Down), ESC (Escape) and default feature. Make sure the correct Security Key is installed when ENT (Enter) to manipulate the LCD interface. -
Page 8: Instructions For Different
Menu Menu Menu Menu Menu Menu Screen Screen Screen Screen Screen Screen NOTE: Not sure what type of network you have? If the RAID 0 IP address displayed on the LCD starts with 169.254, this RAID 1 indicates that the network is probably not DHCP-enabled. RAID 3 [Quick [Apply The... -
Page 9: Using The Gui
h. Type the RTX Secure’s new IP address into a web browser on The tables below show example settings. The first table shows the your computer. This will access the RTX Secure’s GUI, which you type of settings that will appear by default. The next table shows will use to configure the unit. how the settings might look after you’ve made changes. Direct Connection to a Computer Before Making Changes The instructions are similar to those for a static network (see RTX Secure... -
Page 10: Gui Menu Structure
• Reset to factory default RAID Light • Import and export Green indicates that the RAID is working properly. Red • Event log indicates a RAID error. If no RAID is set up, the light will remain green. • Reboot and shutdown • Online support Temperature Light • Product Information and Specs Green indicates normal. Red indicates abnormal system • FAQ and Downloads temperature and probable overheating. -
Page 11: Creating A Virtual Disk
c. All available Free Disks will be displayed. Check the drives that Virtual Disks. You must create at least one Virtual Disk to access you wish to add to the RAID Group, then click “Confirm”. the drives of the RTX Secure with a computer. a. Click the “Create” button at the bottom of the page to open the Virtual Disk creation screen. -
Page 12: Attaching A Logical Unit
Read/Write default setting on this is acceptable. Finally, select the Allows selection of cache type. Normally the default option is permissions that hosts accessing this Logical Unit will have. preferred. Then click “Confirm”. Priority Determines the priority that the RTX Secure will give to RAID activities (rebuild and initialization) versus priority given to file transfers. “High priority” will result in slower file transfers during initialization, but provide for faster initialization. -
Page 13: Ip Address
System Name will appear verifying that changes have been made. To reverse this The default system name is “RTX-IR” . To change the system name, action, press the “Confirm” button again. simply click in the box displaying the system name and highlight or delete the part of the name you wish to change, then type the new 8.5.2 IP Address name and click the “Confirm” button at the bottom of the page. -
Page 14: Mail Settings
Admin Password 8.5.5 Notification Settings The Admin Password option allows you to change the password for the administrator account, which is used to access and modify Notification Settings allows you to configure the Simple Network the settings in the GUI. The default username is ‘admin’ and Management Protocol (SNMP), Windows Messenger events, the the password is ‘1234’. -
Page 15: Iscsi Configuration
browser. The options for Show on LCM will display the selected L AG Displays whether Link Aggregation is enabled or events in the RTX Secure IR’s LCD screen. disabled. LAG NO Displays the LAG number. DHCP Shows whether the channel has DHCP enabled. IP Address Displays the IP address currently in use by the channel. -
Page 16: Session
c. The new CHAP account will appear on the main CHAP account screen: After turning on CHAP authentication, you must set up at least one CHAP account (see Section 8.6.5). 8.6.4 Session Modifying the CHAP Account Hover your mouse cursor underneath the username to bring The session function allows you to view information on a session up a menu. -
Page 17: Volume Creation Wizard
Each RAID Group can be divided into several Virtual Disks. The Virtual fine, click “Confirm.” The GUI will navigate to the Virtual Disk Disks in one RAID Group share the same RAID level, but may have page which now shows a new Virtual Disk with the name different volume capacity. All Virtual Disks share the Cache Volume similar to “QUICK#####”. Your Virtual Disk is now initializing to execute a data transfers. A Logical Unit Number (LUN) is a unique and may take several hours to complete. -
Page 18: Raid Group
Serial Displays the serial number of the hard drive. Rate Displays the transfer speed of the hard drive. • SATA 1.5Gb/s → SATA1 disk SATA 3.0Gb/s → SATA2 or SATA3 disk • The RAID Group screen displays the following information: Write Cache The hard drive’s write cache is enabled or disabled. The default setting is Enabled. -
Page 19: Virtual Disk
Activate Status The status of the Virtual Disk. Activate RAID Group disk roaming. This option can only be • Online → The Virtual Disk is online. executed when the RAID Group status is offline. • Offline → The Virtual Disk is offline. • Initiating → The Virtual Disk is being initialized. • Rebuild → The Virtual Disk is being rebuilt. Deactivate Migrate →... -
Page 20: Logical Unit
Detach LUN Detach a Logical Unit Number from the Virtual Disk. List LUN Lists all Logical Unit Numbers attached to the Virtual Disk. More Information Displays more details about the Virtual Disk, including the LUNs that have been attached to it. 8.7.5 Logical Unit 8.8.1 SES Configuration The Logical Unit is what your computer will use to access and... -
Page 21: Maintenance
8.8.3 S.M.A.R.T. SPECIFIC INSTRUCTION FROM CRU-DATAPORT TECHNICAL SUPPORT. Doing so could result in malfunction of your RTX S.M.A.R.T. (Self-Monitoring Analysis and Reporting Technology) Secure. is a diagnostic tool for hard drives that gives advanced warning in some cases of hard drive failure. S.M.A.R.T. measures various 8.9.3 Reset to Factory Default attributes of a hard drive at all times to detect if certain values have moved outside of a certain range. -
Page 22: Iscsi Initiator Software
9 iSCSI Initiator Software 9.2 Access the RTX Secure Using iSCSI Initiator Software 9.1 Software Installation 9.2.1 Basic Access Instructions This is a required step. Any computer must have initiator software The process for using initiator software to access the RTX Secure installed before it can connect to an iSCSI device such as the varies depending on the software used. -
Page 23: Usage With Mac And Windows Operating Systems
Windows 7 and Windows Server 2008 R2 10.1.2 Formatting a Drive a. After you launch the initiator, input the IP address for the RTX When you first mount a drive to a Windows operating system, a Secure’s CH-1 or CH-2 port (depending which connection link is pop-up window will ask you if you would like to format it. Click shown as “Up” on the NIC screen in the GUI (this as well as the “Format Disk”... - Page 24 Windows XP only), Specify Volume/Partition Size, and Assign c. Select the format type. Most users prefer Mac OS Extended Drive Letter or Path dialog prompts, leaving the default settings. with Journaling (HFS+), which is required for compatibility with Time Machine (OS 10.5 or newer). If you need to use the RTX f.
-
Page 25: Raid Is Not A Backup
12 Encryption • The RTX Secure uses full disk hardware encryption to NOTE: It is strongly suggested that you disable automatic sleep encrypt the entire contents of the drive—including the boot mode on your Mac. You can still put the Mac to sleep manually sector, operating system and all files—without performance at any time as long as you follow the above procedures. - Page 26 Level Type Description Level Type Description Error SATA enable device fail Failed to enable the SATA PCI device Error Voltage level 2 System voltages(<string>) failed!!! Error SATA EDMA mem fail Failed to allocate memory for SATA EDMA Error Voltage level 2 shutdown System voltages(<string>) failed!!! The system will autho shutdown immediately.
- Page 27 Level Type Description Level Type Description Info VD write through Cache policy of VD <name> has been set Warning VD degraded VD <name> is in degraded mode as write-through Error RG failed RG <name> is failed Info VD extend Size of VD <name> extends Error VD failed VD <name>...
-
Page 28: Working With Volumes Larger Than 2Tb In Size
Level Type Description Level Type Description Info Weak RG created A RG <name> made up disks across Info Failback complete All volumes in controller <number> com- <number> chassis is created pleted failback process Info RG size shrunk The total size of RG <name> shrunk Info CTR inserted Controller <number> is inserted into system Info VD erase finished VD <name> finished erasing process Error CTR removed Controller <number>... -
Page 29: Frequently Asked Questions (Faq)
15 Frequently Asked Questions (FAQ) supposed to allow only one person per volume if that’s the case? Q: I created one volume, but my computer sees two of them. A: When you attach a Logical Unit to a Virtual Disk you’ll probably Why? notice a “Host” field with an asterisk as the default selection. - Page 30 Mode, only the top bay drive will mount, and consequently the RTX Secure will complain that the RAID has degraded or failed. But don’t worry, your data will remain intact and will be accessible once the correct encryption mode is set. This is because the Security Key can hold a unique 256-bit security value for up to 8 bays and only the first value on the Security Key is used when the RTX Secure is set to use Common Encrypted...
-
Page 31: Technical Specifications
In the event that you experience Radio Frequency Interference, you should take the following steps to resolve the problem: Security Separate key lock for each HDD (RTX Secure 610-IR only) 1) Ensure that the case of your attached drive is grounded. 2) Use a data cable with RFI reducing ferrites on each end.
Need help?
Do you have a question about the RTX Secure 610-IR and is the answer not in the manual?
Questions and answers