Table of Contents
Advertisement
Quick Links
Data Express DX115 DC SAS/SATA Install Guide
Removable SAS/SATA Drive Enclosure
NOTE: For SAS operation, a SAS controller and SAS hard drive are
required.
SAS DX115 DC receiving frame supports SAS and SATA drives. SATA
6Gb/s DX115 DC receiving frame supports SATA drives only.
Package Contents
(1) DX115 DC Receiving Frame and/or Drive Carrier
(4) M3 drive mounting screws for 2.5" drives
(4) #6-32 drive mounting screws for 3.5" drives
(4) M3 chassis mounting screws
(1) Power Adapter- Legacy 4pin to 15pin SATA
Carrier
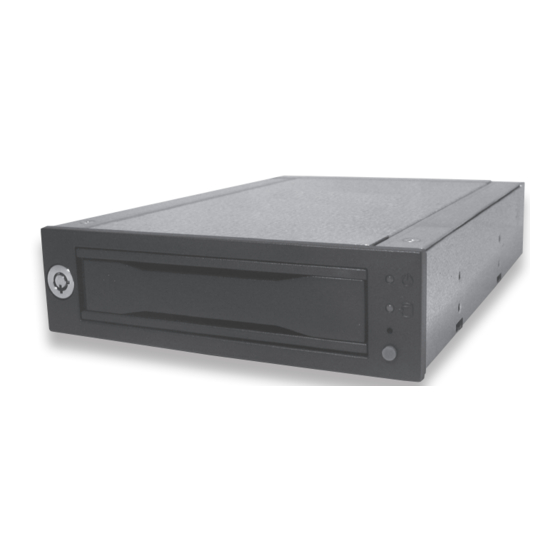
Push Here to Eject Carrier
Handle
Figure 1: Front Bezel
Carrier Handle
This handle allows the ejection and installation of the drive carrier.
To eject the carrier, simply push on carrier handle. Once handle pivots
outward, pull handle to remove carrier.
To install the carrier, simply insert the drive carrier into the receiving
frame. Push handle in to fully seat carrier into the receiving frame.
Power Button
The DX115 DC ships with the power button disabled. To enable the but-
ton remove the Power Button Disable jumper (see Figure 2 for details).
CAUTION: It is the responsibility of the user to ensure that the host
does not access the drive while attempting to remove the drive.
Failure to do so may result in loss of data and/or damage to the
drive itself!
* If the Power Button is enabled use the Power Button will function as
follows:
Drive
Drive Ready/
Activity
Error LED
LED
Operation
Drive Ready/Error LED
Power
This bi-color LED indicates either the status of the drive or fan/DC
Fan Error LED
Button
power, depending on the color.
Disable Button
Drive Activity LED
This amber LED indicates when the host computer is accessing the data
on the drive. LED will flash during communication with the host computer.
Most SAS drives provide support for the Drive Activity LED feature (refer
to your SAS drive manufacturer's documentation for further information).
If your drive does not support this feature, the Drive Activity LED can
be enabled via host connection (cable not included) to Pin 1 located on
Receiving Frame Motherboard (Figure 2). Refer to your SAS PC system/
host controller manufacturer's documentation for further information.
1-800-260-9800
Rugged, Reliable, Mobile, Secure
OFF - Press and hold down the power button until the Drive Ready LED
starts to flash. Drive is ready to be removed when the Drive Ready
LED is OFF.
ON* - Press and hold down the power button until the Drive Ready LED
starts to flash. Drive is ready to be accessed when the Drive Ready
LED is ON.
Drive Ready (blue): Flashing blue LED indicates that drive is
inserted and powering up. Steady blue LED glow indicates drive is
powered on and ready for access.
Error (red): Flashing red and blue LED indicates a fan failure.
Steady red LED glow indicates DC power failure.
www.CRU-DataPort.com
TM
Advertisement
Table of Contents

Related Manuals for CRU Dataport Data Express DX115 DC


Summary of Contents for CRU Dataport Data Express DX115 DC
- Page 1 Rugged, Reliable, Mobile, Secure Data Express DX115 DC SAS/SATA Install Guide Removable SAS/SATA Drive Enclosure NOTE: For SAS operation, a SAS controller and SAS hard drive are required. SAS DX115 DC receiving frame supports SAS and SATA drives. SATA 6Gb/s DX115 DC receiving frame supports SATA drives only.
- Page 2 Limited Product Warranty Figure 2: DX115 DC SAS Receiving Frame Rear Panel with cable CRU-DataPort (CRU) warrants the Data Express DX115 DC to be free support bracket removed (SATA receiving frame not shown) of significant defects in material and workmanship for a period of five years from the original date of purchase.
Need help?
Do you have a question about the Data Express DX115 DC and is the answer not in the manual?
Questions and answers