Advertisement
Quick Links
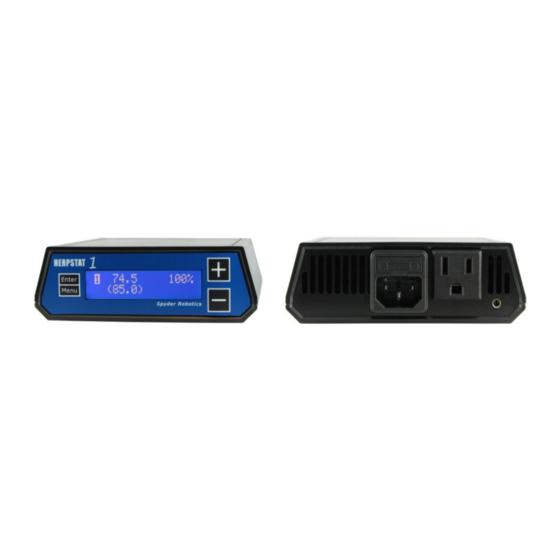
Herpstat 1 Basic
User's Manual
www.spyderrobotics.com
Thank you for choosing the Herpstat digital proportional thermostat. This product
offers the following features:
Proportional heating constantly monitors and adjusts amount of heat necessary to maintain a target
•
temperature (usable range from 40˚F to 150˚F or 4˚C to 65˚C).
Soft startup slowly applies power during initial warm-ups.
•
Configurable for Heating, Cooling, Lighting.
•
Lighting can simulate sunrise/sunset and moonlight.
•
User selectable temperature and light ramping allows day to night changes to occur slowly.
•
Sensor Matching allows the user to digitally calibrate the sensor output to match other equipment.
•
Auto Power Matching constantly adjusts the power output curve to match the enclosures efficiency.
•
Individually selectable day/night schedules.
•
High/Low temperature tracking helps monitor heating system and enclosure efficiency.
•
User adjustable High/Low temperature threshold alarms.
•
Precision temperature sensors with an internal resolution of .1125 ˚F and are accurate to ± .9 ˚F
•
Display and setting in tenths of a degree.
•
Security Passcode option deters vandals.
•
Settings retained in memory even if power is lost. *
•
Power Outage detection/tracking.
•
Temperature can be set/displayed in Fahrenheit or Celsius.
•
Easy to read backlit LCD display.
•
12 ft removable sensor allows for easy replacement if necessary.
•
User replaceable fuse.
•
Audible alarm system
•
Internal error detection shuts off heat if sensor fails or is disconnected.
•
700 total watt output
•
1 year limited warranty
•
* Software clock is reset and features requiring the clock are disabled on power loss.
What's new in this Herpstat?
The Herpstat line of thermostats has a reputation as the most reliable and user customizable thermostats
geared directly towards the reptile industry. Here are a few highlights of the new features:
A new revolutionary way of controlling the temperature has been implemented. Most thermostats apply full
power when plugged up. However, this is not always ideal. For example, if your power goes out and you have
eggs in an incubator. When the power comes back on, the heat element (typically at the bottom of the
incubator) turns full on and the eggs on bottom can be subjected to the immediate heat. The Herpstat now has
a "soft power" state that will slowly advance the power a single percent around every second or so. If the temp
seems to be rising too quickly (a tenth of a degree per loop) it will stop or back off a percent. There is also a
completely new routine that will figure out the best power output curve in the last two degrees before the target
temp. This allows the Herpstat much better control for some of the weaker heating devices as well as
overpowering ones. This is all automatic and requires no settings to enable.
Temperature ramping has been added. The Herpstat can slowly ramp up and down between the day and night
time temperature settings. The amount of time is user selectable up to 10 hours.
Lighting control ramping was also added. Using this feature can more closely mimic natural lighting. We also
added a fully user adjustable nighttime power setting which can be used to mimic moonlight.
The High/Low temperature tracking now keeps track of the time when it was recorded. This helps identify when
the peaks are happening and can help fine tune the environment.
An updated menu design and larger LCD makes it even easier to adjust the settings.
Pulse Proportional mode was added. On some metal rack systems dimming style proportional can generate a
audible hum in the rack. Pulse style proportional can help eliminate the hum while still providing varied power
to the heating device.
Grounded outlets (3-prong plugs) were added to accommodate more types of heating devices.
Hardware Installation
WARNING – FIRE OR ELECTRICAL SHOCK MAY RESULT FROM MISUSE. FOR INDOOR USE ONLY!
WARNING: Do not exceed 700 watts.
1.
Attach the temperature probe to jack in the back of the Herpstat. For lighting control or for a
disabled output the probe jack can be left empty.
2.
Attach the Herpstat electrical cable to the back of the unit and to a standard wall outlet.
3.
After setting the correct mode of operation in the menu attach the appropriate devices to the AC
outlet receptacles. These devices may include heat tape, heat coils, mats or other resistive load
heating devices. Not recommended for use with rock heating devices or other devices that come in
direct contact with the animal. In cooling mode the outlets can be used for 120V emergency fans.
For controlled lighting incandescent lamps, transformerless LED lamps, and standard and dimmable
fluorescents can be used.
Do not connect oil-filled heaters or other space heaters.
Available Output Modes
Disabled
Heat (Dimming)
Heat (Pulse)
Cooling
Lighting (ON/OFF style for standard fluorescents)
Lighting (Dimming style for incandescent, dimmable fluorescents, and transformerless LED lights)
Advertisement

Related Manuals for Spyder Robotics Herpstat 1 Basic


Summary of Contents for Spyder Robotics Herpstat 1 Basic
- Page 1 Herpstat 1 Basic What's new in this Herpstat? User’s Manual The Herpstat line of thermostats has a reputation as the most reliable and user customizable thermostats geared directly towards the reptile industry. Here are a few highlights of the new features: A new revolutionary way of controlling the temperature has been implemented.
-
Page 2: Setup Procedure
The Herpstat 1 Basic, Herpstat 1, and Herpstat 2 share much of the same software and the number in the upper right indicates which output you are adjusting. The Herpstat Basic has only one output. The arrows indicate if If possible, route the probe wires so that they are not in direct contact with the 120vac cables going to the there are additional menu choices to toggle through. - Page 3 (Output Setup for Temperature Control continued...) (Output Setup for Lighting Control continued...) NiteCycle End Time: Output Mode: (Lights ON/OFF, Lights Dimming) This setting adjusts what time the Nite Cycle ends. Note: When the Mode is changed all settings for selected output will be set to the defaults for that particular mode.
- Page 4 Replacement parts may be new or serviceable used parts at Spyder Robotics LLC option, of equal or better quality to those being replaced. This warranty does not extend and shall not apply to products that have been subjected to System Information misuse, neglect, accident, or improper installation.
Need help?
Do you have a question about the Herpstat 1 Basic and is the answer not in the manual?
Questions and answers