Blackmagicdesign Videohub Hardware Control Installation And Operation Manual
Hide thumbs
Also See for Videohub Hardware Control:
- Installation and operation manual (119 pages) ,
- Installation and operation manual (64 pages) ,
- Installation and operation manual (89 pages)

Related Manuals for Blackmagicdesign Videohub Hardware Control


Summary of Contents for Blackmagicdesign Videohub Hardware Control
- Page 1 Installation and Operation Manual Videohub Hardware Control Mac OS X ™ Windows ™ September 2014...
- Page 2 We think it should take you approximately 5 minutes to complete installation. Please check our website at www.blackmagicdesign.com and click the support page to download the latest updates to this manual and Videohub software including the Blackmagic Videohub Hardware Panel Setup.
-
Page 3: Table Of Contents
Contents Videohub Hardware Control Manual Getting Started Using Videohub Master Control Introducing Videohub Controllers About Routing Levels Videohub Master Control How to Select Sources and Destinations Videohub Smart Control Using Videohub Smart Control GPI and Tally Interface Using Videohub Smart Control as a Cut-Bus Controller... -
Page 4: Getting Started
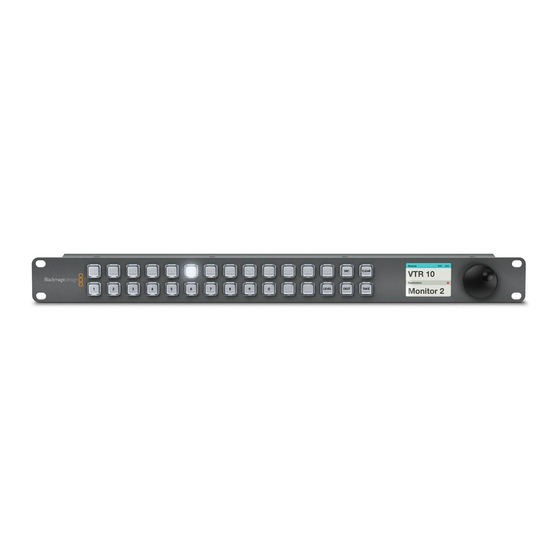
Getting Started Getting Started Introducing Videohub Controllers Videohub Master Control Videohub Master Control is a rack-mountable control panel with 30 backlit pushbuttons, LCD, scroll Videohub Master Control wheel and Ethernet connectivity designed to perform Videohub crosspoint switching without using a computer. -
Page 5: Connecting Usb To Setup The Control Panel
Getting Started Connecting USB to Setup the Control Panel A USB 2.0 connection to a computer is used to configure the network settings of the Videohub Controller. Be aware that the USB port of the Videohub Smart Control is inaccessible once it is installed in a rack. If you are likely to reconfigure Videohub Smart Control network settings periodically, then it may be convenient to permanently connect a USB cable to the unit before installing Videohub Smart Control in a rack. -
Page 6: Control Panel Button Diagnostics
Getting Started Control Panel Button Diagnostics When power is first connected to a Videohub control panel, all the buttons will display their test lights in the following sequence: red, green, blue and white. The top left button of a Videohub control panel indicates its network status, using the following Videohub control panel is attempting to acquire an IP address. -
Page 7: Installing The Videohub Software
Getting Started Installing the Videohub Software Videohub software runs on the latest Mountain Lion and Mavericks versions of Mac OS X. On the Windows platform, the software runs on both 32 and 64-bit versions of Windows 7 and Windows 8. Mac OS X installation Step 1: Double click the installer file from the supplied... -
Page 8: Setting Up Your Videohub Controller
Getting Started Setting up your Videohub Controller Configuring Videohub Hardware Panel Setup When you launch Blackmagic Videohub Hardware Panel Setup, any Videohub control panels discovered on the network will be listed in the Videohub Control Panels pane next to an Ethernet network icon. If several Videohub control panels are listed, but you don't know which one is which, select one of them and then press Identify. -
Page 9: Configuring Videohub Master Control
Getting Started Add Videohub Control If you already know the IP address of a Videohub control panel but it hasn't automatically appeared in the Videohub Control Panels pane, you can add the unit manually. Step 1. Press the + (add device) button at the bottom of the Videohub Control Panels pane. Step 2. -
Page 10: Configuring Videohub Smart Control
Getting Started You are now ready to label the Videohub Master Control buttons. Step 1. Launch the Videohub Hardware Panel Setup and select your Videohub Master Control from the Panels pane. Step 2. Click one of the 15 buttons in the picture of the panel. Enter a text label so it partially matches the labels of SDI and deck control ports that you previously entered for your router. - Page 11 Getting Started XY Controller Configuration Step 1. Drag the Number of Destinations slider to the desired number. Step 2. You can now configure the destination buttons by clicking on each gold button in the software interface. In the Router SDI Out A field, enter the number of the Videohub output port to which the destination device is connected.
-
Page 12: Setting Up The Gpi And Tally Interface
Getting Started Setting up the GPI and Tally Interface The GPI and Tally Interface is configured using Videohub Hardware Panel Setup software. Before you can use the GPI and Tally Interface, you may need to install the latest version of the software. Step 1. -
Page 13: Labeling Pushbuttons
Getting Started Labeling Pushbuttons Videohub Master Control and Videohub Smart Control have removable face plates, which provide access to the pushbuttons for labeling. Included with the software installer is a Videohub Control Labels folder containing both PDF and Adobe Illustrator template files. You can print and use either of these files for labeling the buttons. The Illustrator file contains text boxes so you can add your text labels before printing them out. -
Page 14: Using Videohub Master Control
Using Videohub Master Control Using Videohub Master Control About Routing Levels Source SDI 422 CLEAR VTR 10 Destination Monitor 2 LEVEL DEST TAKE If your Videohub does not feature RS-422 remote deck control, Videohub Master Control will always Front panel showing a new source has been selected. show "SDI"... - Page 15 Using Videohub Master Control How to select devices by typing the Videohub port numbers Source If you've chosen to keep the default labels for all Videohub SDI and remote ports, you can simply type Input 52 CLEAR the port numbers to make a routing change. This method is fast but requires that you remember port Destination numbers or have devised a system for knowing what equipment is connected to each Videohub port.
- Page 16 Using Videohub Master Control How to select devices using the customizable buttons and scroll wheel If you have customized the Videohub port labels, you can use the customizable buttons and scroll wheel together to find a short list of sources and destinations. This method is fast and intuitive because you only have to scroll through a short list of equipment and you don't have to remember any port numbers.
- Page 17 Using Videohub Master Control How to select devices using the numeric buttons and scroll wheel If you have customized the Videohub port labels with numbers, you can use the numeric buttons and scroll wheel together to find a short list of sources and destinations. This method is fast and intuitive because you only have to scroll through a short list of equipment and you don't have to remember any port numbers.
- Page 18 Using Videohub Master Control How to select devices using the customizable and numeric buttons together Source If you have customized the Videohub port labels with names and numbers, you can use the customizable Edit 3 CLEAR buttons and numeric buttons together to directly select sources and destinations. This method is very Destination fast and intuitive because you don't have to scroll through a list of equipment and you only have to VTR 1...
- Page 19 Using Videohub Master Control Locking and Unlocking Routes Source SDI 422 Videohub Master Control can lock and unlock any route on your Videohub. In contrast to Videohub Edit 1 CLEAR Smart Control, Videohub Master Control can also unlock any destinations locked by other people using Destination their computer, iPad or Videohub Smart Control.
-
Page 20: Using Videohub Smart Control
Using Videohub Smart Control Using Videohub Smart Control Using Videohub Smart Control as a Cut-Bus Controller If Videohub Smart Control has been configured as a Cut-Bus controller, the destination device has already been chosen and you only need to choose a video source. Step 1. -
Page 21: Using Gpi And Tally Interface
Using GPI and Tally Interface Using GPI and Tally Interface 21 21 Configuring GPIs The GPI and Tally Interface has 8 GPIs that provide crosspoint switching. In the example on the left, if GPI 1 detects a contact closure it will switch Input 12 on your Videohub to Output 1. This means when you switch the joystick control on your CCU, video going to Input 12 of your Videohub will be previewed on your monitor. - Page 22 Using GPI and Tally Interface 22 22 Daisy Chaining Multiple GPI and Tally Interfaces The GPI and Tally Interface supports 8 GPIs and 8 GPOs at a time, which should be enough for most live television situations. However, if you have more than 8 cameras then you may want to daisy chain a GPI OUT GPI IN 1 GPI OUT...
-
Page 23: Help
After checking the version of your Videohub Control on your computer, please visit the Blackmagic Design support center at www.blackmagicdesign.com/support to check for the latest updates. While it is usually a good idea to run the latest updates, it is a wise practice to avoid updating any software if... -
Page 24: Warranty
Warranty Warranty Limited Warranty Blackmagic Design warrants that Videohub routers will be free from defects in materials and workmanship for a period of 36 months from the date of purchase excluding connectors, cables, cooling fans, fiber optic modules, fuses, keyboards and batteries which will be free from defects in materials and workmanship for a period of 12 months from the date of purchase.
Need help?
Do you have a question about the Videohub Hardware Control and is the answer not in the manual?
Questions and answers