
Summary of Contents for Kyocera IRIDIUM KI-G100
- Page 1 Kyocera KI-G100 GSM Handset - Ver. 0.3 Preliminary Version - 01.1999 KI-G100 <Main Kit> IRIDIUM Ready GSM Handset User Guide...
-
Page 2: Safety Precautions
Kyocera KI-G100 GSM Handset - Ver. 0.3 Preliminary Version - 01.1999 Safety Precautions The following are regulations and instructions concerning the safety of the phone user and of third parties. Please read these points carefully before using the phone. The manufacturer will not be responsible for any damage caused by non-observance of the User Guide and/or safety precautions. -
Page 3: Table Of Contents
Kyocera KI-G100 GSM Handset - Ver. 0.3 Preliminary Version - 01.1999 Table of Contents Safety Precautions... front cover Introduction ... 1 What's in the box ... 1 1. Getting Started ... 2 Insert your SIM Card ... 2 Attach the battery ... 2 Charge your battery... - Page 4 Kyocera KI-G100 GSM Handset - Ver. 0.3 Preliminary Version - 01.1999 4. Menus... 12 How to use the menus... 12 Main Menu structure... 14 Memory Menu structure ... 15 Main Menu... 16 1 Settings ...16 2 Messages... 16 3 Costs... 18 4 Services ...
-
Page 5: Introduction
Kyocera KI-G100 GSM Handset - Ver. 0.3 Preliminary Version - 01.1999 Welcome! Congratulations on choosing the Kyocera KI-G100 GSM phone for use on the GSM and IRIDIUM services. You have selected the unique digital phone designed to use the features offered by both the GSM cellular and the IRIDIUM satellite networks in a simple, friendly way. -
Page 6: Getting Started
Kyocera KI-G100 GSM Handset - Ver. 0.3 Preliminary Version - 01.1999 1. Getting Started INSERT YOUR SIM CARD The GSM SIM (Subscriber Identification Module) Card contains all the relevant information concerning your subscription (card number, phone number...). This card must be inserted in the phone prior to use. Place the SIM Card (Plug-In size) in the phone as shown beside. -
Page 7: Charge Your Battery
Kyocera KI-G100 GSM Handset - Ver. 0.3 Preliminary Version - 01.1999 CHARGE YOUR BATTERY Before using your phone for the first time or after a long period without use, it is important to charge the battery for at least 24 hours. Plug the connector into the socket in the base of the phone, then plug the transformer unit into a mains AC power socket. -
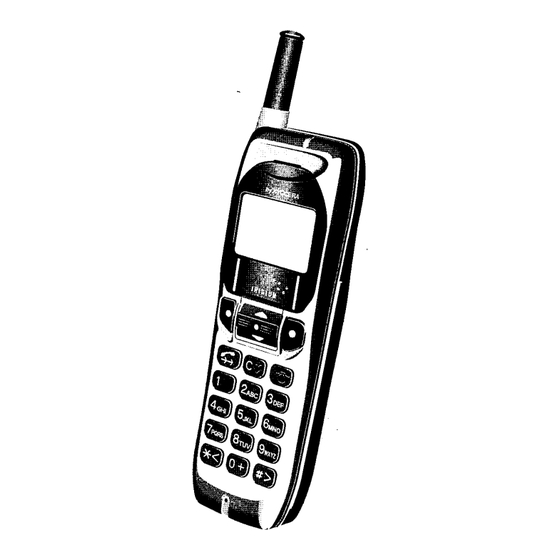
Page 8: Your Ki-G100 Phone
Kyocera KI-G100 GSM Handset - Ver. 0.3 Preliminary Version - 01.1999 YOUR KI-G100 PHONE The keypad and the display are your way of communicating with your KI-G100 phone. They light up when you turn the phone on or press any key. The backlighting goes off automatically after 10 seconds, to conserve battery life. -
Page 9: Display Description
Kyocera KI-G100 GSM Handset - Ver. 0.3 Preliminary Version - 01.1999 Display description Battery charge level: Fully charged Empty Roaming (receiving service on another network than your home network) Calling status: Blinking: call setup On: call in progress Short Message status: On: new message waiting Blinking: Short Message memory full IRIDIUM system operation... -
Page 10: Your First Call
In case of poor coverage conditions, the reception quality may be improved by changing location (e.g. in a building move near to a window). • Dial a telephone number, including the full area code, even if you are making a local call. If you make a mistake, use the... -
Page 11: To Adjust The Volume
Kyocera KI-G100 GSM Handset - Ver. 0.3 Preliminary Version - 01.1999 TO ADJUST THE VOLUME During a conversation, the volume can be adjusted with the Rocker Key (+ -). After the call the volume returns to its original setting (set in the Menu option “14 Ear Volume”). TO MUTE THE MICROPHONE During a call the microphone can be muted so that your caller cannot hear you but you still can hear... -
Page 12: Extra Dialling Services
Kyocera KI-G100 GSM Handset - Ver. 0.3 Preliminary Version - 01.1999 3. Extra Dialling Services ABBREVIATED DIALLING There are different ways to recall and dial a phone number from the Phonebook: Speed retrieval • In standby mode, scroll with desired number in the Phonebook. Only the entries from the SIM Card’s memory are listed here. -
Page 13: Caller Log
Kyocera KI-G100 GSM Handset - Ver. 0.3 Preliminary Version - 01.1999 CALLER LOG Your KI-G100 is equipped with a caller log for identified calls (with telephone number if Calling Line Identification is available) that have been received. To recall this caller log, press (Mem) and “3 Received”... -
Page 14: Call Waiting, Call Hold And Multiparty Calls
Kyocera KI-G100 GSM Handset - Ver. 0.3 Preliminary Version - 01.1999 CALL WAITING, CALL HOLD AND MULTIPARTY CALLS The GSM services “Call Waiting” and “Call Hold” allow you to put an active call on hold to be able to answer a waiting call or initiate a new call. The “Call Waiting”... -
Page 15: To Swap Between Active And Held Call(S)
Kyocera KI-G100 GSM Handset - Ver. 0.3 Preliminary Version - 01.1999 To swap between active and held call(s) • Press (Menu) to access the In-Call Menu • (5 6): Select with Retrieve if there is only one held party and one active call Swap if there are more held parties and... -
Page 16: Menus
Kyocera KI-G100 GSM Handset - Ver. 0.3 Preliminary Version - 01.1999 Please read this introduction to get the most out of the menus and their features. Your KI-G100 features 2 principal menus: the Main Menu and the Memory Menu. The menu structures are illustrated at the end of this introduction. In standby mode, the Main Menu can be accessed by pressing the left Softkey (Menu) and the Memory Menu by pressing the right Softkey... - Page 17 Kyocera KI-G100 GSM Handset - Ver. 0.3 Preliminary Version - 01.1999 A. Access the menu option by scrolling • Press (Menu) to access the Main Menu • (5 6) to option “3 Costs” Scroll with • Press (OK) to confirm and enter the submenu “Costs”...
-
Page 18: Main Menu Structure
Kyocera KI-G100 GSM Handset - Ver. 0.3 Preliminary Version - 01.1999 MAIN MENU STRUCTURE (continued on next page) Menus... -
Page 19: Memory Menu Structure
Kyocera KI-G100 GSM Handset - Ver. 0.3 Preliminary Version - 01.1999 (from previous page) MEMORY MENU STRUCTURE 1 Phone Book 1 Find 2 New 3 Edit 4 Delete 2 Dialled 3 Received 4 Erase 5 Own Number Note: Menu “8 IRIDIUM” is only available when the KI-G100 is docked Iridium Adapter... -
Page 20: Main Menu
You can directly call (or transfer into the Phonebook) the telephone number given in the message itself. A received message can be edited and resent. Broadcast messages such as traffic or whether information are sent from the network to a group of users. - Page 21 Kyocera KI-G100 GSM Handset - Ver. 0.3 Preliminary Version - 01.1999 21 Text 1 Read new read all unread message(s) that have been received: • Scroll in the message with • Press (Menu) to access the Message Menu and select 1 Read Next (appears only if there is at least one other to read) 2 Edit to edit the message (see next section)
-
Page 22: Costs
Kyocera KI-G100 GSM Handset - Ver. 0.3 Preliminary Version - 01.1999 received from the net work 3 COSTS An indication of the cost of a call and its duration can be displayed during the call itself or after it. You can also see an indication of the cumulative cost of all calls and their total duration since the last reset. -
Page 23: Services
Enter your Barring Password and confirm 42 Divert You can choose to divert your incoming calls to another telephone anywhere (for example to your office or a friend’s house) or to your Voicemail, so that you are not disturbed, e.g. in a meeting or a restaurant. You can decide whether you want to divert all calls or those if you are engaged, if you don’t wish to answer... -
Page 24: Network
Multyparty Calls” information on page 10. 44 Caller id With this menu you can choose whether the telephone number of someone or a party calling you will be displayed (provided the function is activated on their side) and whether your telephone number will be transmitted to someone or a party you are calling. -
Page 25: Security
Kyocera KI-G100 GSM Handset - Ver. 0.3 Preliminary Version - 01.1999 6 SECURITY Here you can lock the keypad, enable or disable the SIM Card’s PIN check, change its PIN code, change its PIN2 code, enable or disable the Fixed Dialling Memory (FDN) function. -
Page 26: Accessory
Kyocera KI-G100 GSM Handset - Ver. 0.3 Preliminary Version - 01.1999 You can change here the PIN2 code of your SIM Card. It must contain a minimum of 4 and a maximum of 8 digits. Note: if you enter the wrong PIN2 code 3 times in succession, the PIN2 function of your SIM Card is blocked and you must enter the PUK2 code to unblock it (contact your Service Provider). -
Page 27: Iridium
Kyocera KI-G100 GSM Handset - Ver. 0.3 Preliminary Version - 01.1999 8 IRIDIUM This menu allows you to perform the settings related to the IRIDIUM satellite operation. It is only shown when the IRIDIUM Adapter (accessory) is attached. Please refer to the section “5. IRIDIUM” for more information. 81 Registration This performs a manual registration request on the IRIDIUM satellite network. -
Page 28: Memory Menu
Kyocera KI-G100 GSM Handset - Ver. 0.3 Preliminary Version - 01.1999 MEMORY MENU 1 PHONEBOOK Your Phonebook consists in 3 different memories for storing phone numbers: • SIM Card Memory: memory locations 1 to 300 • Phone Memory: memory locations 301 to 600 •... - Page 29 • Enter the telephone number (use • Select the “Phone”, “SIM” or “FDN” Memory, and confirm • Eventually, enter and confirm the PIN2 code to access the FDN Memory •...
-
Page 30: Dialled
The phone number of your SIM Card can be recalled, for example to give it to someone. Should this number not be stored already on the SIM Card, you can enter it here. • Press the “Edit” softkey and enter your SIM Card telephone number • Press the “Save” softkey to store it Menus... -
Page 31: Iridium
Kyocera KI-G100 GSM Handset - Ver. 0.3 Preliminary Version - 01.1999 5. IRIDIUM By attaching the Kyocera IRIDIUM Adapter SD-66K (accessory) to your KI-G100 phone, you transform it into an IRIDIUM compatible handset capable of communicating directly with the IRIDIUM satellite network. The IRIDIUM network consists of 66 satellites covering 100% of the earth surface, 100% of the time. - Page 32 (“urban canyon”) or trees that would limit the satellite visibility. Always dial a telephone number with its country code (e.g. +49 2159 918396).
-
Page 33: Problem Solving / Helpful Hints
Kyocera KI-G100 GSM Handset - Ver. 0.3 Preliminary Version - 01.1999 6. Problem Solving / Helpful Hints IN CASE OF A PROBLEM Before contacting the Kyocera Helpline, please observe the following. If the display shows “PIN is blocked”: The PIN code has been entered incorrectly three times, you need the PUK (PIN Unlocking Key) to release it. -
Page 34: Maintenance
Kyocera KI-G100 GSM Handset - Ver. 0.3 Preliminary Version - 01.1999 MAINTENANCE The equipment i.e. phone and charger do require some care. Please observe the following: • Store it in a clean, dust-free space. Its moving parts can be damaged by dust. -
Page 35: Technical Data
Kyocera KI-G100 GSM Handset - Ver. 0.3 Preliminary Version - 01.1999 TECHNICAL DATA KI-G100 (main unit) Max. output power: Power supply: Standby time GSM*: Talk time GSM*: Standby time IRIDIUM*: Talk time IRIDIUM*: SIM Card size: Dimensions (excl. Antenna): Weight: Operating temperature: Data speed: * depending on network coverage and system parameters offered by the... -
Page 36: Gsm Accessories
Kyocera KI-G100 GSM Handset - Ver. 0.3 Preliminary Version - 01.1999 The following Kyocera original accessories have been designed especially to work with your KI-G100 phone. Additional accessories may be available and are sold separately. Please contact your local Service Provider or retail outlet for more information. - Page 37 Kyocera KI-G100 GSM Handset - Ver. 0.3 Preliminary Version - 01.1999 Soft Case GC (Ref. SG-G100) External Antenna GC (Ref. OA-G100) Personal Hands Free GC (Ref. EM-G100) Accessories...
-
Page 38: Iridium Accessories
Kyocera KI-G100 GSM Handset - Ver. 0.3 Preliminary Version - 01.1999 IRIDIUM ACCESSORIES IRIDIUM Adapter (Ref. SD-66K)) IRIDIUM AC Charger (Ref. AC-S100) IRIDIUM DC Charger (Ref. DC-S100) IRIDIUM Hands Free Kit (Ref. HF-S100) IRIDIUM Car Holder (Ref. CH-S100) IRIDIUM External Antenna (Ref. - Page 39 Kyocera KI-G100 GSM Handset - Ver. 0.3 Preliminary Version - 01.1999 IRIDIUM Solar Power Supply (Ref. SP-S100) Data Cable GC (Ref. DA-G100) IRIDIUM Two Way Cable (Ref. TW-S100) Personal Hands Free GC (Ref. EM-G100) IRIDIUM Separate Vibrator (Ref. SV-S100) Accessories...
-
Page 40: Index
Kyocera KI-G100 GSM Handset - Ver. 0.3 Preliminary Version - 01.1999 Index (to be inserted in the final version) Index... - Page 41 Kyocera KI-G100 GSM Handset - Ver. 0.3 Preliminary Version - 01.1999 Notes:...
-
Page 42: To Make An Emergency Call
Kyocera KI-G100 GSM Handset - Ver. 0.3 Preliminary Version - 01.1999 Emergency Call TO MAKE AN EMERGENCY CALL: • Press and hold to switch on the phone • If required, enter the SIM Card’s PIN code and confirm with • Enter (112 is the international GSM emergency call number) •... - Page 43 Your phone is ready to be used when a network name is displayed. To make a call: Telephone no. To end or refuse a call: To redial: To receive a call (telephone ringing, light blinking): To switch off: hold until “Powering Down...” is displayed. Side 2: Abbreviated dialling b.
Need help?
Do you have a question about the IRIDIUM KI-G100 and is the answer not in the manual?
Questions and answers