Table of Contents
Advertisement
SALES NETWORK
SAMSUNG TECHWIN CO., LTD
Optics & Digital Imaging Division
145 -3, Sangdaewon 1-Dong, Jungwon-Gu,
Sungnam, Kyungki-Do, Korea
462-121
TEL :82 -31-740 - 8137~41
FAX : 82 -31-740 - 8145
SAMSUNG OPTO-ELECTRONICS AMERICA, INC.
Closed Circuit Division
40 Seaview Drive, Secaucus N.J
07094, U.S.A.
TEL : (201) 902-0347
FAX : (201) 902-9342
P/ NO. : 6806 - 0366- 01A
Printed in Korea
DAY & NIGHT COLOR CCD CAMERA
INSTRUCTION MANUAL
SDN - 520N/P
SDN - 510N/P
SAMSUNG CCD CAMERA
o m
t v . c
g c c
s u n
a m
w . s
w w
Advertisement
Table of Contents

Related Manuals for Samsung SDN-520N

Summary of Contents for Samsung SDN-520N
- Page 1 . c g c c s u n w . s SALES NETWORK SAMSUNG OPTO-ELECTRONICS AMERICA, INC. SAMSUNG TECHWIN CO., LTD Closed Circuit Division Optics & Digital Imaging Division 40 Seaview Drive, Secaucus N.J 145 -3, Sangdaewon 1-Dong, Jungwon-Gu, 07094, U.S.A.
-
Page 2: Cautions
CAUTION RISK OF ELECTRIC SHOCK DO NOT OPEN CAUTION : TO REDUCE THE RISK OF ELECTRIC SHOCK, DO NOT REMOVE COVER (OR BACK), NO USER SERVICEABLE PARTS INSIDE. REFER SERVICING TO QUALIFIED SERVICE PERSONNEL. The lightning flash with an arrowhead symbol, within an equilateral triangle is intended to alert the user to the presence of uninsulated "dangerous voltage"... - Page 3 Day & Night Electronic Iris The camera provides automatic mode The electronic iris shutter is automatically changeover by sensing day or night conditions. controlled at the speed of It can change color mode in the day condition 1/60~1/10,000sec(NTSC Models), / for optimal color and BW mode in night 1/50~1/10,000sec(PAL Models).
-
Page 4: Table Of Contents
Cautions ....................8 Setup Menu ..................22 Camera ID ....................23 Getting to Know Your Camera ............10 Backlight ....................26 Front ....................10 Motion Detection ................... 27 Bottom ....................11 Lens Selection ..................31 Back ....................12 Shutter Speed Control ................32 Accessories ..................13 Gain Control .................... - Page 5 Never keep the camera face to strong Do not drop the camera or subject Do not install the camera in extreme Do not install or use the camera in an light directly. them to physical shocks. temperature conditions. environment where the humidity is high. Only use the camera under conditions where It can cause the image quality to be poor.
-
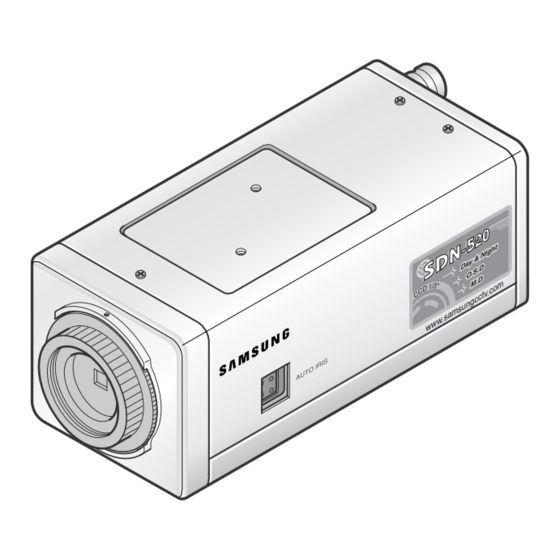
Page 6: Front
E E T T T T I I N N G G T T O O N N O O W W O O U U R R A A M M E E R R A A Front Bottom Tripod Mounting Hole Used to install the camera on an optional tripod. -
Page 7: Back
E E T T T T I I N N G G T T O O N N O O W W O O U U R R A A M M E E R R A A E E T T T T I I N N G G T T O O N N O O W W O O U U R R A A M M E E R R A A... -
Page 8: Lens
O O N N N N E E C C T T I I O O N N 3. Remove the cover from the iris lens plug supplied, and solder the lens cable to the plug as shown below. Lens •... -
Page 9: Installing C/Cs-Mount Lens
O O N N N N E E C C T T I I O O N N O O N N N N E E C C T T I I O O N N Installing C/CS-Mount lens Mounting a C-mount lens 1. -
Page 10: Connecting To Monitor
O O N N N N E E C C T T I I O O N N O O N N N N E E C C T T I I O O N N Connecting to Power Connecting to Monitor Connect the VIDEO Out jack to the monitor VIDEO In jack. -
Page 11: Setup Menu
O O N N F F I I G G U U R R A A T T I I O O N N O O F F E E N N U U Gain Control (see page 34) Setup Menu Camera ID (see page 23) •... -
Page 12: Camera Id
E E T T U U P P E E N N U U 2. Select the desired feature using the UP or DOWN button. Use the five Setup Menu buttons on the rear of the camera. Each time you press the UP or DOWN button, the arrow indicator moves up or down. - Page 13 E E T T U U P P E E N N U U E E T T U U P P E E N N U U 3. Press SET button. 5. Select the position at which the camera ID will be located on the screen. The ID generation screen appears.
-
Page 14: Backlight
E E T T U U P P E E N N U U E E T T U U P P E E N N U U Backlight Motion Detection The Wide Dynamic Range and Super BLC technology in Your camera transmits an alert signal when it detects your camera provides intelligent light level control to motion of an object on the screen. - Page 15 E E T T U U P P E E N N U U E E T T U U P P E E N N U U How to Assign the Zone 4. Specify the zone area. If you assign a zone, an alert signal occurs when the camera detects motion of objects in that zone.
-
Page 16: Lens Selection
E E T T U U P P E E N N U U E E T T U U P P E E N N U U Lens Selection 6. When completed, move the arrow indicator to 'End' and press the SET button. -
Page 17: Shutter Speed Control
E E T T U U P P E E N N U U E E T T U U P P E E N N U U 3. If you choose “DC”, you can adjust the brightness. 3. If you choose 'Manual', select the optimal shutter speed. After pressing the SET button, adjust the brightness of the monitor You can select speed from '1/60' to '1/10,000' sec (NTSC screen using the LEFT or RIGHT button. -
Page 18: Gain Control
E E T T U U P P E E N N U U E E T T U U P P E E N N U U Gain Control White Balance Control Your camera provides 3 white balance control modes. You 1. -
Page 19: Color (Day & Night)
E E T T U U P P E E N N U U E E T T U U P P E E N N U U Synchronization Mode Color ( Day & Night) Your camera provides automatic mode changeover by sensing day Two synchronization modes are available Internal and or night conditions. -
Page 20: Reset
E E T T U U P P E E N N U U The phase is preset to 225 degrees at the factory. You can re- If you connect a remote plug to the REMOTE jack on the adjust it from 0 to 270 degrees. rear of the camera as shown below, you can access the menu setup mode from a remote place. - Page 21 R R O O U U B B L L E E S S H H O O O O T T I I N N G G If you have trouble operating your camera, refer to the following table. If the guidelines do not enable you to solve the problem, contact an authorized technician.
- Page 22 DECLARATION OF CONFORMITY Application of Council Directive(s) 89/336/EEC Item Manufacturer's Name SAMSUNG TECHWIN CO., LTD AC 24V, 50Hz / DC 12V Power Source AC 24V, 60Hz / DC 12V Manufacturer's Address SAMSUNG TECHWIN CO., LTD Image Pick-Up Device 1/3 SONY...
Need help?
Do you have a question about the SDN-520N and is the answer not in the manual?
Questions and answers