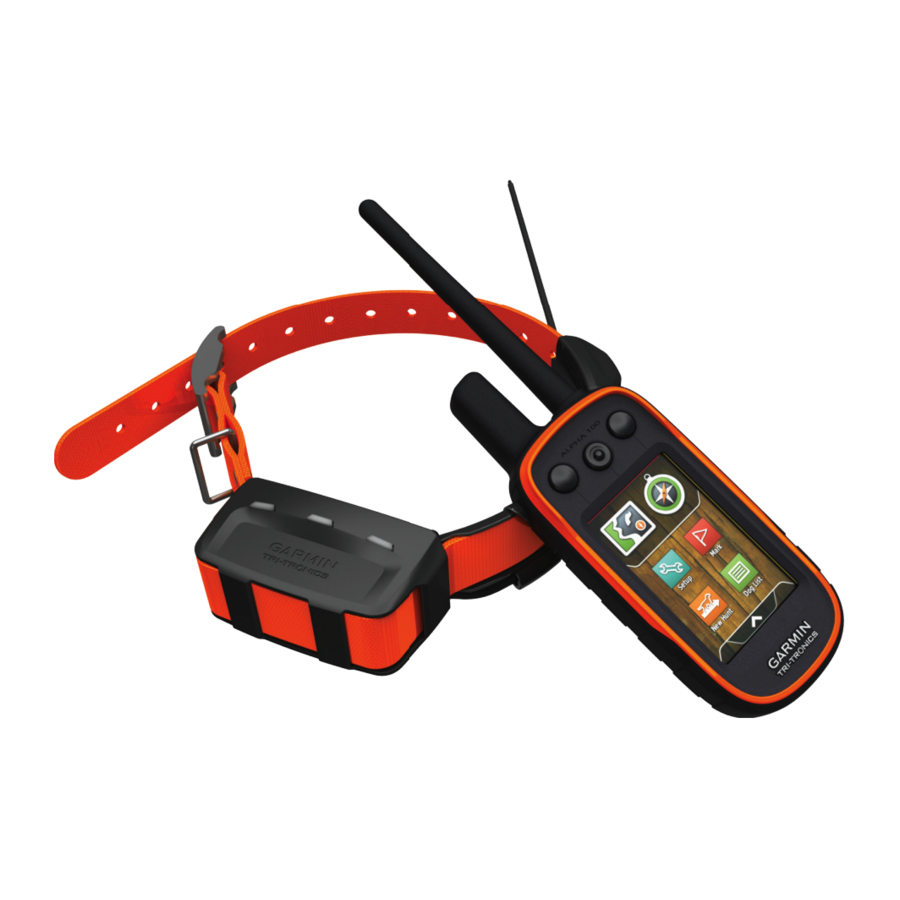
Garmin Alpha 100 Owner's Manual
With tt 15
Hide thumbs
Also See for Alpha 100:
- Owner's manual (27 pages) ,
- Product information (4 pages) ,
- Quick reference (2 pages)

Related Manuals for Garmin Alpha 100


Summary of Contents for Garmin Alpha 100
- Page 1 Alpha 100 with TT ™ ® Owner’s Manual June 2014 190-01786-00_0A Printed in Taiwan...
- Page 2 Garmin ® , the Garmin logo, Alpha ® , BlueChart ® , and City Navigator ® are trademarks of Garmin Ltd. or its subsidiaries, registered in the USA and other countries.
-
Page 3: Table Of Contents
Setting Up the Alpha System ............. 1 Device Overviews ..............1 Marking Your Truck Location ............. 8 Alpha 100 Handheld Device ..........1 Marking a Covey ................ 8 TT 15 Dog Collar Device ............1 Turning On the Collar Light ............8 Getting More Information ............ - Page 4 Device Care ................14 Cleaning the Device ............14 Cleaning the Touchscreen ..........14 Specifications ................14 Alpha 100 Handheld Device Specifications ......14 TT 15 Dog Collar Device Specifications ......14 Battery Information ..............14 Long-Term Storage ............. 15 Maximizing the Battery Life ..........
-
Page 5: Installing Battery Pack
• Go to www.garmin.com/alpha. Alpha 100 Handheld Device • Go to www.garmin.com/outdoor. • Go to www.garmin.com/learningcenter. • Go to http://buy.garmin.com, or contact your Garmin dealer for information about optional accessories and replacement parts. Registering Your Device Help us better support you by completing our online registration today. -
Page 6: Charging The Handheld Device
Press the battery into place. Replace the battery cover, and turn the D-ring clockwise. Plug the included power cable into the mini-USB port on the Charging the Handheld Device charging clip cable. Plug the power cable into a power source. NOTICE The status LED is solid red when the collar is charging. -
Page 7: Dog Collar Device Setup
Resetting a Dog's Statistics and Track which vary depending on the country of use. See the product You might want to clear the dog statistics and track before a packaging or go to www.garmin.com/tracking-legal for details new hunt. about the radio frequency of this product. -
Page 8: Dog Tracking
Select Show Info. Position the device at the front of the dog's neck, with the status LED facing toward the dog's chin and the contact Select the dog’s name. points against the throat. Enter the name, and select > OK. Tighten the strap so that it is very snug around the dog's Changing the Color of the Dog's Track neck, and fasten the buckle. -
Page 9: Location Alerts
BaseCamp to your computer Select > > List Sync On. (www.garmin.com/basecamp). Select to cycle through the dogs. The BaseStation feature of BaseCamp allows you to track your dogs and contacts in real-time on a computer. For more... -
Page 10: Setting A Geofence Alert
A geofence is an invisible boundary around an area and is When you put the collar on the dog, make sure the contact created using points on the map. The virtual boundaries of a points are tight against the neck. geofence are accurate up to approximately 10 ft. -
Page 11: Customizing The Training Keys
Select the area at the top of the screen directly below the As the dog becomes better trained, you can decrease the use of keys. collar training. Continue to have the dog wear the collar until you feel certain that it is no longer needed to reinforce known Select to choose the intensity level for each of the commands. -
Page 12: Sending A Message To Your Contacts
Sending a Message to Your Contacts Marking a Covey You can send and receive automated messages. There are 18 You can mark a covey location and enter the estimated number messages choose from, such as "Help" and "I'm Coming." of birds flushed and the number of birds taken. Select >... -
Page 13: Repositioning A Waypoint To Your Current Location
Repositioning a Waypoint to Your Current Location Select Change Name. You can change the position of a waypoint. For example, if you Enter the new name, and select move your vehicle, you can change the location to your current Navigating a Saved Route position. -
Page 14: Viewing Details About The Track
Sending and Receiving Data Wirelessly Select a track. Before you can share data wirelessly, you must be within 10 feet (3 m) of a compatible Garmin device. Select View Map. You can share waypoints, geocaches, routes, and tracks The beginning and the end of the track are marked by flags. -
Page 15: Course Pointer
Course Pointer Details about the point appear in the upper-left corner of the plot. The course pointer is most useful if you are navigating on water or where there are no major obstacles in your path. It also helps Select >... -
Page 16: Setting An Alarm
GPS: Sets the GPS to Normal, WAAS/EGNOS (Wide Area Select Track Up. Augmentation System/European Geostationary Navigation Overlay Service), or Demo Mode (GPS off). For more Turning Off GPS information about WAAS, go to http://www.garmin.com Select > Satellite > > Use With GPS Off. /aboutGPS/waas.html. Simulating a Location BaseCamp BaseStation: Sets how the device connects to BaseCamp when the device is connected to the computer. -
Page 17: Calibrating The Touchscreen
Calibrate Screen: Aligns the screen to properly respond to Record Method: Sets a track recording method. Auto records touches (Calibrating the Touchscreen). the tracks at a variable rate to create an optimum representation of your tracks. Calibrating the Touchscreen Interval: Sets a track log recording rate. Recording points more You can calibrate the screen, if it does not seem to be frequently creates a more-detailed track, but fills the track log responding properly. -
Page 18: Altimeter Settings
Calibrate Altimeter: Calibrates the altimeter. Specifications Marine Map Settings Select Setup > Marine. Alpha 100 Handheld Device Specifications Marine Chart Mode: Sets the type of chart the device uses. Battery type Rechargeable, replaceable lithium-ion Nautical displays various map features in different colors so... -
Page 19: Long-Term Storage
• GPX geocache files. Go to www.opencaching.com. Changing the Dog Collar Device Update Rate • GPI custom POI files from the Garmin POI Loader. Go to Before you can change the collar update rate, the collar must be turned on and within range of the handheld device. -
Page 20: Connecting The Handheld Device To A Computer
If you do not know the purpose of a file, do not delete it. Your device memory contains important system files that should not be deleted. Open the Garmin drive or volume. If necessary, open a folder or volume. Close the card holder. -
Page 21: Battery Replacement
• Before you pair the ANT+ accessory with your Garmin device, move 10 m (32.9 ft.) away from other ANT+ accessories. • Bring the Garmin device within range 3 m (10 ft.) of the ANT+ accessory. • After you pair the first time, your Garmin device automatically recognizes the ANT+ accessory each time it is activated. -
Page 22: Changing The Fuse In The Vehicle Power Cable
Battery Level: The remaining battery power. Bearing: The direction from your current location to a destination. You must be navigating for this data to appear. Cadence: The revolutions of the crank arm or strides per minute. Your device must be connected to a cadence accessory. - Page 23 Sunset: The time of sunset based on your GPS position. Time of Day: The current time of day based on your current location and time settings (format, time zone, daylight saving time). Time to Destination: The estimated time remaining before you reach the destination.
-
Page 24: Index
Index information 3, 4 deleting 9 navigating to 5 editing 9 settings 12 navigating 9 statistics 3 settings 13 accessories 1, 16, 17 track and train codes 3 viewing on the map 9 alarms tracking 4, 5 clock 12 tracks 3, 4, 16 marine 14 satellite signals 12 training 6, 7 proximity 11 acquiring 2 training basics 6, 7 tones 13 screen training intensity levels 6... - Page 26 +27 (0)11 251 9999 + 46 7744 52020 +886 2 2642-9199 ext 2 +49 (0)180 6 427646 0808 238 0000 20 ct./Anruf. a. d. +44 (0) 870 8501242 deutschen Festnetz, Mobilfunk max. 60 ct./Anruf 913-397-8200 1-800-800-1020 © 2014 Garmin Ltd. or its subsidiaries...
Need help?
Do you have a question about the Alpha 100 and is the answer not in the manual?
Questions and answers
alpha 100 tt25 tracking works great will not train
The Garmin Alpha 100 may not fully train the TT25 tracking device because some features of the TT25 may not be compatible with older products like the Alpha 100. While the TT25 is compatible for tracking, certain functions, including training features, may not be accessible due to hardware and software limitations. Additionally, it is unclear if future software updates will address compatibility issues.
This answer is automatically generated