Garmin Astro Owner's Manual
Gps-enabled dog tracking system
Hide thumbs
Also See for Astro:
- Owner's manual (84 pages) ,
- Instructions manual (9 pages) ,
- Getting started manual (2 pages)
Table of Contents
Advertisement
Quick Links
Download this manual
See also:
Instruction Manual
Advertisement
Table of Contents

Related Manuals for Garmin Astro


Summary of Contents for Garmin Astro
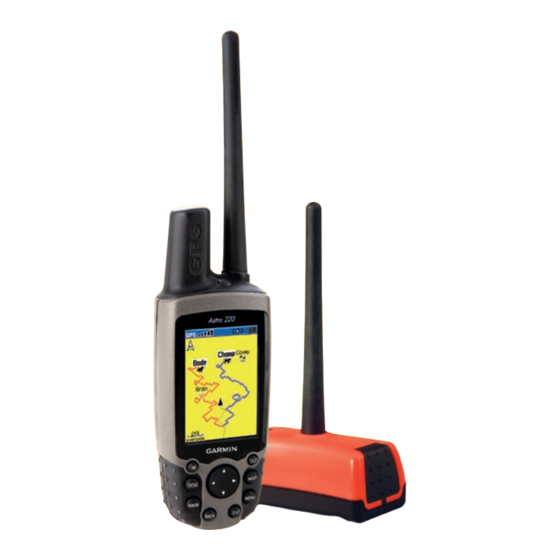
- Page 1 Owner’s Manual Astro ™ GPS-enabled dog tracking system...
- Page 2 Information in this document is subject to change without notice. Garmin reserves the right to change or improve its products and to make changes in the content without obligation to notify any person or organization of such changes or improvements. Visit the Garmin Web site (www.garmin.com) for current updates and supplemental information concerning the use and operation of this and other Garmin products.
-
Page 3: Contact Garmin
Contact Garmin if you have any questions while using Thank you for choosing the Garmin® Astro™ Dog your Astro 220. In the USA contact Garmin Product Tracking System. The Astro 220 uses the proven Support by phone: (913) 397-8200 or (800) 800-1020, or performance of Garmin GPS and full-featured mapping go to www.garmin.com/support/. -
Page 4: Table Of Contents
Unit Overview ............. Marking a Location Using the Map ......Installing the Batteries ..........Averaging a Marked Location ........Using the Astro 220 Keypad Functions ...... Projecting a Location ..........Turning on the Astro 220 ..........Map Page .............. Charging the DC 20 ............ - Page 5 Accessories ............Appendix .............. Calendar ..............Specifications ............Calculator ..............Optional Accessories ..........Stopwatch ..............Caring for the Astro System ........View Sunrise/Sunset ..........Software License Agreement ........View Hunting Almanac..........Product Registration ..........Games Menu ............FCC Compliance ............
-
Page 6: Warning
WARNING: This product, its packaging, and its components contain chemicals known to the State of California to cause cancer, birth defects, or reproductive harm. This Notice is provided in accordance with California’s Proposition 65. See www.garmin.com/prop65 for more information. Astro Dog Tracking System Owner’s Manual... -
Page 7: Dc 20 Battery Warnings
-4˚ to 140˚F (-20˚ to 60˚C). and Garmin makes no such guarantees or warranties that this list is • Recharge the unit within the following temperature range: 32˚ to complete. -
Page 8: Important Information
Introduction Important Information myGarmin Map DATA INFORMATION: One of the goals of Garmin is to Go to http://my.garmin.com to access the latest services provide customers with the most complete and accurate cartography for your Garmin products. that is available to us at a reasonable cost. We use a combination of... -
Page 9: Getting Started
Power key screen USB connector port (under weather cap) Lanyard Battery compartment attachment slot locking D-Ring Belt clip button attachment Battery compartment location cover and access to the microSD card tray Keypad Astro Dog Tracking System Owner’s Manual... -
Page 10: Installing The Batteries
Battery Battery compartment compartment Belt clip Remove the batteries from your Astro 220 when you do not expect to use the unit for several months. Data is not Refer to page 67 for information on accessing the lost when batteries are removed. -
Page 11: Using The Astro 220 Keypad Functions
Getting Started Using the Astro 220 Keypad Functions POWER Key - Press and hold to turn the unit on or off. Press and release to adjust the backlighting. ROCKER Key - Press up, down, left, or right to highlight IN/OUT Zoom Keys - Press to zoom in options and to enter data, or move the map panning or out on the Map page. -
Page 12: Turning On The Astro 220
Turning on the Astro 220 Adjusting the Astro 220 Backlight You may want to adjust the backlight to see the display The first time you turn on the Astro 220, a message better. appears followed by a prompt. Thereafter, when the... -
Page 13: Charging The Dc 20
3. Charge until the blue LED on the top of the unit turns off. The first time you turn on your Astro 220 and DC 20, each GPS receiver must collect overhead satellite signal NOTE: Charging a fully depleted DC 20 battery requires data to establish its current location. -
Page 14: Calibrating The Astro 220 Compass
Hold the units in front of you with the antennas slowly. held upward. While the Astro 220 GPS receiver is searching for the satellite signals, observe the GPS Signal Strength bars in the Status Bar at the top of the page. -
Page 15: Operating The Astro 220
To scroll through a list, press up or down explanation. Astro Dog Tracking System Owner’s Manual... -
Page 16: Using The Status Bar
• The Auxiliary Power icon ( ) appears when the unit is powered by an external source. • Satellite signal strength bars are filled in when the unit has acquired satellites ( Astro Dog Tracking System Owner’s Manual... -
Page 17: Dog Tracking
Communicating with the DC 20 Direction After the Astro 220 and the DC 20 have been turned on to dog and both have a GPS location fix, you can then ensure the DC 20 is communicating with the Astro 220. If you... -
Page 18: Screen Buttons
Dog Tracking Naming the dog Dog name By default the Astro 220 assigns the name Dog (Dog 1, field Dog status fields Dog 2, etc.) to every Dog Unit (DC 20) linked to it. When you use the ROCKER, to select the Name Field on the... -
Page 19: Tracking A Dog
Astro 220 level to achieve the most accurate • Transfer Dog Unit Track—initiates transfer of readings. detailed tracks from the DC 20 via the Astro 220 to a Tracking a dog on the Dog Tracker Page computer. See page 70 for details and procedures. -
Page 20: Dog Tracker Page Options Menu
Calibrate Compass—allows you to calibrate the compass inaccuracy can contribute to several degrees compass as explained on page of error on the dog pointer. Hold the Astro 220 level for • View Dog List—opens the Dog List to allow for accuracy. -
Page 21: Adding Dogs To Dog List
Adding dogs to the Dog List 3. Observe your current location and track on the map. If you purchased your Astro 220 as a kit, the DC 20 provided in the kit was linked to the Astro 220 at the factory. -
Page 22: Tips For Successful Tracking
Each dog you are tracking has its own ID number. If two dogs within range of the Astro 220 have the same ID the NOTE: You must be able to touch the Astro 220 to the Astro 220 warns you of a conflicting ID signal. It then DC 20 to change the ID. -
Page 23: Main Menu
This option provides the ability to easily reset dog POOR statistics, track logs, and mark the location of your vehicle. To clear the statistics from a previous hunt and mark a new starting location: Select Start New Hunt and follow on-screen instructions. Astro Dog Tracking System Owner’s Manual... -
Page 24: Go To Marked Location
4. Choose Use Map to select a point on the map using 3. To view the predictions for a different location, select the pointer arrow. Press ENTER to show the table for the Location field to open the New Location Options that location. Menu. Astro Dog Tracking System Owner’s Manual... -
Page 25: Advanced
Astro 220 Astro 220 to navigate back to it. The Start New Hunt basemap and on downloaded MapSource® detailed maps. option does this automatically, or you can press the MARK key. -
Page 26: Marking Hunting Specific Locations
ENTER to open information is birds taken the on-screen keypad. After entering and confirming recorded to aid your changes, select OK. in finding this covey site again, and to aid in managing bird numbers. Astro Dog Tracking System Owner’s Manual... -
Page 27: Averaging A Marked Location
4. Use the ROCKER to move the location to a new location in the appropriate fields at the bottom of the location on the map, and press ENTER. page then to navigate to it, select Go To. Astro Dog Tracking System Owner’s Manual... -
Page 28: Map Page
Map page. The position marker shows your travel on the Map page. When you press the ROCKER, the Astro 220 enters pan Astro Dog Tracking System Owner’s Manual... -
Page 29: Map Page Options
Map page: Map Only, 1 wide, 2 small, 3 (2 small • Restore Defaults—returns the map display to the and 1 wide), or 4 data fields. factory set defaults. Astro Dog Tracking System Owner’s Manual... -
Page 30: Data Fields
When navigating a route, guidance text appears above Change data the map. Guidance text shows useful information when 3 data field selection option navigating to a destination. arrow Use guidance text to aid navigation Select from 3 options Astro Dog Tracking System Owner’s Manual... -
Page 31: Measuring Distance
ENTER. A push pin marks the point. measurement 3. Move the arrow to the point you want to measure to. The distance between the two points is shown in the upper-right corner of the Map page. Astro Dog Tracking System Owner’s Manual... -
Page 32: Find Features
Use the Find Menu to search for marked locations, cities, use the Find By Name option. and exits included in the Astro 220 basemap. Additional categories appear depending on the optional MapSource To find a location using Find By Name: compatible detailed maps or BlueChart data loaded in 1. -
Page 33: Recent Finds
2. Select an option > ENTER: this item location (see page 16). • Average Location—average a marked location for a • Map Information—show the detailed map from more accurate reference (see page 19). which the map item originated. Astro Dog Tracking System Owner’s Manual... - Page 34 ENTER to show a list of items near the new map location. 5. Select a category and press ENTER to open a Find list of items near the item. Astro Dog Tracking System Owner’s Manual...
-
Page 35: Finding A Location
Finding a Geocache You can view the list of geocache locations created using your Astro 220 or downloaded from your computer. For more information about geocaching, go to my.garmin.com, login and click “Go Geocaching”. -
Page 36: Finding A City
<ENTER City> field because 2. Select Exits > ENTER. The Exits page shows a list of the database has information for the entire region. interstate exits near your location. 3. Select <ENTER Number> > ENTER. Astro Dog Tracking System Owner’s Manual... -
Page 37: Intersections
POI Loader and Custom Points of Interest You can create your own category for points of interest by using the Garmin POI Loader utility, downloadable from the Garmin Web site: www.garmin.com/poiloader/. Follow the Help instructions to use POI Loader. -
Page 38: Gps Applications
Change Data Fields—allows you to change the type personal requirements by pressing MENU and selecting of data shown on the Trip Computer. Change Data Fields. • Restore Defaults—returns the data fields to factory settings. Astro Dog Tracking System Owner’s Manual... -
Page 39: Compass Page
Course Pointer Bearing Pointer Hold the compass level when navigating to ensure maximum accuracy. Bearing pointer The compass ring moves to indicate North orientation. Compass Page Astro Dog Tracking System Owner’s Manual... - Page 40 Compass page. 3. Press ENTER to lock the direction and open the Sighting page. • Change Data Fields—allows you to select the type of data you want to show in the data fields. Astro Dog Tracking System Owner’s Manual...
- Page 41 5. Begin traveling to your destination on a course line using the course pointer as a guide. Select Project Location to open the Project Location page. 6. Enter an estimated distance from your current location to establish a projected location. Astro Dog Tracking System Owner’s Manual...
- Page 42 If you are using the course pointer option, and you drift away from the line of travel from your original location to your destination, the course deviation indicator (an arrow with horizontal dotted line) provides graphic indication Astro Dog Tracking System Owner’s Manual...
-
Page 43: Altimeter Page
It also helps you avoid hazards to either side of the course, such as shoals or submerged rocks. Current Rate of ascent elevation or descent Altimeter Page Astro Dog Tracking System Owner’s Manual... - Page 44 • View Elevation Plot (View Pressure Plot)—shows to the View Elevation Plot option. The View Pressure Plot the elevation or the pressure plot. option is measured by time and pressure only. When one Astro Dog Tracking System Owner’s Manual...
-
Page 45: Zoom Ranges
Ranges for View Pressure Plot pressure values are shown period of time. when you press up or down on the ROCKER. Values for time are shown in the same manner as for elevation plots. Astro Dog Tracking System Owner’s Manual... -
Page 46: View Points On Map
3. Press BACK to close. or pressure, time of day, and date when the point was recorded. Astro Dog Tracking System Owner’s Manual... -
Page 47: Calibrating The Altimeter
Calibrating the Altimeter data field to view a list of available data field options. The Astro 220 relies on the barometric pressure to 2. Select an option to place it in the data field. determine elevation. Since the pressure at any given... -
Page 48: Using Tracks
Color—selects the color of the active track. If you want to change the color of a dog’s track and pointer, use the color option on the Saved Track Tracks Page Track Log Setup page. Astro Dog Tracking System Owner’s Manual... - Page 49 To view a track on the map: On the Saved Track page, select Map to open the Map page. A map showing the entire track appears. Begin and End markers and user location are added to the track. Astro Dog Tracking System Owner’s Manual...
-
Page 50: Track Profiles
Stop button appears at the bottom of the page. Symbols options. To zoom ranges only, press up or 4. When finished defining the area, press ENTER to down on the ROCKER. open the page with a Save button. Astro Dog Tracking System Owner’s Manual... -
Page 51: Navigating A Saved Track
- Use Track Data option menu appears when you select To use the TracBack feature: Profile. Refer to the Garmin Web site, 1. With the Saved Tracks page for the track or the Tracks www.garmin.com/cartography/ontheTrail/, for more page open, select TracBack >... - Page 52 ENTER. Use the Delete All button to clear the entire list. Transfer of saved tracks to MapSource page 70 for detailed instructions. To transfer a dog’s more detailed tracks from a DC 20, also see page Astro Dog Tracking System Owner’s Manual...
-
Page 53: Routes
GPS Applications Routes Route navigation allows you to create a path to a destination with turn-by-turn directions. The Astro 220 lets you store 50 routes with up to 250 points each. To create a route: 1. Press MENU twice > Advanced > GPS Applications >... - Page 54 The Turn Preview page shows the turn and guidance ENTER to open the Route page for the selected route. text and a small field at the bottom shows the turn number in sequence and total turns in the route. Astro Dog Tracking System Owner’s Manual...
-
Page 55: Editing A Route
To change the name of the route: Routes Options Menu. Select Delete All Routes. 1. Press MENU twice > Advanced > GPS Applications > select Routes to open the Routes page. 2. Select a saved route and press ENTER. Astro Dog Tracking System Owner’s Manual... -
Page 56: Using The Route Page Options
Change Data Fields—select different values for the Select Manual to transition to the next location anytime two data fields at the bottom of the page. while navigating a route. • Restore Defaults—restore route settings to the factory default setting. Astro Dog Tracking System Owner’s Manual... -
Page 57: Proximity Locations
As you move toward each point on your route, the graphic shows the direction you should move to stay Astro Dog Tracking System Owner’s Manual... -
Page 58: Satellite Page
Heading bug Satellite indicates your 2. Select each alarm field and press ENTER to view the signal direction of list of tones. strength movement Satellite Page 3. Select the desired tone and press ENTER. Astro Dog Tracking System Owner’s Manual... -
Page 59: Using The Satellite Page Options Menu
• New Location—use if you have moved the unit more than 600 miles and you are having trouble locking onto satellite signals. • GPS Elevation—your GPS-determined elevation. Astro Dog Tracking System Owner’s Manual... -
Page 60: Accessories
1. Select Calendar. The Calendar page opens with the current week shown. Calculator 2. Use the ROCKER to select the day you want to add Your Astro 220 has both a standard and scientific a location to, and press ENTER to show the page for calculator. that day. -
Page 61: Stopwatch
Accessories Stopwatch View Sunrise/Sunset Use the Astro 220 as a stopwatch, which includes a lap This feature is also accessed from the Main Menu. Refer timer. You can also have the unit record the lap time page 16 to learn details about its operation. -
Page 62: Settings
Use the System Options Menu to Restore Defaults to return the System Setup fields to their original values, Customize the operation of your Astro 220. Card Info to view micro SD card status and Mass Storage Mode to use a microSD card as a data storage To access the Settings Menu: device. -
Page 63: Dog Alerts Setup
GPS Lost Alert—the dog’s DC 20 has lost GPS satellite signals. Tones Setup • Lost Communication Alert—the Astro 220 is not Use the Tones Setup page to customize sound tones made receiving the DC 20 (out of range, lost power, etc.). by the Astro 220. -
Page 64: Main Menu Setup
All scales above that revert to the North Up map orientation. • Auto Zoom—zooms the map scale to include the beginning and ending points of a route. • Detail—selects the degree of map detail shown. Astro Dog Tracking System Owner’s Manual... - Page 65 Track Log—sets the maximum zoom range at which active track logs are shown. • Track Points—sets the maximum number of track points used to record a track. • Go To Line—selects either a bearing or course line for navigating a track. Astro Dog Tracking System Owner’s Manual...
- Page 66 Spot Soundings—toggles spot soundings on or off on the Map page. (Periodic depth measurements shown on the map.) • Light Sectors—select Off, Auto, or ON. (navigational light locations) • Symbol Set—select the symbol set to use (Auto, GARMIN, NOAA, International). Astro Dog Tracking System Owner’s Manual...
-
Page 67: Routing Setup
Off Route Recalculation—allows you to traveling outside of the detailed map coverage area set whether the unit prompts you when it is or where no roads exist. recalculating your route (Prompted) or recalculates automatically or Off. Astro Dog Tracking System Owner’s Manual... -
Page 68: Geocache Setup
Geocache Setup Use the Geocache Setup page to find and record items hidden at geographic locations. Go my.garmin.com, login and click Go Geocaching for details and how to download geocache locations from the Internet. Astro Dog Tracking System Owner’s Manual... -
Page 69: Marine Alarms Setup
Select Other to enter a show your speed and distance traveled. Universal Time Coordinate offset. • Elevation (Vert. Speed)—sets the unit of measurement (Feet [ft/min], Meters [m/min], or Meters [m/sec]) to show your rate of ascent. Astro Dog Tracking System Owner’s Manual... -
Page 70: Heading Setup
From the Main Menu select Advanced > Settings > setup wizard. Heading. • Display—sets the value (Cardinal Letters, Degrees, or Mils). • North Reference—provides headings based on a true, magnetic, grid, or specific user value. Astro Dog Tracking System Owner’s Manual... -
Page 71: Altimeter Setup
3. Select the Barometer Mode field > to select Variable Elevation (used when moving) or Fixed Elevation (used when stationary, allowing the altimeter to function as a standard barometer). Trip data is not recorded when in Fixed Elevation mode. Astro Dog Tracking System Owner’s Manual... -
Page 72: Appendix
Map Storage: Depends on microSD card capacity *The temperature rating of the Astro System may exceed the usable range of some A small portion of the card capacity has been used in formatting the card for use. batteries. Some batteries can rupture at high temperatures. -
Page 73: Optional Accessories
Appendix MapSource Software Data Disks and Pre-Loaded Battery Life: Astro 220 - Up to 24 hours (typical use)* microSD Cards—offer detailed mapping that is DC 20 - Up to 17 hours Recharge 3 to 4 hours compatible with the Astro 220. Visit the Garmin Web site *Alkaline batteries lose a significant amount of their capacity as the temperature at www.garmin.com/products/astro/. -
Page 74: Transferring Data To A Microsd Card
Astro 220. When you disks for your computer to enhance the versatility of initially connect the Astro 220 to a USB port, your your Astro System. With selected MapSource detailed computer might prompt you to locate the destination mapping data, you can view listings of nearby restaurants, of the drivers for the device. - Page 75 Highly detailed dog tracks can be transferred from the maps provided with the MapSource map data disk. DC 20 via the Astro using the “Transfer Dog Unit Track” option from the Dog Info page Option Menu. To install or remove the microSD card: 1.
- Page 76 To use the USB Mass Storage Mode: 3. For a PC, select the file and select Edit > Copy and 1. Connect the Astro to a computer using the USB cable open the drive identified with the Astro 220. provided.
- Page 77 Downloads. 4. Follow instructions for using WebUpdater or click 5. Open the Astro 220 Dog Info page for the DC 20 you download from Unit Software from the Web site and are updating and press MENU > Upgrade Dog Unit follow instructions.
- Page 78 Manager is installed on your computer and open. Astro 220. 2. Select the Tracks tab on the left side of the 4. Open the Astro 220 Dog Info page for the DC 20 MapSource screen. you are downloading tracks from and press MENU 3.
-
Page 79: Caring For The Astro System
Water Immersion Hand wash the harness using a mild detergent solution, The Astro 220 and DC 20 are waterproof to IEC Standard rinse, and then air dry. Avoid chemical cleaners that may 60529 IPX7. They can withstand immersion in 1 meter damage the material. -
Page 80: Software License Agreement
Use this area to record the serial number (8-digit number Garmin grants you a limited license to use the software embedded in located on the back of the Astro 220 and bottom of the this device (the “Software”) in binary executable form in the normal DC 20) in case your system needs service. -
Page 81: Fcc Compliance
Appendix This product does not contain any user-serviceable parts. Repairs FCC Compliance should only be made by an authorized Garmin service center. This device complies with part 15 of the FCC Rules. Unauthorized repairs or modifications could result in permanent... - Page 82 OFF when in a “blasting area” or in areas posted: “Turn off off immediately if you have any reason to suspect that interference is two-way radio.” Obey all signs and instructions. taking place. Hearing Aids—Some digital wireless radios may interfere with Astro Dog Tracking System Owner’s Manual...
-
Page 83: Limited Warranty
Potentially Explosive Atmospheres—Turn your radio OFF and do not remove your battery when you are in any area with a potentially This Garmin product is warranted to be free from defects in materials explosive atmosphere. Obey all signs and instructions. Sparks from or workmanship for one year from the date of purchase. - Page 84 Online Auction Purchases: Products sold through online auctions are not eligible for rebates or other special offers from Garmin. Online auction confirmations are not accepted for warranty verification. To obtain warranty service, an original or copy of the sales receipt from the original retailer is required.
- Page 85 60 use Sight N Go to marking a location using the elevation, GPS 51 navigate 32 map page 18 ENTER key 3 use the View Points marking hunting specific option 38 locations 18 Astro Dog Tracking System Owner’s Manual...
- Page 86 8 Manager 66 QUIT key 3 stop (resume) navigation 21 stop tracking 11 system setup 54 units setup 61 upgrading software 69 using the keypad 3 view hunting almanac 16 view sunrise/sunset 16 Astro Dog Tracking System Owner’s Manual...
- Page 88 For the latest free software updates (excluding map data) throughout the life of your Garmin products, visit the Garmin Web site at www.garmin.com. © 2008 Garmin Ltd. or its subsidiaries Garmin International, Inc. 1200 East 151 Street, Olathe, Kansas 66062, USA Garmin (Europe) Ltd.
Need help?
Do you have a question about the Astro and is the answer not in the manual?
Questions and answers