Parmco AR600 Installation And Operating Instructions Manual
Hide thumbs
Also See for AR600:
- Installation and operating instructions manual (34 pages) ,
- Installation and operating instructions manual (29 pages) ,
- Installation and operating instructions manual (21 pages)
Table of Contents
Advertisement
Models:
Models: AR600
Models:
Models:
As part of Parmco Appliances commitment to improving and updating product ranges,
we reserve the right to alter, change and update technical specifications and appearance
attributes of all Parmco Appliances Freestanding Stoves. E&OE
Installation
and Operating
Instructions
AR600
AR600
AR600
AR900
AR900
AR900
AR900
AR600-LEG
AR600-LEG
AR600-LEG
AR600-LEG
AR900-LEG
AR900-LEG
AR900-LEG
AR900-LEG
1
Advertisement
Table of Contents

Related Manuals for Parmco AR600


Summary of Contents for Parmco AR600
- Page 1 AR600-LEG AR600-LEG AR600-LEG AR900-LEG AR900-LEG AR900-LEG AR900-LEG As part of Parmco Appliances commitment to improving and updating product ranges, we reserve the right to alter, change and update technical specifications and appearance attributes of all Parmco Appliances Freestanding Stoves. E&OE...
- Page 2 We hope you enjoy your new appliance. If you would like to find out more about this product or any other products in Parmco’s extensive range visit us on the web at www.parmco.co.nz. Regards,...
- Page 3 Standards and Regulatory Requirements with particular reference to the New Zealand Electrical and Gas Standards . Any attempt to install this or any other Parmco product without an authourised person could result in damage to the product and create a possible health hazard.
-
Page 4: Important Safety Information
IMPORTANT SAFETY INFORMATION For best performance and to extend the life of your appliance we recommend that you read the instructions in this owners manual thoroughly before using your new appliance. It will provide you with all the information you need to ensure its safe installation, proper use and maintanence. - Page 5 IT IS IN OPERATION. • WHERE THIS APPLIANCE IS USED IN A MARINE CRAFT OR CARAVAN IT SHALL NOT BE USED AS A SPACE HEATER. • For any enquiries please contact Parmco Appliances (09) 573 5678 USE AND CARE OF APPLIANCE...
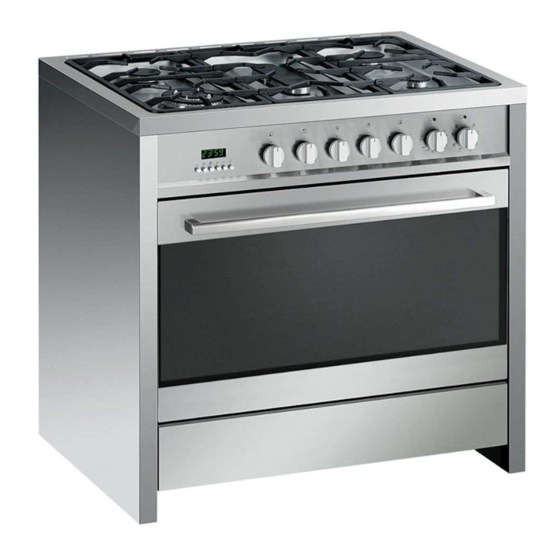
- Page 6 Description Of Appliance 1. Electronic Controller 5. Auxiliary Burner 2. Control Knobs (Cooktop Burners) 6. Semi-Rapid Burner 3. Cooking Temperature Selection Knob 7. Wok Burner 4. Cooking Mode Selection Knob 8. Trivets Oven & Accessories The appliance is supplied with easy clean shelf supports which offer a range of shelf heights.
- Page 7 The symbols on the gas control knob mean the following: No Gas or “Off” Maximum gas flow or ‘high’ flame and lighting position. Minimum gas flow or ‘low’ flame. All operating positions must be set between maximum and minimum flow settings. Never operate burners between maximum setting and the “Off”...
- Page 8 Once lit check that the flame is even and regular and turn the control knob to adjust the flame as required. If the flame is uneven, check that the burner head /skirt ( Fig 1 A & B) are correctly positioned. To turn off the flame, turn the control knob clockwise to the “Off”...
- Page 9 To remove the side support Fit the trays and shelves racks, push down on the wire between the two closest below the locking pin and pull wires as shown right away from the oven wall until you can release the bottom of the support from the holes in the oven wall.
-
Page 10: Cooking Modes
If supplied use the chrome wire handles (shown below) when removing the oven tray from the oven. COOKING MODES Convection Mode When set to Convection Mode, the top and bottom heating elements operate together like a ‘normal’ conventional oven that you have probably used before. Convection mode is best suited for traditional baking and roasting and you should only use one shelf at a time, otherwise there will be uneven heat distribution. - Page 11 Grill Mode When Grill mode is selected the top inner element operates. Set the temperture to MAX when using grill function. The extremely high and direct temperature of the grill makes it possible to brown the surface of meats and roasts while locking in the juices to keep them tender.
-
Page 12: Electronic Timer
ELECTRONIC TIMER 6 BUTTON DIGITAL CLOCK 6 BUTTON DIGITAL CLOCK 6 BUTTON DIGITAL CLOCK 6 BUTTON DIGITAL CLOCK This appliance has a digital display with 24 hour clock with six control buttons. When the power is connected, the screen displays 3 flashing numbers and “AUTO”. Adjusting The Digital Clock To set the correct time, press the button first, then the + or –... - Page 13 For Example: If cooking time takes 45 minutes and you want it to finish at 14:00 1. Press the button, set the cooking time to 45 minutes with the + and – buttons. 2. Press the button, set finish time to 14:00 with + and – buttons. 3.
-
Page 14: Practical Cooking Advice
In case of power failure, all settings including the time display will be lost. When the power is restored, three ‘0’ and “AUTO” will be displayed. The Oven Light Set the cooking mode selection knob to symbol to switch on the oven light/s. The oven light/s will stay on while the oven is operating. -
Page 15: Cooking Guide
COOKING GUIDE Selector Knob Food To Be Level from Temperature Time in ⁰ ⁰ ⁰ ⁰ C. C. C. C. Setting Cooked below Minutes (*) Traditional First Courses Cooking Lasagne 210-230 Oven-Baked Pasta 210-230 Meat Roast Veal 175 – 200 30 –... - Page 16 Desserts/ Pastries Fruit Cake 2 – 3 170 – 190 40 – 50 Sponge Cake 2 – 3 190 – 220 25 – 35 Strudel 1 – 2 25 – 35 Bread 2 – 3 190 – 210 Toast 1 - 2 220 - 240 Selector Knob Food To Be...
-
Page 17: Maintenance
There is a rubber seal surrounding the oven, Check the condition of the seal on a regular basis. If necessary, clean it but avoid using abrasive products or objects to do so. Should it become damaged please contact Parmco Appliances service department. We recommend you avoid using the oven until it has been repaired. - Page 18 difficulties, check that the cavities in the burner are not obstructed (B). To remove deposits in the burner, remove the burner caps (A). After cleaning, put the burner heads and caps back together and return correctly to their position. After washing, replace the pan trivets, checking that they are correctly positioned.
- Page 19 Replacement lamps are available from Parmco Appliances Disposal Parmco has a commitment to being environmentally responsible. To avoid potential negative impacts on the environment please ensure that this appliance is disposed of correctly. This product must not be treated as household waste. Instead it should be handed over to an appropriate collection point for recycling of electrical and steel components.
-
Page 20: Important Note
Requirements with particular reference to the New Zealand Electrical and Gas Standards . Any attempt to install this or any other Parmco product without an authourised person could result in damage to the product and possible health hazards. Not having an authourised person install this... -
Page 21: Installation
Before any procedure, it is important to check that the appliance is DISCONNECTED from the electrical mains. Parmco declines all responsibility for any damage deriving from installations that are in breach of the regulations in force or from failure to comply... - Page 22 Parmco Appliances shall be a minimum of 750mm above this appliance. Installing units on a Plinth It is possible to install the AR600, AR900, AR600-LEG and AR900-LEG units on a “plinth” if required. Specialist ventialltion is required in this application. Please refer to the diagram below.
- Page 23 MAKE SURE THE ANTI-TILTING CHAINS ARE TAUT WHEN ANCHORED TO PREVENT THE APPLIANCE TILTING AR600-LEG and AR900-LEG MODELS These models come supplied with extendable legs that you can use to raise and lower the appliance to the desired installation height. It is important not to over extend these legs as the appliance can become unstable.
-
Page 24: Electrical Connection
Connection To the Gas Supply Conversion to LPG LPG jets are included with this appliance. To covert unit to LPG replace the jets with a size 7 socket . Ensure that the injector jets are matched with the burner size as per technical data table below. - Page 25 This appliance is not intended to be operated by means of an external timer or separate remote-control system. It is essential that this unit is operated in conjunction with some form of ventilation/extraction system . Parmco has a wide range of kitchen ventilation solutions avavaialable. TECHNICAL DATA Gas intake connection ½”...
- Page 26 AR900 and AR900-LEG Inner Volume of oven: 105 litres AR600 and AR600-LEG Inner Volume of oven: 56 litres AR900 and AR900-LEG AR600 and AR600-LEG Electrical Features Electrical Features Oven Light 2 x 25W Oven Light 2 x 25W Spit Motor 1 x 4W...
- Page 27 • This warranty is offered as an extra benefit, and does not affect discretion of Parmco Sales. Proof of purchase can be for the product other legal rights, which can not be modified or excluded by itself, or if installed with a kitchen or house then proof of purchase can be from a Parmco reseller of products supplied by Parmco.
Need help?
Do you have a question about the AR600 and is the answer not in the manual?
Questions and answers