Table of Contents
Advertisement
Available languages
Available languages
Quick Links
Download this manual
See also:
Instruction Manual
Advertisement
Table of Contents

Related Manuals for Weston 83-0850-W


Summary of Contents for Weston 83-0850-W
- Page 1 10” MEAT SLICER MODEL NO. 83-0850-W TRANCHEUSE À VIANDE DE 25 CM MODÈLE NO 83-0850-W Household Use Only / Usage Domestique Seulement AC 120V~60Hz 200W INFORMATION ON THE WARRANTY FOLLOW THE INSTRUCTIONS IN THIS BOOKLET. / LE INFORMATION SUR LA GARANTIE PRÉCÈDENT LES INSTRUCTIONS DANS CE LIVRET.
-
Page 2: Component List
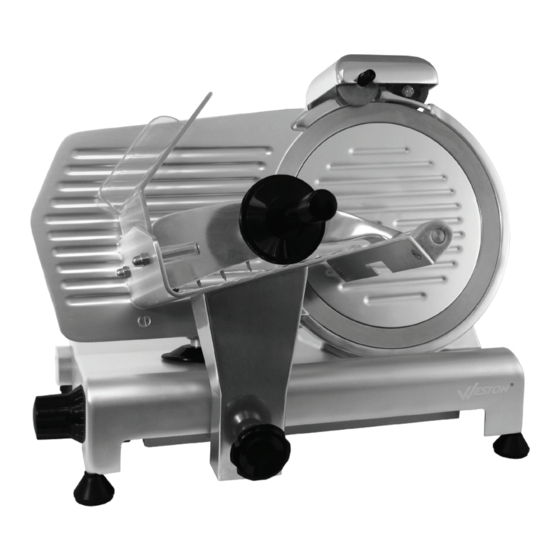
7 Blade Sharpener Assembly 83-0853 If any components of this unit are broken or the unit does not operate properly, call Weston Products LLC Toll Free at 1-800-814-4895 Monday thru Friday 8:00am-5:00pm EST. Outside the U.S. call 440-638-3131 ADDITIONAL ACCESSORIES AVAILABLE 10”... - Page 3 Metal Food Pusher Power Switch Thickness Adjustment Knob Motor Housing CAUTION! It is important to follow the “Food Safety” guidelines outlined in this manual. For the most up to date instruction visit the USDA website. WARNING! Before cleaning, assembling or disassembling the appliance, make sure the appliance is OFF and the PLUG IS REMOVED FROM THE OUTLET/POWER SOURCE! HANDLE CAREFULLY!
-
Page 4: Important Safety Rules
IMPORTANT SAFETY RULES READ AND FULLY UNDERSTAND ALL INSTRUCTIONS AND WARNINGS PRIOR TO USING THIS UNIT. YOUR SAFETY IS MOST IMPORTANT! FAILURE TO COMPLY WITH PROCEDURES AND SAFE GUARDS MAY WARNING! RESULT IN SERIOUS INJURY OR PROPERTY DAMAGE. REMEMBER: YOUR PERSONAL SAFETY IS YOUR RESPONSIBILITY! 1. -
Page 5: Grounding Instructions
WARNING! Before cleaning, assembling or disassembling the appliance, make sure the appliance is OFF and the PLUG IS REMOVED FROM THE OUTLET/POWER SOURCE! HANDLE CAREFULLY! KEEP FINGERS AWAY FROM THE BLADE! NEVER FEED FOOD BY HAND. ALWAYS USE THE FOOD PUSHER! WARNING! Always use completely assembled Meat Slicer with Food Carriage and Food Pusher. -
Page 6: Directions For Use
DIRECTIONS FOR USE WARNING! Before cleaning, assembling or disassembling the appliance, make sure the appliance is OFF and the PLUG IS REMOVED FROM THE OUTLET/POWER SOURCE! HANDLE CAREFULLY! KEEP FINGERS AWAY FROM THE BLADE! NEVER FEED FOOD BY HAND. ALWAYS USE THE FOOD PUSHER! WARNING! Always use completely assembled Meat Slicer with Food Carriage and Food Pusher. - Page 7 Figure 3 5. Rotate the Thickness Adjustment CAUTION! Knob to set the Gauge Plate to the SHARP BLADE! Gauge desired cutting thickness (Figure 3). Plate Rotate towards “0” for the thinnest slice, and rotate towards “12” for the thickest Food slice.
-
Page 8: Cleaning Instructions
CLEANING INSTRUCTIONS WARNING! Before cleaning, assembling or disassembling the appliance, make sure the appliance is OFF and the PLUG IS REMOVED FROM THE OUTLET/POWER SOURCE! HANDLE CAREFULLY! KEEP FINGERS AWAY FROM THE BLADE! NEVER FEED FOOD BY HAND. ALWAYS USE THE FOOD PUSHER! WARNING! Always use completely assembled Meat Slicer with Food Carriage and Food Pusher. - Page 9 8. Remove the blade by unscrewing Figure 6 and pulling out the knob at the back of the slicer (Figure 6). This will allow you to remove the plate on top of the blade. You need a Phillips head screwdriver to remove the 3 screws securing the blade to the unit.
- Page 10 ASSEMBLY INSTRUCTIONS WARNING! Before cleaning, assembling or disassembling the appliance, make sure the appliance is OFF and the PLUG IS REMOVED FROM THE OUTLET/POWER SOURCE! HANDLE CAREFULLY! KEEP FINGERS AWAY FROM THE BLADE! NEVER FEED FOOD BY HAND. ALWAYS USE THE FOOD PUSHER! WARNING! Always use completely assembled Meat Slicer with Food Carriage and Food Pusher.
-
Page 11: Mounting The Blade Sharpener
MOUNTING THE BLADE SHARPENER WARNING! Before cleaning, assembling or disassembling the appliance, make sure the appliance is OFF and the PLUG IS REMOVED FROM THE OUTLET/POWER SOURCE! HANDLE CAREFULLY! KEEP FINGERS AWAY FROM THE BLADE! NEVER FEED FOOD BY HAND. ALWAYS USE THE FOOD PUSHER! WARNING! Always use completely assembled Meat Slicer... - Page 12 OPERATING BLADE SHARPENER 1. Place the Meat Slicer on a flat stable surface. Be sure the Power Switch is in the “O” off position. Adjust the graduated knob to the “0” position. 2. Make sure the Blade is clean (Follow Cleaning Instructions). 3.
-
Page 13: Food Safety
FOOD SAFETY There are basic rules to follow when handling food. They are COOK, SEPARATE, CLEAN, and CHILL. COOK It’s crucial to cook food to a safe internal temperature to destroy bacteria that is present. The safety of hamburgers and other foods made with ground meat has been receiving a lot of attention lately, and with good reason. -
Page 14: Weston Warranty Information
In some cases, a $50 cleaning surcharge may apply. Weston Products LLC will repair (or at its discretion, replace) the product free of charge, if in the judgment of the company, it has been proven to be defective as to seller’s labor and material, within the warranty period. -
Page 15: Liste Des Composants
7 Aiguiseur de lame 83-0853 Si des composants de cet appareil sont cassés ou si l’appareil ne fonctionne pas correctement, veuillez appeler Weston Products, LLC au numéro sans frais : 1-800-814-4895 Du lundi au vendredi: de 8h00 à 17h00 EST. - Page 16 Interrupteur de Marche/ Arrêt Corps/moteur Bouton de réglage de l’épaisseur Compartiment du moteur ATTENTION! Il est important de suivre les directives sur la « sécurité alimentaire » fournies dans ce manuel. Pour obtenir les instructions les plus récentes, visiter le site Web d’USDA. AVERTISSEMENT! TOUJOURS DÉBRANCHER la trancheuse à...
-
Page 17: Importantes Règles De Sécurité
IMPORTANTES RÈGLES DE SÉCURITÉ LIRE ET COMPRENDRE COMPLÈTEMENT TOUTES LES DIRECTIVES ET AVERTISSEMENTS AVANT D’UTILISER CE PRODUIT. LE PLUS IMPORTANT EST VOTRE SÉCURITÉ! LE DÉFAUT D’OBSERVER LES PROCÉDURES ET MISES EN AVERTISSEMENT! GARDE PEUT ENTRAINER DES BLESSURES GRAVES OU DES DOMMAGES MATÉRIELS. N’OUBLIEZ PAS : VOTRE SÉCURITÉ... -
Page 18: Instructions De Mise À La Terre
AVERTISSEMENT! TOUJOURS DÉBRANCHER la trancheuse à viande de sa source d’alimentation avant d’en faire l’entretien, de la nettoyer, de changer des accessoires ou encore lorsqu’elle n’est pas utilisée. UTILISER AVEC PRÉCAUTION! TENIR LES DOIGTS À L’ÉCART DE LA LAME! NE JAMAIS ALIMENTER MANUELLEMENT. TOUJOURS UTILISER LE POUSSOIR POUR ALIMENTS! Toujours utiliser la trancheuse à... -
Page 19: Notices D'emploi
NOTICES D’EMPLOI AVERTISSEMENT! TOUJOURS DÉBRANCHER la trancheuse à viande de sa source d’alimentation avant d’en faire l’entretien, de la nettoyer, de changer des accessoires ou encore lorsqu’elle n’est pas utilisée. UTILISER AVEC PRÉCAUTION! TENIR LES DOIGTS À L’ÉCART DE LA LAME! NE JAMAIS ALIMENTER MANUELLEMENT. - Page 20 Figure 3 5. Tournez le bouton de réglage de ATTENTION! l’épaisseur pour régler la plaque de LAME TRANCHANTE! Plaque de calibrage à la coupe souhaitée (Figure mesure 3). Tournez vers 0 pour une coupe fine et vers 12 pour la coupe la plus épaisse. Poussoir Utilisez le bouton situé...
-
Page 21: Instructions De Nettoyage
INSTRUCTIONS DE NETTOYAGE AVERTISSEMENT! TOUJOURS DÉBRANCHER la trancheuse à viande de sa source d’alimentation avant d’en faire l’entretien, de la nettoyer, de changer des accessoires ou encore lorsqu’elle n’est pas utilisée. UTILISER AVEC PRÉCAUTION! TENIR LES DOIGTS À L’ÉCART DE LA LAME! NE JAMAIS ALIMENTER MANUELLEMENT. - Page 22 8. Retirez la lame en dévissant et en Figure 6 retirant le bouton situé à l’arrière de la trancheuse (Figure 6). Vous pourrez ainsi retirer plus facilement la plaque située au- dessus de la lame. Vous aurez besoin d’un tournevis Phillips pour retirer les 3 vis fixant la lame à...
- Page 23 ASSEMBLY INSTRUCTIONS WARNING! Before cleaning, assembling or disassembling the appliance, make sure the appliance is OFF and the PLUG IS REMOVED FROM THE OUTLET/POWER SOURCE! HANDLE CAREFULLY! KEEP FINGERS AWAY FROM THE BLADE! NEVER FEED FOOD BY HAND. ALWAYS USE THE FOOD PUSHER! WARNING! Always use completely assembled Meat Slicer with Food Carriage and Food Pusher.
-
Page 24: Installation De L'aiguiseur De Lame
INSTALLATION DE L’AIGUISEUR DE LAME AVERTISSEMENT! TOUJOURS DÉBRANCHER la trancheuse à viande de sa source d’alimentation avant d’en faire l’entretien, de la nettoyer, de changer des accessoires ou encore lorsqu’elle n’est pas utilisée. UTILISER AVEC PRÉCAUTION! TENIR LES DOIGTS À L’ÉCART DE LA LAME! NE JAMAIS ALIMENTER MANUELLEMENT. -
Page 25: Fonctionnement De L'aiguiseur De Lame
FONCTIONNEMENT DE L’AIGUISEUR DE LAME 1. Placez la trancheuse à viande sur une surface stable et à niveau. Assurez-vous que le commutateur d’alimentation est en position d’arrêt (O). Réglez maintenant le bouton gradué en position 0. 2. Assurez-vous que la lame est propre (voir les instructions de nettoyage). 3. -
Page 26: Sécurité Alimentaire
SÉCURITÉ ALIMENTAIRE Il y a des règles fondamentales à suivre lors de la manipulation d’aliments. Elles sont CUIRE, SÉPARER, NETTOYER, et REFROIDIR RAPIDEMENT. CUIRE Il est crucial de cuire les aliments à une température interne sûre pour détruire les bactéries qui sont présentes. -
Page 27: Information Sur La Garantie
Le produit doit être livré à ou expédié franco de port à Weston Products LLC pour les services de garantie, soit dans son emballage d’origine ou un emballage similaire offrant un degré de protection équivalent. Les dommages causés par l’expédition ne sont pas la responsabilité... - Page 28 Pour toutes les autres questions concernant l’utilisation du produit, les pièces manquantes, les problèmes ou l’activation de la garantie, veuillez communiquer avec l’équipe du service clientèle des produits Weston: de 8:00 à 17:00 HNE, du lundi au vendredi.
Need help?
Do you have a question about the 83-0850-W and is the answer not in the manual?
Questions and answers