
Subscribe to Our Youtube Channel
Related Manuals for Panasonic PP103909


Summary of Contents for Panasonic PP103909
-
Page 1: Operating Instructions
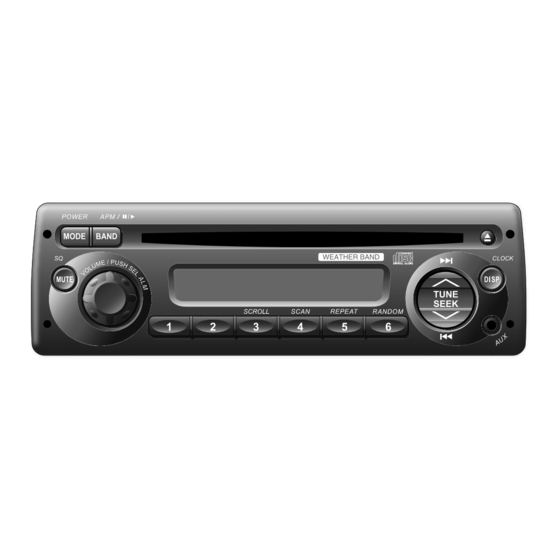
CD Player/Weather Band Receiver PP103909 PP P/N Operating Instructions • Please read these instructions carefully before using this product and keep this manual for future reference. -
Page 4: Table Of Contents
Contents Safety Information(Part 15 of the FCC Rules)....page 2 Contents ..........4 r Power and Sound Controls . -
Page 5: Power And Sound Controls
Power and Sound Controls Power Turn the key in the ignition until the accessory indicator lights. Power on: Press [MODE](POWER). Power off: Hold down [MODE](POWER) for more than 1 second. A C C Display Change One-Hour Timer With the ignition off, pressing the page 8, 12, 15) on this unit will turn on [MODE](POWER) - Page 6 Power and Sound Controls (Continued) SQ (Sound Quality) SQ is a function that can call up various sound types at the touch of button in accordance with your listening music type. Hold down [SQ] for more than 2 seconds to select the sound type as follows: (FLAT) flat frequency response: does not emphasize any part.
- Page 7 Audio Modes Note: If no operation takes place for more than 5 seconds in audio mode (2 seconds in (Bass/Treble/Balance/Fader) volume mode), the display returns to the regular mode. Push [VOLUME] (PUSH SEL) to select the audio mode. Regular Mode Volume Bass Fader...
-
Page 8: Clock Adjustment
Clock Adjustment Selecting the Clock Display Press [DISP] (CLOCK) to change the display. (refer to the display function of each mode) Ex. Radio mode display Clock display The 12-hour system is used for the clock. (The 12-hour system distinguishes between AM and PM) Initial Time [{ TUNE], [} TUNE] (Hours, Minutes) -
Page 9: Radio
Radio Radio Mode Press [MODE] to change to the radio mode. Radio CD Player AUX Mode ( When a CD disc is loaded.) FM stereo indicator, lights while receiving an FM stereo signal. Band Frequency Press [BAND] to change the band. Band (Weather Band) Manual Tuning... - Page 10 Radio (Continued) Preset Station Setting Up to 6 stations can be saved in each of the FM1, FM2 and AM preset station memories. Note: Existing saved stations are overwritten with new stations after following this procedure. Band Press [BAND](APM) to select a desired band. (·...
-
Page 11: Tuning In A Weather Band Station
Weather Band indicator Selection Tuning in a Weather Band Station • Press [BAND](APM) to select WB (Weather Band). page 9) • Press any of the buttons [1] to [6] to monitor the preset station. Weather Band Frequency (channel) Number Weather Band Frequency Note: The weather band (CH1-6) has been preset. -
Page 12: Cd Player
CD Player Disc Insert and Playback Disc Insert Playback will start automatically after the player recognized the loaded disc as an ordinary music CD. (When a CD-R or CD-RW which has CD-DA* formatted data as the same as an ordinary music CD is loaded, this player recognizes it as an ordinary music CD.) *CD-DA: A general music CD format. -
Page 13: Track Search
Caution • Only 12 cm {5"} CD, CD-DA data recorded CD-R and CD-RW discs are available for this unit. • This unit does not support MP3 and WMA disc playback. • Refer to page 20 about notes on CD-R/RW. • This unit is not designed for any 8 cm {3"} disc. •... -
Page 14: Aux (Auxiliary Input Mode)
AUX (Auxiliary Input Mode) Before Using the Portable Audio Device Warning ¡ Please or temporarily fix the portable audio device and mini-plug cable where they will not interfere the driver when driving. Otherwise, they may interfere driving or cause accident. Connecting with the Portable Audio Player The AUX input terminal is equipped on the front panel. - Page 15 Listening to the Portable Audio Device q Turn on the connected portable audio device and play the music. w Press [MODE] (POWER) to change to AUX mode. The sound of the portable audio device is output through the speakers. ( When a CD disc is loaded.) CD player AUX Mode Radio...
-
Page 16: Alarm Setting
Alarm Setting [ALM] Alarm Time Setting Turning ON/OFF the Alarm q Hold down [ALM] for more than 2 seconds. q Hold down [ALM] for more than 2 seconds. lights.) (Alarm time display) (Alarm time display) w Push [ALM]. “ALM ADJ” is displayed when the alarm time is not Alarm ON/OFF adjusted. -
Page 17: Troubleshooting
Troubleshooting If You Suspect Something Wrong Warning Check and take steps as described below. If the described suggestions do not solve the problem, it is ¡ Do not use the unit in an irregular condi- recommended to take the unit to your dealership. The prod- tion, for example, without sound, or with uct should be serviced only by qualified personnel. - Page 18 Troubleshooting (Continued) p Radio Trouble Check point Station is too far, or signals are too weak. Much noise in FM Select other stations of higher signal level. stereo and monaural broad casts. The radio antenna is not extended enough. Extend fully the radio antenna. p CD Trouble Check point...
-
Page 19: Sound Setting
p Sound Setting Trouble Check point Left and right balance, or front and rear balance is off on one side. No sound from left, Adjust BAL/FAD as appropriate. right, front, or rear Cables are not correctly connected. speaker. Connect the cables correctly. Left and right sounds The right speaker wire is connected to the left speaker and the left speaker are reversed in stereo... -
Page 20: Maintenance
Maintenance Care of the Unit p Cleaning this Unit p Caution on Cleaning Use a dry, soft cloth to wipe. Never use solvents such as benzine, thinner as they may mar the surface of the unit. Notes on Discs Do not play any ordinary music CDs with la- bels other than this one. -
Page 21: Specifications
Specifications p General Power Supply: 12 V DC (11 V-16 V) test Voltage 14.4 V, Negative @ ground Current consumption: Less than 2.5 A (CD mode, 0.5 W 4-speaker) 37 W × 4 channels at 400 Hz, Volume Control maximum Maximum Power Output: Tone adjustment range: Bass:... -
Page 22: Specification From The Terminal End (Rear Connector Of This Unit)
Specification from the Terminal End (Rear Connector of This Unit) Specification from the terminal end (Rear connector of this unit) Cavity Pin # Function Park Lights ACC (Ignition) Cavity C 15 18 Dim PWM Battery Cavity B Power Ground RR+ (Speaker) O 10 RR- (Speaker) Cavity A 11 RF+ (Speaker) - Page 23 Memorandum...
- Page 24 YFM264C213CA PTW1009-1119 Printed in China...
Need help?
Do you have a question about the PP103909 and is the answer not in the manual?
Questions and answers