Table of Contents
Advertisement
Quick Links
Advertisement
Table of Contents

Related Manuals for Mikado VBAR


Summary of Contents for Mikado VBAR
- Page 1 Owner , s Manual...
- Page 3 VBar Control Owner , s Manual Mikado Model Helicopters GmbH Friedrich-Klausing-Str. 2 · 14469 Potsdam · Germany Telefon +49 331 23749-0 · Telefax +49 331 23749-11 info@mikado-heli.de · www.mikado-heli.de © Mikado Model Helicopters 2014. All rights reserved. v1.11 12-2014...
-
Page 5: Table Of Contents
After-Sales Service ......19 What is VBar Control? ......7... -
Page 6: Benefits At A Glance
(may need additional hardware). ■ Easy Dialog System with rotary dial for convenient and ■ Storage of event log files like VBar event log, VBar safe inputs, with optical, tactile and acoustic feedback. Control event log, GPS way points, voltage/current ■... -
Page 7: Introduction
VBar Control is designated for use with model helicopters troller, servos, the helicopter kit itself. For latest informa- (and in the future also for use with model airplanes). VBar tion, new features and updates, visit our product web site Control is not designated for any other purpose than re- www.vstabi.info. -
Page 8: General Safety Precautions
Precautions for the Use of the 2 4 GHz Band to meet the needs of all appliances connected. Malfunc- VBar Control operates in the 2.4 GHz band, which is in tioning components or components drawing too high a cur- common use with e.g. industry, science and medical (ISM) rent, or generating back voltages, may disrupt the safe op- applications. -
Page 9: Built-In Rechargeable Lithium Polymer Battery And Battery Charger
Check the voltage in the country you are in, it must not exceed 100-240 V AC. » Do not misconnect (+) and (–) » Do not place VBar Control or the charger next to heat or open fire. » Keep open terminals (+) and (–) away from conductive materials like metal surfaces, carbon fibre, tools. -
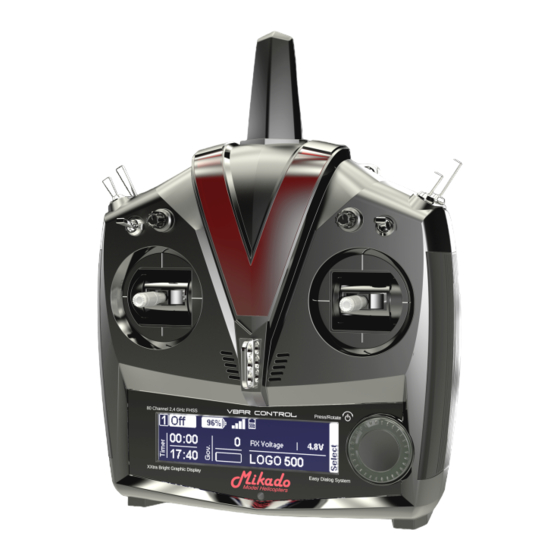
Page 10: Transmitter Controls And Features
Transmitter Controls Antenna and Features ■ Gimbals Gimbals ■ Adjustable sticks ■ Switches 1-6 ■ Rotating knobs 1+2 ■ Easy Dialog System Dial (EDS) with LED ring ■ XXtra Bright Graphic Display ■ Ambient light sensor Adjustable sticks ■ 3-point neck-strap attachment ■... -
Page 11: Basic Transmitter Operation
Shutdown menu by rotating the EDS, then click OK. der to empty menus or free memory. ■ Mind that you cannot turn off your VBar Control as long as a VBar Control Receiver is connected, so always turn off your model first. - Page 12 You can calibrate the gimbals by selecting one control function at a time and thereby ‘show’ the VBar Control the limits and the center position by just moving the stick. It will learn and store the values automatically.
-
Page 13: Application Setup
Collective Center Fine allows to set the zero collective Optional switches lets you assign Option 1-3 functions to position, even though the gimbal has no spring to center switches according to your liking. Later you will assign Op- itself. Move the stick to the precise mechanical center po- tion 1-3 functions within additional apps. -
Page 14: How To Change The Stick Mode And Adjust The Stick Tension, How To Change The Stick Length
Remove the neck strap. ■ Put the VBar Control transmitter face down on a soft surface. Remove the six screws M3x20 mm to take off the bottom case. Then flip the case over so the screws fall out of the bottom case. -
Page 16: How To Use Vbar Control As A Usb Game Controller
Receiver connected. ■ You may connect both the USB cable and the wall » Wait a few seconds for the VBar Control to scan for charger at the same time. The integrated charging circuit available devices. in your VBar Control transmitter will always use the input »... -
Page 17: Vbar Control Satellite Receiver
Antennae ☝ Attention The black coded wire connects to the black mark of the Control Panel Connector of a VBar main unit or to the triangle mark on a Mini VBar. Control LEDs ■... -
Page 18: Recycling Vbar Control And The Rechargeable Battery
Just click on ‘Applications’ to access the App Store for » Once the VBar Control is connected to the computer, VBar Control. There you find a selection of Apps for all VBar Control Manager will automatically connect to kinds of tasks. -
Page 19: Technical Data
280 mA placement during the legal warranty period applicable only Maximum 1,200 mA if VBar Control is faulty during or after use according to the Weight 880 g specification and this manual, and based on the regula- tions of Mikado Model Helicopters. -
Page 20: Compliance Information For The U S , Europe And Other Countries
EU as well as additional countries such as Sweden, Norway, Est- land and Switzerland for example. VBar Control may be sold and used in these countries. Please note that it is sole- ly in the user’s responsibility to put radio equipment into... -
Page 21: Fcc Grants
FCC Grants... -
Page 23: Setup
☑ Attention Read the manuals at least one time from cover If you want to use a new VBar with VBar Control that al- to cover. Familiarize yourself with all functions and espe- ready has firmware version 6 installed, you can proceed cially all safety precautions. -
Page 24: Getting Started
6.x. Parameters will not be transferred on an already set-up 4.x or 5.x VBar. Setup files from older ver- sions of the VBar software and firmware are not compatible and can not be loaded into the VBar by copying on the VBar Control’s internal memory. ☝... -
Page 25: Basic Setup Using The Wizard
LOGO series type and size into the VBar Flybarless Controller. Wait a few seconds for the process to finish. Mount the VBar or sensor of the VBar, as shown in the manual of your LOGO and as shown in the Wizard. - Page 26 Select the type of Governor you intend to use: External Gov- ernor (means the ESC will do the rpm control, VBar Control will loop through the throttle signal) or VBar e-Governor (means VBar Control and the VBar Flybarless Controller will govern rpm).
-
Page 27: Express-Version, Non-Mikado Helis
Heli Setup Wizard from Model Setup, Setup Tools in the menu to start the setup process. ☝ Attention To set up VBar Control with a nitro heli, you will need the Nitro Governor App. Turn on your VBar Control Transmitter. If prompted, turn the motor switch to OFF-position. - Page 28 Mount the VBar or sensor of the VBar in suitable a place, Check if the swash plate is moving correctly according to as recommended in the heli’s manual. Accordingly, select the stick inputs. If not, reverse the individual servos as nec- the proper alignment of the sensor in the Wizard.
- Page 29 Select the type of Governor you intend to use: External Gov- ernor (means the ESC will do the rpm control, VBar Control The actual configuration of the n-Governor will be done by...
-
Page 30: Esc Setup Wizard
Now follow the YGE programming procedure as shown on Carefully read the instructions on the screen of your VBar the screen: Wait for the ESC to confirm it is in program- Control Transmitter. Your heli and the VBar Flybarless ming mode (20+2 beeps). -
Page 31: Kontronik Escs
The ESC will confirm again. Carefully read the instructions of your Kontronik ESC and the instructions on the screen of your VBar Control Trans- mitter. Your heli and the VBar Flybarless Controller must be set up using the wizard. Both must be wired properly according to the manuals prior to entering this menu. -
Page 32: Unknown/Other Escs
Carefully read the instructions of your ESC and the instruc- tions on the screen of your VBar Control Transmitter. Your heli and the VBar Flybarless Controller must be set up us- ing the wizard. Both must be wired properly according to the manuals prior to entering this menu. -
Page 33: General Settings
The learned values will be saved if you deactivate the auto trim feature, or if you cut power your VBar. Mainrotor Parameters Note: Do a trim flight only in calm weather conditions. Wind will affect the quality of the trim flight. -
Page 34: Tailrotor Parameters
VBar Flybarless Controller. 40 (for 250 size helis) through 60 (for 400 and 450 size The last VBar Event Log files will also be saved on your helis) and 90 (for 500-800 size helis) to 120 (for large VBar Control Transmitter for later analysis. -
Page 35: Tail-Servo List
760 µSec ■ Save/Load Setup files DS 760 333 Hz 760 µSec You may save the settings of any VBar connected to a 8910A 333 Hz 760 µSec file on your VBar Control transmitter. The saved file can Robbe FS 61 BB 333 Hz 1.500 µSec... -
Page 36: Vbar And Mini Vbar
Attention Additional power supply may be connected to moving, the rotor blades pose a serious danger to persons any free port on the servo side (Mini VBar: do not use RX A and things. You must obey all safety instructions of the for power supply, if necessary use Y-harnesses).
Need help?
Do you have a question about the VBAR and is the answer not in the manual?
Questions and answers