Technaxx TX-29 User Manual

Security premium camera set 10.1 tx-29; security premium camera set 18.5 tx-30

Advertisement

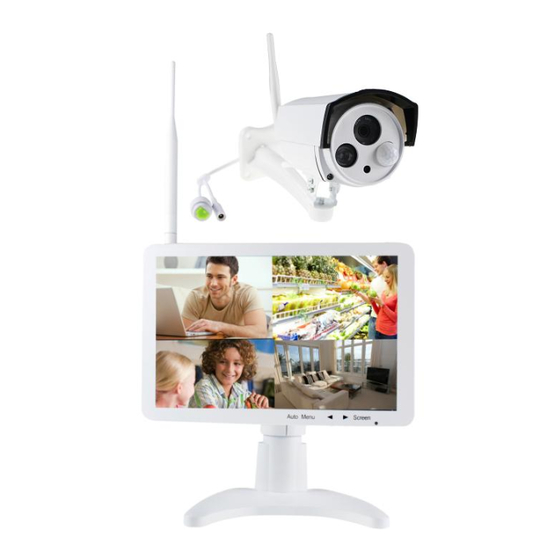
Security Premium Camera Set 10.1 TX-29
Security Premium Camera Set 18.5 TX-30
All languages of the user manual are on the CD enclosed.
Contents
1 Features ............................................................................................................................ 2
2. Package content .............................................................................................................. 3
3. Product Overview............................................................................................................. 3
4. Installation ........................................................................................................................ 6
4.1 How to install TX-29 & TX-30 ......................................................................................... 7
4.2 Antenna installation ........................................................................................................ 7
4.3 Hard disk installation ...................................................................................................... 8
4.4 Add camera to TX-29/TX-30 .......................................................................................... 9
5. Software Functions ........................................................................................................ 10
5.1 Split screen .................................................................................................................. 10
5.2 Video Manage .............................................................................................................. 10
5.4 Video playback ............................................................................................................. 15
5.5 Video backup ............................................................................................................... 20
5.6 Color adjust .................................................................................................................. 21
5.7 PTZ control (not for included cameras) ........................................................................ 21
5.8 Manual record .............................................................................................................. 22
5.9 Volume ......................................................................................................................... 22
5.10 Setup Wizard ............................................................................................................. 22
5.11 Fast network ............................................................................................................... 22
5.12 Add Camera ............................................................................................................... 22
5.13 Exit System ................................................................................................................ 22
6. Device Access ............................................................................................................... 23
6.1 Access via LAN (local WEB Interface) ......................................................................... 23
6.2 Access via WAN ( global WEB Interface) ..................................................................... 24
6.3 Mobile application (Security Premium) ......................................................................... 25
7. Security Premium PC Client .......................................................................................... 29
8. Advanced camera settings ............................................................................................. 32
9. Troubleshooting ............................................................................................................. 32
10. Specifications ............................................................................................................... 33
11. Attachment ................................................................................................................... 34
Technaxx
Important Hint regarding the user manuals:
®
* User Manual
Warranty 2 years
1

Advertisement

Table of Contents
loading

Summary of Contents for Technaxx TX-29

  • Page 1: Table Of Contents

    2. Package content ......................3 3. Product Overview......................3 4. Installation ........................6 4.1 How to install TX-29 & TX-30 ..................7 4.2 Antenna installation ......................7 4.3 Hard disk installation ...................... 8 4.4 Add camera to TX-29/TX-30 ..................9 5.
  • Page 2: Features

     Push message via APP when motion is detected  Wireless camera connection with up to 4 cameras (TX-29) & up to 8 cameras (TX-30)  Windows split-screen function with real-time/routine/event surveillance  Hard disk storage function & USB backup function Network operation via LAN cable connection ...
  • Page 3: Package Content

    Manual, [*HDD not included] 3. Product Overview The main use of the device is local on the display. The TX-29 & TX-30 are recorder, receiver and display in one device. They can be used for example as surveillance device. TX-29 supports up to 4 cameras, TX-30 supports up to 8 cameras. Both need a HDD (not included) for recording and push notifications.
  • Page 4 TX-29 TX-30 No. Name Function AUTO key Adjusts the screen display automatically. MENU key Activates and exits the OSD menu settings of the display (monitor) Moves the OSD menu or decreases the selected item value or ← key decrease volume of the display (monitor).
  • Page 5 IP Camera: No. Name Function IR (Infrared) LEDs The camera will use these in low-light conditions to generate a black and white image, even in total darkness. Lens The business end of the camera. For a reliable and clear image, ensure that the lens stays clean and unobstructed. To clean, use a dedicated lens cleaning solution and cloth, available from all good photography stores.
  • Page 6: Installation

    4. Installation Figure 4-1 DC12V/1A Computer AC Wall Socket Internet DC12V/2A/3A Smartphone USB Mouse Router RJ45 Cable Safety cautions • Make sure product is fixed correctly and stable if fastened in place. • Do not operate if wires and terminals are exposed. •...
  • Page 7: How To Install Tx-29 & Tx-30

    Camera. ⑤ Plug the power adapter into the wall socket. Wait for a few minutes till the TX-29/TX-30 and the IP camera finished startup. So far, the local surveillance system was done. ⑥ If you want to remote access this system with a Smartphone or computer, you should connect the TX-29/TX-30 to your home wireless router with a RJ45 network cable and make sure the router has been linked to internet.
  • Page 8: Hard Disk Installation

    HDD is needed for recording (Time, Motion, Sensor), playback of recordings, saving log files and sending out Push Notifications. TX-29 (HDD has to be 2.5 inch, max. 4TB) 1. Remove the screws of 3. Connect the data and the device back cover.
  • Page 9: Add Camera To Tx-29/Tx-30

    “N1” and press “refresh”->select the camera in the search list and press “Match code” and answer with yes. Note: Match code only works with cameras of the TX-29 or TX-30 system (additional cameras). ③ After about 30 seconds the new camera will be occurred in the “added device” list, and status displays ”Connect success”.
  • Page 10: Software Functions

    Standard: Shows mostly all IP cameras that are connected to the network after pressing refresh. N1: Shows the IP cameras of the TX-29 & TX-30 system that are not connected to NVR (WiFi: But have already matched to NVR) after pressing refresh.
  • Page 11 Multiply Network Segment Multiply Network Segment means that Advanced (not supported) access a segment to add the device. Allow Repeated Add When enabled you can add the same camera more than one time Intelligent Add Intelligent smart functionality. It is mainly used for the wired camera.
  • Page 12: System Setup

    Both cameras must be first connected to the NVR (see chapter 4.4) and should be nearby to the NVR and each other. Now press the button and see next step. By pressing button a dropdown menu opens. Select the channel number (camera) that you want to connect to the repeater.
  • Page 13 General setup: General The main functions of the device like Auto Logout, Key buzzer; Language, setup Keypad Type and Remote ID can be set under this menu. Boot Wizard, Show Device ID when Preview, Show time when Preview and Auto Turn Off Screen can also be Enabled/Disable.
  • Page 14 Record setup: Record Plan  Set four time periods for every channel for everyday of the week. First select the channel and weekday. After that set the time periods you want to get alarmed. You can set Alarm, Motion, Sensor or all by checking all three boxes. (By checking motion the display shows a yellow walking man in the top right corner of the channel that the alarm occurred.
  • Page 15: Video Playback

    Network setup: DHCP will be set as default it is the easiest way that the TX-29/TX-30 connects with your network and get an IP. But it is also possible to set the IP address manually. The IP address and the port (default 81) of your device are shown on this page. The page displays the network status where you can see if the device is connected to a network and the internet.
  • Page 16 If you want to receive alarm emails when motion (motion or sensor E-Mail enabled) is detected, you must enable the function and fill in the settings. When you are finished with the settings first press Apply and then Test to check if your settings are right.
  • Page 17 Handle: The different notifications you can get are set here.. The red triangle symbol in the left bottom corner is for Alarm reminding. Click on it to see alarm information. After activating Buzzer function the TX-29/TX-30 will make an acoustic sound when an alarm is detected (set volume with arrow keys of the display).
  • Page 18 By checking Alarm for motion the display shows a yellow walking man in the top right channel corner when alarm occurs. If you have activated time and not motion you will see a clock on the top right corner of the channel. For PIR sensor a yellow triangle with exclamation mark is shown in the top right corner of the channel.
  • Page 19 System upgrade For the system upgrade you need to copy the firmware to an empty USB disk. Insert it to the free USB port of the TX-29/TX-30. Select from the menu USB storage and the option you want to update (mostly system).
  • Page 20: Video Backup

    5.5 Video backup Click the mouse right button on the main interface  Video backup  choose channel No.  Choose record mode  enter Search time, input the beginning time and end time  click search. The recording will come up  choose the videos which needed to backup  click on Backup.
  • Page 21: Color Adjust

    5.6 Color adjust Before you can adjust the color you have to switch via the split screen function to the channel you want to adjust. Then click the mouse right button on the main interface  Color Adjust. Now on the right bottom appears a window where you can set the Hue, Brightness, Saturation and Contrast.
  • Page 22: Manual Record

    Here you can see the Device ID as QR code. You can setup the network options of the TX-29/TX-30 with two options. Choose Auto Config to let the NVR set everything on his one or choose Manual Config to set IP, Gateway and subnet mask by yourself. Under Manual Config you can also decide to choose the PPPoE function if necessary for you.
  • Page 23: Device Access

    6. Device Access 6.1 Access via LAN (local WEB Interface) Local WEB Interface is only for live view and playback. Do settings directly on NVR. Step 1: Click the mouse right button on the main interface-> System setup ->Network setup Check NVR IP address.
  • Page 24: Access Via Wan ( Global Web Interface)

    6.2 Access via WAN ( global WEB Interface) Global WEB Interface is only for live view to check from other locations on a computer. Step 1: Click the mouse right button on the main interface-> System setup->Network setup Check video recorder Device ID. Step 2: Access by computer in WAN, input www.technaxxp2p.de in IE browser (recommended).
  • Page 25: Mobile Application (Security Premium)

    6.3 Mobile application (Security Premium) The TX-29/TX-30 can work with iPhone and Android devices. Install the mobile APP and use your mobile for remote viewing/playback your NVR. The mobile APP is free to download for you, and is available from the respective Apple APP Store and Google Play Store.
  • Page 26 Step 5: Now you entered the device edit page. Scan the QR-code of the TX-29/TX-30 or enter the Device ID (= Cloud ID). Switch to your TX-29/TX-30 press right click and open “Fast network”. There you find device IP and QR-code. See chapter 5.3 system setup ...
  • Page 27 Functions under My Device (For Playback inserted HDD in the NVR is needed) 1. Click on Playback to see the recorded videos 2. Click on Capture to manually take a snapshot of the chosen channel 3. Click on Record to manually take a recording of the chosen channel 4.
  • Page 28 Functions under Me 1. Local Records: Take a look at your manually taken photo & Video. 2. Notifications list: Look up different notifications. 3. Alarm setting: Enable or disable the Alarm setting 4. Change password: You can change the password 5.
  • Page 29: Security Premium Pc Client

    7. Security Premium PC Client Preview: Preview After starting the client you see the live view of the connected cameras (depending on the selected screen divide mode 1, 4, 6, 8, 9, 16, 25, 36 or 49 channels). By holding the left mouse button and moving over the live view of a channel.
  • Page 30 Playback (max. 4 channel playback at the same time): Shows the devices with its available channels. By clicking on “plus” / Area “minus” it will open / close the channel list. Double click on a device to open/close all channels of the device. Double click on channel of the device to just open/close the selected channel.
  • Page 31 Settings  Device manage: By checking the box in front of one or more devices from the device list and then pressing Add the selected devices will be add to a Area. Quick setup All devices in the device list will be added Add area Add areas for organizing the cameras.
  • Page 32: Advanced Camera Settings

    After that go to your TX-29/TX-30 Display, open the video manage setup, select the N1 protocol and press on the refresh button on the right. Now you will see the IP address (example: 192.168.1.168) which you have to insert into the browser.
  • Page 33 10. Technical specifications Wireless NVR Specification 10.1” (TX-29) 18.5” (TX-30) Screen Horizontal 170° Horizontal 90° Viewing angle Vertical 170° Vertical 65° Response time 25ms Display device Luminance contrast ratio 800:1 Central luminance 350cd/m² Max. 4CH Max. 8CH Network video IP cameras...
  • Page 34: Specifications

    Weight 550g Protection class IP66 11. Attachment: Some tested and recommended HDD for TX-29 and TX-30 are listed here. But other HDD models can be compatible but not tested from our side. Seagate 2.5" 500GB Pipeline HD ST500VT000 SAMSUNG 2.5" 500GB ST500LM012-W SAMSUNG 2.5"...
  • Page 35 GPL v2 without charge except for the cost of media, shipping, and handling, upon written request to Technaxx GmbH & Co. KG, Kruppstraße 105, 60388 Frankfurt am Main, Germany.
  • Page 36 Also, for each author's protection and ours, we want to make certain that everyone understands that there is no warranty for this free software. If the software is modified by someone else and passed on, we want its recipients to know that what they have is not the original, so that any problems introduced by others will not reflect on the original authors' reputations.
  • Page 37 c) If the modified program normally reads commands interactively when run, you must cause it, when started running for such interactive use in the most ordinary way, to print or display an announcement including an appropriate copyright notice and a notice that there is no warranty (or else, saying that you provide a warranty) and that users may redistribute the program under these conditions, and telling the user how to view a copy of this License.
  • Page 38 If distribution of executable or object code is made by offering access to copy from a designated place, then offering equivalent access to copy the source code from the same place counts as distribution of the source code, even though third parties are not compelled to copy the source along with the object code.
  • Page 39 8. If the distribution and/or use of the Program is restricted in certain countries either by patents or by copyrighted interfaces, the original copyright holder who places the Program under this License may add an explicit geographical distribution limitation excluding those countries, so that distribution is permitted only in or among countries not thus excluded.
  • Page 40 HOW TO APPLY THESE TERMS TO YOUR NEW PROGRAMS (1) If you develop a new program, and you want it to be of the greatest possible use to the public, the best way to achieve this is to make it free software which everyone can redistribute and change under these terms.

This manual is also suitable for:

Tx-30

Table of Contents