Advertisement
Advertisement
Table of Contents

Related Manuals for MagniSight MSE-L24-HD Explorer HD


Summary of Contents for MagniSight MSE-L24-HD Explorer HD
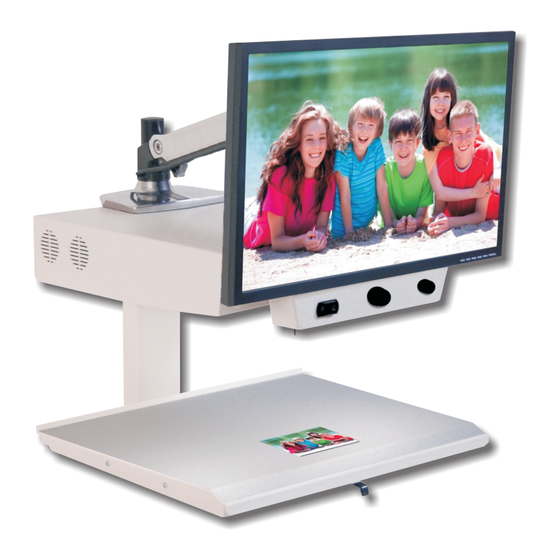
- Page 1 MSE-L24-HD User's Manual Model A...
-
Page 2: Table Of Contents
Table of Contents SECTION 1: Unpacking and Set-Up of System........2 SECTION 2: Features and Operating Instructions......4 Turning ON the System..............4 Selecting Viewing Mode...............4 Adjusting Magnification............... 5 Adjusting Brightness..............6 Switching Lights................6 Using the Viewing Table...............7 SECTION 3: Service and Safety Information........9 FCC Information: Explorer CCTV’s has been tested and found to comply with the limits for a Class B digital device, pursuant to part 15 of the FCC Rules. -
Page 3: Section 1: Unpacking And Set-Up Of System
Section 1: Unpacking & Set-Up 1. Remove User’s Manual and power cord from top foam compartments and remove the upper foam packaging. IMPORTANT: DO NOT DISCARD packing carton and materials. In the event service or return of the unit is required in the future, the original packaging is REQUIRED to insure no damage occurs in shipping. - Page 4 Set-Up (cont’d) 4. Connect the AC Power Cord to the AC IN jack on the rear panel of the camera. Plug the other end of the AC Power Cord into wall outlet or surge protected power strip (not included). CAUTION: THE POWER SUPPLY CORD IS USED AS THE MAIN DISCONNECT DEVICE.
-
Page 5: Section 2: Features And Operating Instructions
Section 2: Features & Instructions Turning ON the System Turn the unit ON using the Power Switch located under the front, right corner of the camera housing. The Lighting should illuminate the Viewing Table. If the Lights do not illuminate and the screen does not turn on, please check the power cord connections described in the previous section. -
Page 6: Adjusting Magnification
Selecting Viewing Mode (cont’d) By pushing the MODE Control RIGHT or LEFT you cycle through the viewing modes. In most cases, the Full Color HD modes works well for viewing pictures or color graphics while one of the Black & White or Select-A-Color modes may perform better for reading or writing text. -
Page 7: Adjusting Brightness
Adjusting Magnification (cont’d) When first learning to use the HD camera system, place printed material on the Viewing Table and adjust the Size Control to the smallest magnification setting. Then begin turning the Size Control to increase the size of the image until you are able to read the text. Adjusting Brightness The Brightness Control is used to BRIGHTEN or DARKEN the image being viewed. -
Page 8: Using The Viewing Table
Switching the Lighting (cont’d) magnification, the angle of lighting from one set or the other may improve the HD image. The factory setting is the with the REAR lights ON. In most cases, this is optimal for most material. To change the lighting, locate the LIGHT Switch under the front, left corner of the Camera unit. - Page 9 Using the Viewing Table (cont'd) Additional Table Features Include: 1. Rear Alignment Edge on the table allows you to line up pages or envelopes. This is especially useful for writing. 2. Non-glare wipeable table surface reduces eyestrain. Its dark color and speckled pattern helps you to distinguish the edge of a white page.
-
Page 10: Section 3: Service And Safety Information
Section 3: Safety & Service Safety Information and Maintenance 1. ALWAYS put the Viewing Table in the LOCKED position (Brake Lever to the far right) and use the hand holds in the base of the unit when attempting to move the machine. 2. - Page 11 Service Information (cont’d) In the event Service is required, you may be asked to send the unit to MagniSight’s main repair facility. The camera or system MUST BE SHIPPED IN THE ORIGINAL PACKAGING to prevent damage. Please call MagniSight for return information or to order packaging if needed. NOTES...
Need help?
Do you have a question about the MSE-L24-HD Explorer HD and is the answer not in the manual?
Questions and answers