Table of Contents
Advertisement
Available languages
Available languages
Item #1000 014 078
Model #HD12120
USE AND CARE GUIDE
12/120 VOLT AUTO AND HOME INFLATOR
Questions, problems, missing parts?
Before returning to the store, call
Husky Customer Service
8 a.m. ‐ 6 p.m., EST, Monday‐Friday
1-888-43-HUSKY
HUSKYTOOLS.COM
THANK YOU
We appreciate the trust and confidence you have placed in Husky through the purchase of this inflator. We strive to continually
create quality products designed to enhance your home. Visit us online to see our full line of products available for your home improvement
needs. Thank you for choosing Husky!
Advertisement
Chapters
Table of Contents

Subscribe to Our Youtube Channel
Related Manuals for Husky HD12120


Summary of Contents for Husky HD12120
- Page 1 Item #1000 014 078 Model #HD12120 USE AND CARE GUIDE 12/120 VOLT AUTO AND HOME INFLATOR Questions, problems, missing parts? Before returning to the store, call Husky Customer Service 8 a.m. ‐ 6 p.m., EST, Monday‐Friday 1-888-43-HUSKY HUSKYTOOLS.COM THANK YOU We appreciate the trust and confidence you have placed in Husky through the purchase of this inflator. We strive to continually create quality products designed to enhance your home. Visit us online to see our full line of products available for your home improvement needs. Thank you for choosing Husky!
-
Page 2: Table Of Contents
Table of Contents Table of Contents ............2 Operation ............... 4 Safety Information ............2 Maintenance ..............5 Warranty ................. 3 Replacing the Fuse ................5 Pre-Operation ..............3 Care And Cleaning ............5 Specifications .................. 3 ... -
Page 3: Warranty
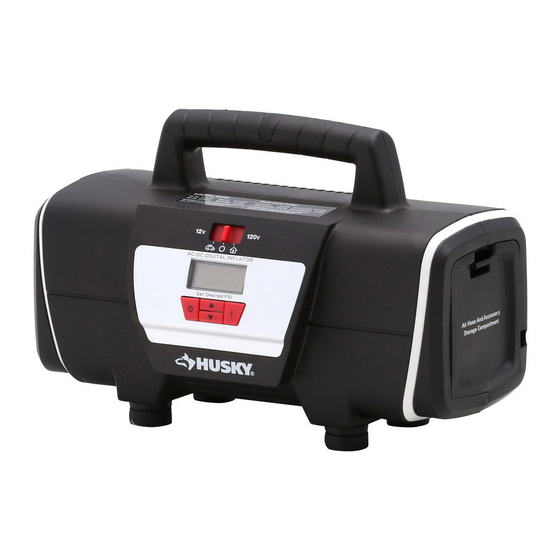
Warranty If this Husky product fails due to a defect in material or workmanship within 2 years from date of purchase, return to any Home Depot store for disposition. Contact the Customer Service Team at 1‐888‐43‐HUSKY or visit www.HUSKYTOOLS.com. Pre-Operation SPECIFICATIONS Model HD12120 Max. Pressure 120 PSI Voltage 120 V AC/12 V DC Hertz 60 (120 Volt) Phase 1 (120 Volt) Current 1.5 A (120 Volt) PACKAGE CONTENTS Part Description Quantity Part Description Quantity Carrying Handle Off Button Power Selector Switch Scroll Buttons (for preset PSI level) Digital Pressure Gauge On Button Power Cord Storage (120 Presta Valve Adaptor Volt) Air Hose Storage Sports Needle Accessory Storage Mattress Nozzle... -
Page 4: Operation
Operation Preparing the inflator Operating the inflator Place the inflator on a flat surface, near the item that □ CAUTION: Avoid over‐inflating. Never exceed the will be inflated. recommended pressure, as items overinflated may burst and cause serious injury. □ Insert the power cord (H or O) into an appropriate power source (12 Volt DC or 120 Volt AC). Press the scroll buttons (J) to set the desired PSI □ □ Connect the air hose (G) quick connect valve adaptor (between 3 and 120). When the digital pressure to the item you are inflating, and push the valve lock gauge (C) is displaying the target PSI, the readout will lever down to secure the connection. blink three times at the desired preset level, and then Set the power selector switch (B) to the desired □ change back to the current PSI level of the item you position (12 Volt or 120 Volt). The digital pressure are inflating. gauge (C) will show the current pressure of the item Press the on button (K) to begin inflating the item. □ you are inflating. The inflator will automatically stop when the item reaches the preset PSI level. □ Disconnect the power cord (H or O) from the power source. NOTE: The preset PSI level can be changed during inflation using the scroll buttons. To stop the inflator during inflation, press the off button. Disconnecting the power cord will clear the preset PSI setting. -
Page 5: Maintenance
REPLACING THE FUSE This unit is equipped with fuse protection. If at some point the inflator fails to operate when using the 12 Volt DC power method, follow the procedure below to check the fuse in the end of the 12 Volt plug. □ Unscrew the 12 Volt power plug tip. Remove and inspect the existing fuse. □ If a new fuse is needed, install a new fuse of the same type into the 12 Volt power plug. □ Reassemble the power plug. □ Care And Cleaning Set the power selector switch to the off or “O” position, and unplug the cord. □ □ Wipe plastic parts clean using mild soap and warm water. Do not get moisture or water into any interior moving parts. Troubleshooting Problem Possible Cause Solution The inflator does not start. The preset pressure setting may be below Adjust the preset pressure setting to a higher the actual pressure of the item you are pressure. inflating. The power cord is not plugged in. Plug the power cord into a working power outlet. The circuit breaker is tripped. Reset the circuit breaker. The fuse in the 12 Volt vehicle cord is Replace the fuse. blown. HUSKYTOOLS.COM Please contact 1‐888‐43‐HUSKY for further assistance. - Page 6 Questions, problems, missing parts? Before returning to the store, call Husky Customer Service 8 a.m. ‐ 6 p.m., EST, Monday‐Friday 1‐888‐43‐HUSKY HUSKYTOOLS.COM Retain this manual for future use.
- Page 7 Núm. de artículo 1000 014 078 Núm. de modelo HD12120 GUÍA DE USO Y CUIDADO 12/120 VOLTIOS INFLADOR PARA EL AUTO Y EL HOGAR ¿Tiene preguntas, problemas, o faltan piezas? Antes de regresar a la tienda, llame a Servicio al Cliente de Husky de lunes a viernes de 8 a.m. a 6 p.m., hora local del Este 1-888-43-HUSKY HUSKYTOOLS.COM GRACIAS Apreciamos la confianza que ha depositado en Husky por la compra de este inflador. Nos esforzamos por crear continuamente productos de calidad diseñados para mejorar su hogar. Visítenos en internet para ver nuestra línea completa de productos disponibles para sus necesidades de mejorar su hogar. ¡Gracias por preferir a Husky!
- Page 8 Tabla de contenido Tabla de contenido ............2 Operación ..............4 Información de seguridad ..........2 Mantenimiento ............... 5 Garantía ................3 Reemplazo del fusible ..............5 Pre-Operación ............... 3 Cuidado y limpieza ............5 Especificaciones ................ 3 ...
-
Page 9: Garantía
Garantía Si este producto Husky falla debido a un defecto en materiales o mano de obra dentro de 2 años a partir de la fecha de compra, devuélvalo a cualquier tienda de Home Depot para su disposición. Póngase en contacto con el Equipo de Servicio al Cliente llamando al 1‐888‐43‐HUSKY o visite www.HUSKYTOOLS.com. Pre-Operación ESPECIFICACIONES Modelo HD12120 Presión máx. 120 PSI Voltaje 120 V AC/12 V DC Hertz 60 (120 Voltios) Fase 1 (120 Voltios) Corriente 1.5 A (120 Voltios) CONTENIDO DEL PAQUETE ieza Descripción Cantidad Pieza Descripción Cantidad Asa de transporte Botón de apagado Interruptor de selector de Botones de desplazamiento (para energía preajustar el nivel de PSI) Manómetro digital Botón de encendido Almacenamiento de cable Adaptador de válvula Presta eléctrico (120 Voltios) -
Page 10: Operación
Operación Preparación del inflador Cómo operar el inflador □ Coloque el inflador sobre una superficie plana, cerca PRECAUCIÓN: Evite inflar demasiado. Nunca supere del artículo que será inflado. la presión recomendada, ya que los artículos sobreinflados pueden explotar y ocasionar lesiones □ Inserte el cable eléctrico (H o O) en una fuente de graves. energía apropiada (12 Voltios DC o 120 Voltios AC). Conecte el adaptador de válvula de conexión rápida □ Presione los botones de desplazamiento (J) para fijar □ de la manguera de aire (G) al artículo que está los PSI deseados (entre 3 y 120). Cuando el inflando, y empuje la palanca de cierre de la válvula manómetro digital (C) esté mostrando los PSI hacia abajo para asegurar la conexión. deseados, la lectura parpadeará tres veces al nivel Coloque el interruptor selector de energía (B) en la □ preajustado deseado y luego cambiará de nuevo al posición deseada (12 Voltios o 120 Voltios). El nivel de los PSI actuales del artículo que está inflando. manómetro digital (C) mostrará la presión actual del Presione el botón de encendido (K) para comenzar a □ artículo que está inflando. inflar el artículo. El inflador parará automáticamente cuando el artículo alcance el nivel preajustado de PSI. Desconecte el cable eléctrico (H o O) de la fuente de □ energía. NOTA: El nivel preajustado de PSI puede ser cambiado durante el inflado usando los botones de desplazamiento. Para parar el inflador durante el inflado, presione el botón de apagado. Al desconectar el cable eléctrico se limpiará el ajuste prefijado de PSI. -
Page 11: Mantenimiento
12 Voltios. Desatornille la punta del enchufe de alimentación de 12 Voltios. □ □ Retire e inspeccione el fusible existente. Si se necesita un fusible nuevo, instale un fusible nuevo del mismo tipo en el enchufe de alimentación de 12 Voltios. □ Arme de nuevo el enchufe de alimentación. □ Cuidado y limpieza Coloque el selector de energía en la posición Off u “O” y desconecte el cable. □ Limpie las piezas plásticas usando jabón suave y agua tibia. No permita que se deposite humedad o agua en ninguna de □ las piezas móviles interiores. Resolución de fallas Problema Posible causa Solución El inflador no arranca. El ajuste prefijado de la presión puede estar Fije el ajuste prefijado de la presión a una abajo de la presión real del artículo que está presión más alta. inflando. El cable eléctrico no está conectado. Conecte el cable de energía en un tomacorriente en condiciones operativas. El disyuntor de circuito se ha activado. Reajuste el disyuntor de circuito. El fusible el cable para el vehículo, de 12v ha Reemplace el fusible. explotado. HUSKYTOOLS.COM Póngase en contacto con el 1‐888‐43‐HUSKY para asistencia adicional. - Page 12 ¿Tiene preguntas, problemas, o faltan piezas? Antes de regresar a la tienda, llame a Servicio al Cliente de Husky de lunes a viernes de 8 a.m. a 6 p.m., hora local del Este 1‐888‐43‐HUSKY HUSKYTOOLS.COM Conserve este manual para uso futuro.
Need help?
Do you have a question about the HD12120 and is the answer not in the manual?
Questions and answers