Table of Contents
Advertisement
Quick Links
Advertisement
Table of Contents

Subscribe to Our Youtube Channel
Related Manuals for Baumatic BMGI255SS


Summary of Contents for Baumatic BMGI255SS
- Page 1 BMGI255SS 25 Litre Built-in microwave oven with grill...
- Page 2 O w n e r ' s M a n u a l MODEL: BMGI255SS...
-
Page 3: Table Of Contents
CONTENTS ................................2 PRECAUTIONS TO AVOID POSSIBLE EXPOSURE TO EXCESSIVE MICROWAVE ENERGY .....3 SPECIFICATIONS..............................3 IMPORTANT SAFETY INSTRUCTIONS ......................3 INSTALLATION ..............................5 RADIO INTERFERENCE .............................5 GROUNDING INSTRUCTIONS...........................5 MICROWAVE COOKING PRINCIPLES ......................3 BEFORE YOU CALL FOR SERVICE .........................3 ... -
Page 4: Precautions To Avoid Possible Exposure To Excessive Microwave Energy
Do not attempt to operate this oven with the door open since open door operation can result in harmful exposure to microwave energy. It is important not to adjust or tamper with the safety interlocks. Do not place any object between the oven front face and the door or allow dirt or cleaner residue to accumulate in the door seal. - Page 5 WARNING: Only allow children to use the oven without supervision when adequate instructions have been given so that the child is able to use the oven in a safe way and understands the hazards of improper use. Warning: When the appliance is operated in the combination mode, children should only use the oven under adult supervision due to the temperatures generated.
-
Page 6: Installation
Make sure that all the packing materials are removed from the inside of the cavity. WARNING: Check the oven for any damage, such as misaligned or bent door, damaged door seals and sealing surface, broken or loose door hinges and latches and dents inside the cavity or on the door. - Page 7 Arrange food carefully. Place thickest areas towards outside of dish. Watch cooking time. Cook for the shortest amount of time indicated and add more as needed. Food severely overcooked can smoke or ignite. Cover foods while cooking. Covers prevent spattering and help foods to cook evenly. Turn foods over once during microwaving to increase the speed of cooking of such foods as chicken and hamburgers.
-
Page 8: Utensils Guide
The ideal material for a microwave utensil is transparent to microwave energy, it allows the energy to pass through the container and heat the food. Microwave energy cannot penetrate metal, so metal utensils or dishes with metallic trim should not be used. -
Page 9: Part Names
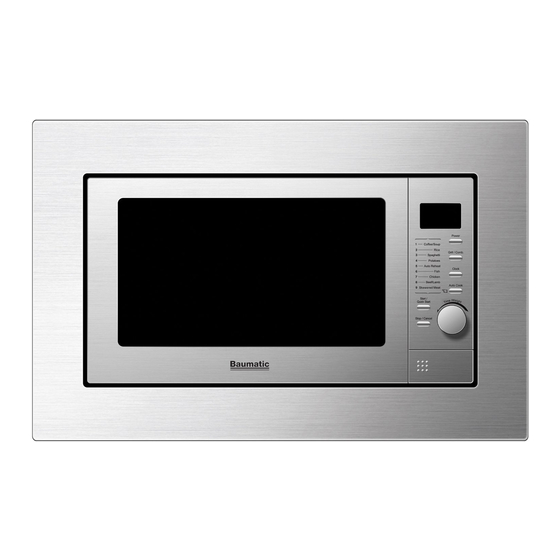
1. Door Safety Lock System 2. Oven Window 3. Roller Ring 4. Shaft 5. Door Release Button 6. Control Panel 7. Wave Guide (Please do not remove the mica plate covering the wave guide) 8. Glass Tray (turn-table) 9. Grill Heater Metal Rack... -
Page 10: Control Panel
Display Screen Cooking time, power, indicators and present time are displayed. Power Press to select microwave Power. Grill / Combi. Press to set a grill cooking program. Press to select one of two combination cooking settings. Clock Press to set the clock or to set the kitchen timer. Auto Cook Press to select an auto-menu option. -
Page 11: How To Set The Oven Controls
With the oven ready for input, touch the CLOCK button once or twice to set the digital clock in 12 or 24 hours cycle. FOR EXAMPLE: Suppose you want to set the oven clock time to 8:30. Press CLOCK button once or twice (12/24 hour clock) Turn TIME/WEIGHT to indicate the hour digit 8. -
Page 12: Grill / Comb
RILL COMB Grill/comb cooking has three cooking modes: grill, combination 1, and combination 2. You can press the Grill/comb button to select one. The longest cooking time is 95 minutes. GRILL: 100% grilling function Combination 1(COMB1): 30% of the time microwave cooking, 70% grill cooking. ... -
Page 13: Auto Defrost
EFROST The oven can defrost meat, poultry, and seafood. The time and the defrosting power are adjusted automatically once the weight is programmed. FOR EXAMPLE: Suppose you want to defrost some shrimp. Place the shrimp to be defrosted into the oven. Rotate TIME/WEIGHT dial anticlockwise to choose weight (100g~1800g). -
Page 14: Cleaning And Care
Turn off the oven and remove the power plug from the wall socket before cleaning. Keep the inside of the oven clean. When food splatters or spilled liquids adhere to oven walls, wipe with a damp cloth. Mild detergent may be used if the oven gets very dirty. Avoid the use of spray and other harsh cleaners as they may stain, streak or dull the door surface. -
Page 15: Installation Instructions
Built-in installation instructions: Cabinet Frame fastener (x2) Heat channel Microwave oven Frame kit Screw 4x10 (x4) Screw 4x8 (x4) Screw 4x16 (x4) - Page 16 Make a cut out in the cabinet as per the below dimensions: Turn the oven over and place on a cushioned surface. Then attach the feet...
- Page 17 Fasten the heat channel to the top of the microwave using the 4 screws (4x8). Fasten the frame kit to the front of the microwave using the screws provided (4x10):...
- Page 18 Attach the 2 frame fasteners to the cabinet using the screws provided (4 x 4x16) Install the microwave into the aperture, ensuring the clips on the frame kit secure to the frame fasteners. You can adjust the feet to aid in alignment.
- Page 19 Ensure that the oven is central Installation complete.
- Page 20 IMPORTANT: If your appliance appears not to be operating correctly, then you should disconnect it from your mains supply and then contact the Customer Care Department. DO NOT ATTEMPT TO REPAIR THE APPLIANCE YOURSELF. Please note that if an engineer is asked to attend whilst the product is under guarantee and finds that the problem is not the result of an appliance fault, then you may be liable for the cost of the call out charge.
- Page 23 Republic/Slovakia United Kingdom Baumatic s.r.o. Baumatic Ltd., Baumatic Buildings, ípová 665/1 6 Bennet Road, 460 01 Liberec Reading, Berkshire Czech Republic RG2 0QX United Kingdom anenská 34 811 03 Bratis lava - Staré Mesto Sales Telephone Slovakia (0118) 933 6900...
- Page 24 www.baumatic.com...
Need help?
Do you have a question about the BMGI255SS and is the answer not in the manual?
Questions and answers