Clarion NX700 Quick Start Manual
Hide thumbs
Also See for NX700:
- Owner's manual & installation manual (177 pages) ,
- Service manual (50 pages) ,
- User manual (14 pages)
Table of Contents
Advertisement
Printed in China /
Imprimé en Chine
/ Impreso en China
NX700
English
Françals
Español
PACKAGE CONTENTS /
CONTENU DE L'EMBALLAGE
/ CONTENIDO DEL PAQUETE
1 Main unit /
Unité principale
/ Unidad principal
2 Quick Start Guide (This Guide) /
Guide de démarrage rapide (Ce Guide)
/ Guía de inicio rápido (Esta Guía)
3 Installation Manual /
Manuel d'installation
/ Manual de instalación
4 CD-ROM /
CD-ROM
/ CD-ROM
Mode d'emploi et manuel d'installation
/ Manual de instrucciones y de instalación
Manuel de l'utilisateur - Clarion Mobile Map
/ Manual de usuario - Clarion Mobile Map
User Manual - Bluetooth Connectivity /
Manuel de l'utilisateur - Connectivité Bluetooth
/ Manual de usuario - Conectividad Bluetooth
5
Cordon d'alimentation
/ Cable de la fuente de alimentación
6 RCA pin cord /
Cordon RCA à broche
/ Cable de terminales RCA
7 Bag for accessories /
Sac d'accessoires
/ Bolsa de accesorios
Vis à tête plate
/ Tornillo de cabeza plana (M5 X 8 mm)................................................................................... 8
Hexagonal bolt /
Vis hexagonales
/ Perno hexagonal (M5 X 8 mm) ............................................................................................. 8
Rubber cap (for RCA pin cord) /
Capuchon en caoutchouc (pour le cordon RCA à broche)
Cubierta de caucho (para cables de terminales RCA).................................................................................................................. 14
Lead holder /
Support de câble
/ Sujetacables .............................................................................................................................. 3
Double-sided tape for fastening GPS antenna /
Ruban adhésif double face pour fixer l'antenne GPS
Cinta de doble cara para fijar la antena GPS ................................................................................................................................ 1
8 Remote control unit /
Télécommande
/ Unidad de mando a distancia
9 Battery /
Pile
/ Pilas
0 Finisher /
Cadre extérieur
/ Acabado
! Warranty card /
Carte de
garantie/ Tarjeta de garantía
@ GPS antenna /
Antenne GPS
/ Antena GPS
# Microphone /
Microphone
/ Micrófono
Functions of Buttons /
Fonctions des touches
/ Funciones de los botones
z Operation Panel /
z With the operation panel open /
Panneau de commande
/ Panel de operaciones
Lorsque le panneau de commande est ouvert
Con el panel de operaciones abierto
NX700
1
4
2
3
2
Note:
Remarque :
Be sure to read this section while referring to the front diagram.
Lisez attentivement ce chapitre en vous référant aux schémas de la façade.
1 Sensor
1 Capteur
directions).
dans toutes les directions).
2 [VOL –], [VOL +] buttons
2 Touches [VOL –], [VOL +]
3 [SRC] button
3 Touche [SRC]
the source mode.
l'écran et changer le mode source.
4 Blink LED/Reset button
4 DEL clignotante/bouton de réinitialisation
On" from the System tab
turned off.
coupez le contact du véhicule.
5 SD memory card slot
5 Logement de la carte mémoire SD
more information about the SD memory card function, see your
plus d'informations sur la fonction de carte mémoire SD, consultez
Note:
Remarque :
When you insert the SD memory card stored music files, they cannot
Si vous insérez une carte mémoire SD contenant des fichiers
be read in this unit.
musicaux, il est impossible de lire ces fichiers sur cet appareil.
Opening/closing the Operation Panel /
Ouverture/fermeture du panneau de commande
1.
En
Touch the [o (Eject)] key to display the Eject screen.
Fr
Appuyez sur le bouton [o (Ejection)] pour afficher l'écran Eject.
o (Eject)] para visualizar la pantalla Eject.
Es
2.
Touch the [Open/Close] key.
En
Appuyez sur la touche [Open/Close].
Fr
Le panneau de commande s'ouvre.
Open/Close].
Es
Se abrirá el panel de operaciones.
280-8884-00
Turning the Power On /
Encender la alimentación
QUICK START GUIDE /
GUIDE DE DÉMARRAGE
RAPIDE
/
GUÍA DE INICIO RÁPIDO
/
/
/
5
[Options] key /
Bouton [Options]
/ Tecla [Options]
Nota:
Asegúrese de leer esta sección a la vez que consulta el diagrama delantero.
1 Sensor
2 Botones [VOL –], [VOL +]
3 Botón [SRC]
cambiar al modo de fuente.
4 LED parpadeante/botón de reinicio
On » à partir de
de la ficha System de la pantalla General, parpadea al
desactivar la alimentación de ACC.
5 Ranura para tarjeta de memoria SD
tarjetas de memoria SD, consulte el Manual de usuario
Nota:
Si inserta una tarjeta de memoria SD con archivos de música, no
podrán leerse en esta unidad.be read in this unit.
/ Apertura o cierre del panel de operaciones
3.
Touch the [Open/Close
En
Appuyez sur la touche [Open/Close
Fr
Le panneau de commande se ferme.
pendant un moment.
Open/Close] cuando el panel de operaciones esté abierto.
Es
Se cerrará el panel de operaciones.
4.
En
Touch the [Back] key to return to the previous screen.
Fr
Appuyez sur la touche [Back] pour revenir à l'écran précédent.
Es
Back] para regresar a la pantalla anterior.
Selecting a Media Source /
Mise sous tension
/
En
1.
Press the [SRC] button to display the Source screen.
Fr
Appuyez sur la touche [SRC] pour afficher l'écran Source.
Démarrez le moteur. L'appareil est alimenté.
Es
Pulse el botón [SRC] para ver la pantalla Source.
Encienda el motor. Esta unidad recibe la alimentación.
En
media mode.
Fr
Le système active le mode source multimédia
correspondant.
Es
El sistema se cambia al modo de soporte de fuente
correspondiente.
Source Media Modes /
Cuando selecciona el modo de fuente deseado (por ejemplo, DVD Vídeo o iPod), aparece la siguiente pantalla.
z DVD Video mode /
Press the [SRC] button to display the Source screen.
Appuyez sur la touche [SRC] pour afficher l'écran Source.
Pulse el botón [SRC] para ver la pantalla Source.
You can change the media sources.
Vous pouvez modifier les supports sources.
Es posible cambiar las fuentes de medios.
8
Touch the [DVD] key to select the DVD Video screen.
Appuyez sur le bouton [DVD] pour sélectionner le mode
DVD vidéo.
DVD] para seleccionar el modo DVD
1 Displays status of Repeat play.
vídeo.
Affiche l'état de la lecture répétée.
Muestra el estado de la reproducción repetida.
2 Hides the control keys.
Oculta las teclas de control.
z iPod mode /
On" en el menú
Connecting a Bluetooth Mobile Phone /
En
1.
Tap TEL on the Source screen.
Fr
Pressez sur le bouton TEL sur l'écran Source.
Es
Presione el botón TEL en la pantalla Source
(Fuente).
En
Tap Setup ➜ Search Phone.
2.
Pressez sur Paramètres ➜ Rech. téléph.
Fr
Presione Configuración ➜ Buscar teléfono.
Es
3.
En
Make sure that your Bluetooth mobile
phone is in discoverable mode.
Tap
for the program to search for
nearby Bluetooth mobile phone.
Fr
mode de découverte. Pressez sur
programme commence à chercher tous les
téléphones portables Bluetooth à proximité.
Es
Presione
para buscar teléfonos móviles Bluetooth cercanos.
Sélection d'une source multimédia
2
1
6
1 Control keys for current source /
Boutons de commande de la source actuelle
Teclas de control para la fuente actual
2 Source keys /
Boutons de la source
3 Control 2-Zone /
Commande 2-Zone
Mode Source Multimédia
/ Modo De Soporte De Fuente
DVD Video mode
/ Modo DVD vídeo
1
3 Changes the screen size to suit to the playback film.
Modifie la taille de l'écran selon le type de film lu.
2
4
3
Cambia entre los ángulos si las imágenes de vídeo se han grabado en dos o más ángulos.
5 Displays the DVD menu.
4
Affiche le menu DVD.
Muestra el menú DVD.
5
6 Displays the Cursor-Key Pad panel to operate the DVD menu.
Affiche le curseur pour pouvoir utiliser le menu DVD.
Muestra el panel de teclado-cursor para utilizar las funciones del menú DVD.
7
6
7
Muestra el panel de teclado numérico para utilizar las funciones del menú DVD.
8 Displays the Options screen to specify other settings.
Affiche l'écran Options pour spécifier d'autres réglages.
Muestra la pantalla Options para especificar otros ajustes.
iPod mode
/ Modo iPod
1
2
1 Displays status of Repeat and Shuffle play.
Affiche l'état de la lecture répétée et de la lecture aléatoire.
Muestra el estado de la reproducción repetida o aleatoria.
2 Displays the corresponding list screen to select track to be played.
Affiche l'écran de liste correspondant en vue de sélectionner la plage à lire.
Muestra la pantalla de la lista correspondiente para seleccionar una pista y reproducirla
3
Cambia el modo de funcionamiento del modo de vídeo al modo de música y viceversa.
3
Connexion d'un téléphone portable Bluetooth
En
4.
Fr
Les résultats s'afficheront sur l'écran.
Es
5.
En
Fr
Pressez sur
Es
Presione
6.
When prompted, enter the passkey 1234 on your mobile phone to establish a connection.
En
Depending on the mobile phone model, you may need to select the hands-free service to complete the connection.
Fr
Vous devrez peut-être choisir, en fonction du type de téléphone portable utilisé, le service mains-libres avant de
pouvoir établir la connexion.
Es
le
completar la conexión.
En
7.
Tap
. The Phone Menu screen appears.
Fr
Pressez sur
Es
Presione
/ Selección de una fuente de soporte
3
4
2
3
4
1
1
5
6
5
4 Enter Settings screen /
Pour afficher l'écran Settings
/
/
Pantalla de introducción de ajustes (Settings)
5 Set DIMMER mode /
Pour régler le mode DIMMER
/
/ Teclas de fuente
Establecer modo DIMMER
6
/ Control de 2-Zone
/
/ Conectar a un Teléfono Móvil Bluetooth
Cuando empareje su teléfono móvil Bluetooth con este sistema
pour connecter votre appareil au téléphone portable.
para conectar su dispositivo con el teléfono móvil.
. L'écran Menu du téléphone apparaît.
. Aparecerá la pantalla del Menú del Teléfono.
1
Advertisement
Chapters
Table of Contents

Related Manuals for Clarion NX700


Summary of Contents for Clarion NX700
- Page 1 Mode d’emploi et manuel d’installation / Manual de instrucciones y de instalación Manuel de l’utilisateur - Clarion Mobile Map / Manual de usuario - Clarion Mobile Map Source Media Modes / Mode Source Multimédia / Modo De Soporte De Fuente User Manual - Bluetooth Connectivity / Manuel de l’utilisateur - Connectivité...
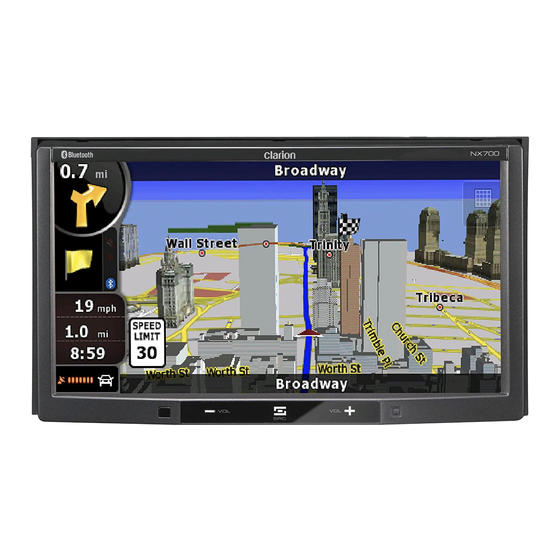
- Page 2 The map screen is the most frequently used screen of Clarion L’écran Carte est l’écran le plus fréquemment utilisé dans Clarion La pantalla Mapa es la que más se utiliza en Clarion Mobile Map. Mobile Map. It can be accessed from the Navigation menu by Mobile Map.
- Page 3 Congratulations on your purchase of a Clarion mobile electronic product. We are con¿ dent d’importantes instructions d’utilisation. La non observation de du conducteur;...
- Page 4 BEFORE STARTING/AVANT DE DEMARRER/ANTES DE COMENZAR INSTALLING THE MAIN UNIT/INSTALLTION DE L’UNITE PRINCIPALE/INSTALACIÓN DE LA UNIDAD PRINCIPAL This set is exclusively for use in cars with a Cet appareil est exclusivement destiné à Esta unidad ha sido diseñada para This unit is designed for ¿ xed installation in the dashboard. negative ground, 12 V power supply.
- Page 5 Owner’s manual & Installation manual NX700 2-DIN MEMORY NAVIGATION & DVD MULTIMEDIA STATION WITH 7-inch TOUCH PANEL CONTROL...
- Page 6 Once you’re registered, we can keep you informed of important product information. Register at www.clarion.com - it’s easy to keep your Clarion product up to date. INFORMATIONS DE L’ENREGISTREMENT DE PRODUITS CLARION Pour les Étas Unis et le Canada seulement www.clarion.com...
-
Page 7: Table Of Contents
Thank you for purchasing the Clarion NX700. • Please read this owner’s manual thoroughly before operating this equipment. • After reading this manual, be sure to keep it handy for future reference. • Check the contents of the enclosed warranty card and keep it carefully with this manual. -
Page 8: Features
Sirius Tuner XM Mini-Tuner Rear Vision (via Translator Adapter Camera sold separately) Rear Monitor (CC2011/ CAA185) 4-Channel Amplifier VTR etc. iPod/iPhone NX700 USB Memory Bluetooth Telephone Note: The items listed outside of the frames are the commercial products generally sold. NX700... -
Page 9: Playable Discs
This player can play CD-R/RW discs previously depending on the DVD video disc. Refer to the recorded in Audio CD format or format with MP3/ instructions provided with the DVD video. • Some disc functions may operate differently from WMA/AAC/DivX files. described in this manual. NX700... -
Page 10: Precautions
If this equipment does cause harmful interference to radio or television reception, which can be determined by turning the equipment off and on, the user is encouraged to consult the dealer or an experienced radio/TV technician for help. NX700... -
Page 11: Operation Panel/Generalities
• Do not insert objects or poke in the space between the operation panel and the main unit when the panel is tilted. • Do not place anything on the display when the panel is tilted. NX700... -
Page 12: About The Registered Marks, Etc
• The Bluetooth word mark and logos are owned card slot by the Bluetooth SIG, Inc. and any use of such marks by Clarion Co., Ltd. is under license. Other trademarks and trade names are those of their respective owners. - Page 13 • SD memory card function is available in the Navi mode. For more information about the SD memory card function, see your User Manual (for the Navi mode). Note: • When you insert the SD memory card stored music files, they cannot be read in this unit. NX700...
-
Page 14: Outline Of Button And Touchkey Operation
Outline of Button and Touchkey Operation Turning the power on NX700 Engine ON position System check The CeNET format utilized on this unit is provided with a system check function. When the system check function is performed under the following conditions, the power is automatically turned off. - Page 15 Tuner mode operation (Source screen) Switches the radio band. Selects Home/Travel modes. Seek tuning Manual tuning Preset ch. • Select desired station after selecting radio band. NX700...
- Page 16 (Options screen) when automobile moving. (DVD top menu) *2 (Setup screen) Note: *2 If you do not touch the screen for about 7 seconds, all the keys on the screen will disappear. Touch the screen surface to redisplay them. NX700...
- Page 17 Adjusting the General settings (Source or Mode screen) (Settings screen) (General screen) (Display tab screen) (System tab screen) NX700...
- Page 18 Adjusting the Audio settings (Source or Mode screen) (Settings screen) (Others tab screen) (Audio screen) (Beat EQ tab screen) (BAL/FAD tab screen) NX700...
-
Page 19: Remote Control Unit
Unit Buttons [RETURN] [SOURCE] You can use the remote control unit to control the [BAND] NX700. When the 2-Zone function is ON, the [–], [+] controls work upon the Sub zone only. [R], [F] Note: • The steering wheel remote control operations work upon the Main zone even when the 2-Zone function is ON. -
Page 20: Basic Operations
• Keep pressing to perform fast backward or fast • The displayed clock data is based on the CT forward playback. (in DVD and USB modes) (clock time) data in the Navigation system. • When the CT data cannot be received, “--:--” appears in the display. NX700... -
Page 21: Adjusting The Volume
• Do not move the operation panel by hand. Opening/closing the operation panel 1. Touch the [o (Eject)] key to display the following Eject screen: NX700... -
Page 22: Turning The Audio Off
Returning the operation panel to the original angle 1. Touch and hold the [Tilt] key. The operation panel will move and stop at 30q. 2. Touch and hold the [Tilt] key again. The operation panel will move and stop at 0q. NX700... -
Page 23: Turning The Monitor Off
• When there seems to be something wrong with roughness from the edge of the disc. reading discs, please consult your dealer or an Ball-point pen authorized Clarion service center. Roughness NX700... -
Page 24: Connecting/Disconnecting An Usb Media Device
(page 30) or “DivX Operations” (page 33). • For detailed information on the playable iPod models, see our home page: www.clarion.com Note: • For the other limitations, see “iPod Operations” • Never insert foreign objects into the disc insertion (page 39). - Page 25 The system is switched to the USB Memory mode. See “USB Memory Operations” (page 42). Note: • Never insert foreign objects into the USB connector. • Always insert the USB media device fully into the connector. Incomplete connections may cause the device not to be recognized. NX700...
-
Page 26: Selecting A Media Source
• You cannot operate the 2-Zone function during the interrupt of the navigation system. • When the same source is assigned for Main and Sub zones, operations in a zone are also applied for another zone. NX700... -
Page 27: Source Operations
Turning off the 2-Zone function 1. Press the [SRC] button to display the Source screen. 2. Touch the [2-Zone] tab to display the 2-Zone tab screen. 3. Touch and hold the [2-Zone Off] key for more than 1 second. NX700... - Page 28 2. Touch the [Band] key to select the band. 3. Touch the corresponding Preset key to recall the stored station. • Touching and holding the desired Preset key for more than 2 seconds will store the current station to the preset memory. NX700...
-
Page 29: Dvd Video Operations
• The factory default setting is “Wide”. Video mode), and starts playback from the previous position. 4-1. Touch the [Wide], [PS], or [LB] key of the TV Display item to change the screen size to “Wide”, “Pan Scan” or “Letter Box”. NX700... - Page 30 [ENT] key. to turn the Angle function ON or OFF. Note: • When a disc with view restrictions is inserted, you will be prompted to input a password. The disc will not be viewable until the correct password is entered. NX700...
- Page 31 • The factory default setting of the ●When the DVD menu is displayed password is “0000”. For general DVD Video discs, the DVD menu may appear. After the DVD menu is displayed, select an item in the operations described as follows. NX700...
- Page 32 The image is expanded so that the left and right edges of the image fit to the screen. The top and bottom areas of the image may be cut off. 3. Touch the [Hide] key to return to the playback screen. NX700...
- Page 33 • Touching the [} (Chapter)] key starts playback from the beginning of the current chapter. When touching this key again within about 4 seconds, playback starts from the beginning of the previous chapter. NX700...
- Page 34 • To turn off subtitles, select “OFF”. • Depending on the disc, switching may be completely impossible or impossible on some scenes. • It may take time to switch among subtitles. 4. Touch the [Back] key to return to the previous screen. NX700...
-
Page 35: Audio Cd Operations
The system changes to the DVD mode (CDDA mode), and starts playback from the previous position. ❏ Operating an audio CD Listening to an audio CD After disc loading, the play mode is automatically engaged. • When playback is not started, touch the [p] key. NX700... -
Page 36: Mp3/Wma/Aac Operations
• You can also specify this function by touching the [Random] key on the CDDA mode screen. 3. To cancel the play, touch the [Track] key of the function to cancel. 4. Touch the [Back] key to return to the previous screen. NX700... - Page 37 • Set the Sampling Frequency to 44.1 or 48 kHz. • Set the Bit Rate to within ranges from 16 to 320 kbps (VBR). • Add a file extension “.M4A” or “.m4a” using single byte characters. NX700...
- Page 38 4. Touch the [{] or [}] key to scroll the list, and After disc loading, the play mode is automatically touch the desired Track key. engaged. The corresponding track is started playback. • When playback is not started, touch the [p] 5. Touch the [Back] key. key. NX700...
-
Page 39: Divx Operations
• Files other than DivX format (such as the Xvid files) cannot be played. In addition, some files may not be played because of the encoding format. When a file cannot be played, the next file is played instead. NX700... - Page 40 [Yes] key to play the movie. started. • For your safety, the driver should not watch the movie or operate the controls while driving. Please note that watching and operating the movie while driving are prohibited by law in some countries. NX700...
- Page 41 The image is expanded so that the left and right edges of the image fit to the screen. The top and bottom areas of the image may be cut off. 3. Touch the [Hide] key to return to the playback screen. NX700...
-
Page 42: Source Operations (Accessories)
DVD player. Note: • If the [Sirius] or [XM] key is not displayed, check the connection with the tuner. • The audio output is muted and other button operations are not accepted during channel selection. NX700... - Page 43 2. To return to the previous screen, touch the [Back] key. ●XM 1. Touch the [Direct] key to display the Key Pad screen. 2. Touch the [0] key, then touch the [ENT] key. Receiving the Channel “0” will display your Radio ID (8-digit number). NX700...
- Page 44 • Touching the [Back] key within 1 second after selecting the category cancels the category selection and returns to the channel previously received. • If you do not touch the screen for 7 seconds, the display will return to the previous screen. NX700...
-
Page 45: Ipod Operations
“iPod/iPhone”. • This system will not operate or may operate improperly with unsupported versions. • For detailed information on the playable iPod models, see our home page: www.clarion.com ❏ Notes on using Apple iPod [Options] key [Music/Videos] key •... - Page 46 3. Touch the [Back] key to return to the previous screen. [Playlists]: The list of all the Video Playlists stored in the iPod is displayed. [Movies]: The list of all the Movies stored in the iPod is displayed. NX700...
- Page 47 The list of all the Tracks stored in the iPod is following character). displayed. [Genres]: You can narrow the Artists to be listed by specifying the Genre name. [Composers]: You can narrow the Albums to be listed by specifying the Composer name. NX700...
-
Page 48: Usb Memory Operations
For MP3 files: • MPEG1 Layer3: 32, 44.1, or 48 kHz • MPEG2 Layer3: 16, 22.05, or 24 kHz • MPEG2.5 Layer3: 8, 11.025, or 12 kHz For WMA files: 8 to 48 kHz For AAC files: 8 to 48 kHz NX700... -
Page 49: Navigation System Operations
USB mode (USB Memory mode), and start Navi operations playback after a while. Changes between the Navi display and the See also “Connecting/Disconnecting an USB Audio/Visual (hereinafter, referred as “AV”) Media Device” (page 18). display. NX700... -
Page 50: Bluetooth Telephone Operations (Tel Mode)
• Touch the [ ] key on the Navigation Menu to enter the Tel mode. • Touch the [TEL] key on the Source screen to enter the Tel mode. Note: • For the details, refer to the supplied Bluetooth telephone operation manual. NX700... -
Page 51: System Settings
• In the following sections, only the details regarding adjustments are described, 3. Touch the [Hide] key to return to the video procedures to select items are skipped. screen. 4. When the adjustment completes, touch the [Back] key to return to the previous screen. NX700... - Page 52 Emphasizes the sound from the left speakers. 3-2. Touch the [Custom] key. []]: 3-3. Perform the following settings to adjust the Emphasizes the sound from the right sound tone. speakers. Adjustment range: left 12 to right 12 • The factory default setting is “0”. NX700...
- Page 53 3-1. Touch the [Others] key to display the Others tab screen. 3-2. Touch the [}] key to display the next screen. 3-3. Touch the [On] or [Off] key of the Magna Bass EX item to turn the Magna Bass Extend function on or off. NX700...
-
Page 54: General Settings
• When you set to “Auto”, the video image may be disturbed temporarily depending on the input video signal. 3-1. Touch the [Display] key to display the Display tab screen. 3-2. Touch the [Auto], [NTSC], or [PAL] key of the AUX input item to set the VTR system. NX700... - Page 55 3-1. Touch the [System] key to display the System tab screen. 3-2. Confirm the displayed information of the DivX Registration Code and DivX URL items. Note: • The DivX registration code is not displayed when a disc is set in the DVD player. NX700...
- Page 56 Erasing the Personal Code (CATS) 3-1. Touch the [System] key to display the “CATS” is the acronym of “Clarion Anti-Theft System tab screen. System”. When you set a PIN code (called as 3-2. Touch the [}] key to display the next “Personal Code”), a theft is prevented by...
-
Page 57: Adjusting The Monitor
[–]: Press to make contrast lower. [Hue]: Adjust the tone of color (red or green is emphasized). [+]: Press to increase green. [–]: Press to increase red. 4. When the adjustment completes, touch the [Back] key to return to the previous screen. NX700... -
Page 58: Troubleshooting
8. TROUBLESHOOTING If you have a problem with this system, check the following items to resolve it. See also our homepage (www.clarion.com) for additional information. General Problem Cause Measure Power does not turn Fuse is blown. Replace with a fuse of the same amperage. If the on. - Page 59 ISO file system for CD-R/RW, or UDF for DVD±R/ The color of the The color is not adjusted Check that the Bright, Color, Contrast, and Hue display is light or a adequately. are adjusted properly. shade of color is not good. NX700...
-
Page 60: Error Displays
Eject the disc, and replace correct region code disc. WMA files protected by Perform the operation such as skipping a file. DRM are played. (Repeat and random playback mode may be canceled.) Not Support Files not supported by this unit are played. NX700... - Page 61 If an error display other than the ones described above appears, press the Reset button. If the problem persists, turn off the power and consult your store of purchase. • The frequencies of radio stations, setting data, etc. stored in memory are not cleared even when the Reset button is pressed. NX700...
-
Page 62: Specifications
• Specifications and design are subject to change without notice for further improvement. Power Output: 20 W x 4 Channels RMS [4 : @ 14.4 V d 1 % THD+N] Signal to Noise Ratio: 84 dBA (reference: 1 W into 4 :) NX700... -
Page 63: Safety Precautions
• Disconnect the negative terminal of the back, left and right of the vehicle. battery before connecting wires, If it comes in contact with pedestrians, it otherwise an electric shock, injury by may cause an accident. short circuit may occur. Car battery NX700... -
Page 64: Installation Notes
• Owner’s manual & Installation Manual • Fasten the bolts securely when installing • User Manual - Clarion Mobile Map the unit. If the bolts are loose an accident or • User Manual - Bluetooth Connectivity malfunction could occur. - Page 65 Chassis Chassis serviceable parts inside. If you drop anything into the unit during installation, consult your Damage dealer or an authorized Clarion service center. 4. CAUTIONS ON INSTALLATION Max. 3 mm (M4 screw)/ Max. 8 mm (M5 screw) Figure 4 •...
- Page 66 (M5 u 8) (1 pair for the left and right sides) (attached to the main unit) Figure 6 Note: *1 Position the face panel with its wide edge at the bottom. Fit the edge into the groove of the main unit. NX700...
- Page 67 0.5 to 1.5 mm so the unit can be inserted smoothly. Typical Mounting Brackets Example 1 Example 2 Example 3 Affix the screws to the ● marks. Vehicles other than NISSAN and TOYOTA In some cases the center panel may require modification. (Trimming, filing, etc.) NX700...
- Page 68 CeNET (Figure 8) terminal Slide cap Fuse (15A FUSE) CeNET cable Fuse holder Figure 9 Figure 8 Note: • There are various types of fuse holder. Do not let the battery side touch other metal parts. NX700...
-
Page 69: Installing The Gps Antenna
Stick it surely on a flat plane of the passenger-side dashboard where GPS signal interruption is minimized. • Wire the GPS antenna cord. Fasten the cord using the cord holders. GPS antenna Cord holder (Shows an example in case of the left-hand traffic.) NX700... - Page 70 Microphone Visor Clip Type A Visor Clip Type B MIC Holder Attach the microphone with the MIC holder or visor clip • External microphone has to be connected at the back of the main unit during installation if necessary. NX700...
- Page 71 Left White Black Yellow Wireless Headphone Rear Vision Camera terminal Yellow Black AUX video input terminal VTR etc. Yellow Black iPod video input terminal Connect to the AUX audio/ video input terminal. Right AUX audio input terminal Left White NX700...
- Page 72 Brown No connection Green Rear left + Green/Black Rear left - Blue/White Amplifier turn-on cord Orange/White Illumination Blue Auto antenna Grass-green Parking brake cord Purple/white Reverse gear cord See next page for how to connect the parking brake cord. NX700...
- Page 73 • The power supply box CAA185 (sold separately) is required for connection of the main unit and the Rear Vision Camera. ●Sirius Tuner and XM Mini-Tuner Connect these tuners to the CeNET connector via Translator adapter sold separately. For detailed information, refer to the instruction manual of these tuners. NX700...
- Page 74 Clarion Co., Ltd. All Rights Reserved.Copyright © 2010: Clarion Co., Ltd. QY-5014B 280-8883-00 2010/1...
- Page 75 User Manual Bluetooth Connectivity NX700...
- Page 76 Bluetooth Connectivity Bluetooth Profiles This system incorporates Bluetooth wireless communications technology. Devices with Bluetooth capabilities can exchange information over a distance of about 10 meters (30 feet) without requiring a physical connection. This system supports Bluetooth profiles as below: Hands-free Profile (HFP) NOTE: Not all Bluetooth devices support all profiles.
- Page 77 3. Make sure that your Bluetooth mobile phone is in discoverable mode. Tap for the program to search for nearby Bluetooth mobile phones. 4. The screen shows the search result. Tap the mobile phone you want to connect. Pair 5. Tap to connect this system with the mobile phone.
- Page 78 Connecting from a Mobile Phone for the First Time You will be prompted when a mobile phone wants to connect to the system. Accept 1. Tap on the system to proceed. Pair 2. Enter the same passkey used on the mobile phone and tap on the system to establish a connection.
- Page 79 Connecting a Paired Mobile Phone Connect Tap the button on the Phone Menu to connect a paired phone. Phone Operations Placing a Call Phonebook After pairing with a mobile phone, you can place a call by using the Call Log Phone Dialer button on the Phone Menu.
-
Page 80: Phone Book
Phone Book Phonebook 1. Tap button on the Phone Menu screen 2. If the contact list does not display, tap to download the contact list from the mobile phone. NOTE: Not all mobile phone models support the downloading of such data. 3. - Page 81 NOTE: If you need to input other numbers during a call, such as an extension number, tap Phone Dialer on the Phone Menu to open the keypad and tap the digits. Call Log Call Log 1. Tap on the Phone Menu. 2.
- Page 82 NOTE: If you need to input other numbers during a call, such as an extension number, tap Phone Dialer on the Phone Menu to open the keypad and tap the digits. Redialing a Recently Dialed Number To make a call using a recently dialed number: 1.
-
Page 83: Receiving A Call
Receiving a Call After pairing with a mobile phone, this system will ring and display the incoming call screen when there is an incoming call. To receive the call, tap . To reject the call, tap Operations during a Call During a phone call: If you need to browse the phonebook or the message, tap and then tap... - Page 84 2. If the messages do not display, tap to download the messages from the mobile phone. NOTE: Not all mobile phone models support the downloading of such data. 3. Select a message to view the full message. The screen displays the sender, date and the message. Depending on your mobile phone model, not all information will be displayed.
- Page 85 2. Select the device you want to connect. 3. Tap NOTE: The shortcuts will be cleared if you shut down the system. You can delete a selected shortcut by tapping Turning On/Off Bluetooth Radio Whenever you start the Bluetooth, the Bluetooth radio is turned on. Setup To turn off Bluetooth radio, tap the button on the Phone Menu and tap...
- Page 86 MIC Gain You can adjust the microphone volume for hands-free calling. Setup MIC Gain. Tap the button on the Phone Menu and tap Æ to increase the microphone volume; tap to decrease the microphone volume. Info To view the application version, address and name of the Bluetooth of the system, Setup Info.
-
Page 87: Regulatory Information
Regulatory Information Bluetooth QD ID B016101 Revision: R00 (11/2009) Trademarks The Bluetooth word mark and logo are owned by the Bluetooth SIG, Inc. All other brand and product names are trademarks or registered trademarks of their respective companies. Note The information in this manual is subject to change without notice. - Page 88 User Manual Clarion Mobile Map NX700...
- Page 89 The product and the information contained herein is subject to change without prior notification. This manual may not, in whole or in part, be reproduced or transmitted in any form either electronically or mechanically, including photocopying and recording, without the express written consent of Clarion. © 2009 – Clarion.
- Page 90 Thank you for choosing the Clarion NX700 as your in-car navigator. This document is the detailed description of the software. You can easily discover Clarion Mobile Map while you are using it; however, we still recommend that you read this manual to understand the screens and the features of Clarion Mobile Map.
- Page 91 Table of contents 1 Warnings and Safety information .................. 7 2 Getting started with Clarion Mobile Map ..............8 2.1 Simple and Advanced modes ....................10 2.2 Buttons and other controls on the screen ................11 2.2.1 Using keyboards..........................12 2.3 Using the map ......................... 13 2.3.1 Checking the details of a map location ..................13...
- Page 92 3.1.2.4 Selecting an intersection as the destination .................... 36 3.1.2.5 Selecting a city center as the destination ....................37 3.1.2.6 Entering an address with a ZIP code ...................... 38 3.1.2.7 Tips on entering addresses quickly ......................39 3.1.3 Selecting the destination from your Favorites ................40 3.1.4 Selecting the destination from the POIs ..................40 3.1.5 Selecting the destination with saved POI search criteria ...............
- Page 93 4.1.9 GPS Data screen ..........................67 4.2 Find menu ..........................68 4.3 Route menu ..........................69 4.4 Manage menu ......................... 70 4.4.1 Manage Saved Routes ........................70 4.4.2 Manage History ..........................71 4.4.3 Manage Track Logs ........................71 4.4.4 Manage Favorites ...........................72 4.4.5 Manage POIs ..........................
-
Page 94: Warnings And Safety Information
Clarion Mobile Map has a Safety Mode: if you turn on Safety Mode, you cannot change anything in Clarion Mobile Map while the vehicle is moving at a speed of 10 km/h (6 mph) or higher. Unless only passengers operate Clarion Mobile Map, we strongly encourage you to turn on Safety Mode. -
Page 95: Getting Started With Clarion Mobile Map
2 Getting started with Clarion Mobile Map Clarion Mobile Map is optimized for in-car use. You can use it easily by tapping the screen buttons and the map with your fingertips. Clarion Mobile Map can plan routes throughout the whole installed map set; you do not need to change maps or switch to a poorly detailed general map to navigate between map segments or countries. - Page 96 The Navigation menu in Advanced mode: The typical way of using Clarion Mobile Map is to select a destination, and start navigating. You can select your destination in the following ways (not all of them are available in Simple mode): Use the selected location on the map (the Cursor) (page 31).
-
Page 97: Simple And Advanced Modes
2.1 Simple and Advanced modes The two operating modes of Clarion Mobile Map mainly differ in the menu structure and the number of available features. The controls and screen layouts are the same. Simple mode: you have easy access to the most important navigation functions and the basic settings only. -
Page 98: Buttons And Other Controls On The Screen
When you are using Clarion Mobile Map, you usually tap buttons on the touch screen. You only need to confirm selections or changes in Clarion Mobile Map if the application needs to restart, it needs to perform a major reconfiguration, or you are about to lose some of your data or settings. -
Page 99: Using Keyboards
2.2.1 Using keyboards You only need to enter letters or numbers in Clarion Mobile Map when you cannot avoid it. You can type with your fingertips on the full-screen keyboards and you can switch between various keyboard layouts, for example ABC, QWERTY, or numerical. -
Page 100: Using The Map
2.3 Using the map The map screen is the most frequently used screen of Clarion Mobile Map. It can be accessed from the Navigation menu by tapping For further information about the map screen, see page 51. 2.3.1 Checking the details of a map location If you are interested in the details of your current position during navigation: Check the bottom line of the map. -
Page 101: Manipulating The Map
Zooming in and out Changes how much of the map is displayed on the screen. Clarion Mobile Map uses high-quality vector maps that let you see the map at various zoom levels, always with optimized content. It always displays street names and other text with the same font size, never upside-down, and you only see the streets and objects that you need. - Page 102 Map zooms in and raises the view angle to let you easily recognize your maneuver at the next junction. If the next turn is at a distance, Clarion Mobile Map zooms out and lowers the view angle to show you the road in front of you.
-
Page 103: Lane Information And Signposts
When navigating on multilane roads, it is important to take the appropriate lane in order to follow the recommended route. If lane information is available in the map data, Clarion Mobile Map displays the lanes and their directions using small arrows either at the bottom or at the top of the map (the position of these arrows can be modified in Map Screen settings). -
Page 104: Status Information And Hidden Controls On The Map
Some dots need to turn green to be able to navigate. If the icon is a static GPS position and an active Tap this area to make Clarion picture, route route available, Mobile recalculate calculation is needed... - Page 105 The following area appears next to the above described rounded area. When tapping this area, the result depends on the information currently shown. Icon Information Details Action There is no valid GPS Tap this area to open the GPS If there is no valid GPS position Data screen to check the signal position,...
-
Page 106: More Information
The Bluetooth radio is turned on, but no telephone is connected. There is an error in the Bluetooth connection. Clarion Mobile Map is connected to a telephone as a handsfree set via Bluetooth. A phone call is in progress over the Bluetooth connection. -
Page 107: Using The Cursor (The Selected Map Location)
Estimated arrival time at the destination Estimated arrival time at the next via point Distance information There are distance type values that can be shown: Distance remaining to reach the destination Distance remaining to reach the next via point Current altitude The next area is a combined status indicator field. -
Page 108: Clarion Mobile Map Concepts
While driving without an active route in Clarion Mobile Map: Smart Zoom will zoom in if you drive slowly and zoom out when you drive at high speed. -
Page 109: Position Markers
Settings window. Modify the zoom limits of Smart Zoom if necessary. 2.4.2 Position markers 2.4.2.1 Current GPS position and Lock-on-Road When your GPS position is available, Clarion Mobile Map marks your current position with the icon on the map. icon may not show your exact GPS position and heading. If roads are near, it is aligned to the nearest road to suppress GPS position errors, and the direction of the icon is aligned to the direction of the road. -
Page 110: Selected Location (Cursor)
If you select a location in the Find menu, or you tap the map, the Cursor appears at the selected point on the map. Clarion Mobile Map displays the Cursor with a radiating red dot ( ) to make it visible at all zoom levels, even when it is in the background of a 3D map view. -
Page 111: Daytime And Night Color Profiles
The night color profiles use dark colors for large objects to keep the average brightness of the screen low. Clarion Mobile Map offers different daytime and night color profiles. It can also switch automatically between the daytime and the night schemes depending on the illumination setting. -
Page 112: Itinerary
Ferries Cross-border Planning Carpool (appears only when used in the USA) Clarion Mobile Map automatically recalculates the route if you deviate from the proposed itinerary. For further information about Route Planning options, see page 79. 2.4.6 Itinerary The Itinerary is the list of the route events, that is, the driving instructions. -
Page 113: Track Logs
You can use it, for example, to see which bridge Clarion Mobile Map planned for the route; if you do not want to take that bridge, you can avoid it. -
Page 114: Poi (Points Of Interest)
2.4.9 POI (Points of Interest) A point of interest (POI) is a location that someone might find useful or interesting. Clarion Mobile Map is delivered with thousands of POIs and you can also create your own POIs in the application. -
Page 115: Camera Types
Clarion Mobile Map warns you when you approach these speed cameras in the measured direction. If your speed exceeds the speed limit near the speed camera, Clarion Mobile Map plays a special warning sound. Mobile Some speed cameras are operated from vehicles. -
Page 116: Camera Directions
The same directions apply to red light cameras. Clarion Mobile Map warns you only if you drive in a measured or possibly measured direction. The measured direction of the camera appears with the following symbols:... -
Page 117: Speed Limit Warning
(ask your local dealer) or may not be fully correct for all roads on the map. You can configure Clarion Mobile Map to warn you if you exceed the current limit. Tap the following buttons: When you exceed the speed limit, a voice message is played using the selected voice guidance profile. -
Page 118: Navigating With Clarion Mobile Map
(available in Advanced mode only) 3.1 Selecting the destination of a route Clarion Mobile Map offers you several ways of choosing your destination and via points (intermediate destinations): Use the selected location on the map (the Cursor) (page 31). -
Page 119: Entering An Address Or Part Of An Address
(Advanced mode). By default, Clarion Mobile Map proposes the country, state and city where you are. If needed, tap the button with the name of the country, and select a different one from the list. If you select a new... - Page 120 To enter a new city: Tap the button with the name of the city, or if you have changed the country/state, Start entering the city name on the keyboard. Get to the list of search results: After entering a couple of characters, the names that match the string appear in a list.
-
Page 121: Entering An Address If House Numbering Is Restarted
(Simple mode), or (Advanced mode). By default, Clarion Mobile Map proposes the country/state and city where you are. If needed, tap the button with the name of the country/state, and select a different one from the list. If needed, change the city: To select the city from the list of recently used ones, tap the button. -
Page 122: Entering An Address Without Knowing The District/Suburb
(Simple mode), or (Advanced mode). By default, Clarion Mobile Map proposes the country/state and city where you are. If needed, tap the button with the name of the country/state, and select a different one from the list. If needed, change the city: To select the city from the list of recently used ones, tap the button. -
Page 123: Selecting An Intersection As The Destination
(Simple mode), or (Advanced mode). By default, Clarion Mobile Map proposes the country/state and city where you are. If needed, tap the button with the name of the country/state, and select a different one from the list. If needed, change the city: To select the city from the list of recently used ones, tap the button. -
Page 124: Selecting A City Center As The Destination
(Simple mode), or (Advanced mode). By default, Clarion Mobile Map proposes the country/state and city where you are. If needed, tap the button with the name of the country/state, and select a different one from the list. If needed, change the city: To select the city from the list of recently used ones, tap the button. -
Page 125: Entering An Address With A Zip Code
(Simple mode), or (Advanced mode). By default, Clarion Mobile Map proposes the country/state and city where you are. If needed, tap the button with the name of the country/state, and select a different one from the list. Tap the button with the name of the city, and enter the ZIP code: Start entering the ZIP code on the keyboard. -
Page 126: Tips On Entering Addresses Quickly
3.1.2.7 Tips on entering addresses quickly When you are entering the name of a city or a street, Clarion Mobile Map only displays those characters that appear in possible search results. The other characters are grayed out. -
Page 127: Selecting The Destination From Your Favorites
3.1.4 Selecting the destination from the POIs You can select your destination from the POIs included with Clarion Mobile Map or from the ones you have previously created. The procedure is explained starting from the Navigation menu. -
Page 128: Selecting The Destination With Saved Poi Search Criteria
3.1.5 Selecting the destination with saved POI search criteria POI search criteria can be saved in the POI section of the Manage menu, but Clarion Mobile Map is already shipped with some saved criteria you can use instantly when searching for a POI. -
Page 129: Selecting The Destination From The History
The map appears with the selected point in the middle. Tap (Simple mode) or (Advanced mode) from the Cursor menu. The route is then automatically calculated, and you can start navigating. 3.1.6 Selecting the destination from the History The destinations that you have set earlier appear in the History. The procedure is explained starting from the Navigation menu. -
Page 130: Creating A Multi-Point Route (Inserting A Via Point)
The map appears with the selected point in the middle. Tap (Simple mode) or (Advanced mode) from the Cursor menu. The route is then automatically calculated, and you can start navigating. 3.2 Creating a multi-point route (inserting a via point) Multi-point routes are created from simple routes, so a route must be active first. -
Page 131: Creating A Multi-Point Route (Appending A New Destination)
3.3 Creating a multi-point route (appending a new destination) destination Multi-point routes are created from simple routes, so a route must be active first. One of the ways of expanding the route is to add a new destination. The previous destination becomes the last via point of the route. -
Page 132: Viewing The Entire Route On The Map (Fit-To-Screen)
Tap this button to remove the selected point from the route. As soon as you leave this screen, the route is recalculated automatically, and you can start navigating right away. 3.5 Viewing the entire route on the map (Fit-to-Screen) The map can be moved and scaled to show the whole line of the route. You do not need to manipulate the map manually. -
Page 133: Enabling Safety Mode
Tap the following buttons: 3.8 Pausing the active route You do not need to pause the active route: when you start driving again, Clarion Mobile Map restarts the voice instructions from your position. 3.9 Deleting the next via point from the route... -
Page 134: Deleting The Active Route
Tap it to cancel the whole route. 3.11 Using Track Logs Clarion Mobile Map can record the track (how your GPS position changed) that you drive. Tip! You do not need to select a destination and create a route for this; you can also record your driving path while cruising. - Page 135 You return to the map and you can continue driving. Repeat the above steps, then tap later to stop the recording. Clarion Mobile Map labels the Track Log with a time stamp. (As an alternative, you can tap the button in the Quick menu to start, and later to stop the Track Log recording.)
-
Page 136: Saving The Active Route
Enter a name for the saved route, and then tap When you save a route, Clarion Mobile Map not only saves the route points but the whole itinerary: If you updated your map since you first saved the route, Clarion Mobile Map recognizes the change, and recalculates the driving instructions according to the latest available map information. -
Page 137: Reference Guide (Advanced Mode)
4 Reference Guide (Advanced mode) On the following pages you will find the description of the different menu screens of Clarion Mobile Map in Advanced mode. In Simple mode, these functions work the same way, but only a few of them are available. -
Page 138: Map Screen
4.1 Map screen Clarion Mobile Map is primarily intended for land navigation. That is why maps in Clarion Mobile Map look similar to paper road maps. However, Clarion Mobile Map provides much more than regular paper maps: you can customize the look and the content of the map. - Page 139 2D rotated 3D rotated Opens the Navigation menu Menu Detour Opens the Detour screen, offering two ways of modifying the route: the list of Saved Search Criteria a button to avoid parts of the route Position menu (appears when Opens the Position menu navigating a route) Cursor menu (appears when Opens the Cursor menu...
- Page 140 Return position Tap this button to move the map back (appears when GPS position is to the current GPS position. If the map available and you have moved been rotated, automatic the map) rotation is also re-enabled. Enable Smart Zoom (replaces Tap this button once to enable Smart the previous button if there is Zoom.
-
Page 141: Icons On The Map
Devices with a built-in GPS receiver are permanently connected. On such devices, the icon does not appear in normal circumstances. Clarion Mobile Map is connected to the GPS receiver, but the signal is too weak and the receiver cannot determine the GPS position. -
Page 142: Status Indicator Strip
The Bluetooth radio is turned on, but no telephone is connected. There is an error in the Bluetooth connection. Clarion Mobile Map is connected to a telephone as a handsfree set via Bluetooth. A phone call is in progress over the Bluetooth connection. -
Page 143: Next Two Route Events (Turn Preview Fields)
4.1.1.4 Next two route events (Turn Preview fields) There are two fields reserved on the Map screen to display the next two maneuvers (route events that are listed in the Itinerary). Both the type of the event (turn, traffic circle, exiting freeway, etc.) and its distance from the current GPS position is displayed. -
Page 144: Objects On The Map
4.1.2.1 Streets and roads Clarion Mobile Map shows the streets in a way that is similar to how the paper road maps show them. Their width and colors correspond to their importance: you can easily tell a freeway from a small street. - Page 145 Normally if GPS position is available, it is the start point of the route. If there is no valid GPS position, Clarion Mobile Map uses the last known GPS position as the start point. When you are using a saved route, Clarion Mobile Map asks you if you want to use your GPS position or the first point in the saved route as the start point.
-
Page 146: Detour Menu
4.1.3 Detour menu This screen contains quick detour possibilities during navigation. It can be opened directly from the Map screen by tapping You have the following options: On the main part of the screen you can see the first page of Saved Search Criteria. Select any of the criteria to quickly receive the list of nearest matching POIs, and instantly plan a new route to the desired one, or insert it as a via point in your active route. - Page 147 Creates a new route with the Cursor as the destination. The previous route (if exists) is deleted. The location of the Cursor is added to the list of frequently visited destinations, the so called Favorites. You can give a name for the Favorite. Opens a new screen with the address and coordinate of the Cursor, and the list of nearby POIs.
-
Page 148: Position Menu
Recalculation is re-enabled. The Cursor is saved as a user POI. Select the POI group and give a name for the POI, then select a suitable icon, enter a phone number, and additional information if you like. The Cursor is saved as the location of a Road Safety Camera (speed camera or red light camera). -
Page 149: Route Information Screen
4.1.6 Route Information screen The Route Information screen has all the data and some of the functions you need while you navigate. There are two ways to open this screen: It can be opened directly from the Map screen by tapping the Turn Preview field ( In Advanced mode, from the Navigation menu tap the following buttons: In the top section of the screen you see information about the current route. -
Page 150: Trip Information Screen
either displays the Route Calculation Method or content of all data fields to via the Vehicle field from the Route Planning options. point information. Warning icons Tap any of the icons for an In these square fields graphical symbols are explanation. - Page 151 You have the following data and functions on this screen: Name Description Function Shows whether the route data fields show information about the final destination (checkered flag) or about the next via point (yellow flag) . Field next to the flag Shows the name or number of the current street or road.
-
Page 152: Trip Computer Screen
This button replaces the previous one if it has been activated. Tap it to resume collecting trip data. Resets all counters of the currently shown trip. Collecting trip data is restarted only when Clarion Mobile Map receives a position from the GPS. Cycles through all trips. -
Page 153: Quick Menu
GPS receiver, and a shortcut to the GPS Settings screen if needed (GPS receiver detection is automatic). This button opens the phone application. You can pair your Clarion NX700 with your cell phone as a hands-free device. -
Page 154: Gps Data Screen
Description Green GPS position quality indicator Clarion Mobile connection to the GPS receiver and position information available in 3D: Clarion Mobile Map can calculate both your horizontal and vertical GPS position. Yellow Clarion Mobile connection to the GPS receiver and... -
Page 155: Find Menu
You can select your destination from the thousands of POIs page 40 included with Clarion Mobile Map or from the ones you have previously created. The destinations that you have already entered in Clarion page 42 Mobile Map are available in the History list. -
Page 156: Route Menu
Description Reference Opens a screen with useful route data. page 62 You can browse the driving instructions that Clarion Mobile Map page 25 follows during navigation. You can exclude maneuvers or streets to adjust the route to your preferences. You can modify the route: remove route points or change their page 44 order. -
Page 157: Manage Menu
4.4 Manage menu You can manage the content that Clarion Mobile Map stores. Tap the following buttons: Button Description Reference Renaming or deleting saved routes page 70 Deleting History items page 71 Recording, simulating, renaming or deleting track logs, assigning... -
Page 158: Manage History
Moves between pages for additional list items. 4.4.2 Manage History You can manage the list of locations you used lately. Tap the following buttons: Button Description Deletes the selected item in the History. Deletes the entire History. Moves between pages for additional list items. 4.4.3 Manage Track Logs You can record Track Logs, then play them back, display them on the map, and view their details. -
Page 159: Manage Favorites
When track log details are shown: Button Description Button with the name of Opens a keyboard screen to let you rename the Track Log. the Track Log Tap this button to hide the Track Log on the map. No color will be assigned to the Track Log. -
Page 160: Manage Pois
4.4.5 Manage POIs You can manage your POIs, and set POI visibility for both your POIs and the ones that came with the product. Tap the following buttons: Button / Icon Description Button with the name of Opens the list of the subgroups of this POI group. The new list behaves the the POI group same as this one. -
Page 161: Manage Saved Search Criteria
Button with the icon of Tap this button to select a new icon for the POI group. the POI group Deletes the edited POI group. You are only allowed to remove POI groups that you have created. When a POI item is open for editing: Button Description Button with the name of... -
Page 162: User Data Management
Tap to save a new search criteria. Similar to how you search for a POI, select the search reference first, then select the POI group or subgroup to search in. 4.4.7 User Data Management You can manage the data you have saved (e.g. POIs, Favorites or History) and the settings you have made in the program. -
Page 163: Settings Menu
4.5 Settings menu You can configure the program settings, and modify the behavior of Clarion Mobile Map. Tap the following buttons: The Settings menu has two pages of submenus. Tap to access the other options. Button Description Reference You can fine-tune the appearance and content of the Map page 77 screen. -
Page 164: Map Screen Settings
3D when you navigate. Color Profiles Clarion Mobile Map is able to show the map and the menus in different colors during the day and during the night. Select the color profiles to be used in each mode, and select the automatic or manual switching between the daytime and night color profiles. -
Page 165: Sound Settings
This setting tells Clarion Mobile Map whether to display this information at the top or at the bottom of the map. Interrupt AV When Clarion Mobile Map is working in the background, the map can be displayed on the screen when approaching a maneuver. 4.5.2 Sound settings You can adjust the sounds of Clarion Mobile Map. -
Page 166: Route Planning Options
4.5.3 Route Planning options These settings determine how routes will be calculated. Tap the following buttons: Button Description Vehicle You can set the type of vehicle you will use to navigate the route. Based upon this setting, some of the road types can be excluded from the route, or some of the restrictions may not be taken into account in route calculation. - Page 167 Per-use Toll By default Clarion Mobile Map includes toll roads (pay roads where there is a per- use charge) in the routes. If you disable toll roads, Clarion Mobile Map plans the best toll-free route.
-
Page 168: Regional Settings
OK when you have selected the new spoken language. Units You can set the distance units to be used by the program. Clarion Mobile Map may not support all the listed units in some voice guidance languages. If you select a measurement unit not supported by the chosen voice guidance language, a warning message will appear. -
Page 169: Navigation Settings
Please note that the GPS clock is only available with GPS reception. This allows you to check whether any correction is needed. 4.5.5 Navigation settings You can control how Clarion Mobile Map behaves during navigation. Tap the following buttons: Button Description... -
Page 170: Warning Settings
Warn When Speeding Maps may contain information about the speed limits of the road segments. Clarion Mobile Map is able to warn you if you exceed the current limit. This information may not be available for your region (ask your local dealer), or may not be fully correct for all roads in the map. -
Page 171: Menu Settings
You can fine-tune the position of the screen content on the display. Tap this button, use the arrows to reposition the application window, and then to save the changes and exit. GPS Antenna This field indicates whether the external GPS antenna is connected to your Clarion NX700. -
Page 172: Track Log Settings
Create NMEA/SIRF Log Independently of the normal track log, you can instruct Clarion Mobile Map to record the native GPS data received from the GPS device. These logs are saved as separate text files on the memory card, and they... -
Page 173: Glossary
Active route The currently navigated route. You can save and load routes in Clarion Mobile Map, but only one route can be active at any given time, and it is always active until you delete it, reach your destination or you quit Clarion Mobile Map. - Page 174 Overview mode You can instruct Clarion Mobile Map to automatically switch to Overview mode if the next route event is in a distance. In Overview mode the map is shown in 2D but scaled down to a predefined zoom level. When you approach the next route event, the previous 2D or 3D map view returns automatically.
-
Page 175: End User License Agreement
6 End User License Agreement 1 The contracting parties 1.1 This Agreement has been entered into by and between PDAMill Kft. (registered seat: 23 Bérc utca, H- 1016 Budapest, Hungary) as Licensor (hereinafter: Licensor) and You as the User (hereinafter: User; the User and the Licensor jointly referred to as: Parties) in subject of the use of the software product specified in this Agreement. - Page 176 6.1 The User is entitled to install the Software Product into one hardware device (desktop, handheld, portable computer, navigation device), and to run and use one copy of the Software Product or a preinstalled copy of the Software Product thereon. 6.2 The User is entitled to make one backup copy of the Software Product.
- Page 177 responsibility of the User. The Licensor shall not assume any responsibility for any damages occurred in relation to use of the Software Product in a motor vehicle. 8.6 By concluding the Agreement, the User shall, in particular, acknowledge the information stated in Section 8 above.
Need help?
Do you have a question about the NX700 and is the answer not in the manual?
Questions and answers