Rane Scratch Live TTM 57SL Operator's Manual
Hide thumbs
Also See for Scratch Live TTM 57SL:
- Operator's manual (60 pages) ,
- User manual (44 pages) ,
- Operator's manual (60 pages)
Table of Contents
Advertisement
Quick Links
Advertisement
Table of Contents

Related Manuals for Rane Scratch Live TTM 57SL


Summary of Contents for Rane Scratch Live TTM 57SL
- Page 1 1xxxx SCRATCHLIVE TTM 57SL OPERATORS MANUAL 1.8.0...
-
Page 2: Important Safety Instructions
Trademarked in the U.S. and other countries. Licensed exclu- unacceptable amount of hum or may generate too much heat sively to Rane Corporation. This software is based in part on the and degrade the performance of this apparatus. work of the Independent JPEG Group, and uses libpng code, 19. -
Page 3: Table Of Contents
TTM 57SL MIXER OPERATOR’S MANUAL Scratch Version 1.8 LIVE Contents TTM 57SL: The Hardware ........3 Tracking indicator .......... 22 Connecting the Mixer .......... 3 Autoplay ............22 PGM Inputs 1-4 and Aux Input ......3 Master gain ............ 22 Mic Input ............ - Page 4 The TTM 57SL Performance Mixer combines the best technolo- Record your mix directly to hard drive. See page 30. gies that Rane and Serato have to offer in a single high-perfor- mance mixer. The TTM 57SL fully integrates Rane’s proven...
-
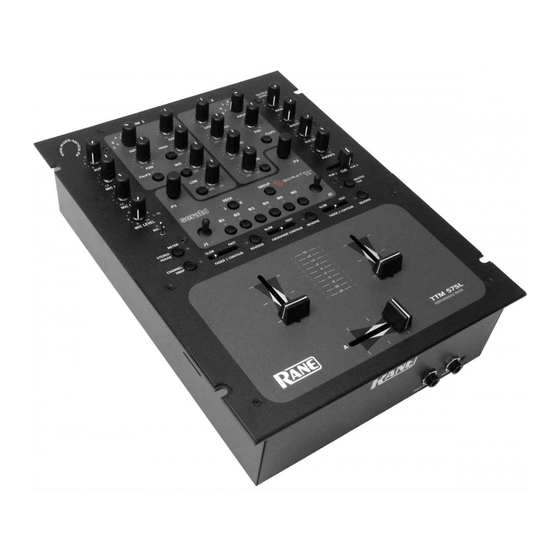
Page 5: Ttm 57Sl: The Hardware
10 feet (3 meters), you can usually get away with an unbalanced cable. See the RaneNote “Sound System Interconnec- tion” available at www.rane.com for details and cable wiring. Power Supply The TTM 57SL features an internal universal switching power supply that operates on any AC mains 100 to 240 VAC, 50 or 60 Hz (most places in the world). -
Page 6: Program Controls
Program Controls INPUT Choose one of four INPUT sources for each Program. INPUT INPUT GAIN GAIN PGM 1 selects: • Analog-1 (A1) HIGH HIGH • Analog-2 (A2) • Digital-l (D1) • Digital-2. (D2) PGM 2 selects: • Analog-3 (A3) • Analog-4 (A4) FlexFX FlexFX... -
Page 7: Faders
Faders CHANNEL SWAP Magnetic faders are used for both Channel Faders and Crossfader This button reverses the channel assignment for all three faders. (the same faders used in the TTM 56). Each fader has an inde- Pressing the switch toggles Channel Swap on and off. When the pendent Contour control and a Reverse switch. -
Page 8: Aux In
AUX IN OUTPUT LEVELS This level adjusts the level of the Auxiliary Input signal. This is a full-range control providing Off to +6 dB gain adjustment. MIC LEVEL and EQ (XLR) The MIC ON switch engages the Mic. The green indicator is lit when the MIC is engaged. -
Page 9: Flexfx Loop
FlexFX Loop USB Streaming Audio FlexFX This stereo loop connects an external effects proces- There are eight channels of streaming audio sor. The signals coming from the PGM 1 fader, the over the USB port. Two stereo channels from PGM 2 fader, or both may be routed to the FlexFX the computer and two stereo channels to the loop. -
Page 10: Effects: Hardware And Software Control Panels
Effects For this reason, you may want to begin by using the Effects Hardware and software control panels with Scratch software to learn control assignments. Typically, LIVE These “soft” controls have multiple functions for controlling Effects are controlled by ear. If you know which Effect is installed Serato Scratch software. -
Page 11: Basic Effects Controls
Basic Effects Controls Effects Cueing The selected effect is edited with the remaining soft controls. The You can cue an effect before you turn it on so that you can check function of some controls depends on the selected Effect. Specific how it sounds before you bring it into the mix. -
Page 12: Controls For Filter Effects
Control Assignments for Sweep Filter Effects P2 Resonance / Depth Three Filters have the same parameters, but are different filter Resonance is adjusted using the primary function of P2 (indica- types: tor off). The diagrams below show the different resonances for •... - Page 13 Control Assignments for Phaser & Flanger J2 Wet / Dry Mix Phasing is a swept comb-filter effect with no linear harmonic Pressing J2 toggles between transform operation (indicator off) relationship between the comb teeth. Splitting an audio signal in and Wet / Dry control (green indicator on). The default is 100% two, shifting the phase of one signal by passing it through an all- wet.
-
Page 14: Controls For Echo Effects
Control Assignments for Echo Effects HP Echo Effect Differences: If the track has a BPM tag, the Echo BPM is automatically set • Each delay cycle repeatedly runs through a second-order High and a lock icon appears in the Echo section. To manually set the Pass Filter having a set resonance of 0.7. -
Page 15: Controls For Hold Echo Effects
Control Assignments for Hold Echo Effects HP Hold Echo Effect Differences: If the track has a BPM tag, the Echo BPM is automatically set • Each delay cycle repeatedly runs through a second-order High and a lock icon appears in the Echo section. To manually set the Pass Filter having a set resonance of 0.7. -
Page 16: Controls For Desecrator Effect
Control Assignments for Desecrator The Desecrator adds controlled distortion...from fine dust to rusty metal spikes, by allowing adjustment of bit-depth and sample rate without dithering or anti-aliasing. Clipping can be a fine shave, or enough for a wig! P1 Drive Level The only function of P1 (indicator off) is Drive Level, adjusting from 0 dB to +24 dB in 32 uniform steps. -
Page 17: Scratch Live: The Software
The Software: Getting started 1) Install the software Installing the Scratch driver. LIVE 1. With the Scratch installation CD in the drive, run LIVE Scratch LIVE Insert the Software Installation CD-ROM and double-click the 2. Windows will ask you if you wish to search for drivers on the installer icon. -
Page 18: Starting The Software
Setting up your turntables Starting the software 1. Set the tone arms to the specific recommendations of the Close all other programs on your Mac or PC. When you load cartridge used, such that the needle never leaves the record, but Scratch for the first time, you will see the screen below. -
Page 19: Calibrating Scratch Live
Calibrating Scratch LIVE The TTM 57SL interprets the signal on record and communi- Tip: If the slider jumps to the far right, then you have a prob- cates with the software. The signal needs to be clear for Scratch lem with noise in your turntables/CD players/mixer. Check all your to perform well. -
Page 20: Playing Your First Track
Playing your first track Preparing your files Now that you have calibrated Scratch , you are ready to play LIVE your first track. We will return to the screen later to set setup general system preferences. When you first run Scratch , your library contains only LIVE the pre-installed tracks. -
Page 21: Playing Tracks
Playing tracks When a track is loaded, the track name, artist and length are displayed in the track title bar, and the Virtual Deck shows a solid black line. The track will start playing as soon as it detects the signal from the control vinyl (or CD). The control record The control record has two sides. -
Page 22: Visual Aids
Visual aids When the track is playing several waveforms are displayed. Each shows a different aspect of the track being played. Tempo Matching display The Tempo Matching display area provides a helpful tool for beat matching. Scratch detects the beats within the track, and LIVE places a row of orange peaks (for the track on the left side) above a row of blue peaks (for the track on the right side) in the Tempo... -
Page 23: Main Waveform Display
Main Waveform display This view provides a close-up view of the track, including color- coding to show the frequency of the sound; red representing low- frequency bass sounds, green representing mid-frequency sounds and blue representing high-frequency treble sounds. You can also switch to a three-band spectrum view by holding key and clicking on the waveform. -
Page 24: Tracking Indicator
Master gain The master output of Scratch can be controlled LIVE using the control. This adjusts the output master gain volume of all tracks played. Note: for best results, set the master gain to the 12 o’clock position, and adjust the volume of individual tracks using the track gain adjustment. -
Page 25: Scratch Live Modes
Scratch modes LIVE Scratch has three different modes of operation. You can LIVE switch between these modes by clicking the mode buttons near the Virtual Deck. Absolute mode mode is the default mode, and most closely resembles the properties of normal vinyl. The beginning of the track is mapped to the start of the record, and by picking up the tone arm and moving the needle to another part of the record (needle dropping) you can move to a different position within... -
Page 26: Internal Mode
Internal mode mode allows you to play tracks without external vinyl (or CD player) control. mode has a Internal start / stop function and virtual pitch slider. Hold- ing down the shift key moves the pitch slider slowly. Holding the ctrl key and clicking on the pitch slider resets it to 33 rpm or 45 rpm, depending on which you are closest to at the time. -
Page 27: Cue Points
properties are in the Control Panel. Mac users: Keyboard and Mouse are in System Preferences. Tip: use the keyboard shortcuts comma (for left deck) and ctrl- dot (for right deck) to place cue points. ctrl- Looping You can save up to 9 loops per track; these loops are saved in the file, and will be pres- ent when you reload the track. -
Page 28: Midi Control
When using an auto-loop, a save button is visible where the lock started auto-looping. Turning the loop off using the 'loop' button loop button normally is. leaves you in the 'A' slot. The 'A' slot is not saved to disk auto- matically –... -
Page 29: Organizing Your Music
Organizing your music You can change the order of tracks within a crate by dragging Scratch can support an unlimited number of tracks – the LIVE only limitation is the size of the hard drive of your computer. A them up or down. number of features are included to help you to keep your music Tip: The protect library... -
Page 30: Using The Song Browser
Using the song browser The song browser allows you to filter your song list by Genre, BPM, Artist and Album. To turn the song browser on or off, click the button. browse Searching Scratch includes a search function to help you find files quickly and easily. Enter text into the search box and Scratch will LIVE LIVE... -
Page 31: Prepare Window
Prepare window Status icons The prepare window is a holding area for tracks, much like The leftmost column shows the status of each track. The image to preparing a set by lifting records part way out of your record bag. the left shows 5 tracks with differing statuses. -
Page 32: Recording
Recording Recordings can be loaded onto the decks, renamed and man- Scratch LIVE allows you to record one of six stereo signals from aged like other files. Recordings are saved in “ MyDocuments\My- the TTM 57SL: ” on a PC and “ Music\ScratchLIVE\Recording ~/Music/ScratchLIVE/ •... -
Page 33: Keyboard Shortcuts
Keyboard shortcuts These actions can be accessed directly from the computer keyboard. Action ctrl - L Locate the current track. This will highlight the track you most recently loaded. Pressing ctrl - L again will alternate between the tracks recently loaded on both decks. ctrl - R Reveal - the highlighted song is opened in a file browser. -
Page 34: Additional Setup
Additional setup This section covers general preferences and adjustments you can mixer settings make to improve the performance of Scratch . From the LIVE save to mixer main screen, tick to get to this area. setup The following settings are transferred to the mixer with the cen- tral button. -
Page 35: Playback
miscellaneous options gain that you would like. This can be turned on / off, and the expand library on track scroll target gain changed on the fly. If you change the target gain while With this option turned on, the hardware panel will hide tempo- a song is loaded to a deck, the change will apply the next time a rarily while you are using the mixer to scroll through your library. -
Page 36: Vinyl Control
Vinyl Control Library Read iTunes™ library vinyl control reverse vinyl scroll Existing iTunes users will recognize many features from iTunes. This setting allows you to reverse the direction of Vinyl Scroll. Scratch can read the iTunes library format, and will auto- LIVE For a full description, see page 19. -
Page 37: Display
USB dropout indicator import AAC files Turn this option off if you do not wish to import AAC files into The USB dropout indicator on the your library. Changing this option will cause your iTunes library main screen is a useful trouble shoot- to be reloaded if you have the option turned read iTunes library... -
Page 38: The Hardware Control Panel
The hardware control panel Groups When you connect the TTM 57SL to Scratch , the hardware Functions are organized in a series of groups. Each group con- LIVE control panel appears. You can show or hide this panel by clicking tains a bank of software controls. -
Page 39: Group Details
(Group B1) general controls (custom group 1) This is the first group shown below with default commands when you first start Scratch . These give you basic playback controls LIVE and up to three cue points per Virtual Deck. The orange arrows (left) control the left Virtual Deck and the blue (right) arrows control the right Virtual Deck. - Page 40 (Group B3) playback To access this group, press the GROUP button on the mixer, then press B3. This group contains all the software functions required for mixing in mode. To select which of the Virtual Decks a given effect is applied to, press the mixer’s DECK button. The LED internal next to the button indicates which of the Virtual Decks the software function applies.
- Page 41 (Group B5) recording To access this group, press the GROUP button on the mixer, then press B5. In this group you can select your input source, start and stop recording, and load this new recording to either Virtual Deck. Push to load track on left deck. Scroll through your crates and library.
-
Page 42: Mixing With Only One Turntable
Mixing with only one turntable TTM 57SL Specifications The single turntable technique allows you to mix as if you had Parameter, Specification, Conditions & Comments Analog Inputs: 4 Stereo, Unbalanced RCA jacks: two turntables, using just one. If one of your turntables is not ..Phono or line level input performing properly, or if you only have one available, you will be ..Phono Response: RIAA ±1 dB, Gain: 30 dB at 1 kHz... -
Page 43: Troubleshooting And Faq
— check all your cables, and the connection between your cartridges and the tone arm. You can order replacement control records from your local distributor. You may also order these in the online store at www.rane.com if you are in the USA. -
Page 44: Scope Reading And Fixes
Scope reading and fixes Most of the problems that occur with Scratch can be attributed to it not getting a good reading of the control signal from your re- LIVE cords or CDs. These examples show what the scopes on the setup screen can look like to help solve possible problems. Some problems cause similar looking scopes, e.g. - Page 45 Record Burn Left Channel Missing Right Channel Missing This section of the control vinyl has been The left signal from the needle is not The right signal from the needle is not worn. Swap sides or use the reaching the TTM 57SL. Check the cable reaching the TTM 57SL.
-
Page 46: Corrupt File Descriptions And Diagnoses
Corrupt file descriptions and diagnoses Corrupt file: This MP3 contains invalid This MP3 contains frames which do not conform strictly to the official MP3 specifica- frames. tion. Scratch can not be certain that this file will play back 100% accurately. LIVE Corrupt file: This file contains corrupt This file contains two or more contiguous corrupt frames. -
Page 47: Magnetic Fader Maintenance
Q: Can I install other faders in my TTM 57SL? Order DeoxIT® F100 from CAIG Laboratories, Inc. A: No. The cable connections are specially designed for Rane 12200 Thatcher Ct. magnetic faders. Poway, CA 92064 Q: Can I install a different magnetic fader in my mixer or... - Page 48 11. Removal of grease or other stubborn debris may require alcohol or contact cleaner. Make sure the part is clean and dry before lubri- cating or reinstalling. 12. To reassemble, reverse the disassembly procedure. 13. Problems? Contact Rane Corporation customer service at 425-355-6000.
-
Page 49: Appendix: Dsp And Analog Block Diagrams
Appendix FlexFX OUTPUT MIX OUTPUT DSP processing block diagram AUX BUS INPUT DIGITAL RECORD 1 LEFT RIGHT DIGITAL RECORD 2 LEFT RIGHT INPUTS INPUTS... -
Page 50: Foot Switch Diagram
Scratch to work with 1, 2 or 3 button LIVE footswitches). SLEEVE ©Rane Corporation 10802 47th Ave. W., Mukilteo WA 98275-5098 USA TEL 425-355-6000 FAX 425-347-7757 WEB www.rane.com All features & specifications subject to change without notice. Build 18048...
Need help?
Do you have a question about the Scratch Live TTM 57SL and is the answer not in the manual?
Questions and answers