Table of Contents
Advertisement
Quick Links
RADIO CONTROLLED PROJECTION
ALARM CLOCK
Instruction manual
INTRODUCTION:
Congratulations on purchasing this innovative Projection alarm clock which displays indoor temperature
and humidity and also outdoor temperature (by 433MHz transmission). It is further acting as a DCF-77
radio controlled clock with an alarm. With the totally 15 different weather forecast icons featured by
"weather man", users can easily observe the forecast weather condition and will no longer worry the
sudden weather change. To enjoy the full benefits of this innovative product, please read this operating
manual.
35
Advertisement
Table of Contents

Related Manuals for Technoline DCF-77


Summary of Contents for Technoline DCF-77
- Page 1 Congratulations on purchasing this innovative Projection alarm clock which displays indoor temperature and humidity and also outdoor temperature (by 433MHz transmission). It is further acting as a DCF-77 radio controlled clock with an alarm. With the totally 15 different weather forecast icons featured by "weather man", users can easily observe the forecast weather condition and will no longer worry the...
- Page 2 Battery compartment Displa Function keys Stand Adapter socket...
-
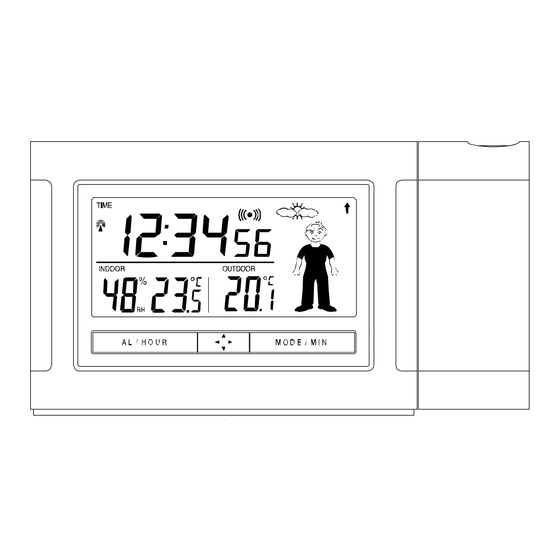
Page 3: Temperature Transmitter
TEMPERATURE TRANSMITTER: Holder FEATURES • Radio-controlled time and date • Projection of time and outdoor temperature • Weather forecasting with 15 easy-to-read weather forecast signs featured by weather man • Displays time with seconds, indoor temperature & humidity • Display outdoor temperature •... -
Page 4: To Install And Replace Batteries Into The Projection Alarm
TO INSTALL AND REPLACE BATTERIES INTO THE PROJECTION ALARM The Projection Alarm uses 2 x AA, IEC LR6, 1.5V batteries. To install and replace the batteries, please follow the steps below: Insert finger or other solid object in the space at the bottom center of the battery compartment and lift up to remove the cover. -
Page 5: Power Supplied By Batteries And Ac/Dc Adapter
Important! Use only the adapter provided with the projection clock and make sure that your household voltage is appropriate to the working voltage of the transformer. Otherwise your Projection clock may be damaged. POWER SUPPLIED BY BATTERIES AND AC/DC ADAPTER If the Projection clock is first powered by batteries and the power adapter is subsequently used for extended period of time, the main power source of the Projection clock will switch to AC/DC power. - Page 6 TO INSTALL AND REPLACE BATTERIES IN THE TEMPERATURE TRANSMITTER The Temperature Transmitter uses 2 x AA, IEC, LR6, 1.5V batteries. To install and replace the batteries, please follow the steps below: Remove the cover. Insert the batteries, observing the correct polarity (see marking). Replace the battery cover on the unit.
- Page 7 2 minutes, the batteries will need to be removed from both units and reset from step 1. When the transmitter is set up, there is a testing period. Then DCF-77 time code reception is automatically started just after the clock is activated. This takes typically between 3 - 5 minutes in good conditions.
-
Page 8: Battery Change
In the event of changing batteries to the transmitter, the projection clock needs to be reset. (See RESETTING THE PROJECTION CLOCK) RESETTING THE PROJECTION CLOCK To reset the Projection clock to the factory default setting or in case of a malfunction or changing batteries to transmitter, please remove all batteries from the unit and unplug the AC/DC adapter from any power source. -
Page 9: Projection Of Time
PROJECTION OF TIME Note: The projection is a red light, not harmful under normal usage, yet care should be taken to avoid looking directly into the light. When plugged into an AC outlet, the projection alarm can continuously project the time and the outdoor temperature When operating on batteries alone, the projection alarm will only project when the SNOOZE button is pressed or the alarm is sounding. -
Page 10: Dcf-77 Radio Controlled Time
The time is coded and transmitted from Mainflingen near Frankfurt via frequency signal DCF-77 (77.5 kHz) and has a transmitting range of approximately 1,500 km. Your radio-controlled Projection alarm clock receives this signal and converts it to show the precise time in summer or wintertime. -
Page 11: Function Keys
• Within ferro-concrete rooms (basements, superstructures), the received signal is naturally weakened. In extreme cases, please place the unit close to a window and/or point its front or back towards the Frankfurt transmitter. During nighttime, the atmospheric disturbances are usually less severe and reception is possible in most cases. -
Page 12: Snooze Key
MODE/ MIN AL / HOUR button button Projection Direction button SNOOZE key • Press to initiate the snooze function when the alarm is sounding. • Press to activate the projection of time • Press to confirm the manual setting in the different setting modes •... -
Page 13: Mode/Min Key
MODE/MIN key • Press and hold to advance to the manual setting • Press to set the minute in alarm setting mode • Press to set the minute in time setting mode • Press to set the month and year in calendar setting mode •... - Page 14 LCD contrast level After pressing and holdin g the MODE/MIN key for about 3 seconds, the manual setting mode is activated. Then The LCD contrast can be set: flashing The contast level will be flashing. Press the MODE/M IN key to adjust the contrast level 0 to 7 (default: 5).
- Page 15 flashing Press and release MODE/MIN key to adjust the time zone. The range runs from 0, -1, -2 to -12, then 12, 11, 10 to 0, in consecutive 1-hour intervals. Confirm with the SNOOZE key and enter the Manual time setting. Manual time setting In ca se the Projection cloc...
- Page 16 The hour and the minute digits will start flashing. Use the AL/HOUR key to set the hour; MODE/MIN key to set the minute. Confirm with the SNOOZE key and enter the Calendar setting. ot : The unit will still try and receive the signal every hour despite it being manually set. When it does receive the signal, it will change the manually set time into the received time.
- Page 17 Calendar setting The date default of the Projection clock is 1. 1. in the year 2005. Once the radio-controlled time signals are received, the date is automatically updated. However, if the signals are not received, the date can also be set manually. The year starts flashing.
- Page 18 flashing Use the AL/HOUR key to set the day and MODE/MIN key to set the month. Press the SNOOZE key again to confirm and to enter the 12/24 hour time format setting. 12/24 hour time format setting The time format digit starts flashing. Press the MODE/MIN key to select the 12-hour or 24-hour time format.
- Page 19 Press the SNOOZE key again to confirm and to enter the Daylight saving time setting. Daylight saving time setting Note: • The function of daylight saving time on/off is only applicable to specific area in United states using WWVB time sources. It is not applicable for DCF-77 signal in European countries.
- Page 20 • User may skip doing this part of setting for this European version temperature station (press the SNOOZE key to exit the setting mode and go back to the normal display). Setting of “dST On” or “dST Off” will have no effects on the reception time.
-
Page 21: Time Alarm
TIME ALARM Setting the alarm Press and hold “AL/HOUR” button for about three seconds until the alarm time is flashing. Alarm-on icon flashing Press and release “AL/HOUR” to advance the hour, and “MODE/MIN” to advance the minute. The time will display in 24-hour format. Press the SNOOZE key to confirm. - Page 22 Alarm-on icon, “ (•) ” will be displayed next to the time display when the alarm is activated. Turning alarm off (while sounding) While the alarm is sounding, press and release the SNOOZE bar to disable the alarm for 10 minutes.
- Page 23 ≥ 26°C 10 – 0 – 19 – < 0°C 18.9°C 9.9°C 25.9°C Sunny Sunny + Cloudy Rainy...
-
Page 24: The Weather Tendency Indicator
Note: After setting up, readings for weather forecasts should be disregarded for the next 12-24 hours. This will allow sufficient time for the Weather station to collect air pressure data at a constant altitude and therefore result in a more accurate forecast. Common to weather forecasting, absolute accuracy cannot be guaranteed. - Page 25 is increasing and the weather is expected to improve, but when indicator points downwards, the air- pressure is dropping and the weather is expected to become worse. Therefore, user may see how the weather has changed and is expected to change. For example, if the indicator is pointing downwards together with cloudy icons, it means that the last noticeable change in the weather was when it was sunny (the sunny icon only).
-
Page 26: 433Mhz Reception
433MHz RECEPTION If the outdoor temperature data are not being received within three minutes after setting up (or “- -. -” is shown in the outdoor temperature section of the Projection alarm clock after 3 failed attempts during normal operation), please check the following points: The distance of the Projection alarm clock or transmitter should be at least 2 metres away from any interfering sources such as computer monitors or TV sets. - Page 27 POSITIONING THE OUTDOOR TRANSMITTER: The Outdoor transmitter is supplied with a holder that may be attached to a wall with the three screws or double-sided tape supplied. To attach to the wall using screws, please follow the steps below: Mark the wall using a pen through the holes in the holder to obtain the exact drilling position.
- Page 28 metal or highly polished surface is in the immediate proximity (garage doors, double-glazing, etc.). Before securing in place, please ensure that the Temperature Station can receive the 433 MHz signal from the Outdoor Transmitter at the positions that you wish to situate them.
-
Page 29: Care And Maintenance
CARE AND MAINTENANCE: • Extreme temperatures, vibration and shock should be avoided as these may cause damage to the units and give inaccurate forecasts and readings. • When cleaning the display and casings, use a soft damp cloth only. Do not use solvents or scouring agents as they may mark the LCD and casings. -
Page 30: Liability Disclaimer
Indoor temperature checking intervals : Every 15 seconds Indoor humidity checking intervals : Every 20 seconds Outdoor : -29.9ºC to +69.9ºC with 0.1°C resolution (“OF.L” displayed if outside this range) Outdoor temperature checking intervals : Every 5 minutes Power consumption: Projection alarm clock 2 x AA, IEC LR6, 1.5V Outdoor transmitter... - Page 31 • All electronic instruments must from now on be recycled. User shall take an active part in the reuse, recycling and recovery of the electrical and electronic waste. • The unrestricted disposal of electronic waste may do harm on public health and the quality of environment.
- Page 32 R&TTE DIRECTIVE 1999/5/EC Summary of the Declaration of Conformity : We hereby declare that this wireless transmission device does comply with the essential requirements of R&TTE Directive 1999/5/EC.
Need help?
Do you have a question about the DCF-77 and is the answer not in the manual?
Questions and answers