Panasonic KX-TCA185 Operating Instructions Manual
Dect portable station
Hide thumbs
Also See for KX-TCA185:
- Operating instructions manual (92 pages) ,
- Getting ready (144 pages)
Table of Contents
Advertisement
Operating Instructions
DECT Portable Station
KX-TCA185/KX-TCA285/KX-TCA385
Model No.
KX-TCA185
KX-TCA285
KX-TCA385
Thank you for purchasing this Panasonic product.
Please read this manual carefully before using this product and save this manual for future
use.
KX-TCA385's handset meets IP65 classification.
For KX-TCA185:
Please use only the batteries provided and charge the batteries for about 7 hours before using
the handset for the first time. For details, see "Charging the Battery/Batteries" on Page 74
in this manual.
For KX-TCA285/KX-TCA385:
Please use only the battery provided and charge the battery for about 3 hours before using
the handset for the first time. For details, see "Charging the Battery/Batteries" on Page 74
in this manual.
Document Version: 2013-10
Advertisement
Table of Contents

Related Manuals for Panasonic KX-TCA185


Summary of Contents for Panasonic KX-TCA185
-
Page 1: Operating Instructions
KX-TCA185/KX-TCA285/KX-TCA385 Model No. KX-TCA185 KX-TCA285 KX-TCA385 Thank you for purchasing this Panasonic product. Please read this manual carefully before using this product and save this manual for future use. KX-TCA385’s handset meets IP65 classification. For KX-TCA185: Please use only the batteries provided and charge the batteries for about 7 hours before using the handset for the first time. -
Page 2: Related Documentation
R The contents and design of the software are subject to change without notice. R For more details of PBX features, please refer to the manuals of the PBX. Manuals and supporting information are provided on the Panasonic Web site at: http://panasonic.net/pcc/support/pbx/... -
Page 3: Other Information
R The Bluetooth word mark and logos are registered trademarks owned by Bluetooth SIG, Inc. and any use of such marks by Panasonic Corporation is under licence. R Jabra is a registered trademark of GN Netcom A/S. R Plantronics is a registered trademark of Plantronics, Inc. -
Page 4: Table Of Contents
Changing Handset Settings ......63 Installation and Setup Battery Installation ..........72 Charger Connection ..........73 Charging the Battery/Batteries ......74 Charger Wall Mounting ........75 Attaching the Phone Strap (KX-TCA185/ KX-TCA285 only) ..........76 Attaching the Belt Clip (KX-TCA185/KX-TCA285 only) ..............76 Removing the Belt Clip ........77 Appendix Specifications ............78... -
Page 5: Important Information
Important Information Important Information For Your Safety To reduce the risk of injury, loss of life, electric shock, fire, malfunction, and damage to equipment or property, always observe the following safety precautions. Explanation of symbols The following symbols are used to classify and describe the level of hazard and injury caused when the denotation is disregarded and improper use is performed. - Page 6 Important Information Unplug the AC adaptor from the AC outlet and have the product serviced by qualified service personnel in the following cases: A. When the power supply cord or plug is damaged or frayed. B. If liquid has been spilled into this product. C.
- Page 7 Do not dispose of batteries in a fire. It may explode. Check with local authorities for special disposal instructions. For KX-TCA185 only Do not open or disassemble the batteries. Released electrolyte is corrosive and may cause burns or injury to the eyes or skin. The electrolyte is toxic if swallowed.
-
Page 8: Data Security
R Do not use the handset near water, for example, near a bathtub, wash bowl, kitchen sink, or laundry tub, in a wet basement, or near a swimming pool. (For KX-TCA185/KX-TCA285) R Do not use the charger near water, for example, near a bathtub, wash bowl, kitchen sink, or laundry tub, in a wet basement, or near a swimming pool. - Page 9 This device is a DECT Portable station operating in the frequency band of 1880 MHz to 1900 MHz. The usage of this device is generally allowed in all EU countries. Panasonic System Networks Co., Ltd. declares that this equipment is in compliance with the essential requirements and other relevant provisions of Radio & Telecommunications Terminal Equipment (R&TTE) Directive 1999/5/EC.
-
Page 10: For Best Performance
Important Information voice calls. The combined effect of audio / VoIP conversion delay and IP routing delay can cause the echo cancellation time of ³ 64 ms to be required. PTC200 6.11.1 (3) All Customer Equipment (fail safe requirements) R Under power failure conditions this appliance may not operate. Please ensure that a separate telephone, not dependent on local power, is available for emergency use. -
Page 11: Battery Information
Battery Information After batteries are fully charged (at 25 °C): Operation Operating Time While Talking KX-TCA185: Up to about 11 H KX-TCA285/KX-TCA385: Up to about 13 H (Backlight off , Bluetooth off While not in use (Standby) Up to about 200 H *1 When the "Talking"... - Page 12 R There is a danger of explosion if the batteries are incorrectly replaced. Important Notice Concerning the Correct Use and Charging of Ni-MH Batteries (KX-TCA185 only) Batteries, due to their construction, undergo some wear and tear. The lifetime of batteries also depends on correct maintenance.
- Page 13 Important Information to 15 minutes due to the memory effect. Therefore you should discharge the batteries completely, i.e. use them in the handset until the battery level indicator displays as empty (" "). Then recharge them as described in the manual. After the memory effect has occurred, it is possible to achieve almost complete capacity of the Ni-MH batteries by charging and discharging several times one after another.
-
Page 14: Before Operating The Telephone
Before Operating the Telephone Before Operating the Telephone Included Accessory KX-TCA185 AC adaptor: 1 Model No. Part No. KX-TCA185CE PNLV226CE KX-TCA185RU KX-TCA185UK PNLV226E KX-TCA185AL PNLV226AL KX-TCA185X PNLV226 Charger: 1 Battery Battery Cover Belt Clip: 1 Belt Clip Holder: 1 *1 Rechargeable AAA Ni-MH 1.2 V, 700 mAh batteries... - Page 15 Before Operating the Telephone KX-TCA285 AC adaptor: 1 Model No. Part No. KX-TCA285CE PNLV226CE KX-TCA285RU KX-TCA285UK PNLV226E KX-TCA285AL PNLV226AL KX-TCA285X PNLV226 Charger: 1 Battery Battery Cover Belt Clip: 1 Belt Clip Holder: 1 *1 For details, consult your administrator or dealer. *2 The battery cover comes attached to the handset.
- Page 16 Before Operating the Telephone KX-TCA385 AC adaptor: 1 Model No. Part No. KX-TCA385CE PNLV226CE KX-TCA385RU KX-TCA385UK PNLV226E KX-TCA385AL PNLV226AL Charger: 1 Battery Battery Cover Belt Clip Replacement Cover: *1 For details, consult your administrator or dealer. *2 The battery cover comes attached to the handset.
-
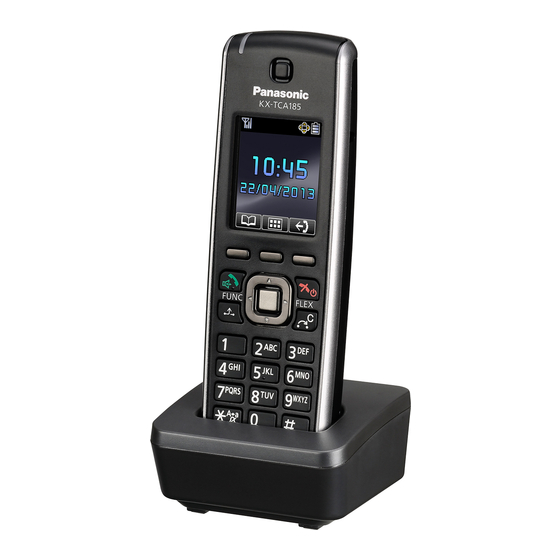
Page 17: Location Of Controls
Before Operating the Telephone Location of Controls KX-TCA185 The headset is an optional [Back View] accessory. Open the cover. FLEX... - Page 18 Before Operating the Telephone KX-TCA285 The headset is an optional [Back View] accessory. Open the cover. KX-TCA385 [Back View]...
-
Page 19: Soft Keys
Before Operating the Telephone A Ringer/Charger Indicator B Headset Jack (KX-TCA185/KX-TCA285) The following wired headsets can be used with this unit. (Not all operations with the headsets can be guaranteed.) R For KX-TCA185CE/KX-TCA285CE/KX-TCA185AL/KX-TCA285AL/KX-TCA185UK/ KX-TCA285UK/KX-TCA185RU/KX-TCA285RU: Panasonic RP-TCA400 and RP-TCA430 R For KX-TCA185X/KX-TCA285X: Panasonic KX-TCA89 The headset is an optional accessory. - Page 20 Before Operating the Telephone O Charge Contacts P Strap Holes Used to attach phone straps and similar items. Q Speaker...
-
Page 21: Handset Functions
Before Operating the Telephone Handset Functions Setting the Password The handset password is not set by default. You must register a handset password (4 digits) before use. You cannot use the following features without setting a password: R Phonebook lock (See Page 60.) R "Manual&Password"... -
Page 22: Noise Reduction
Before Operating the Telephone R Ringer Volume R Ring On Charger R Auto Answer R Key Tone R Vibrate (Vib.&Ring) To set or cancel To set or cancel Silent Mode, press and hold for more than 2 seconds. Note R If you set the handset on the charger during Silent Mode, the handset will not vibrate. R When Silent Mode is set, the low battery alarm will not be heard in standby mode. -
Page 23: Power Save Mode
Before Operating the Telephone Power Save Mode Power Save Mode turns off the ringer, LCD backlight, and/or key backlight automatically after a set number of seconds have passed while receiving a call. For details about adjusting power save mode settings, see "Incoming Option" on Page 64. Editing the Standby Display Name You can edit the name displayed when the handset is in standby mode. - Page 24 Before Operating the Telephone Display Pictograph Battery Indicator Within range of a Cell Station (CS) Out of range Full Intercom Indicator Off-hook Status Phonebook Needs to be charged. Voice Message Bluetooth on, no Bluetooth headset connection (KX-TCA285/ KX-TCA385 only) Bluetooth on, Bluetooth headset connected (KX-TCA285/KX-TCA385 only) Incoming Call Log...
- Page 25 Before Operating the Telephone Date or Missed Call Display Handset number and Name Soft Keys For more information, see Page 26. Note R Example images of the display in this manual are samples only, and the actual screen on your phone may vary in colour and/or appearance.
- Page 26 Before Operating the Telephone Soft Keys Icons and information shown on the display will vary depending on the context. To select an item shown on the display, press the corresponding soft key. Opens the Phonebook. Inserts a dialling pause. Pressing this key for more than 2 seconds locks the Phonebook.
- Page 27 Before Operating the Telephone Displayed when in Special character Used for System/Personal Speed (Extended 2) entry mode. Pressing this Dialling. key switches to Alphabetic character entry mode. Displayed when in Cyrillic character Used to set/clear the Auto Answer mode. entry mode. Displays the Outgoing Call Log.
-
Page 28: Basic Operations
Before Operating the Telephone Basic Operations Operation Outline Screen Transition Diagram Handset functions are accessed through the display menu and selected with the Navigator Key and soft keys. [In standby mode] [Function Keys] [Flexible Keys] [Handset Phonebook] [Outgoing Call Log] [Incoming Call Log] [PBX System Phonebook] [PBX Extension Phonebook]... -
Page 29: Function Menus
Before Operating the Telephone *2 If you specify an ICD group extension number, you can see the call log of the ICD group. For operation, see Page 35. R The selected item will be highlighted. R To enter characters, see Page 58. R To search for an item in the Phonebook, see Page 51. - Page 30 Before Operating the Telephone Function Keys Handset functions can be activated through the display key list. Press the Navigator Key to display the function key list. 1: Redial Redials the last dialled number. 2: Fwd/DND Displays and/or sets Call Forwarding and Do Not Disturb. 3: Conference Establishes a multiple-party conversation.
-
Page 31: Selecting The Display Language
Before Operating the Telephone Auto Answer PBX Program Flash/Recall Incoming Log Pause Outgoing Log R For operation, see Page 34. R To edit the function key list, see "Key Option" on Page 66. Flexible Keys A Flexible Key can be used either to seize a line in order to make or receive an outside call, or used as a function key. -
Page 32: Adjusting The Ringer Volume
Before Operating the Telephone 1. Press or the [CENTRE] navigation key. 2. Select "Setting Handset" by pressing the arrow keys, and then press 3. Select "Display Option" by pressing the arrow keys, and then press 4. Select "Language" by pressing the arrow keys, and then press 5. -
Page 33: Changing The Vibrate Setting
Before Operating the Telephone Changing the Vibrate Setting 1. Press or the [CENTRE] navigation key. 2. Select "Setting Handset" by pressing the arrow keys, and then press 3. Select "Incoming Option" by pressing the arrow keys, and then press 4. Select "Vibrate" by pressing the arrow keys, and then press 5. -
Page 34: Feature Operations
Feature Operations Feature Operations Making Calls Note R To enter characters, see Page 58. R You can confirm that the number was dialled correctly before calling (Predialling) by entering the number, then pressing R To clear an entire number while predialling, press for more than 1 second. - Page 35 Feature Operations Using the Incoming Call Log 1. Press [ ] or [ 2. Press [ ] or [ ] to select an entry in the incoming call log, and then press 3. Talk. Using the Group Log 1. Press 2.
- Page 36 Feature Operations *1 To store an item in the Phonebook, see Page 49. To search for an item in the Phonebook, see Page 52. *2 This step can be omitted. One-touch Dialling To store 1. Press or the [CENTRE] navigation key. 2.
-
Page 37: Receiving Calls
Feature Operations Receiving Calls Note R If an incoming call is directed to PS ring groups, the flexible keys will not flash. Please press TALK key to answer the call. R Please consider the following when "Quick Answer" is set to "On". If a brief power failure occurs when the handset is receiving a call on the charger, –... -
Page 38: During A Conversation
Feature Operations During a Conversation Transferring a Call To an extension 1. Press 2. Enter an extension number. 3. Talk. 4. Press To an outside party 1. Press 2. Enter 0 or 9. Or, enter 8, and then enter an outside line group number. 3. -
Page 39: Three-Party Conference
Feature Operations R To hold several outside calls, you need to assign Flexible Keys ("Single Line"/"Loop Line"/"Trunk Group") as necessary beforehand. Three-party Conference To add another party during a conversation 1. Press [ ] during a conversation. 2. Enter 3. 3. -
Page 40: Useful Features
Feature Operations Useful Features Call Forwarding 1. Press 2. Enter 3. Press a dial key to select the types of calls to apply this feature to. 0: Both outside and intercom calls 1: Outside calls only 2: Intercom calls only 4. - Page 41 Feature Operations [To cancel a message waiting indication] 1. Press 2. Enter 700. 3. Enter the extension number. 4. Press Called extension [To call back] 1. Press 2. Press or enter 702. 3. Talk. [To clear message waiting indications left on your extension] 1.
-
Page 42: Bluetooth (Kx-Tca285/Kx-Tca385 Only)
Feature Operations Bluetooth (KX-TCA285/KX-TCA385 only) You can use Bluetooth to connect to a Bluetooth wireless headset and transfer phonebook data from a cell phone. The following Bluetooth headsets can be used with this unit. (Not all operations with the headsets can be guaranteed.) ®... - Page 43 Feature Operations [To register a Bluetooth headset when none is registered] 1. Press or the [CENTRE] navigation key. 2. Select "Setting Handset" by pressing the arrow keys, and then press 3. Press [ ] or [ ] to select "Bluetooth Option", and then press 4.
- Page 44 Feature Operations Note R The default setting is "On". Disconnecting the Bluetooth Headset 1. Press or the [CENTRE] navigation key. 2. Select "Setting Handset" by pressing the arrow keys, and then press 3. Press [ ] or [ ] to select "Bluetooth Option", and then press 4.
- Page 45 Feature Operations 5. Press [ ] or [ ] to select "Headset Mic Vol", and then press 6. Press [ ] or [ ] to adjust the volume (Level 1–6), and then press Note R The microphone volume for the Bluetooth headset can only be adjusted when the handset is in standby mode.
-
Page 46: Using The Handset Phonebook
Using the Handset Phonebook Using the Handset Phonebook Handset Phonebook You can store up to 500 items with names, phone numbers, and category numbers in the handset for easy access. You can set unique Ringer/LED/Vibrate patterns for each category to identify incoming calls. -
Page 47: Storing An Item In The Handset Phonebook
Using the Handset Phonebook Storing an Item in the Handset Phonebook Storing a New Item 1. Press or the [CENTRE] navigation key. 2. Select "New Phonebook" by pressing the arrow keys, and then press 3. Enter a name (max. 24 characters), and then press 4. -
Page 48: Storing An Item Using The Outgoing Call Log
Using the Handset Phonebook Storing an Item Using the Predialling You can dial a number first and then add it as a phonebook entry. 1. In standby mode, dial a number. 2. Press 3. Enter a name (max. 24 characters), and then press 4. -
Page 49: Storing An Item Using The Pbx System Phonebook
Using the Handset Phonebook 7. Press *1 Press to confirm each entry. (name: max. 24 characters/phone number: max. 32 digits) R When storing an outside phone number, the line access number will be stored automatically. The line access number must be identical to the handset’s "Line Access CD" setting. See "Other Option" on Page 70. - Page 50 Using the Handset Phonebook 5. Select the desired category number (1–9) by pressing the arrow keys, and then press 6. Enter a name. (max. 13 characters) 7. Press...
-
Page 51: Searching For An Item Stored In The Phonebook
Using the Handset Phonebook Searching for an item stored in the Phonebook You can search for an item in the Phonebook by following the steps below. Handset Phonebook Scrolling through all items 1. Press 2. Press 3. Press [ ] or [ ] repeatedly. - Page 52 Using the Handset Phonebook 4. Press [ ] or [ ] repeatedly. Searching by name or first character(s) of name 1. Press 2. Press 3. Enter the name or the first character(s) of the desired name. 4. Press 5. Press [ ] or [ ] to select the desired item, if required.
-
Page 53: Phonebook And Vcard Transfer By Bluetooth
Using the Handset Phonebook Phonebook and vCard Transfer by Bluetooth Transferring Phonebook Data from a Cell Phone using Bluetooth You can transfer the phonebook data of a cell phone to the handset using Bluetooth wireless transmission. For details about Bluetooth, see "Bluetooth (KX-TCA285/KX-TCA385 only)" on Page 42. To transfer the phonebook data of a registered cell phone to the handset 1. - Page 54 Using the Handset Phonebook R While transferring phonebook data from a cell phone using Bluetooth, the Bluetooth pictograph will not be displayed on the screen of the handset. See "Display" on Page 24. Transferring vCard Data using Bluetooth vCard™ is a standard file format for an electronic business card. A vCard can include a name and phone numbers.
-
Page 55: Deleting Stored Items In Handset Phonebook/Hot Key Dial/Outgoing Call Log/Incoming Call Log
Using the Handset Phonebook Deleting Stored Items in Handset Phonebook/Hot Key Dial/ Outgoing Call Log/Incoming Call Log Handset Phonebook 1. Press 2. Enter a name. 3. Press 4. Press [ ] or [ ] to select the desired item, if required. 5. - Page 56 Using the Handset Phonebook 3. Press [ ] or [ ] to select the desired item. 4. Press 5. Press [ ] or [ ] to select "Delete". 6. Press 7. Select "Yes". 8. Press...
-
Page 57: Assigning Hot Keys
Using the Handset Phonebook Assigning Hot Keys You can assign a phone number stored in the Handset Phonebook to a key to be used as a Hot Key. 1. In standby mode, press and hold a dial key (0–9) for more than 1 second. 2. -
Page 58: Entering Characters
Using the Handset Phonebook Entering Characters You can enter characters and digits using the dialling keys. A, a You can select one of 5 character modes by pressing the Right Soft Key while B, b entering a name. The function icon above the soft key displays the current C, c character mode. -
Page 59: Character Mode Table
Using the Handset Phonebook Character Mode Table 0–9 Keys (Alphabetic) (Numeric) (Greek) (Extended 1) (Extended 2) Space & ’ ( ) Space & ’ ( ) , – . / 1 , – . / 1 A B C 2 a b c 2 D E F 3 d e f 3... -
Page 60: Locking The Handset Phonebook
Using the Handset Phonebook Locking the Handset Phonebook You can lock/unlock the Phonebook while the handset is in standby mode. If no password has been set, you cannot lock the Phonebook. To set the password, see "Setting the Password" on Page 21. Locking the Handset Phonebook R Press for more than 2 seconds. -
Page 61: Customising The Telephone
Customising the Telephone Customising the Telephone Changing the Initial Settings Changing the Initial Settings 1. Press or the [CENTRE] navigation key. 2. Select "Setting Handset" by pressing the arrow keys, and then press 3. Select the desired main item by pressing the arrow keys, and then press 4. -
Page 62: To Stop The Alarm
Customising the Telephone *1 A " " will be displayed next to the day of the week that has been set. Select the alarm mode-Off 1. Press or the [CENTRE] navigation key. 2. Select "Memo Alarm" by pressing the arrow keys, and then press 3. -
Page 63: Changing Handset Settings
Customising the Telephone Changing Handset Settings Handset Setting Menu Layout [Main Item] [Sub Item] Setting Handset Incoming Option Ringer Volume Ringer Type Vibrate Ring On Charger Memo Alarm Power Save Headset Ringer Talk Option Noise Reduction Speaker Volume Receiver Volume Headset Volume Headset Mic Vol Talk On Charger... - Page 64 Change PIN H/S Information Bluetooth Option On/Off Cell Phone BT Headset Other Option Change Password Line Access CD Reset Handset *1 KX-TCA185/KX-TCA285 only *2 KX-TCA285/KX-TCA385 only Incoming Option Sub Item Description Setting Default Ringer Volume Adjusts the ringer volume. Step Up...
- Page 65 Customising the Telephone Sub Item Description Setting Default Ringer Type Ringer Pattern Ringtone 1–19, 25–32 – Intercom Ring Selects the ringer pattern for Ringtone 1 – Ext Ring each type of call. – Group Ring LED Pattern Intercom Ring: – Doorphone Selects the LED pattern for Green Green...
-
Page 66: Talk Option
Level 1–6 Level 3 microphone volume. Talk On Charger Selects whether or not to continue the conversation when the handset is put on the charger during a conversation. *1 KX-TCA185/KX-TCA285 only Answer Option Sub Item Description Setting Default Any Key Answer Answers a call by pressing any dialling key. - Page 67 Customising the Telephone Sub Item Description Setting Default Function Key Edits the Function Key list. 1: Redial Redial 2: Fwd/DND Fwd/DND 3: Conference Conference 4: Auto Answer 5: Flash/Recall Auto Answer 6: Pause Flash/Recall 7: H/S Phonebook Pause 8: PBX Auto Dial Phonebook Noise Reduction...
-
Page 68: Display Option
Customising the Telephone – Change the password regularly. *4 If no password has been set, you cannot select "Manual&Password" or "Auto&Password" for Key lock type. Display Option Sub Item Description Setting Default Language Selects the display language. Auto Deutsch Español Italiano Dansk Nederlands... -
Page 69: Tone Option
Customising the Telephone Sub Item Description Setting Default Colour Scheme Selects the colour scheme of Dark Dark the LCD. Light *1 If an extension name is stored in the PBX, the extension name is displayed when "Handset Number" or "Base&H/S No." is selected. Depending on the number of characters stored for the extension name, the end of the extension name may not be displayed. -
Page 70: Other Option
Customising the Telephone Bluetooth Option (KX-TCA285/KX-TCA385) Sub Item Description Setting Default On/Off Turns the Bluetooth function on or off. Cell Phone Phonebook Receives the phonebook from — — a cell phone by Bluetooth. Registration Register Registers or deregisters a cell Not registered Deregister phone. - Page 71 Customising the Telephone Sub Item Description Setting Default Reset Handset Returns the handset settings to Enter Password. its default settings. (4 digits) ¯ Not selected Select the desired item(s). ¯ Press "OK". *1 To avoid unauthorised access to this product: –...
-
Page 72: Installation And Setup
Installation and Setup Battery Installation Open the battery cover, insert the battery, and close the cover as indicated below. KX-TCA185 KX-TCA285 KX-TCA385 R Confirm that the slide switch has been returned to its original position when the cover is closed... -
Page 73: Charger Connection
AC adaptor to a ceiling-mounted AC outlet, as the weight of the adaptor may cause it to become disconnected. R Fasten the AC adaptor cord to the cord holder. R Use only the included Panasonic AC adaptor. For details, see "Included Accessory" on Page 14 or later. WARNING R To reduce the risk of fire or electric shock, do not overload AC outlets and extension cords. -
Page 74: Charging The Battery/Batteries
Installation and Setup Charging the Battery/Batteries At the time of shipment, the batteries are not charged. KX-TCA185: Please charge the batteries for about 7 hours before using the handset for the first time. KX-TCA285/KX-TCA385: Please charge the battery for about 3 hours before using the handset for the first time. -
Page 75: Charger Wall Mounting
Installation and Setup Charger Wall Mounting 1. Install the two screws in the wall, spacing them 25 mm apart. 25 mm (1 in) Space 2 mm (1/16 in) 20 mm (3/4 in) Screws or longer (Not supplied) • Recommended screw size is M4 x 20. -
Page 76: Attaching The Phone Strap (Kx-Tca185/Kx-Tca285 Only)
Installation and Setup Attaching the Phone Strap (KX-TCA185/KX-TCA285 only) Open the battery cover, run the strap through the strap hole, and then loop it around the hook. Attaching the Belt Clip (KX-TCA185/KX-TCA285 only) You can attach the handset to your belt by following the steps below. -
Page 77: Removing The Belt Clip
Installation and Setup Removing the Belt Clip KX-TCA185/KX-TCA285 1. Make sure to turn the handset 180° when you take it off. 2. Remove the belt clip. KX-TCA385 The belt clip is attached to the handset before shipment. You can remove the attached belt clip by following the steps below. -
Page 78: Appendix
Appendix Appendix Specifications Specifications Item KX-TCA185 KX-TCA285 KX-TCA385 Display 1.8-inch TFT Backlight LCD, 65,000 colours Headset Jack 1 (ø 2.5 mm) — Ni-MH AAA ´ 2 Battery/Batteries Li-Ion 3.7 V (700 mAh) (1.2 V, 700 mAh) Maximum Power Standby: 0.3 W Consumption (Charger) Maximum: 2.0 W... - Page 79 Appendix RF Specifications (DECT) Item Specifications Frequency Band 1880 MHz to 1900 MHz Number of Carriers Transmission Output Average 10 mW Peak 250 mW RF Specifications (Bluetooth) Item Specifications Frequency Band 2.4000 GHz to 2.4835 GHz Class Class 2 *1 KX-TCA285/KX-TCA385 only...
-
Page 80: System Requirements
Appendix System Requirements This model supports the following CS models, PBX models, and PBX software versions: Model No. Main Processing (MPR) Software Version KX-TDA0141CE KX-TDA30 PSMPR Software File Version 5.0000 or later KX-TDA0155CE KX-TDA100 PMPR Software File Version 5.0000 or later (software version KX-TDA200 5.000 or later) -
Page 81: Troubleshooting
Appendix Troubleshooting Problem Possible Cause Solution The handset does not The battery is drained. Charge the battery fully. work. For details, see "Charging the Battery/Batteries" on Page 74. The power is off. R Turn it on. For details, see "Location of Controls"... - Page 82 "On". See when the headset is attached. "Incoming Option" on Page 64. R KX-TCA185/KX-TCA285 only: Make sure the headset jack is connected properly. See "Location of Controls" on Page 17. Noise is frequently...
- Page 83 Appendix Problem Possible Cause Solution While charging the The battery is not charging Unplug the AC adaptor from the AC battery, the LED correctly due to an electrical outlet, remove the battery from the indicator blinks failure. handset, and consult your dealer. rapidly and the handset beeps rapidly.
- Page 84 Appendix Problem Possible Cause Solution I cannot connect a The Bluetooth headset or the R Confirm that the Bluetooth Bluetooth headset to Bluetooth function of the handset headset is turned on. the handset. is off. R Confirm that the Bluetooth setting (For KX-TCA285/ of the handset is turned on.
-
Page 85: Error Messages
Appendix Error Messages Error Message Possible Cause Solution Register Unit The handset has been cancelled Consult your dealer. or the handset has not been registered. No Service The handset is out of range. Move closer to the CS. The CS is turned off. Make sure the power cord is connected. -
Page 86: Index
Index KX-TCA185: 17 Index KX-TCA285: 18 KX-TCA385: 18 A Accessory: 14 D Deregistering a Cell Phone: 45 KX-TCA185: 14 Display language: 31 KX-TCA285: 15 Do Not Disturb (DND): 40 KX-TCA385: 16 Error messages: 85 B Battery Information: 11 Flexible Keys: 31... - Page 87 Index Answer Option: 66 Bluetooth Option: 70 Display Option: 68 Incoming: 64 Key Option: 66 Other Option: 70 System Option: 69 Talk Option: 66 Tone Option: 69 Shortcut Combinations: 30 Silent Mode: 21 Soft Keys: 26 Speaker volume: 33 Specifications: 78 Standby display number: 32 System Requirements: 80 Text, entering: 59...
- Page 88 1-62, 4-chome, Minoshima, Hakata-ku, Fukuoka 812-8531, Japan © Panasonic System Networks Co., Ltd. 2013 PNQX6173YA PP0613TM1103...