
Related Manuals for Pace IPH8005


Summary of Contents for Pace IPH8005
-
Page 1: Installation Manual
AT&T U-verse Pace IPTV Receivers Installation Manual Supports Models IPH8005 and IPH8010 For use with your AT&T U-verse TV service ®... -
Page 3: Table Of Contents
Contents Safety Information ....... 4 Warnings on the power supply unit ........4 Other warnings . -
Page 4: Safety Information
The exclamation point within a triangle is intended to alert you to the presence of important instructions in the literature accompanying your receiver. To ensure correct operation, use this receiver only with the Pace-approved power supply unit provided. If you use an unapproved alternative, you will invalidate the warranty. -
Page 5: Important Safety Instructions
Important safety instructions Before you install or use the apparatus, you must read and understand these Important Safety Instructions. At all times when installing or using the apparatus you must follow these Important Safety Instructions to reduce the risk of fire, electrical shock, property damage and injury to persons. -
Page 6: Ambient Temperature
Overloading Do not overload wall AC outlets, extension cords, or other power outlets as this can result in a risk of fire or electric shock. Lightning For added protection for your receiver during a lightning storm, or when it is left unattended and unused for long periods of time, disconnect your receiver from the power supply and disconnect your receiver from your U-verse home network. -
Page 7: Safety Aspects Of Connections
Entry of objects and liquids Never push objects of any kind into your receiver through openings as they may touch dangerous voltage points or short-out parts that could result in fire or electric shock. Never spill liquid of any kind on your receiver. Placement and mounting Do not place your receiver on an unstable or uneven surface. -
Page 8: Note To The Installer
Refer all servicing issues to qualified service personnel. The shield of the coaxial cable must be grounded in accordance with Article 840-101A of the National Electrical Code, NFPA 70, 2011 Edition. Service address: Pace Americas, Inc. 3701 FAU Blvd., Suite 200 Boca Raton, FL 33431... -
Page 9: Introduction
Introduction Welcome to AT&T’s U-verse video service. The IPH8005 and IPH8010 U-verse receivers bring a new set of interactive services directly to you through your TV and your in-home IP network. The receiver uses your existing in-home coaxial cable for HPNA connections or Ethernet home network wiring and connects to most entertainment devices. -
Page 10: Package Contents
Package contents In addition to this installation manual, the receiver carton contains the following items: • IPH8005 or IPH8010 receiver. A TV receiver that supports high-definition (HD) and standard-definition (SD) video decoding. • Power cord and adapter. A 12 volt power supply unit that provides power from an AC wall outlet to the receiver. -
Page 11: Serial Number
1.5A Made in Thailand Manufactured under license from Dolby P/N: 296-0411700 Laboratories. Dolby and the double-D symbol are trademarks of Dolby Laboratories. Serial number S/N: 1234567890123 location Pace IPH8010 LISTED LISTED I.T.E. HPNA MAC: 48:44:48:de:ac:8b ICES/NMB-003 B E205389 GUID: c440f5e7-2b49-41f5-8b07-b9f478946384... -
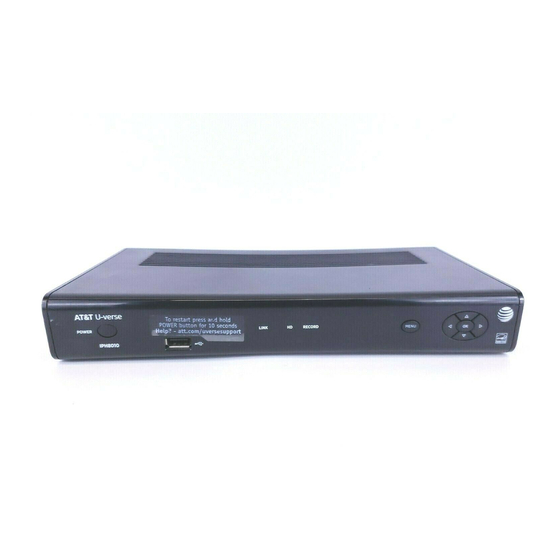
Page 12: Front Panel
Front panel The following illustration shows the buttons, lights, and connectors on the front of the receiver. Power button USB port Menu button OK button POWER LINK RECORD MENU IPH8010 Model number Power light Status lights Navigation buttons Power button Turns the set-top box on or off. -
Page 13: Back Panel
Back panel The following illustration shows the ports and connectors on the back of the receiver. Composite Analog Coaxial video audio input output output output Power VIDEO OUT TO WALL +12V (VIDEO IN) NETWORK 1.5A MAX. TO TV AUDIO POWER OPTICAL Network Component... -
Page 14: Connecting The Receiver
Connecting the Receiver To view programs broadcast in high definition, your receiver must be connected to a suitable high-definition TV or computer monitor. Your receiver is also compatible with standard-definition TVs and VCRs. Your receiver should have been connected to your TV by your installer. However, if you need to disconnect and re-connect your equipment, please read the information in this chapter carefully before you re-connect the receiver to your TV. -
Page 15: Connect The Receiver To The Home Network
Connect the receiver to the home network If you connect to your IPTV signal from your HPNAv3 in-home network over coaxial cable, use the TO WALL (VIDEO IN) connector on the back panel of the receiver to connect to the HPNAv3 in-home network through a coaxial cable. Wall outlet Receiver VIDEO OUT... -
Page 16: Connect The Receiver To The Tv
Connect the receiver to the TV The connections for an HD or SD TV are different, and before you begin, you must determine if your TV is HD or SD. Your TV must receive HD signals for you to enjoy the benefits of HDTV. - Page 17 Connections for SDTV To use the receiver with standard-definition TVs, you need to use one of the following connections to view SD content. For more information about making SDTV connections, check the owner’s manual for your TV and the appropriate connection diagrams in this manual.
-
Page 18: Video And Audio
Using an HDMI connection The HDMI connector provides the connection to an HDTV. HDMI carries signals for video and audio. To connect the receiver to the TV using an HDMI cable: Insert one end of the HDMI cable into the HDMI connector on the receiver. Insert the other end of the HDMI cable into an available HDMI connector on the TV. -
Page 19: Using A Dvi Connection With Digital Audio
Using a DVI connection with digital audio The HDMI connector on the receiver can provide the connection to an HDTV with a DVI input. If your HDTV has a Digital Visual Interface (DVI) connector, you need an HDMI-to-DVI cable and a separate digital optical audio cable. To connect the receiver to the TV using an HDMI-to-DVI cable and digital audio cable: Insert the HDMI end of the cable into the HDMI connector on the receiver. -
Page 20: Using A Dvi Connection With Analog Audio
Using a DVI connection with analog audio The HDMI connector on the receiver can provide the connection to an HDTV with a DVI input. If your HDTV has a Digital Visual Interface (DVI) connector, you need an HDMI-to-DVI cable and a separate analog audio cable. To connect the receiver to the TV using an HDMI-to-DVI cable and analog audio cable: Insert the HDMI end of the cable into the HDMI connector on the receiver. -
Page 21: Using A Component Video Connection With Digital Audio
Using a component video connection with digital audio Component video uses the Y Pb Pr (green, blue, and red) connectors to provide component video signals to an HDTV or SDTV. You must connect the audio signal separately using a digital optical audio cable. To connect the receiver to the TV using a component video cable and digital audio cable: Insert the connectors on the color-coded component video cable into the Y Pb Pr... -
Page 22: Using A Component Video Connection With Analog Audio
Using a component video connection with analog audio Component video uses the Y Pb Pr (green, blue, and red) connectors to provide component video signals to an HDTV or SDTV. You must connect the audio signal separately using an analog audio cable. To connect the receiver to the TV using a component video cable and analog audio cable: Insert the connectors on the color-coded component video cable into the Y Pb Pr... -
Page 23: Using A Composite Video Connection
Using a composite video connection Composite video provides the video connection to a SDTV. You must connect the audio signal separately. To connect the receiver to the TV using a composite video cable: Insert the yellow video connector on the color-coded composite video cable into the VIDEO OUT (yellow) connector on the receiver. -
Page 24: Using An Rf Coaxial Connection
Using an RF coaxial connection The RF coaxial connector provides the connection to an SDTV. The RF coaxial cable carries signals for standard video and audio. To connect the receiver to the TV using an RF coaxial cable: Insert one end of the RF coaxial cable into the TO TV connector on the receiver. Insert the other end of the RF coaxial cable into an available RF coaxial connector on the TV. -
Page 25: Connecting The Receiver To A Home Theater System
Connecting the receiver to a home theater system If your television viewing configuration includes a home theater system, you can connect the receiver directly to the home theater system receiver. The following example uses the HDMI port to provide the video and audio signals from the receiver to the home theater system. -
Page 26: Plug In The Receiver
Plug in the receiver Use the power adapter included in the container to provide AC power to the receiver. To connect the receiver to a power supply: Insert the 12 volt connector into the POWER connector on the receiver. Insert the AC power adapter into an AC electrical outlet. Verify that the LED on the AC power adapter lights green when the receiver is receiving power from the wall outlet. -
Page 27: Troubleshooting And Support
Troubleshooting and Support This section contains troubleshooting tips and answers to common issues and questions. Troubleshooting Use the information in this section to identify and resolve issues with the receiver. If you need further assistance, contact AT&T U-verse. No Picture •... - Page 28 • Verify that the receiver is set to the proper screen type and resolution. No Color or Incorrect Color • Verify that the current TV program is broadcast in color. • Adjust the TV color controls. • If you are using a component video connection, check that all connectors are completely and properly connected.
-
Page 29: Frequently Asked Questions
Frequently asked questions What is digital television? Digital television (DTV) is a significant leap forward in television technology compared to analog television that has been widely available since the 1940s. DTV is delivered and displayed using digital encoding, similar to the way a computer operates. By using digital technology, there is no variation in picture and sound quality from the origination point until it is displayed on your television. -
Page 30: Picture Formats
Picture formats What is the difference between a standard-screen and a wide-screen HDTV? The type of screen your HDTV has (wide-screen or standard-screen) determines how the receiver displays programs on the screen. The picture format for an HDTV is a combination of aspect ratio and screen resolution and is different for standard-screen and wide-screen HDTVs. -
Page 31: Compliance Information
Do not attempt to modify your receiver without written authorization from the manufacturer. Unauthorized modification could void your authority to operate your receiver. Trade Name: Pace Americas Responsible Party: 2Wire, Inc. DBA Pace Americas Address: 1764 Automation Parkway, San Jose, CA 95131 Phone: (408) 428-9500 Declaration of Conformity... -
Page 32: Trademarks And Licenses
Safety This product is intended to be supplied with an approved listed Pace Direct Plug-In AC/DC power adapter marked Class 2 or LPS and rated 12V, 1.5A for all IPH8005 and IPH8010 series models Trademarks and licenses This product incorporates copyright protection technology that is protected by U.S. - Page 33 Notes...
- Page 34 Notes...
- Page 36 Pace and the Pace logo are registered trademarks of Pace plc. All other trademarks are the property of their respective owners. © 2013 Pace plc. All rights reserved. Pace provides no warranty with regard to this manual, the software, or other information contained...
Need help?
Do you have a question about the IPH8005 and is the answer not in the manual?
Questions and answers