Advertisement
Table of Contents
TABLE OF CONTENTS:
EUROPICCOLA
Models: EPBB-8, EPC-8, EPG-8
Instruction Manual
FIRST-TIME OPERATION
WARMING UP THE MACHINE
MAKING ESPRESSO
TROUBLESHOOTING
P. 2
P. 4
P. 4
P. 5
P. 6
P. 8
P. 9
P. 10
P. 10
P. 11
Advertisement
Table of Contents

Related Manuals for La Pavoni Europiccola EPBB-8


Summary of Contents for La Pavoni Europiccola EPBB-8
-
Page 1: Table Of Contents
EUROPICCOLA Models: EPBB‐8, EPC‐8, EPG‐8 Instruction Manual TABLE OF CONTENTS: INTRODUCTION P. 2 FIRST‐TIME OPERATION P. 4 WARMING UP THE MACHINE P. 4 STEAMING THE MILK P. 5 MAKING ESPRESSO P. 6 MAINTENANCE P. 8 TROUBLESHOOTING P. 9 TECHNICAL DATA P. 10 CONTACT INFORMATION P. 10 MAINTENANCE NOTES P. 11 ... -
Page 2: Introduction P
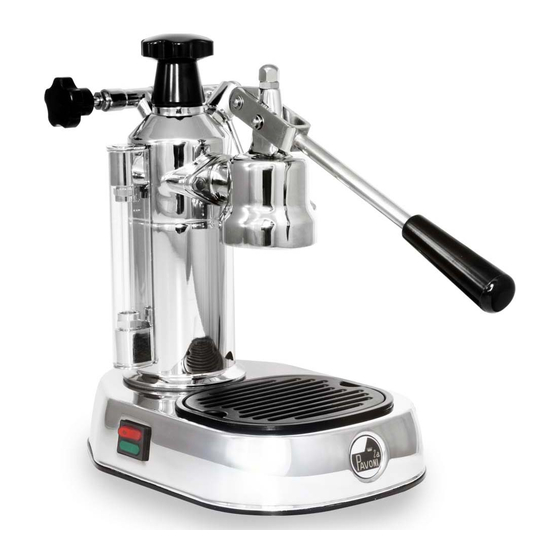
EUROPICCOLA INTRODUCTION Congratulations on your purchase of the la Pavoni espresso machine. We recommend you read through all of the instructions before beginning. Making hand‐pressed espresso is an art, and, with some practice, you will make delicious espresso every time! EQUIPMENT: LEVER • SAFETY VALVE • BOILER CAP • STEAM KNOB • SIGHT GLASS • OFF POWER SWITCH • • PRESSURE INDICATOR (2 ) DRIP BASIN PARTS • ... - Page 3 PRECAUTIONS: Install the machine on a steady, dry base. Do not immerse the machine or power cord in water. Parts of this machine get very hot. Keep out of the reach of children. Never leave your machine on when not in use. Leaving your machine on and idle for more than 30 minutes will cause excessive wear on the internal gaskets. Never operate this unit without sufficient water in the boiler (at least 1inch showing in the sight glass). Failure to maintain the proper water level can cause damage to internal parts. Note: Your unit is equipped with a manual reset fuse. Should the water level drop too low, or if the machine is left on too long, the machine may overheat, causing the fuse to blow. If this happens, the unit will not turn on. Take the following steps to restart: 1. Unplug the unit. 2. Close the boiler knob tightly. 3. Gently place the machine on its side. 4. Using a blunt instrument (the end of a pencil or pen), remove the red grommet plug under the base of the unit and push in the red switch. 5. Replace the grommet, add water if necessary, plug in, and restart. Barista tips: The beans: Use freshly roasted coffee. Try different types of coffee, even if they aren’t specifically for espresso. ...
-
Page 4: First-Time Operation P
FIRST‐TIME OPERATION: WARNING: PARTS OF THIS MACHINE GET VERY HOT DURING OPERATION. HANDLE WITH CARE. 1. Fill the boiler with water until the water level reaches the top of the sight glass. Make sure that the lever is lowered. 2. Add ½ packet of coffee descaler (enclosed). If you don’t have descaler, add 1 teaspoon of sodium carbonate. 3. Close the boiler cap and steam knob (Fig. 1). 4. Plug in the machine and turn on the power switch. Wait until it reaches the proper operating temperature. The green pressure light will go out when it is ready. 5. Leave the machine on for 15 minutes. Some water may exit from the safety valve. Place a paper towel over the base or let the water drip into the basin. 6. After 15 minutes place a container under the group and slowly raise 1 IGURE the lever. 7. Let the water pour out until the sight glass shows 1/4 tank of water remaining. 8. Lower the lever and turn off the power. You may then raise the lever again and allow the remaining water to exit. 9. When all water and steam has exited, repeat steps 1, 3, 4, 5, 6, 7 and 8. Do not use the descaler this time. STEP‐BY‐STEP INSTRUCTIONS WARMING UP THE MACHINE 1. -
Page 5: Steaming The Milk P
STEAMING THE MILK (If you don’t require steamed milk, skip to “Making Espresso”.) WARNING: BOTH STEAM TUBES WILL BE HOT DURING AND AFTER USE. USE EXTREME CARE WHEN HANDLING. Barista tip: Always use cold whole milk or 2% low fat milk for steaming and frothing. 1. Check the sight glass to ensure that there is sufficient water in the boiler. 2. Be sure the lever is lowered, and that the steam knob is closed. 3. Wait for the green light to go off, indicating that the machine is ready to deliver steam. Your la Pavoni machine is designed to steam milk two ways: Method 1: Using the standard steam wand 1. Fill a stainless steel, ceramic, or glass container up to ¾ full with milk. 2. Insert the steam wand so that it is below the surface of the milk, toward the bottom of the container. 3. Open the steam knob by turning it 3 complete turns counterclockwise (Fig. 3). 4. Immediately lower the cup so steam wand tip is even with the top of the milk. Slowly lower the cup as the froth rises, always keeping the steam wand tip even with the top of the froth. It should take approximately 15 to 20 seconds to steam a 10 oz. cup. 3 IGURE 5. After the desired amount of froth has been made you may heat up the milk beneath the froth by raising the cup, plunging the tip deeper into the milk. ... -
Page 6: Making Espresso P
Steam the milk: 1. Make sure your la Pavoni has reached proper operating temperature (the green light should be off). 2. Place tube into a container of milk (Fig. 6). 3. Hold a cup under the black aerator spout. 4. Open the steam knob slowly 2 complete turns. 6 FIGURE 5. When the desired amount of milk has been dispensed, stop the flow of milk by closing the steam knob. After every use you must clean the tube and aerator: 1. Place the tube in a cup of clean water. 2. Position an empty cup under the aerator. 3. Open the steam knob and allow a few ounces of water to cycle through. Close the steam knob when finished. MAKING ESPRESSO Barista tips: The cup and group: Your espresso will stay warmer if you preheat the cup and group. Insert the portafilter and filter (empty) into the group. Put your empty espresso cup under the group and lift the lever for about 5 seconds. This will run hot water through the group and filter, and fill your cup with warm water. The cup stays warm as you prepare your coffee. The filters: The one‐cup filter produces a 1‐ to 1.4‐ounce shot, and the two‐cup filter produces about a 2.5‐ounce shot. If you prefer a larger shot, use the large filter for single shots. Using two pulls of the lever for one dose of coffee is not recommended, as it results in weak espresso. The grind: To make a great shot of espresso, you need a very fine grind that is firmly tamped. You can adjust for a coarser grind by tamping harder, and adjust for a finer grind by tamping ... - Page 7 “Pulling” espresso shots 1. Place the portafilter up under the group and turn the filter handle to the left (Fig. 9). The handle should fit snugly. If the handle won’t catch on the grooves of the group, remove some coffee from the coffee filter and try again. 2. Place your cup(s) under the portafilter. 3. Raise the lever slowly. After a few seconds the coffee should begin to dribble out into the bottom of the cup. Hold the lever up for a total of 10 seconds. 4. Lower the lever and let it rest at its lowest position. 9 IGURE Barista tips: The lever: If it the coffee doesn’t start to dribble within 15‐20 seconds after you’ve raised the lever, lower the lever about 4 inches. Raise it back up, wait for the coffee to dribble out, and start the shot again. Next time, lighten your tamp or grind more coarsely. The pull: If the lever comes down too easily, the coffee will bubble or gush out, and it will taste weak and bitter. Next time, tamp harder or try a finer grind. If you need excessive pressure to pull down the lever, you need a coarser grind and/or a lighter tamp. The portafilter: After you have dispensed your coffee, wait about 30 seconds before removing the portafilter to avoid spraying the coffee grounds. Remove the portafilter slowly from left to right. The crema: Crema is foam that is formed at the end of your pull, and is a mark of good espresso. To form crema, you must have fresh beans and fresh water without any chemical taste (such as chlorine). You must also be sure that the water coming through the group isn’t too hot (don’t leave the machine on too long). Other things to try: Grind the grounds to a finer consistency. Put more grounds in the filter. Leave the lever in the raised position longer, allowing more water to soak into the grounds. Lower the handle with more force so the coffee comes out faster. 7 ...
-
Page 8: Maintenance P
MAINTENANCE WARNING: BEFORE PERFORMING ANY MAINTENANCE, TURN OFF THE UNIT AND UNPLUG THE POWER CORD. AFTER EVERY USE: 1. Remove the portafilter from the group. 2. Place a receptacle under the group and lift the handle. This will drain the remaining water from the unit and flush the group. When there is no water visible in the sight glass, lower the handle. 3. Purge the steam wand by turning the knob and letting the steam escape for 5‐10 seconds. 4. Clean the portafilter and filter. Make sure there is no coffee residue in the filter. 5. Wipe the surface of the machine, removing any residue. Wipe the steam wand, making sure to remove any remaining milk. Wipe underneath the group. Do not use abrasive or ammonia‐based cleaning products, as they will damage the finish. 2‐3 TIMES A YEAR: Run the First Time Operation procedures, p.3. Contact us to order more descaler (see Contact Information, p. 9). Liquid descalers are not recommended. EVERY 2‐3 YEARS: Take or send your machine to a trained service technician to have the gaskets replaced. 8 ... -
Page 9: Troubleshooting
TROUBLESHOOTING COFFEE EXITS TOO SLOWLY OR •Coffee grinds are too fine. HANDLE IS HARD TO LOWER •Coffee is packed too tightly in filter. •There is too much coffee in filter. COFFEE LEAKS OUT OF SIDES OF •Portafilter is not properly mounted to group. PORTAFILTER •There is too much coffee in filter. •Group gasket needs to be replaced. COFFEE NOT HOT ENOUGH •Portafilter and filter were not warmed before use. COFFEE SPRAYED OUT WHEN •There is too much pressure in boiler. Wait 30 PORTAFILTER WAS REMOVED seconds after coffee exits before slowly removing portafilter. CREMA NOT FORMING •Coffee grind is not fine enough. •There is not enough coffee in filter. MACHINE DOES NOT MAINTAIN •Machine needs to be reset: Turn it off, then PRESSURE following normal procedures for startup. MACHINE DOES NOT MAKE STEAM •Holes on end of steam tube are blocked. •Water level in tank is too low. •Machine isn’t sufficiently heated. MILK NOT STEAMING •Milk is too warm prior to steaming. •Machine is not sufficiently heated. PORTAFILTER DOES NOT FIT INTO •There is too much coffee in filter. GROUP POWER LIGHT DOES NOT LIGHT UP •Power cord is not connected. •Outlet has no power. STEAMED MILK IS TOO WATERY ... -
Page 10: Technical Data P
TECHNICAL DATA Size: 11”l x 7”w x 12”h Weight: 15 lbs. Boiler capacity: 20 oz. Steam delivery: 8 minutes Power supply: 110 Volt/60 Hz Heating element: 1000‐Watts max – 800‐Watts min. ETL Safety Listed CONTACT INFORMATION Contact us for further information about the operation of your la Pavoni machine, extra parts, or the name of a repair facility near you. European Gift & Houseware PO Box 111 Mt. Vernon, N. Y. 10550 Phone: l‐800‐927‐0277 Email: sales@europeangift.com www.europeangift.com 10 ... -
Page 11: Maintenance Notes P
MAINTENANCE NOTES DATE: NOTE: ...
Need help?
Do you have a question about the Europiccola EPBB-8 and is the answer not in the manual?
Questions and answers