Raspberry Pi A User Manual
Hide thumbs
Also See for Raspberry Pi A:
- Getting started manual (13 pages) ,
- Quick start manual (2 pages)
Table of Contents
Advertisement
Quick Links
Advertisement
Table of Contents

Subscribe to Our Youtube Channel
Related Manuals for Raspberry Pi Raspberry Pi A


Summary of Contents for Raspberry Pi Raspberry Pi A
- Page 3 Raspberry Pi ® User Guide 2nd Edition...
- Page 5 Raspberry Pi ® User Guide 2nd Edition Eben Upton and Gareth Halfacree...
- Page 6 Trademarks: Wiley and the Wiley logo are trademarks or registered trademarks of John Wiley & Sons, Inc. and/or its affiliates in the United States and/or other countries, and may not be used without written permission. Raspberry Pi and the Raspberry Pi logo are registered trademarks of the Raspberry Pi Foundation. All other trademarks are the property of their respective owners.
- Page 7 Publisher’s Acknowledgements Some of the people who helped bring this book to market include the following: Editorial and Production Marketing VP Consumer and Technology Associate Marketing Director Publishing Director Louise Breinholt Michelle Leete Marketing Manager Associate Director–Book Content Lorna Mein Management Marketing Assistant Martin Tribe...
- Page 8 For Liz, who made it all possible. —Eben For my father, the enthusiastic past, and my daughter, the exciting future. —Gareth...
- Page 9 About the Authors Eben Upton is a founder and trustee of the Raspberry Pi Foundation, and serves as its Executive Director. He is responsible for the overall software and hardware architecture of the Raspberry Pi, and for the Foundation’s relationships with its key suppliers and custom- ers.
-
Page 11: Table Of Contents
So What Can You Do with the Raspberry Pi? ....... . - Page 12 R A S P B E R R Y P I U S E R G U I D E , 2 N D E D I T I O N CHAP TE R 3 Linux System Administration . . . . . . . . . . . . . . . . . . . . . . . . . . . . . 41 Linux: An Overview .
- Page 13 Overclocking the Raspberry Pi ........
- Page 14 Installing WordPress ............150 Part III: Programming with the Raspberry Pi CHAP TE R 1 1 An Introduction to Scratch . . . . . . . . . . . . . . . . . . . . . . . . . . . . .
- Page 15 C HA PT E R 15 The Raspberry Pi Camera Module . . . . . . . . . . . . . . . . . . . . . . . . 233 Why Use the Camera Module? ..........234 Installing the Camera Module .
- Page 16 R A S P B E R R Y P I U S E R G U I D E , 2 N D E D I T I O N CHAP TE R 1 6 Add-on Boards. . . . . . . . . . . . . . . . . . . . . . . . . . . . . . . . . . . . . . 249 Ciseco Slice of Pi ............250 Adafruit Prototyping Pi Plate .
-
Page 17: Introduction
In my day job, where I design the sort of silicon chips that we use in the Raspberry Pi as a processor and work on the low-level software that runs on them, I basically get paid to sit around all day playing. What... - Page 18 Now, obviously, I’m not monomaniacal enough to imagine that simply making the Raspberry Pi is enough to effect all the changes that are needed. But I do believe that it can act as a catalyst. We’re already seeing big changes in the UK schools’ cur- riculum, where Computing is arriving on the syllabus and ICT is being reshaped, and we’ve...
-
Page 19: A Bit Of History
The Raspberry Pi is cheap enough to buy with a few weeks’ pocket money, and you probably have all the equipment you need to make it work: a TV, an SD card that can come from an old camera, a mobile phone charger, a keyboard and a mouse. - Page 20 U S E R G U I D E , S E C O N D E D I T I O N in their spare time. So the initial idea behind the Raspberry Pi was a very parochial one with a very tight (and pretty unambitious) focus: I wanted to make a tool to get the small number of applicants to this small university course a kick start.
- Page 21 A chip like this seemed the obvious next step for the shape the Raspberry Pi was taking, so I worked on taping out a low- cost variant that had an ARM microprocessor on board and could handle the processing grunt we needed.
- Page 22 (engineering cost down is a harder job than you might think), and to get the Raspberry Pi as useable as possible for people who might not be able to afford much in the way of peripherals.
- Page 23 I N T R O D U C T I O N Our Community The Raspberry Pi community is one of the things we’re proudest of. We started with a very bare-bones blog at www.raspberrypi.org just after Rory’s May 2011 video, and put up a forum on the same website shortly after that.
-
Page 24: So What Can You Do With The Raspberry Pi
The first production Pis were made in Chinese factories, but in the last year we have managed NOTE to repatriate all of the production to the UK. Your Raspberry Pi is now made in South Wales, in an area of the country with a proud manufacturing heritage, but few remaining factories. - Page 25 We’ve been immensely proud to see Raspberry Pi labs spring up in the most unlikely places, like a village lab in a part of Cameroon with no electricity network where the Pis run off solar power, generators and batteries, or a school high in the mountains in Bhutan.
- Page 26 R A S P B E R R Y P I U S E R G U I D E , S E C O N D E D I T I O N ...
-
Page 27: Part I: Connecting The Board
Board Chapter 1 Meet the Raspberry Pi Chapter 2 Getting Started with Raspberry Pi Chapter 3 Linux System Administration Chapter 4 Troubleshooting Chapter 5 Network Configuration Chapter 6 The Raspberry Pi Software Configuration Tool Chapter 7 Advanced Raspberry Pi Configuration... -
Page 29: Meet The Raspberry Pi
Chapter Meet the Raspb er ry Pi... -
Page 30: A Trip Around The Board
Pi. A Trip Around the Board The Raspberry Pi is currently available as two different models, known as the Model A and the Model B. While there are differences, with the Model A sacrificing some functionality in order to reduce its cost and power requirements, both share plenty of similarities that you’ll... - Page 31 On the underside of the Raspberry Pi board on the left-hand side is an SD card slot. A Secure Digital (SD) memory card provides storage for the operating system, programs, data and other...
-
Page 32: Model A
The right-hand edge of the Pi will have different connectors depending on which model of Raspberry Pi you have, the Model A or the Model B. Above these is a series of Light Emitting Diodes (LEDs), the top two of which—marked ACT and PWR and providing an activity noti- fication and power notification respectively—are present on all boards. -
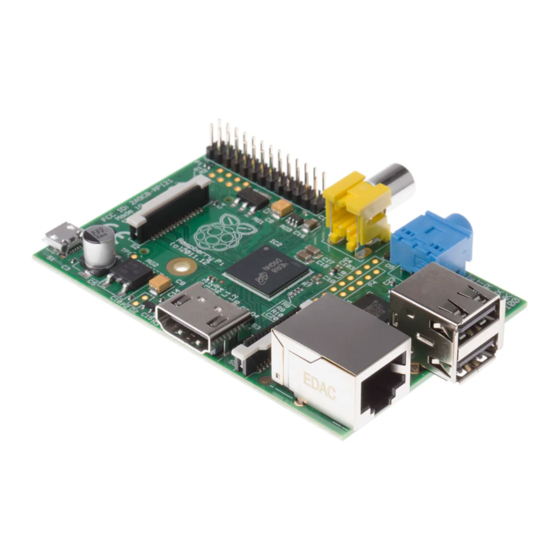
Page 33: Model B
Model B The Raspberry Pi Model B shown in Figure 1-3 is more expensive than the Model A, but comes with considerable advantages. Internally, it includes twice the memory at 512MB, while externally there are additional ports not available on the lower-cost model. For many users, the Model B is a worthwhile investment;... -
Page 34: A History Of Model B Pcb Revisions
The Model B available today is known as Revision 2, as it is the second board to be made with the Model B designation. If you have bought a Raspberry Pi Model B second-hand, or purchased it some time ago, you may have a Revision 1 board, which has a few differences. -
Page 35: Arm Versus X86
(CISC) architectures. The ARM-based BCM2835 is the secret of how the Raspberry Pi is able to operate on just the 5V 1A power supply provided via the onboard micro-USB port. It’s also the reason why you won’t find any metal heat sinks on the device: the chip’s low power draw directly translates... -
Page 36: Windows Versus Linux
Linux core. If you find that you enjoy the experience of using Linux on the Raspberry Pi, you could consider adding it to other computing devices you use as well. It will happily coexist with your current operating system, allowing you to enjoy the benefits of both while giving you a familiar environment when your Pi is unavailable. -
Page 37: Getting Started With The Raspberry Pi
Chapter Getting Starte d wi t h th e Rasp berry P i... -
Page 38: Connecting A Display
You’ll also learn how to download and install an operating system for the Pi. Your Mileage May Vary The information and instructions in this book give you all you need to get your Raspberry Pi up and running and to make the most of its capabilities. Be aware that some of the software... -
Page 39: Hdmi Video
If your monitor has a VGA input—a D-shaped connector with 15 pins, typically coloured silver and blue—the Raspberry Pi can’t connect to it directly. To use this type of monitor, you will need to purchase what is known as an adapter dongle; look for models that convert... -
Page 40: Dsi Video
Pi, but for beginners, the use of a composite or HDMI display is recommended. Connecting Audio If you’re using the Raspberry Pi’s HDMI port, audio is simple: when properly configured, the HDMI port carries both the video signal and a digital audio signal. This means that you can connect a single cable to your display device to enjoy both sound and pictures. -
Page 41: Connecting A Keyboard And Mouse
While headphones can be connected directly to the Raspberry Pi, you may find the volume a little lacking. If possible, connect a pair of powered speakers instead. The amplifier inside will help boost the signal to a more audible level, while many will also provide a physical volume control. - Page 42 CD drives and external hard drives. If you want to reduce the number of power sockets in use, connect the Raspberry Pi’s USB power lead to your powered USB hub. This way, the Pi can draw its power directly from the hub, rather than needing its own dedicated power socket and mains adapter.
-
Page 43: Installing Noobs On An Sd Card
Some SD cards work better than others, with some models refusing to work at all with the Raspberry Pi. For an up-to-date list of SD card models known to work with the Pi, visit the eLinux Wiki page at http://www.elinux.org/RPi_SD_cards. -
Page 44: Connecting External Storage
SD card Connecting External Storage While the Raspberry Pi uses an SD card for its main storage device—known as a boot device—you may find that you run into space limitations quite quickly. Although large SD cards holding 32 GB, 64 GB or more are available, they are often prohibitively expensive. -
Page 45: Connecting The Network
Don’t be tempted to go for a gigabit-class adapter, which may be referred to as a 10/100/1000 USB Ethernet adapter. Standard USB ports, as used on the Raspberry Pi, can’t cope with the speed of a gigabit Ethernet connection, and you’ll see no benefit from the more expensive... -
Page 46: Wired Networking
The Raspberry Pi is cleverer than that, however. The RJ45 port on the side of the Pi (see Figure 2-6) includes a feature known as auto-MDI, which allows it to reconfigure itself auto- matically. -
Page 47: Wireless Networking
Chapter 5, “Network Configuration”. Wireless Networking Current Raspberry Pi models don’t feature any form of wireless network capability onboard, but—as with adding wired Ethernet to the Model A—it’s possible to add Wi-Fi support to any Pi using a USB wireless adapter (see Figure 2-7). -
Page 48: Connecting Power
Ensure that Linux is listed as a supported operating system. Some wireless adapters ❍ are provided with drivers for Windows and OS X only, making them incompatible with the Raspberry Pi. A list of Wi-Fi adapters known to work with the Raspberry Pi can be found on the following website: http://elinux.org/RPi_USB_Wi-Fi_ Adapters ❍... -
Page 49: Installing The Operating System
If you have installed NOOBS on your SD card, or purchased an SD card with NOOBS pre- installed, powering on the Raspberry Pi will display a menu (see Figure 2-8). This menu pro- vides a list of operating systems suitable for the Pi, any one (or more) of which can be installed. - Page 50 P A R T I C O N N E C T I N G T H E B O A R D Figure 2-8: The NOOBS operating system menu If you see only a blank screen, but the Pi’s ACT and PWR lights are on, you may need to choose a different display mode.
-
Page 51: Installing Manually
NOOBS or newer versions that the tool doesn’t yet have available. To prepare a blank SD card for use with the Raspberry Pi, you’ll need to flash an operating system onto the card, using your desktop or laptop computer. While this is slightly more complicated than simply dragging and dropping files onto the card, it shouldn’t take more... - Page 52 SD card set up by the distribution’s creators in a way that the Raspberry Pi understands. This is the file that needs to be flashed to the SD card. In the following instructions, you’ll be using a software utility called .
- Page 53 C H A P T E R 2 G E T T I N G S T A R T E D W I T H T H E R A S P B E R R Y P I Flashing from Linux If your current PC is running a variant of Linux already, you can use the command to write the...
- Page 54 SD card images of Linux distributions, this features a simple graphical user interface that makes the creation of a Raspberry Pi SD card straightforward. The latest version of Image Writer for Windows can be found at the official website: .
- Page 55 When the image has been flashed onto the SD card, remove it from the computer and insert it into the Raspberry Pi’s SD card slot, located underneath the circuit board. The SD card should be inserted with the label facing away from the board and pushed fully home to ensure a good...
-
Page 57: Linux System Administration
Chapter Li nux S yste m A dm i ni st r at io n... -
Page 58: Linux: An Overview
(GUI) that provides an easy way to perform common tasks. It is, however, quite dif- ferent to both Windows and OS X, so if you’re going to get the most out of your Raspberry Pi, you’ll need a quick primer in using the operating system. - Page 59 C H A P T E R 3 L I N U X S Y S T E M A D M I N I S T R A T I O N Table 3-1 The Quick Linux Glossary Term/Concept Definition Bash The most popular shell choice, used in the majority of Linux distributions.
-
Page 60: Linux Basics
P A R T I C O N N E C T I N G T H E B O A R D The Terminal and the GUI As in OS X and Windows, there are typically two main ways to achieve a given goal in Linux: through the graphical user interface (GUI) and through the command line (known in Linux parlance as the console or the terminal). -
Page 61: Introducing Raspbian
Raspberry Pi. Raspbian takes Debian as its base, or parent distribution, and adds custom tools and software to make using the Raspberry Pi as easy as possible. - Page 62 Raspbian distribution on a Raspberry Pi The following lists describe the software packages, grouped by category. There is also a cate- gory not covered here, dubbed “Other”, into which numerous system tools are grouped. If you have installed a program and can’t find it anywhere else, try the Other menu.
- Page 63 Trying both will allow you to experiment and find the one that works best for you. wps_gui—A graphical user interface for configuring a Raspberry Pi with optional USB ❍ Wireless Adapter to connect to a Wireless Protected System (WPS) encrypted network.
- Page 64 Monitor Settings—The resolution that the monitor or TV connected to the Pi runs at ❍ can be altered here, although advanced changes require modification of configuration files. You’ll learn about this in Chapter 7, “Advanced Raspberry Pi Configuration”. Openbox Configuration Manager—The LXDE GUI uses a desktop environment ❍...
-
Page 65: About Raspbian's Parent, Debian
Acorn Computers in the late 1980s for its Archimedes range of personal computers—which, like the Raspberry Pi, were based on an ARM processor—RiscOS is a fast, easy-to-use operat- ing system with a clean appearance to its graphical user interface. While the breakup of Acorn in 1998 saw the popularity of RiscOS decline, the platform still has its fans, who were quick to add support for the Raspberry Pi. -
Page 66: Using External Storage Devices
SD card. As you learned in Chapter 1, “Meet the Raspberry Pi”, it’s possible to connect USB Mass Storage (UMS) devices to the Pi in order to gain access to more storage space. -
Page 67: Creating A New User Account
C H A P T E R 3 L I N U X S Y S T E M A D M I N I S T R A T I O N Connect the USB storage device to the Pi, either directly or through a connected USB hub. -
Page 68: File System Layout
The content of the SD card is known as its file system and is split into multiple sections, each with a particular purpose. Although it’s not necessary for you to understand what each sec- tion does in order to use the Raspberry Pi, it can be helpful background knowledge should anything go wrong. -
Page 69: Logical Layout
C H A P T E R 3 L I N U X S Y S T E M A D M I N I S T R A T I O N Logical Layout The way Linux deals with drives, files, folders and devices is somewhat different to other operating systems. -
Page 70: Physical Layout
The first partition on the disk is a small (approximately 75 MB) partition formatted as VFAT, the same partition format used by Microsoft Windows for removable drives. This is mounted, or made accessible, by Linux in the directory and contains all the files required to /boot configure the Raspberry Pi and to load Linux itself. -
Page 71: Installing And Uninstalling Software
Pi according to your own requirements. Obtaining Software from the Pi Store Installing new software onto the Pi is simple, thanks to the inclusion of the Raspberry Pi Store. This is a custom shopfront where Pi programmers can offer their software for quick download and installation. - Page 72 P A R T I C O N N E C T I N G T H E B O A R D Software on the Pi Store is split into categories, ranging from games to tutorials and even media like videos, books and magazines. Clicking on a category across the top will show the software from that category in a grid, which can be scrolled using the keyboard or mouse.
-
Page 73: Obtaining Software From Elsewhere
The Pi Store My Library screen As you learn to use the Raspberry Pi, and especially if you’re learning to program, you may find yourself writing software of your own. Whether it’s a game, a productivity application or even a tutorial, you can quickly and easily list it for download on the Pi Store by clicking the Upload option and filling in the form that appears. -
Page 74: Finding The Software You Want
P A R T I C O N N E C T I N G T H E B O A R D Although is designed to be operated from the command line, it’s very user-friendly and easy to learn. There are GUIs for , such as the popular Synaptic Package Manager, but they often struggle to run on the Pi due to the lack of memory. -
Page 75: Installing Software
C H A P T E R 3 L I N U X S Y S T E M A D M I N I S T R A T I O N For example, to find a game to play, you can type the following command: apt-cache search game That tells to search its list of available software for anything that has the word... - Page 76 P A R T I C O N N E C T I N G T H E B O A R D it affects all users of the Raspberry Pi. As a result, the commands will need to be prefaced with to tell the operating system that it should be run as the root user.
-
Page 77: Uninstalling Software
C H A P T E R 3 L I N U X S Y S T E M A D M I N I S T R A T I O N Uninstalling Software If you decide you no longer want a piece of software, also includes a com- apt-get... -
Page 78: Shutting The Pi Down Safely
P A R T I C O N N E C T I N G T H E B O A R D If the package is already installed, will treat it as an in-place upgrade. If you’re already running the latest version available, will simply tell you it cannot upgrade the software, and will then exit. -
Page 79: Troubleshooting
Chapter T r oub leshoo ting... -
Page 80: Keyboard And Mouse Diagnostics
There are typically two reasons why a USB keyboard fails to operate correctly when con- nected to the Raspberry Pi: it’s drawing too much power, or its internal chipset is conflicting with the USB circuitry on the Pi. -
Page 81: Power Diagnostics
Power Diagnostics Many problems with the Raspberry Pi can be traced to an inadequate power supply. The Model A requires a 5 V supply capable of providing a 500 mA current, while the Model B’s extra components bump up the current requirement to 700 mA. Not all USB power adapters are designed to offer this much power, even if their labelling claims otherwise. - Page 82 (negative) meter probe to TP2, located between the copper GPIO pins and the yellow- and-silver RCA phono connector at the top-left of the board (see Figure 4-1). Figure 4-1: The two voltage test points, labelled TP1 and TP2, on a Raspberry Pi Model B Revision 1...
-
Page 83: Display Diagnostics
To fix this, note the resolution and refresh rate of your connected display, and then jump to Chapter 7, “Advanced Raspberry Pi Configuration”, to find out how to set these manually. Another issue is a too-large or too-small image, either missing portions at the edge of the screen or sitting in the middle of a large black border. -
Page 84: Boot Diagnostics
Linux distribution is available. (See Chapter 1, “Meet the Raspberry Pi”, for more informa- tion about distributions.) If you’ve been changing the speed of your Raspberry Pi by overclocking (see Chapter 6, “The Raspberry Pi Software Configuration Tool”), this can also stop it from booting correctly. To temporarily disable the overclock and run the Pi at its default speed, hold down the Shift key as you turn the Pi on. - Page 85 (see Figure 4-2). For the standard Raspberry Pi Model B, there are two ports: the physical Ethernet port on the right side of the board, and a virtual loopback interface that allows pro- grams on the Pi to talk to each other.
- Page 86 P A R T I C O N N E C T I N G T H E B O A R D Bcast—The broadcast address for the network to which the Pi is connected. Any traffic ❍ sent to this address will be received by every device on the network. Mask—The network mask, which controls the maximum size of the network to which ❍...
-
Page 87: The Emergency Kernel
C H A P T E R 4 T R O U B L E S H O O T I N G You can test the networking by using the command, which sends data to a remote ping computer and waits for a response. If everything’s working, you should see the same response as shown in Figure 4-3. - Page 88 . Reversing the process is as simple as opening again kernel.img cmdline.txt and removing the entry. You’ll learn more about and how it affects the operation of the Raspberry Pi cmdline.txt in Chapter 7, “Advanced Raspberry Pi Configuration”.
-
Page 89: Network Configuration
Chapter Net work Configur at ion... -
Page 90: Wired Networking
C O N N E C T I N G T H E B O A R D FOR MOST USERS, configuring the Raspberry Pi’s network is as easy as plugging a cable into the Model B’s Ethernet port—or a USB Ethernet adapter, in the case of the Model A. For others, however, the network requires manual configuration. - Page 91 C H A P T E R 5 N E T W O R K C O N F I G U R A T I O N Figure 5-1: Editing /etc/ network/ interfaces with nano Make sure that you press the Tab key at the start of each line, and don’t actually type [Tab]. characters in the configuration lines represent network addresses you’ll need to enter.
- Page 92 P A R T I C O N N E C T I N G T H E B O A R D If you need to return to automatic settings via DHCP, you need to edit the file interfaces again and delete the settings.
-
Page 93: Wireless Networking
Model B Wireless Networking Although no current models of the Raspberry Pi include Wi-Fi networking hardware onboard, it’s possible to add wireless connectivity with a simple USB Wi-Fi adapter. However, you will need to configure the adapter before you can use it to get your Pi online. -
Page 94: Installing Firmware
Chapter 2, “Getting Started with the Raspberry Pi”, you can continue. If not, connect the adapter now. The kernel ring buffer is a special portion of memory used by the Linux kernel to store its human-readable output. - Page 95 C H A P T E R 5 N E T W O R K C O N F I G U R A T I O N This will print out the entire kernel ring buffer, which will contain all messages output by the kernel since the Pi was switched on.
- Page 96 , and having multiple firmware packages apt-get remove does no harm. The following wireless firmware packages are available in the recommended Raspbian distribution on the Raspberry Pi: atmel-firmware—for devices based on the Atmel AT76C50X chipset ❍ firmware-atheros—for devices based on Atheros chipsets ❍...
- Page 97 C H A P T E R 5 N E T W O R K C O N F I G U R A T I O N The firmware for the example Zyxel wireless adapter is provided by the firmware-ralink package in this list.
-
Page 98: Connecting To A Wireless Network Via Wpa_Gui
C O N N E C T I N G T H E B O A R D Connecting to a Wireless Network via wpa_gui The simplest way to connect to a wireless network from the Raspberry Pi is to use the tool. This provides a graphical user interface for software that would otherwise... - Page 99 C H A P T E R 5 N E T W O R K C O N F I G U R A T I O N Finding a wireless network is a process known as scanning, which in is activated by wpa_gui clicking the Scan button at the bottom-right of the window.
- Page 100 P A R T I C O N N E C T I N G T H E B O A R D Figure 5-6: Adding a network to wpa_gui If your network includes a Wi-Fi Protected Setup (WPS) option, you can click the WPS button at the bottom-left of the window to perform a one-click setup.
-
Page 101: Connecting To A Wireless Network Via The Terminal
C H A P T E R 5 N E T W O R K C O N F I G U R A T I O N Figure 5-7: Connected to a wireless network via wpa_gui If you need to connect to a different network in the future, simply start the process again from the beginning. - Page 102 P A R T I C O N N E C T I N G T H E B O A R D This command will return a list of all the wireless networks reachable from the Pi, together with their details (see Figure 5-8). If you receive an error message at this point—in particu- lar, one that claims the network or interface is down—check that you have installed the cor- rect firmware, and that the USB wireless adapter is connected to a powered USB hub.
- Page 103 C H A P T E R 5 N E T W O R K C O N F I G U R A T I O N Standard—The IEEE 802.11 wireless standards have a variety of different types, dis- ❍...
- Page 104 P A R T I C O N N E C T I N G T H E B O A R D Figure 5-9: The output of iwconfig when not connected to a wireless network To connect the Pi to a wireless network, you will need to add some lines into the /etc/net- file.
- Page 105 C H A P T E R 5 N E T W O R K C O N F I G U R A T I O N Figure 5-10: Editing the interfaces file for wireless network access Once the entry is in place, save the file by pressing CTRL + O and then quit with nano CTRL + X.
- Page 106 P A R T I C O N N E C T I N G T H E B O A R D program stores its configuration in a file called , located in wpasupplicant wpa.conf directory. To begin configuring the Pi for wireless access, first open a new blank file /etc for editing by typing the following: sudo nano /etc/wpa.conf...
- Page 107 C H A P T E R 5 N E T W O R K C O N F I G U R A T I O N WPA/WPA2 Encryption If your wireless network uses WPA or WPA2 encryption, finish the file as follows: wpa.conf [Tab] key_mgmt=WPA-PSK...
- Page 108 P A R T I C O N N E C T I N G T H E B O A R D To make sure that the network is operational, unplug the Pi’s Ethernet cable (if attached) and type the following: ping -c 1 www.raspberrypi.org If you start having problems with your Pi following the installation of a USB wireless adapter, it could be due to a conflict with other USB devices.
-
Page 109: The Raspberry Pi Software Configuration Tool
Chapter T he Raspb erry P i Sof t w ar e Conf iguration T oo l... -
Page 110: Running The Tool
The Raspberry Pi Software Configuration Tool edits a number of files that are important to the running of the Raspberry Pi. As a result, the tool can only be run as the root user, using command. To load the tool, type the following command:... -
Page 111: The Setup Options Screen
C H A P T E R 6 T H E R A S P B E R R Y P I S O F T W A R E C O N F I G U R A T I O N T O O L The Enter key is used to activate an option when it is highlighted by the red band. -
Page 112: Change User Password
It does this to ensure that the Pi is ready to use as quickly as possible, and also to save mem- ory. Many common uses of the Pi—including using it as a web server or recording video or still images with the Raspberry Pi Camera Module—work fine at the console without the need to load the desktop graphical user interface. -
Page 113: Internationalisation Options
C H A P T E R 6 T H E R A S P B E R R Y P I S O F T W A R E C O N F I G U R A T I O N T O O L 4 Internationalisation Options This menu option provides a way for users in countries other than the UK to configure the Pi for their needs (see Figure 6-2). - Page 114 I2 Change Timezone The system clock of the Raspberry Pi is set to Greenwich Mean Time by default. If you live in a different time zone, this means your Pi will be displaying the wrong time. Choosing the Change Timezone menu option with the cursor keys and pressing Enter will present you with a third menu, listing geographic areas like the Indian Ocean, the US and Europe.
-
Page 115: Enable Camera
T H E R A S P B E R R Y P I S O F T W A R E C O N F I G U R A T I O N T O O L 5 Enable Camera This option should be used only if you have a Raspberry Pi Camera Module (see Chapter 15, “The Raspberry Pi Camera Module”) installed in your system. Choose the Enable Camera option with the cursor keys, press Enter, and then press Enter again to confirm the change. -
Page 116: Overclock
Overclocking refers to the process of running a device at a speed higher than its manufactur- ers intended. The Raspberry Pi’s BCM2835 processor can be run above its default speed of 700MHz to boost the performance of the system. Such performance comes at a price, how- ever, in that the chip will run hotter than before, will draw more power and may suffer from a shorter lifespan than a Pi running at its default speed. -
Page 117: Advanced Options
None, Modest, Medium, High and Turbo. Almost all Raspberry Pi models should be able to use the Modest setting, which sim- ply increases the processor’s clock speed to 800MHz. Many will be able to use Medium, which increases the voltage applied to the processor to reach 900MHz and additionally increases the memory speed from 400MHz to 450MHz. - Page 118 The latter is most common when using the Pi’s composite video output (see Chapter 2, “Getting Started with the Raspberry Pi”) with an older TV set. To adjust the overscan setting, highlight the Overscan option with the cursor keys and press Enter.
- Page 119 T H E R A S P B E R R Y P I S O F T W A R E C O N F I G U R A T I O N T O O L command. Hostnames should be unique, which can cause a problem if you have more than one Raspberry Pi on your network. You can change a Pi’s hostname at any time using the Hostname option of ’s Advanced Options menu, selected by highlighting it...
- Page 120 Enter again to confirm that you want the Pi to reboot. A4 SSH The Secure Shell, also known as SSH, is a way of accessing the Raspberry Pi’s terminal over the network. It’s most commonly used when running the Pi as a standalone server, as it doesn’t require you to have a keyboard or monitor attached.
-
Page 121: About Raspi-Config
C H A P T E R 6 T H E R A S P B E R R Y P I S O F T W A R E C O N F I G U R A T I O N T O O L 9 About raspi-config The final menu option available in simply introduces the tool. -
Page 123: Advanced Raspberry Pi Configuration
Chapter Advan ced R aspberr y Pi Conf iguration... -
Page 124: Editing Configuration Files Via Noobs
Exit on the main window to reboot the Pi with its new settings. If you have a Raspberry Pi Model B that is connected to the Internet, you can also click the Online Help button or press the H key on the keyboard to load a web browser that will take you to the Raspberry Pi Forums. - Page 125 C H A P T E R 7 A D V A N C E D R A S P B E R R Y P I C O N F I G U R A T I O N Figure 7-1: The Edit Config button in...
-
Page 126: Hardware Settings-Config.txt
P A R T I C O N N E C T I N G T H E B O A R D Hardware Settings—config.txt The Pi’s hardware is controlled by settings contained in a file called , which is located config.txt in the directory (see Figure 7-3). -
Page 127: Modifying The Display
Sometimes, however, this automatic detection doesn’t work. This is often the case when a Raspberry Pi from one country is connected to an older TV from another coun- try. If you connect your Pi to your TV and there’s nothing to see, you may need to override these defaults. - Page 128 1—DVI output voltages. In this mode, no audio is included on the HDMI cable. • 2—HDMI output voltages. In this mode, audio is included on the HDMI cable. hdmi_force_hotplug—Forces the Raspberry Pi to use the HDMI port, even if it ❍ doesn’t detect a connected display. A value of...
- Page 129 C H A P T E R 7 A D V A N C E D R A S P B E R R Y P I C O N F I G U R A T I O N hdmi_group—Sets the HDMI group mode to CEA or DMT.
-
Page 130: Boot Options
GPU or CPU voltages will set a fuse in the chip, which invalidates the Raspberry Pi’s warranty even if the setting is returned to normal before any damage is done. Damage caused when using these settings will not be put right by the Raspberry Pi Foundation or by the retailer from whom you purchased your Pi. - Page 131 C H A P T E R 7 A D V A N C E D R A S P B E R R Y P I C O N F I G U R A T I O N The BCM2835 multimedia processor at the heart of the Pi is a system-on-chip (SoC) design split into two main parts: the graphics processor (GPU) and the central processor (CPU).
- Page 132 P A R T I C O N N E C T I N G T H E B O A R D • isp_freq—Sets the clock frequency of the image sensor pipeline, for improving the capture rate of connected video hardware (such as a camera). The default speed is 250 MHz.
- Page 133 C H A P T E R 7 A D V A N C E D R A S P B E R R Y P I C O N F I G U R A T I O N If you want to eke a little more performance out of your Pi, there is a way to potentially boost this upper limit: a process known as overvoltage or overvolting.
-
Page 134: Disabling L2 Cache
P A R T I C O N N E C T I N G T H E B O A R D As an example, the following lines entered into will give the BCM2835 a small config.txt boost of 0.05 V to 1.25 V and the memory chip a bigger boost of 0.1 V to 1.3 V: over_voltage=2 over_voltage_sdram=4 As with other settings, deleting the lines from... -
Page 135: Enabling Test Mode
Memory Partitioning Although the Raspberry Pi has either a 256 MB or 512 MB memory chip, that memory can be apportioned to the hardware in a variety of ways. The BCM2835 is split into two main sections: the general-purpose CPU and the graphics-oriented GPU. Both of these sections require memory to operate, meaning that the 256 MB or 512 MB of memory on the Raspberry Pi needs to be shared between the two. -
Page 136: Software Settings-Cmdline.txt
WARNING software, typically need 128 MB of memory for the GPU. Reducing this can result in a dramatic drop in performance. The Raspberry Pi Camera Module is unable to record video with less than 128 MB of graphics memory. The memory split is changed by editing as with other hardware settings, and config.txt... - Page 137 C H A P T E R 7 A D V A N C E D R A S P B E R R Y P I C O N F I G U R A T I O N In a Linux-based desktop or laptop, these options are normally passed to the kernel by a tool known as a bootloader, which has its own configuration file.
- Page 138 P A R T I C O N N E C T I N G T H E B O A R D Finally, the parameter tells the kernel that it should not try to boot the system rootwait any further until the device containing the root file system is available. Without this option, the Pi can get stuck as it begins to boot before the relatively slow SD card is fully ready for access.
-
Page 139: Part Ii: Building A Media Centre, Productivity Machine Or Web Server
Part II Building a Media Centre, Productivity Machine or Web Server Chapter 8 The Pi as a Home Theatre PC Chapter 9 The Pi as a Productivity Machine Chapter 10 The Pi as a Web Server... -
Page 141: The Pi As A Home Theatre Pc
Chapter T he Pi as a Hom e Th eat r e PC... -
Page 142: Playing Music At The Console
PA R T I I B U I L D I N G A M E D I A C E N T R E , P R O D U C T I V I T Y M A C H I N E O R W E B S E R V E R ONE OF THE most popular tasks for a Pi to carry out is that of a home theatre PC, or HTPC. - Page 143 C H A P T E R 8 T H E P I A S A H O M E T H E A T R E P C To get started, just enter the console—or a terminal window if you’re using a desktop environment—and type the following: mocp The standard...
-
Page 144: Dedicated Htpc With Raspbmc
Dedicated HTPC with Raspbmc Being able to play music on the Raspberry Pi is one thing, but the BCM2835 can do much more than that. Using its VideoCore IV GPU, it can decode and play back Full HD 1080p H.264 video, making the Pi a powerful media centre machine in a tiny package and with... -
Page 145: Streaming Internet Media
Raspbmc Streaming Internet Media By default, Xbmc is configured to play only files it can find on the Raspberry Pi itself. If you choose Add-ons from beneath the Video menu, you’ll be able to add some impressive Internet... - Page 146 PA R T I I B U I L D I N G A M E D I A C E N T R E , P R O D U C T I V I T Y M A C H I N E O R W E B S E R V E R streaming capabilities to the device, including access to various TV channels and Internet- only streaming services.
-
Page 147: Streaming Local Network Media
C H A P T E R 8 T H E P I A S A H O M E T H E A T R E P C Figure 8-4: list of videos available through the CollegeHumor Xbmc add-on Similar add-ons are available under the Music and Video menus, and operate in the same way. - Page 148 Browse to retrieve a list of source types (see Figure 8-5). These source types include local drives connected to the Raspberry Pi, which are highlighted with a blue icon, as well as network devices, which are highlighted with a red icon. Choose the type of server you’re try- ing to connect to from the list, and then click on the server that appears.
-
Page 149: Configuring Raspbmc
(see Chapter 5, “Network Configuration”, for more details). If you needed to set the Raspberry Pi to use a manual network configuration in other distributions, this is the place to do the same in Raspbmc. - Page 150 PA R T I I B U I L D I N G A M E D I A C E N T R E , P R O D U C T I V I T Y M A C H I N E O R W E B S E R V E R Figure 8-7: Configuring Raspbmc in the...
-
Page 151: The Pi As A Productivity Machine
Chapter T he Pi as a Prod uct i vi t y Machine... -
Page 152: Using Cloud-Based Apps
If you’re planning to use the Pi as a pure productivity machine, it’s a good idea to reserve more of the memory for general-purpose use and less for the graphics processor. To learn how to change this split, see Chapter 6, “The Raspberry Pi Software Configuration Tool” . Using Cloud-Based Apps If you use your Pi connected to the Internet the majority of the time, either through the Model B’s integrated Ethernet port or a USB wired or wireless adapter on the Model A, cloud-based... - Page 153 C H A P T E R 9 T H E P I A S A P R O D U C T I V I T Y M A C H I N E formats. They are also inaccessible when no Internet connection is available, making them a poor choice for users with unreliable connections.
- Page 154 Figure 9-1: Google Drive running in Chromium on the Raspberry Pi To install the Chromium browser under Raspbian, open a terminal and type the following: sudo apt-get install chromium-browser Make sure you install the chromium-browser package, and not the chromium package—...
-
Page 155: Using Libreoffice
SD card’s free space. For instructions on doing this, see Chapter 6, “The Raspberry Pi Software Configuration Tool”. Make sure you perform this task before continuing with this chapter, or you’ll find your Pi’s SD card running out of space before you can use LibreOffice. - Page 156 LibreOffice Writer running on the Raspberry Pi By default, LibreOffice saves and loads files in a format known as the Open Document Format (ODF). This is a standards-based, royalty-free file format supported by the majority of office suite packages—including newer versions of Microsoft Office.
-
Page 157: Image Editing With The Gimp
Adobe Photoshop package (see Figure 9-3). Figure 9-3: The Gimp running on the Raspberry Pi... - Page 158 B U I L D I N G A M E D I A C E N T R E , P R O D U C T I V I T Y M A C H I N E O R W E B S E R V E R The Gimp is not installed by default in most Raspberry Pi distributions, so you’ll have to con- nect your Pi to the Internet and install it through the package management system (see Chapter 3, “Linux System Administration”, for details).
- Page 159 C H A P T E R 9 T H E P I A S A P R O D U C T I V I T Y M A C H I N E Figure 9-4: Exporting a file from The Gimp...
-
Page 161: Chap Te
Chapter T he Pi as a We b Ser ve r... -
Page 162: Installing A Lamp Stack
Using a LAMP-based server, you can run some quite complex packages ranging from content management systems like WordPress to interactive forums like phpBB. All of this is possible with the Raspberry Pi, so long as you don’t expect performance similar to that of a powerful commercial server. - Page 163 C H A P T E R 1 0 T H E P I A S A W E B S E R V E R details and other personally identifiable information. Also make sure you pick a password you can remember! You’ll be asked to confirm the password—to check for typing errors— and then the installation will continue.
- Page 164 Linux parlance as daemons—will be running in the background. To check that the server is working correctly, use another computer on the network to connect to the Raspberry Pi using a web browser. In the address bar, type the IP address of the Pi to display the default Apache installation page (see Figure 10-3).
- Page 165 PHP to create an information page for diagnostic purposes. Visit this using either a browser on another computer by typing (replacing http://ipaddress/phptest.php with the IP address of the Raspberry Pi) or on the Pi itself by typing ipaddress http:// into the address bar (see Figure 10-4).
-
Page 166: Installing Wordpress
For example, some of the most popular news sites in the world are built on a customised WordPress platform. To install WordPress on the Raspberry Pi, type the following command at the terminal or console: sudo apt-get install wordpress Like the LAMP stack, WordPress comes with a selection of dependencies (see Figure 10-5). - Page 167 Raspberry Pi to continue the installation. This instruction is slightly incorrect: the address you need to visit to finish the WordPress installation is http://localhost/wordpress (see Figure 10-6).
- Page 168 Figure 10-7: Logging in to WordPress on the Raspberry Pi Before you can access WordPress from another computer, you’ll need to create an additional configuration file. This is created by linking the existing configuration file—set up for local access—using the following command, typed as a single line: sudo ln -s /etc/wordpress/config-localhost.php ↵...
- Page 169 IP address of your Raspberry Pi. If you’ve given the ipaddress Raspberry Pi a hostname in DNS, you can also create a configuration file for that hostname using the same command, but replacing with the chosen hostname. If you do ipaddress not have a hostname, simply use the Pi’s IP address.
- Page 170 PA R T I I B U I L D I N G A M E D I A C E N T R E , P R O D U C T I V I T Y M A C H I N E O R W E B S E R V E R The WordPress software includes an automatic update feature, which ensures that your installation is running the latest version.
-
Page 171: Part Iii: Programming With The Raspberry Pi
Part III Programming with the Raspberry Pi Chapter 11 An Introduction to Scratch Chapter 12 An Introduction to Python... -
Page 173: Chap Te
Chapter An Intro duction t o Scrat ch... -
Page 174: Introducing Scratch
Raspberry Pi. The chief goal of the Raspberry Pi project is to get people writ- ing their own programs, however—and not just adults. The Raspberry Pi Foundation is working to get the device adopted as an educational tool for all age ranges. -
Page 175: Example 1: Hello World
Raspberry Pi The Scratch interface is split into multiple panes. At the left is the block palette, which holds all the different code blocks you can use to create a program. A list of objects in the program, known as sprites, appears at the bottom-right along with a control for the stage on which the sprites appear. - Page 176 P A R T I I I P R O G R A M M I N G W I T H T H E R A S P B E R R Y P I To get the user started, a new Scratch project already includes a blank stage and a single sprite.
- Page 177 C H A P T E R 1 1 A N I N T R O D U C T I O N T O S C R A T C H Figure 11-3: Control block joined to a Looks block in Scratch This concept of connecting multiple bricks together is the heart of Scratch.
-
Page 178: Example 2: Animation And Sound
P A R T I I I P R O G R A M M I N G W I T H T H E R A S P B E R R Y P I Figure 11-4: The Hello World program executing in Scratch... - Page 179 C H A P T E R 1 1 A N I N T R O D U C T I O N T O S C R A T C H Ten steps isn’t a very large value, so click on the value and change it to .
- Page 180 P A R T I I I P R O G R A M M I N G W I T H T H E R A S P B E R R Y P I This simple animation program can be extended in a variety of ways. Using the New Sprite option just below the stage on the right side of the Scratch window allows the programmer to add more sprites that can move and play sounds independently.
-
Page 181: Example 3: A Simple Game
C H A P T E R 1 1 A N I N T R O D U C T I O N T O S C R A T C H Example 3: A Simple Game Using Scratch for simple animation is one thing, but the software also allows users to read inputs from the keyboard to introduce interactivity. - Page 182 P A R T I I I P R O G R A M M I N G W I T H T H E R A S P B E R R Y P I Figure 11-7: Using input blocks to control the motion of a sprite in Scratch...
- Page 183 C H A P T E R 1 1 A N I N T R O D U C T I O N T O S C R A T C H Figure 11-8: Adding the Cheesy-Puffs sprite to the Scratch game project Clicking the Shrink Sprite button—or the Grow Sprite button, which does exactly the oppo-...
- Page 184 P A R T I I I P R O G R A M M I N G W I T H T H E R A S P B E R R Y P I mark, and choose Sprite1 (the cat sprite) from the list. This block will now be activated when the two sprites collide.
- Page 185 C H A P T E R 1 1 A N I N T R O D U C T I O N T O S C R A T C H From the Looks block palette, drag a block into the centre of the say Hello! For 2 secs conditional.
- Page 186 P A R T I I I P R O G R A M M I N G W I T H T H E R A S P B E R R Y P I Figure 11-10: The completed code for the simple Scratch game’s cat sprite...
-
Page 187: Robotics And Sensors
USB connection. The latter is supported by the Raspberry Pi. Simply connect it to a free USB port or a port on a USB hub connected to the Pi, restart Scratch, and you’ll be able to use its various functions within the Scratch interface. -
Page 188: Further Reading
MIT also runs a user forum for Scratch, allowing enthusiasts of the software to learn together and share solutions for common problems. Membership is free, and the site works well using the Midori web browser included in the Raspbian distribution for the Raspberry Pi. The forums can be accessed at http://scratch.mit.edu/discuss/... -
Page 189: Chap Te
Chapter An Intro duction t o Pyt h on... -
Page 190: Introducing Python
Python make it a valuable tool for anyone who wants to learn to program. It is also the language that is recommended by the Raspberry Pi Foundation for those looking to progress from the simple Scratch (described in Chapter 11, “An Introduction to Scratch”) to more “hands-on”... - Page 191 C H A P T E R 1 2 A N I N T R O D U C T I O N T O P Y T H O N integrated development environment (IDE) such as IDLE, which provides Python-specific functionality that’s missing from a standard text editor, including syntax checking, debug- ging facilities and the ability to run your program without having to leave the editor.
- Page 192 P A R T I I I P R O G R A M M I N G W I T H T H E R A S P B E R R Y P I It’s good practice to start all Python programs with a line known as a shebang, which gets its name from the characters at the beginning of the line.
- Page 193 C H A P T E R 1 2 A N I N T R O D U C T I O N T O P Y T H O N Figure 12-2: Syntax highlighting in IDLE Before you run your program, save it as using the File menu.
- Page 194 P A R T I I I P R O G R A M M I N G W I T H T H E R A S P B E R R Y P I Figure 12-3: Running helloworld. py in IDLE This tells the operating system to run Python and then load the file for...
- Page 195 C H A P T E R 1 2 A N I N T R O D U C T I O N T O P Y T H O N Making Python Programs Executable Normally, the only way to run a Python program is to tell the Python software to open the file.
-
Page 196: Example 2: Comments, Inputs, Variables And Loops
# Example 2: A Python program from the ↵ Raspberry Pi User Guide In Python, anything following a hash symbol—with the exception of the shebang line—is treated as a comment. When a comment is found, Python ignores it and skips to the next line. - Page 197 C H A P T E R 1 2 A N I N T R O D U C T I O N T O P Y T H O N This small line actually achieves quite a lot. The first part, , tells Python to cre- userName = ate a new variable—a location for storing a piece of information—called...
- Page 198 P A R T I I I P R O G R A M M I N G W I T H T H E R A S P B E R R Y P I Why ==? Previously, you’ve been using a single equals symbol to set the value of variables. The while loop, however, uses two.
- Page 199 The finished program should look like this, remembering that anything marked with should be entered onto a single line: #!/usr/bin/env python # Example 2: A Python program from the Raspberry Pi User Guide userName = raw_input(“What is your name? “) print “Welcome to the program,”, userName...
-
Page 200: Example 3: Gaming With Pygame
P A R T I I I P R O G R A M M I N G W I T H T H E R A S P B E R R Y P I Figure 12-5: Running calculator. py in IDLE For more short programs that introduce important Python concepts, visit the official Python Simple Programs wiki page at... - Page 201 C H A P T E R 1 2 A N I N T R O D U C T I O N T O P Y T H O N For other distributions, the pygame source files can be downloaded from the official pygame website at .
- Page 202 P A R T I I I P R O G R A M M I N G W I T H T H E R A S P B E R R Y P I instruction and remember the three colour values for red, green and blue. To define the colours for this example program, type the following lines: redColour = pygame.Color(255, 0, 0) blackColour = pygame.Color(0, 0, 0)
- Page 203 C H A P T E R 1 2 A N I N T R O D U C T I O N T O P Y T H O N As with loops, the code for a function should be indented. Every line after the instruc- tion should have four spaces at the start—if you’re using IDLE, these spaces will be inserted automatically, but if you’re using a text editor, you will need to insert the spaces yourself.
- Page 204 P A R T I I I P R O G R A M M I N G W I T H T H E R A S P B E R R Y P I message (which happens when the user presses the Escape key). The two lines QUIT beneath that should be familiar from the function: they tell pygame and Python...
- Page 205 C H A P T E R 1 2 A N I N T R O D U C T I O N T O P Y T H O N if changeDirection == ‘left’ and not direction == ‘right’: direction = changeDirection if changeDirection == ‘up’...
- Page 206 P A R T I I I P R O G R A M M I N G W I T H T H E R A S P B E R R Y P I This uses the instruction to insert a new value into the list: the insert snakeSegments...
- Page 207 C H A P T E R 1 2 A N I N T R O D U C T I O N T O P Y T H O N Python a place on the playing field to position the new raspberry. It’s important that the location of the raspberry is set randomly: this prevents the player from learning where the raspberry will appear next.
- Page 208 Raspberry Pi A full copy of the program listing for Raspberry Snake is included in Appendix A, “Python Recipes”, and on the Raspberry Pi User Guide website at www.wiley.com/go/raspber- . Downloading the source code from the website will save you some typ-...
-
Page 209: Example 4: Python And Networking
As usual, create a new project in IDLE or a text editor and enter the shebang line along with a comment describing the purpose of the program: #!/usr/bin/env python # IRC Channel Checker, written for the ↵ Raspberry Pi User Guide by Tom Hudson Next, import the modules required by the program— —with the fol- socket... - Page 210 = { ‘nick’ : ‘botnick’, ‘username’ : ‘botuser’, ‘hostname’ : ‘localhost’, ‘servername’ : ‘localhost’, ‘realname’ : ‘Raspberry Pi Names Bot’ As with , all these variables are stored within a dict called to make it clear which user variables pertain to which section. The...
- Page 211 C H A P T E R 1 2 A N I N T R O D U C T I O N T O P Y T H O N clear that the user is a program rather than a real person. Do the same with , and username fill in the...
- Page 212 P A R T I I I P R O G R A M M I N G W I T H T H E R A S P B E R R Y P I sends the output through the network connection. In this case, the program is sending strings of text to the IRC server and telling it to register the program using the nickname held in the variable and the user details held in the...
- Page 213 C H A P T E R 1 2 A N I N T R O D U C T I O N T O P Y T H O N The first line sets the variable to a full line of text from the receive buffer by using the lines function to find end of line characters—signified by .
- Page 214 P A R T I I I P R O G R A M M I N G W I T H T H E R A S P B E R R Y P I This tells Python that when the response has been received, it should print out the now- complete list of names to the standard output before blanking the list again.
-
Page 215: Further Reading
A N I N T R O D U C T I O N T O P Y T H O N A full copy of the program listing for the IRC user list is included in Appendix A, “Python Recipes”, and on the Raspberry Pi User Guide website at www.wiley.com/go/ . - Page 217 Part IV Hardware Hacking Chapter 13 Learning to Hack Hardware Chapter 14 The GPIO Port Chapter 15 The Raspberry Pi Camera Module Chapter 16 Add-on Boards...
-
Page 219: Learning To Hack Hardware
Chapter Learning to Hack Hard w are... -
Page 220: Electronic Equipment
H A R D W A R E H A C K I N G IN EARLIER CHAPTERS, you learned how the Raspberry Pi can be turned into a flexible plat- form for running a variety of software. In this, it’s not alone: any desktop or laptop can run the same software, and in many cases run it far faster than the Pi’s low-power processor can manage. - Page 221 C H A P T E R 1 3 L E A R N I N G T O H A C K H A R D W A R E Push-buttons—A very common input component, a push-button completes an electri- ❍...
-
Page 222: Reading Resistor Colour Codes
Thankfully, the resistor colour codes follow a logical pattern. Figure 13-1 shows a typical four-band resistor. A high-resolution colour version of this diagram is available on the Raspberry Pi User Guide website at . The www.wiley.com/go/raspberrypiuserguide2e first two bands are assigned a colour that equates to a resistance value in ohms. - Page 223 C H A P T E R 1 3 L E A R N I N G T O H A C K H A R D W A R E Figure 13-1: A four-band resistor and the decoding table for its colour code To read the example resistor, first take the two resistance bands starting from the left: these...
-
Page 224: Sourcing Components
At the time of this writing, RS Components and Farnell were the only two companies licensed to produce the Raspberry Pi hardware by the Raspberry Pi Foundation, so unless you’re reading this book while considering the purchase of a Raspberry Pi, you’ll have ordered the device from one of the two. -
Page 225: Offline Sources
C H A P T E R 1 3 L E A R N I N G T O H A C K H A R D W A R E Offline Sources You may find that you need a component immediately, and even next-day delivery would not be soon enough. -
Page 226: Moving Up From The Breadboard
In the US, Adafruit offers a similar service. Founded with the intention of making open- source add-ons for the Arduino boards, Adafruit offers a wide selection of components and kits—including one of the first add-on boards designed specifically for the Raspberry Pi (see Chapter 16, “Add-on Boards”, for more details). - Page 227 This, among other reasons, is why the Raspberry Pi itself is built on a printed circuit board (PCB) rather than a breadboard—although the breadboard method was certainly used in the early days of prototyping the device. It’s possible to print and etch your own PCBs at home, but there is a simpler intermediate step you can take: using stripboard to create permanent stand-alone circuits.
- Page 228 P A R T I V H A R D W A R E H A C K I N G Figure 13-3: The copper tracks on the underside of a piece of stripboard Stripboard is extremely easy to use, which makes it a great stepping-stone to custom circuit board design and manufacturing.
-
Page 229: A Brief Guide To Soldering
Soldering works by melting a small quantity of metal to form a join between two compo- nents. If you turn the Raspberry Pi over, you’ll see plenty of evidence of this. All the larger components are connected using what’s called through-hole soldering, where the components’... - Page 230 P A R T I V H A R D W A R E H A C K I N G When you’re starting a soldering project, make sure you have a clean, well-lit workspace. Also make sure the area is well ventilated. Solder fumes aren’t very healthy, and while they’re extremely unlikely to build up to dangerous levels in low-volume hobby soldering, it’s still a good idea to keep exposure to a minimum.
- Page 231 C H A P T E R 1 3 L E A R N I N G T O H A C K H A R D W A R E across your work area. Make sure you can move the iron freely before plugging it in. If the cable gets caught on something, you may end up burning yourself.
- Page 232 P A R T I V H A R D W A R E H A C K I N G This process of tinning the tip protects it against damage and ensures that it will efficiently trans- fer heat onto the surfaces to be soldered. Failure to properly tin the iron’s tip is one of the most common causes of bad solder joints.
- Page 233 Some add-on boards for the Raspberry Pi are also provided in kit form and require soldering, including the Slice of Pi from Ciseco. You’ll learn about these in...
-
Page 235: The Gpio Port
Chapter T he G PI O Po rt... -
Page 236: Identifying Your Board Revision
The layout of the GPIO port can be seen in Figure 14-1. The GPIO port is the same across both the Raspberry Pi Model A and the Model B Revision 2. If you have one of the original Raspberry Pi Model B Revision 1 boards—and if you do, con- gratulations on having a collector’s item—then the pins available on the GPIO port are subtly... - Page 237 C H A P T E R 1 4 T H E G P I O P O R T Figure 14-1: The Raspberry Pi’s GPIO port and its pin definitions Figure 14-2: The original Raspberry Pi Model B Revision 1 GPIO pinout...
-
Page 238: Gpio Features
3.3 V logic or are passing the circuit through a voltage regulator before it reaches the Pi. Connecting a 5 V supply to any pin on the Raspberry Pi’s GPIO port, or directly shorting either of WARNING the power supply pins (Pin 1 and Pin 2) to any other pin will result in damage to the Pi. -
Page 239: C Bus
BCM2835 chip itself, and is known as I C0. The second, I C1, is terminated at resistors on the Raspberry Pi circuit board itself and is not available for general-purpose use. SPI Bus The Serial Peripheral Interface (SPI) bus is a synchronous serial bus designed primarily for in- system programming (ISP) of microcontrollers and other devices. -
Page 240: Gpio Output: Flashing An Led
P A R T I V H A R D W A R E H A C K I N G If true real-time operation is required for your project, the Pi may be a bad choice. Instead, consider using a microcontroller platform such as the popular open-source Arduino, or one of the MSP430 family of microcontrollers from Texas Instruments. - Page 241 Raspbian distribution for this project as well. Before you can use the Raspberry Pi GPIO port from Python, you’ll need to import a library into your Python project. Accordingly, start the file with the following line:...
- Page 242 GPIO library in board mode—which numbers the pins according to their physical position on the Raspberry Pi—and initialise the pins as either inputs or outputs. In this example, Pin 11 is an output, so add the following line to the project: GPIO.setmode(GPIO.BOARD)
- Page 243 T H E G P I O P O R T The last line tells the GPIO library that Pin 11 on the Raspberry Pi’s GPIO port should be set up as an output. If you were controlling additional devices, you could add more GPIO.setup...
-
Page 244: Gpio Input: Reading A Button
P A R T I V H A R D W A R E H A C K I N G Figure 14-4: gpiooutput. py program, being edited in nano, and waiting for its final line If things don’t work, don’t panic. First, check all your connections. The holes in a breadboard are quite small, and it’s easy to think you’ve inserted a component into one row only to find it’s actually in another. - Page 245 This is a pull-up resistor, and will provide the Pi with a reference voltage so it knows when the button has been pressed. Connect the unused leg of the pull-up resistor to Pin 1 of the Raspberry Pi’s GPIO port. This provides the 3.3 V reference voltage.
- Page 246 P A R T I V H A R D W A R E H A C K I N G Figure 14-5: The example breadboard layout for a simple push- button input You don’t need to import the time library, because this example doesn’t need any timing instructions.
- Page 247 Even on the Raspberry Pi’s processor, which is relatively underpowered when compared to high-performance desktop and laptop processors, Python runs very quickly. This embedded loop tells Python to keep checking the status of Pin 12 until it’s no longer low, at which point it knows the button has been released.
- Page 248 Raspberry Snake game from Chapter 12, “An Introduction to Python”, to turn the Raspberry Pi into a simple games console. You can also combine both input and output examples into a single program, which waits for the button to be pushed and then turns on the LED by sending the output pin high.
-
Page 249: The Raspberry Pi Camera Module
Chapter T he Raspb erry P i C am era Module... -
Page 250: Why Use The Camera Module
The module has even reached near-space, as the result of photography projects that tether a Raspberry Pi to a weather balloon and release it to gather high-altitude images. The camera module is built around a five-megapixel sensor of a type commonly used in smartphones, located behind a fixed-focus lens. -
Page 251: Installing The Camera Module
Pi model now and add the Camera Module at a later date. Installing the Camera Module The Raspberry Pi Camera Module, like the Raspberry Pi itself, is supplied as a bare circuit board. Although this is reasonably robust, you must take care when handling it so as not to damage any of its components, particularly the plastic lens located over the camera sensor itself. - Page 252 P A R T I V H A R D W A R E H A C K I N G Figure 15-2: The Raspberry Pi’s CSI connector, pictured on a Model A Figure 15-3: Raising the lugs of the CSI connector, prior to inserting the ribbon cable...
- Page 253 Pi stockists. When using the Camera Module with a Raspberry Pi case, it is usually necessary to thread the ribbon cable through a thin slot or in between layers of plastic. Some cases are not directly compatible with the Camera Module;...
-
Page 254: Enabling Camera Mode
For details on how to change this split, see Chapter 6, “The Raspberry Pi Software Configuration Tool”. The easiest way of ensuring that your Pi is camera-ready is to use the Raspberry Pi Software Configuration Tool . -
Page 255: Capturing Stills
C H A P T E R 1 5 T H E R A S P B E R R Y P I C A M E R A M O D U L E If you can’t find a camera option in raspi-config, you may be running an outdated version. Use the sudo apt-get update &&... - Page 256 Joint Photographers Expert Group (JPEG) file format—the same format used by most digital cameras and smartphones. The software for the Raspberry Pi camera is run from the terminal or console. For best results, run the software at the console without using the...
- Page 257 C H A P T E R 1 5 T H E R A S P B E R R Y P I C A M E R A M O D U L E Sometimes the position of the Camera Module’s cable makes it difficult to place the camera the right way up.
-
Page 258: Recording Video
Pi’s BCM2835 processor to do the recording, and only h.264 is supported as a capture format. If you play the video back, you’ll find that there’s no sound. Unfortunately, the Raspberry Pi does not include a microphone input. Although it’s possible to record audio by connecting certain USB microphones or sound cards, this will need to be captured using separate soft- ware and combined with the video file later using a video editing package. -
Page 259: Command-Line Time-Lapse Photography
So far, you’ve learned the basics of how to use the Raspberry Pi Camera Module—now it’s time to find a practical use for the project. The key advantage of the Raspberry Pi over a dumb network-connected camera is the capability to be easily programmed for different tasks. - Page 260 P A R T I V H A R D W A R E H A C K I N G A shell script is simply a collection of commands, each exactly as you would type them at the console or terminal. Each command is run in order, from top to bottom, but it’s also possible to use loops as in programming languages like Scratch and Python (see Chapter 11, “An Introduction to Scratch”...
-
Page 261: C H A P T E R 1 5
C H A P T E R 1 5 T H E R A S P B E R R Y P I C A M E R A M O D U L E Although other shells are available, Bash is the default for most modern Linux distributions and offers a good mix of guaranteed compatibility and advanced features. - Page 262 The date command pulls time information from the system clock. When connected to a WARNING network, the Raspberry Pi uses the Network Time Protocol (NTP) to find the current time, but the Model A cannot do this unless you connect a USB network adapter. In this case, the date in the filename will be wrong unless you manually set a date before running the script.
- Page 263 C H A P T E R 1 5 T H E R A S P B E R R Y P I C A M E R A M O D U L E Figure 15-9: The complete timelapse. sh script, in the nano text editor...
- Page 264 A Raspberry Pi running this script can do all of these things, but at a fraction of the cost. The images you’ve captured can be transformed into a video, either using video editing soft- ware or the tool.
-
Page 265: Add-On Boards
Chapter Add-on Bo ards... -
Page 266: Ciseco Slice Of Pi
The compact Slice of Pi is designed to be connected directly to the GPIO headers on the top of the Raspberry Pi, with the rest of the board covering part of the Pi’s surface—but not extending beyond the edges of the board nor obscuring any commonly used ports. The Slice of Pi does, however, sit over the DSI video output connector. - Page 267 C H A P T E R 1 6 A D D - O N B O A R D S Figure 16-1: The Ciseco Slice of Pi The primary advantages of using the low-cost Slice of Pi rather than just connecting directly to the Pi’s GPIO header are the labelling on the circuit board, which the GPIO header lacks, and the use of female headers.
- Page 268 If you are considering developing a small add-on module for the Raspberry Pi, such as a sensor board for reading temperatures or detecting moisture, the required components can be soldered directly to the Slice of Pi. Thanks to the low cost of the board, this provides an easy way to create bespoke add-on modules for the Pi that are entirely self-contained, with no wiring required—just connect the Slice of Pi to the Raspberry Pi’s...
- Page 269 Pi’s 3.3 V logic circuits. The labelling is also different to that used to typically describe the Raspberry Pi’s GPIO pins, which can lead to confusion when using a GPIO library not written with the Slice of Pi in mind. Table 16-1 provides a mapping from one labelling system to another.
-
Page 270: Adafruit Prototyping Pi Plate
P A R T I V H A R D W A R E H A C K I N G The Slice of Pi is available from Ciseco’s web shop at http://shop.ciseco.co.uk/ slice-of-pi/ Adafruit Prototyping Pi Plate The Prototyping Pi Plate by Adafruit is based around the same general principle as Ciseco’s Slice of Pi. - Page 271 Pi Plate without trouble. If you’re planning to use an add-on cam- era module (see Chapter 15, “The Raspberry Pi Camera Module”) or DSI-connected display, be sure to check the length of ribbon cable provided before planning your project around the Pi Plate.
- Page 272 Pi, rather than the width or length, and because it includes the screw terminals for side-on access to GPIO pins, it’s also compatible with a surprising number of Raspberry Pi cases (see Figure 16-6). If you’re planning to use the Pi and Pi Plate combination with a case, however, be sure to check that the case can be adjusted for height or has access to the GPIO port through its lid.
-
Page 273: Fen Logic Gertboard
Gert van Loo. An employee of Broadcom and a member of the team that designed the BCM2835 SoC processor at the heart of the Raspberry Pi, van Loo created the Gertboard as a way of unlocking some of the power of the chip hidden by the Pi’s overall design and providing a powerful and versatile platform for electronic tinkering. - Page 274 The Gertboard is almost two-and-a-half times larger than the Raspberry Pi itself, mak- ing it both the most powerful and the largest add-on board for the Pi available at the time of writing.
- Page 275 For project building, the Gertboard offers significantly more functionality than a bare Raspberry Pi. The 12 buffered IO ports, located at the top of the board, can be configured as inputs or outputs and provide more connectivity than the seven or eight general-purpose IO pins provided on the Pi’s own GPIO port.
- Page 276 P A R T I V H A R D W A R E H A C K I N G Figure 16-9: Using the Gertboard motor controller For sensing or feedback projects, the Gertboard’s ADC and DAC components are handy addi- tions.
- Page 277 When fitted, the Gertboard can be wired to address either the Raspberry Pi’s GPIO port or the microcontroller, or a combination of the two. The Gertboard is designed to operate with an Atmel ATmega168 or ATmega328 microcon- troller—the same type of microcontroller used in the Arduino prototyping project.
- Page 278 Slice of Pi will usually be enough. However, for in-depth experimentation of just what is possible with the Raspberry Pi’s BC2835 processor and/or to ensure that you’ll be able to interface almost any hardware with your Pi, it’s a great choice and a powerful extension to the Pi’s already impressive abilities.
- Page 279 Part V Appendixes Appendix A Python Recipes Appendix B Camera Module Quick Reference Appendix C HDMI Display Modes...
-
Page 281: Ap Pen D Ix A Python Recipes
Appendix A P y tho n Re cip es... -
Page 282: Raspberry Snake (Chapter 12, Example 3)
Enter until you reach the end of a line that doesn’t have a symbol present. Raspberry Snake (Chapter 12, Example 3) #!/usr/bin/env python # Raspberry Snake # Written by Gareth Halfacree for the Raspberry Pi User Guide import pygame, sys, time, random from pygame.locals import * pygame.init() fpsClock = pygame.time.Clock() - Page 283 A P P E N D I X A P Y T H O N R E C I P E S time.sleep(5) pygame.quit() sys.exit() while True: for event in pygame.event.get(): if event.type == QUIT: pygame.quit() elif event.type == KEYDOWN: if event.key == K_RIGHT or event.key == ord(‘d’): changeDirection = ‘right’...
-
Page 284: Irc User List (Chapter 12, Example 4)
== snakeBody[1]: gameOver() fpsClock.tick(30) IRC User List (Chapter 12, Example 4) #!/usr/bin/env python # IRC User List # Written by Tom Hudson for the Raspberry Pi User Guide # http://tomhudson.co.uk/ import sys, socket, time RPL_NAMREPLY = ‘353’ RPL_ENDOFNAMES = ‘366’... - Page 285 A P P E N D I X A P Y T H O N R E C I P E S ‘hostname’: ‘localhost’, ‘servername’: ‘localhost’, ‘realname’: ‘Raspberry Pi Names Bot’ s = socket.socket(socket.AF_INET, socket.SOCK_STREAM) print ‘Connecting to %(host)s:%(port)s...’ % irc try: s.connect((irc[‘host’], irc[‘port’])) except socket.error: print ‘Error connecting to IRC server ↵...
-
Page 286: Gpio Input And Output (Chapter 14)
A P P E N D I X E S GPIO Input and Output (Chapter 14) #!/usr/bin/env python # Raspberry Pi GPIO Input/Output example # Written by Gareth Halfacree for the Raspberry Pi User Guide import RPi.GPIO as GPIO GPIO.setmode(GPIO.BOARD) GPIO.setup(11, GPIO.OUT) GPIO.setup(12, GPIO.IN) -
Page 287: Camera Module Quick Reference
Appendix B R aspbe rry Pi Cam era Mo dul e Quick R efe renc e... -
Page 288: Shared Options
Options are included in this appendix. For more raspistill, raspiyuv raspivid information, see Chapter 15, “The Raspberry Pi Camera Module”. Shared Options The following options, listed in alphabetical order, are shared between raspistill, . - Page 289 A P P E N D I X B R A S P B E R R Y P I C A M E R A M O D U L E Q U I C K R E F E R E N C E -ex or --exposure (Exposure Mode)—Sets the camera’s automatic exposure setting, ❍...
- Page 290 -vs or --vstab (Video Stabilisation)—Attempts to correct for the camera’s sensor ❍ shaking. Commonly used when the Raspberry Pi or its Camera Module is held in the hand, or attached to a robot, vehicle or other moving platform.
-
Page 291: Raspistill Options
A P P E N D I X B R A S P B E R R Y P I C A M E R A M O D U L E Q U I C K R E F E R E N C E -w or --width (Width)—Specifies the width, or horizontal resolution, of the captured ❍... -
Page 292: Raspivid Options
P A R T V A P P E N D I X E S Raspivid Options Designed to capture moving images, has some specific options that do not apply raspivid . These options are listed below. raspistill -b or --bitrate (Encoding Bitrate)—Sets the bitrate of the captured video, in bits per ❍... -
Page 293: Ap Pen D Ix Chdmi Display Modes
Appendix C HDMI Disp lay M ode s... - Page 294 Table C-1 and Table C-2 with the option in hdmi_mode con- to alter the HDMI video output stream. For more information, see Chapter 7, fig.txt “Advanced Raspberry Pi Configuration”. Table C-1 HDMI Group 1 (CEA) Value Description VGA (640x480)
- Page 295 A P P E N D I X B H D M I D I S P L A Y M O D E S Value Description 288p 50Hz (Pixel quadrupling enabled) (16:9 aspect ratio) 576p 50Hz (Pixel doubling enabled) 576p 50Hz (Pixel doubling enabled) (16:9 aspect ratio) 1080p 50Hz 1080p 24Hz...
- Page 296 640×480 85Hz 800×600 56Hz 800×600 60Hz 800×600 72Hz 800×600 75Hz 800×600 85Hz 800×600 120Hz 848×480 60Hz 1024×768 43Hz, incompatible with the Raspberry Pi 1024×768 60Hz 1024×768 70Hz 1024×768 75Hz 1024×768 85Hz 1024×768 120Hz 1152×864 75Hz 1280×768 (Reduced blanking) 1280×768 60Hz 1280×768 75Hz...
- Page 297 A P P E N D I X B H D M I D I S P L A Y M O D E S Value Description 1280×960 120Hz (Reduced blanking) 1280×1024 60Hz 1280×1024 75Hz 1280×1024 85Hz 1280×1024 120Hz (Reduced blanking) 1360×768 60Hz 1360×768 120Hz (Reduced blanking) 1400×1050 (Reduced blanking)
- Page 298 P A R T V A P P E N D I X E S Table C-2 continued Value Description 1856×1392 120Hz (Reduced blanking) 1920×1200 (Reduced blanking) 1920×1200 60Hz 1920×1200 75Hz 1920×1200 85Hz 1920×1200 120Hz (Reduced blanking) 1920×1440 60Hz 1920×1440 75Hz 1920×1440 120Hz (Reduced blanking) 2560×1600 (Reduced blanking) 2560×1600 60Hz...
-
Page 299: Index
Index SYMBOLS animations, Scratch, 162–164 antistatic workmat, 214 * (asterisk), Python, 182 Apache servers, 146–150 ` (backtick) symbol, 245 Apple OS X, compared to Linux, 20 $ (dollar) symbol, 246 apt tool, 57–58 == (double-equals) evaluation, Python, 182 apt-cache utility, 58–59, 80 = (equals sign) evaluation, Python, 182 apt-get command, 59–62, 146 >... - Page 300 R A S P B E R R Y P I U S E R G U I D E , 2 N D E D I T I O N breadboards changeDirection variable, Python, 188 disadvantages, 210–211 channel variable, Python, 194 GPIO input example, Python, 228–232, 270 children GPIO output example, Python, 223–228, 270...
- Page 301 I N D E X config.txt file boot options, 114 daemons, 148 capabilities, 110 data storage, 27 display settings, 111–114 date command, raspistill package, editing via NOOBS, 108 245–246 L2 cache, 118 dd command, 36, 37, 38 memory partitioning, 119–120 Debian distribution, 49 overclocking, 114–116 Debian Reference guide, 46...
- Page 302 R A S P B E R R Y P I U S E R G U I D E , 2 N D E D I T I O N directories, 43, 53–54, 150. See also specific directories -e option, camera, 241 disable_commandline_tags setting, electronic components, sourcing, 208–210 config.txt file, 114...
- Page 303 I N D E X flashing, software Gertboard, 257–262 downloads, 35–36 GIF (Graphic Interchange Format) file from Linux, 37 format, 241 from OS X, 38 The Gimp (GNU Image Manipulation Program), from Windows, 38–39 141–143 floating pins, 229 GNOME desktop environment, 43 flooding, 198 GNU Image Manipulation Program (The Gimp), flux, 205, 213...
- Page 304 R A S P B E R R Y P I U S E R G U I D E , 2 N D E D I T I O N graphics processing unit (GPU) hdmi_mode setting, config.txt file, 112 memory partition, 103–104, 119–120 hdmi_safe setting, config.txt file, 113 greater than (>) evaluation, Python, 182...
- Page 305 I N D E X image editing, 141–143 Image Writer for Windows (website), 38 JPEG/JPG (Joint Photographers Expert Group) import command, 185, 220 file format, 142, 240 Impress, LibreOffice, 140 jumper leads, 251 IndieCity, 56 jumper wires, 204 inet addr, ifconfig tool output, 69 infinite loop, 247 infrared remote controls, 129 KDE desktop environment, 43...
- Page 306 R A S P B E R R Y P I U S E R G U I D E , 2 N D E D I T I O N link encap, ifconfig tool output, 69 Math, LibreOffice, 140 linking files or directories, 150 maximum transmission unit, 70 Linux...
- Page 307 I N D E X MTU, ifconfig tool output, 70 New Out-Of-Box Software (NOOBS), 27–28, 33–35, 108–109 Mullins, Rob (computer scientist), 4 multimeter, 66, 206 NFS (Network File System) standard, 131 multiplier colour band, 206 nick variable, Python, 194 multi-threaded programming language, 166 nightly build, XBMC, 134 music on console (moc) tool, 126–128 non-volatility, defined, 15...
- Page 308 R A S P B E R R Y P I U S E R G U I D E , 2 N D E D I T I O N overscan_left setting, config.txt phptest.php file, 148–149 file, 111 physical layout, 54–55 overscan_right setting, config.txt file, pi normal user account, 51 Pi Store, 55–57...
- Page 309 Raspberry Pi Configuration Tool (raspi- Python config), 96–105, 238 calculator program, 182–184 Raspberry Pi Foundation (website), 27 comments, 180 Raspberry Pi User Guide (website), 192, 199, communicating over networks, 193–199 206, 266 further reading, 199 Raspberry Snake game, 184–193, 266–268 Hello World example, 174–178 raspberrysnake.py program, 184–193...
- Page 310 R A S P B E R R Y P I U S E R G U I D E , 2 N D E D I T I O N running, 94–95 RX, ifconfig tool output, 70 SSH, 104 RX bytes, TX bytes, ifconfig tool update, 104 output, 70...
- Page 311 I N D E X Shaw, Zed A. (author) split function, Python, 197 Learn Python The Hard Way, 199 sponge, soldering, 205, 215 shebang (#!), 176 spreadsheets, 140 shell, 43 sprites, Scratch shell scripting, 243–248 adding speech or thought bubbles, Shinners, Pete (programmer), 184 160–161, 164 shutdown command, 33, 62...
- Page 312 61–62 trigger blocks, Scratch, 160 UPnP (Universal Plug and Play) media streaming troubleshooting standard, 131 blank screen, 34 Upton, Liz (Raspberry Pi community boot diagnostics, 68 manager), 7 booting, 39, 101, 108 USB (Universal Serial Bus) displays, 67 external hub, 26 emergency kernel, 71–72...
- Page 313 I N D E X Wi-Fi. See wireless networking Wi-Fi Protected Setup (WPS) network v3d_freq setting, config.txt file, 116 option, 84 van Loo, Gert (inventor), 257 Windows var directory, 54 Linux, compared to, 20 variables, Python, 181, 194 SD cards, flashing from, 38 var/www folder, 150 Wired Equivalent Privacy (WEP) network vector images, 140, 141...
- Page 314 R A S P B E R R Y P I U S E R G U I D E , 2 N D E D I T I O N yum tool, 58 Zeroconf standard, 131 000-default file, 150 Zip archive, defined, 27, 36 Zoho, 137...
Need help?
Do you have a question about the Raspberry Pi A and is the answer not in the manual?
Questions and answers