Table of Contents
Advertisement
Advertisement
Table of Contents

Related Manuals for Raspberry Pi Raspberry Pi


Summary of Contents for Raspberry Pi Raspberry Pi
- Page 1 www.allitebooks.com...
- Page 2 Raspberry Pi ® User Guide Eben Upton and Gareth Halfacree A John Wiley and Sons, Ltd., Publication www.allitebooks.com...
- Page 3 Raspberry Pi ® User Guide www.allitebooks.com...
- Page 4 Trademarks: Wiley and the Wiley logo are trademarks or registered trademarks of John Wiley and Sons, Ltd. and/or its affiliates in the United States and/or other countries, and may not be used without written permission. Raspberry Pi and the Raspberry Pi logo are registered trademarks of the Raspberry Pi Foundation. All other trademarks are the property of their respective owners.
- Page 5 Publisher’s Acknowledgements Some of the people who helped bring this book to market include the following: Editorial and Production Marketing VP Consumer and Technology Publishing Associate Marketing Director Director Louise Breinholt Michelle Leete Marketing Manager Associate Director–Book Content Lorna Mein Management Senior Marketing Executive Martin Tribe...
- Page 6 www.allitebooks.com...
- Page 7 About the Authors Eben Upton is a founder and trustee of the Raspberry Pi Foundation, and serves as its Executive Director. He is responsible for the overall software and hardware architecture of the Raspberry Pi, and for the Foundation's relationships with its key suppliers and customers.
- Page 8 For Liz, who made it all possible. —Eben For my father, the enthusiastic past, and my daughter, the exciting future. —Gareth www.allitebooks.com...
-
Page 9: Table Of Contents
C H AP T E R 1 Meet the Raspberry Pi . . . . . . . . . . . . . . . . . . . . . . . . . . . . . . . . . 11 ARM vs . x86 . . . . . . . . . . . . . . . . . . . . . . . . . . . . . . . . . . . . . . . . . . . . . . . . . . . . . . . . . . . . . . . . 12 Windows vs . - Page 10 C H AP TE R 6 Configuring the Raspberry Pi. . . . . . . . . . . . . . . . . . . . . . . . . . . . . 85 Hardware Settings—config .txt . . . . . . . . . . . . . . . . . . . . . . . . . . . . . . . . . . . . . . . . . . . . . . . . 86 Modifying the Display .
- Page 11 xiii T A B L E O F C O N T E N T S Part II: Using the Pi as a Media Centre, Productivity Machine and Web Server C HA PT E R 7 The Pi as a Home Theatre PC . . . . . . . . . . . . . . . . . . . . . . . . . . . 103 Playing Music at the Console .
- Page 12 R A S P B E R R Y P I U S E R G U I D E Example 3: Gaming with pygame . . . . . . . . . . . . . . . . . . . . . . . . . . . . . . . . . . . . . . . . . . . . . 162 Example 4: Python and Networking .
-
Page 13: Introduction
Python . In the Raspberry Pi Foundation’s educa- tional outreach work, we do meet a lot of kids whose entire interaction with technology is limited to closed platforms with graphical user interfaces (GUIs) that they use to play movies, do a spot of word-processed homework and play games . - Page 14 . In my day job, where I design the sort of silicon chips that we use in the Raspberry Pi as a processor and work on the low-level software that runs on them, I basically get paid to sit around all day playing .
-
Page 15: A Bit Of History
The Raspberry Pi is cheap enough to buy with a few weeks’ pocket money, and you probably have all the equipment you need to make it work: a TV, an SD card that can come from an old camera, a mobile phone charger, a keyboard and a mouse . - Page 16 . They were the ones who were programming in their spare time . So the initial idea behind the Raspberry Pi was a very parochial one with a very tight (and pretty unambitious) focus: I wanted to make a tool to get the small number of applicants to this small university course a kick start .
- Page 17 . A chip like this seemed the obvious next step for the shape the Raspberry Pi was taking, so I worked on taping out a low-cost variant that had an ARM microprocessor on board and could handle the processing grunt we needed .
- Page 18 . We knew we wanted the Raspberry Pi to be used with TVs at home, just like the ZX Spectrum in the 1980s, saving the user the cost of a monitor . But not everybody has access to an HDMI televi- sion, so we added a composite port to make the Raspberry Pi work with an old cathode-ray televi- sion instead since SD cards are cheap and easy to find .
- Page 19 Liz (who runs the community) on the Raspberry Pi website—and some of these people have become good friends of ours. The Raspberry Pi website gets around one request every single second of the day.
-
Page 20: So What Can You Do With The Raspberry Pi
Purpose Input/Output (GPIO) on home PCs is a real handicap for many people getting started with robotics projects . The Raspberry Pi exposes GPIO so you can get to work straight away . I keep being surprised by ideas the community comes up with which wouldn’t have crossed my mind in a thousand years: the Australian school meteor-tracking project;... -
Page 21: Part I: Connecting The Board
Part I Connecting the Board Chapter 1 Meet the Raspberry Pi Chapter 2 Linux System Administration Chapter 3 Troubleshooting Chapter 4 Network Configuration Chapter 5 Partition Management Chapter 6 Configuring the Raspberry Pi... -
Page 23: Meet The Raspberry Pi
Chapter Meet the Raspb er ry Pi... -
Page 24: Arm Vs . X86
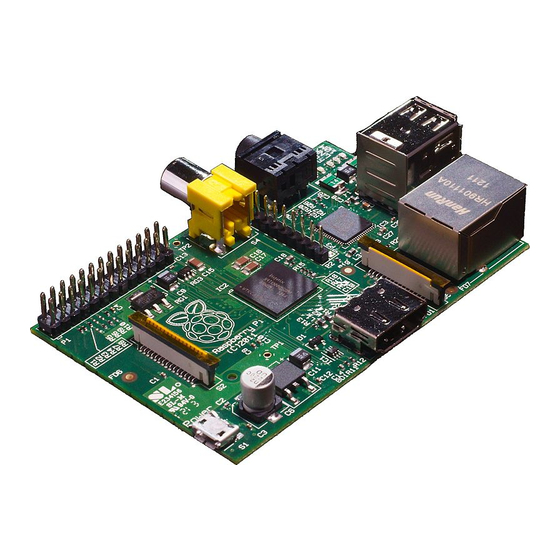
Raspberry Pi to a display, keyboard and mouse. ARM vs x86 The processor at the heart of the Raspberry Pi system is a Broadcom BCM2835 system-on- chip (SoC) multimedia processor . This means that the vast majority of the system’s compo-... -
Page 25: Windows Vs . Linux
(CISC) architectures . The ARM-based BCM2835 is the secret of how the Raspberry Pi is able to operate on just the 5V 1A power supply provided by the onboard micro-USB port . It’s also the reason why you won’t find any heat-sinks on the device: the chip’s low power draw directly translates into... -
Page 26: Getting Started With The Raspberry Pi
Linux core . If you find that you enjoy the experience of using Linux on the Raspberry Pi, you could consider adding it to other computing devices you use as well . It will happily coexist with your current operating system, allowing you to enjoy the benefits of both while giving you a familiar environment when your Pi is unavailable . -
Page 27: Hdmi Video
C H A P T E R 1 M E E T T H E R A S P B E R R Y P I found within an image—red, green and blue—and sends it down a single wire to the display device, typically an old cathode-ray tube (CRT) TV . -
Page 28: Dsi Video
If your monitor has a VGA input—a D-shaped connector with 15 pins, typically coloured silver and blue—the Raspberry Pi can’t connect to it . Adapters are available that will take in a digital DVI signal and convert it to an analogue VGA signal, but these are expensive and bulky . The best option here is simply to buy a more-modern monitor with a DVI or HDMI input . -
Page 29: Connecting A Keyboard And Mouse
Connecting a Keyboard and Mouse Now that you’ve got your Raspberry Pi’s output devices sorted, it’s time to think about input . As a bare minimum, you’re going to need a keyboard, and for the majority of users, a mouse or trackball is a necessity too . - Page 30 CD drives and external hard drives . If you want to reduce the number of power sockets in use, connect the Raspberry Pi’s USB power lead to your powered USB hub. This way, the Pi can draw its power directly from the hub, rather than needing its own dedicated power socket and mains adapter.
-
Page 31: Flashing The Sd Card
Some SD cards work better than others, with some models refusing to work at all with the Raspberry Pi. For an up-to-date list of SD card models known to work with the Pi, visit the eLinux Wiki page: http://www.elinux.org/RPi_VerifiedPeripherals#SD_cards Flashing the SD Card To prepare a blank SD card for use with the Raspberry Pi, you’ll need to flash an operating... -
Page 32: Flashing From Linux
SD card set up by the distribution’s creators in a way that the Raspberry Pi understands . This is the file that needs to be flashed to the SD card . During the following, you’ll be using a software utility called . -
Page 33: Flashing From Os X
C H A P T E R 1 M E E T T H E R A S P B E R R Y P I Figure 1-5: Flashing the SD card using the dd command in Linux Flashing from OS X If your current PC is a Mac running Apple OS X, you’ll be pleased to hear that things are as simple as with Linux . -
Page 34: Connecting External Storage
When the image has been flashed onto the SD card, remove it from the computer and insert it into the Raspberry Pi’s SD card slot, located underneath the circuit board. The SD card should be inserted with the label facing away from the board and pushed fully home to ensure a good connection. -
Page 35: Connecting The Network
Don’t be tempted to go for a gigabit-class adapter, which will be referred to as a 10/100/1000 USB Ethernet adapter. Standard USB ports, as used on the Raspberry Pi, can’t cope with the speed of a gigabit Ethernet connection, and you’ll see no benefit to the more expensive adapter. -
Page 36: Wired Networking
. The Raspberry Pi is cleverer than that, however . The RJ45 port on the side of the Pi (see Figure 1-7) includes a feature known as auto-MDI, which allows it to reconfigure itself auto- matically . -
Page 37: Wireless Networking
Chapter 4, “Network Configuration” . Wireless Networking Current Raspberry Pi models don’t feature any form of wireless network capability onboard, but—as with adding wired Ethernet to the Model A—it’s possible to add Wi-Fi support to any Pi using a USB wireless adapter (see Figure 1-8) . -
Page 38: Connecting Power
❍ Ensure that Linux is listed as a supported operating system . Some wireless adapters are provided with drivers for Windows and OS X only, making them incompatible with the Raspberry Pi . A list of Wi-Fi adapters known to work with the Raspberry Pi can be found on the following website: http://elinux.org/RPi_VerifiedPeripherals#USB_... -
Page 39: Linux System Administration
Chapter Li nux S yste m A dm i ni st r at io n... -
Page 40: Linux: An Overview
(GUI) that provides an easy way to perform common tasks . It is, however, quite dif- ferent to both Windows and OS X, so if you’re going to get the most out of your Raspberry Pi, you’ll need a quick primer in using the operating system . - Page 41 C H A P T E R 2 L I N U X S Y S T E M A D M I N I S T R A T I O N Table 2 1 The Quick Linux Glossary Term/Concept Definition Bash The most popular shell choice, used in the majority of Linux distributions .
-
Page 42: Linux Basics
Debian is one of the oldest Linux distributions around, and a great choice for the Raspberry Pi thanks to its lightweight nature . This is why the Raspberry Pi Foundation has chosen it to be the recommended software for newcomers, and the one used for the examples in this book . - Page 43 Windows, OS X or other GUI-based operat- ing systems in the past . The GUI doesn’t load by default in most Raspberry Pi distributions. To quickly load it and leave the text-based console behind, log in, type and then press the Enter key.
- Page 44 R A S P B E R R Y P I U S E R G U I D E Accessories ❍ Debian Reference—A built-in reference guide, this provides a detailed explanation of the Debian Linux distribution and how programmers can contribute to its development . ❍ File Manager—The PCManFM file manager provides a graphical browser for files stored on the Pi or any connected storage device .
- Page 45 ❍ Monitor Settings—The resolution that the monitor or TV connected to the Pi runs at can be altered here, although advanced changes require modification of configuration files . You’ll learn about this in Chapter 6, “Configuring the Raspberry Pi” . ❍ Openbox Configuration Manager—The LXDE GUI uses a desktop environment called Openbox, which can be adjusted here .
-
Page 46: Using External Storage Devices
SD card . As you learned in Chapter 1, “Meet the Raspberry Pi”, it’s possible to connect USB Mass Storage (UMS) devices to the Pi in order to gain access to more storage space . - Page 47 C H A P T E R 2 L I N U X S Y S T E M A D M I N I S T R A T I O N Figure 2-2: LXDE automatically mounting a USB mass storage device From the console, things are only slightly more difficult .
-
Page 48: Creating A New User Account
R A S P B E R R Y P I U S E R G U I D E Creating a New User Account Unlike Windows and OS X, which are largely designed for use by a single individual, Linux is at heart a social operating system designed to accommodate numerous users . -
Page 49: File System Layout
The content of the SD card is known as its file system, and is split into multiple sections each with a particular purpose . Although it’s not necessary for you to understand what each sec- tion does in order to use the Raspberry Pi, it can be helpful background knowledge should anything go wrong . - Page 50 R A S P B E R R Y P I U S E R G U I D E Figure 2-3: A directory listing for the Pi’s root file system The directories visible on the default Debian distribution are as follows: ❍ boot—This contains the Linux kernel and other packages needed to start the Pi .
-
Page 51: Physical Layout
/boot the Raspberry Pi and to load Linux itself . The second partition is far larger and formatted as EXT4, a native Linux file system designed for high-speed access and data safety . This partition contains the main chunk of the distribu- tion . -
Page 52: Installing And Uninstalling Software
R A S P B E R R Y P I U S E R G U I D E Installing and Uninstalling Software The default software installed with the Debian distribution is enough to get you started, but chances are you’re going to want to customise your Pi according to your own requirements . Installing new software onto the Pi is simple . -
Page 53: Finding Software
C H A P T E R 2 L I N U X S Y S T E M A D M I N I S T R A T I O N Finding Software The first step to installing a new piece of software is to find out what it’s called . The easiest way to do this is to search the cache of available software packages . -
Page 54: Installing Software
R A S P B E R R Y P I U S E R G U I D E If your search term brings up too many different packages to see on a single screen display, you can tell Linux that you want it to pause on each screenfull by piping the output of apt-cache through a tool called less. -
Page 55: Uninstalling Software
C H A P T E R 2 L I N U X S Y S T E M A D M I N I S T R A T I O N Figure 2-5: listing the dependencies for the OpenOffice .org package Uninstalling Software... -
Page 56: Upgrading Software
R A S P B E R R Y P I U S E R G U I D E Upgrading Software In addition to installing and uninstalling packages, can be used to keep them up to date . Upgrading a package through ensures that you’ve received the latest updates, bug fixes and security patches . -
Page 57: Troubleshooting
Chapter T r oub leshoo ting... -
Page 58: Keyboard And Mouse Diagnostics
. There are typically two reasons why a USB keyboard fails to operate correctly when con- nected to the Raspberry Pi: it’s drawing too much power, or its internal chipset is conflicting with the USB circuitry on the Pi . -
Page 59: Power Diagnostics
USB_Mouse_Devices Power Diagnostics Many problems with the Raspberry Pi can be traced to an inadequate power supply . The Model A requires a 5 V supply capable of providing a 500 mA current, while the Model B’s extra components bump up the current requirement to 700 mA . Not all USB power adapters are designed to offer this much power, even if their labelling claims otherwise . - Page 60 R A S P B E R R Y P I U S E R G U I D E Avoid touching the test probes to anything not labelled as a test point. It’s possible to bridge WARNING the 5 V supply that comes in to the Pi to the internal 3.3 V supply, creating a short circuit which can damage the device.
-
Page 61: Display Diagnostics
. This is the usual explanation for a Pi showing black-and-white video . You’ll learn how to adjust this setting in Chapter 6, “Configuring the Raspberry Pi” . When you use the HDMI output, the display type is usually automatically detected . If you’re using an HDMI to DVI adapter to plug the Pi into a computer monitor, however, this occa- sionally goes awry . -
Page 62: Boot Diagnostics
(see Figure 3-2) . For the standard Raspberry Pi Model B, there are two ports: the physical Ethernet port on the right side of the board, and a virtual loopback interface that allows pro-... - Page 63 C H A P T E R 3 T R O U B L E S H O O T I N G Figure 3-2: The output of ifconfig on a Raspberry Pi Model B The output of is split into the following sections: ifconfig ❍ Link encap—The type of encapsulation used by the network, which on the Model B will either read...
- Page 64 R A S P B E R R Y P I U S E R G U I D E ❍ RX—This section provides feedback on the received network traffic, including the number of errors and dropped packets recorded . If you start to see errors appearing in this section, there’s something wrong with the network .
-
Page 65: The Emergency Kernel
C H A P T E R 3 T R O U B L E S H O O T I N G Figure 3-3: The result of a successful test of the network, using the ping command The Emergency Kernel The Linux kernel is the heart of the operating system that drives the Pi . -
Page 66: Chapter
. Reversing the process is as simple as opening again kernel.img cmdline.txt and removing the entry . You’ll learn more about and how it affects the operation of the Raspberry Pi cmdline.txt in Chapter 6, “Configuring the Raspberry Pi” . -
Page 67: Network Configuration
Chapter Net work Configur at ion... -
Page 68: Wired Networking
R A S P B E R R Y P I U S E R G U I D E FOR MOST USERS, configuring the Pi’s network is as easy as plugging a cable into the Model B’s Ethernet port—or a USB Ethernet adapter in the case of the Model A . For others, however, the network requires manual configuration . - Page 69 C H A P T E R 4 N E T W O R K C O N F I G U R A T I O N , you should enter the network mask—which controls the size of the connected netmask network—in what is known as dotted-quad format .
- Page 70 R A S P B E R R Y P I U S E R G U I D E If you need to return to automatic settings via DHCP, you need to edit the file interfaces again and delete the settings .
-
Page 71: Wireless Networking
Model B Wireless Networking Although no current models of the Raspberry Pi include Wi-Fi networking hardware onboard, it’s possible to add wireless connectivity with a simple USB Wi-Fi adapter . However, you will need to configure the adapter before you can use it to get your Pi online . - Page 72 . While some distributions include a selection of the most common Wi-Fi firmware installed by default, others do not . At present, to save space, most distributions designed for the Raspberry Pi need the firmware files for a wireless card install- ing manually .
- Page 73 C H A P T E R 4 N E T W O R K C O N F I G U R A T I O N This will print out the entire kernel ring buffer, which will contain all messages output by the kernel since the Pi was switched on .
- Page 74 , and having multiple firmware packages apt-get remove does no harm . The following wireless firmware packages are available in the recommended Debian distribution on the Raspberry Pi: ❍ atmel-firmware—For devices based on the Atmel AT76C50X chipset ❍ firmware-atheros—For devices based on Atheros chipsets ❍ firmware-brcm80211—For devices based on Broadcom chipsets...
- Page 75 C H A P T E R 4 N E T W O R K C O N F I G U R A T I O N connected to the Internet through its wired Ethernet port or a USB Ethernet adapter . When connected, install the firmware by typing the following: sudo apt-get install firmwarepackage Replace...
- Page 76 R A S P B E R R Y P I U S E R G U I D E This command will return a list of all the wireless networks reachable from the Pi and their details (see Figure 4-4) . If you receive an error message at this point—in particular, one that claims the network or interface is down—check that you have installed the correct firmware, and that the USB wireless adapter is connected to a powered USB hub .
- Page 77 C H A P T E R 4 N E T W O R K C O N F I G U R A T I O N ❍ Standard—The IEEE 802 .11 wireless standards have a variety of different types, dis- tinguished by a letter suffix .
- Page 78 R A S P B E R R Y P I U S E R G U I D E Figure 4-5: The output of iwconfig when not connected to a wireless network To connect the Pi to a wireless network, you will need to add some lines into the /etc/net- file .
- Page 79 C H A P T E R 4 N E T W O R K C O N F I G U R A T I O N Figure 4-6: Editing the interfaces file for wireless network access Once the entry is in place, save the file by pressing CTRL + O and then quit with CTRL + X .
-
Page 80: No Encryption
R A S P B E R R Y P I U S E R G U I D E program stores its configuration in a file called , located in wpasupplicant wpa.conf directory . To begin configuring the Pi for wireless access, first open a new blank file /etc for editing by typing the following: sudo nano /etc/wpa.conf... -
Page 81: Wpa/Wpa2 Encryption
C H A P T E R 4 N E T W O R K C O N F I G U R A T I O N WPA/WPA2 Encryption If your wireless network uses WPA or WPA2 encryption, finish the file as follows: wpa.conf [Tab] key_mgmt=WPA-PSK... - Page 82 R A S P B E R R Y P I U S E R G U I D E To make sure that the network is operational, unplug the Pi’s Ethernet cable (if attached) and type the following: ping -c 1 www.raspberrypi.org If you start having problems with your Pi following the installation of a USB wireless adapter, it could be due to a conflict with other USB devices.
-
Page 83: Partition Management
Chapter P ar titio n M anag em en t... -
Page 84: Creating A New Partition
Creating a New Partition One way to make the most of a large SD on the Raspberry Pi is to create a new partition in the empty space at the end of the card . This partition can be used to store any large files that you want your Pi to be able to access without having to use an external storage device . - Page 85 C H A P T E R 5 P A R T I T I O N M A N A G E M E N T Figure 5-1: Creating a new partition using cfdisk 5 You will be prompted to create a Primary or Logical partition . The default is to create a Primary partition, so just press Enter to accept this .
- Page 86 R A S P B E R R Y P I U S E R G U I D E When the Pi has restarted and you’ve logged back in, you can use to verify that the fdisk new partition is ready for use with the following command: sudo fdisk -l Before you can store files on the new partition, however, you need to put a file system in place by formatting the drive using the...
- Page 87 C H A P T E R 5 P A R T I T I O N M A N A G E M E N T You’ll also need to allow all members of the group to write to the directory . To do this, you use the command with the option , which tells...
-
Page 88: Resizing Existing Partitions
. Automatic Resizing The Debian Linux distribution for the Raspberry Pi comes with a tool called raspi-config which loads when the system is booted for the first time . It can also be loaded manually at any time by typing at the console or in a terminal window . -
Page 89: Manual Resizing
To resize the root file system using the tool, follow these instructions: raspi-config 1 If this is the first time you have loaded Debian on the Raspberry Pi, raspi-config will load automatically . If it does not, type at the console or sudo raspi-config terminal to load the tool manually . - Page 90 Parted Magic is a customised Linux operating system that includes tools specifically designed for managing storage devices . Connect the Raspberry Pi’s SD card to your computer and load Partition Editor from the desktop by double-clicking the icon (see Figure 5-4) .
- Page 91 C H A P T E R 5 P A R T I T I O N M A N A G E M E N T By default, the partition editor will look at the first drive it finds in your system, which is usu- ally your PC’s hard drive .
- Page 92 R A S P B E R R Y P I U S E R G U I D E Figure 5-6: Moving the swap partition in the partition editor 4 Click the Resize/Move button to confirm the change . Moving the partition will trigger a warning about the potential for the new partition table to lead to booting problems .
-
Page 93: Moving To A Bigger Sd Card
. The latter half of the process is no different to how you flashed the SD card back in Chapter 1, “Meet the Raspberry Pi” . Where it differs, however, is that you will be using the existing SD card as the source rather than a downloaded image file . -
Page 94: Imaging From Linux
R A S P B E R R Y P I U S E R G U I D E The first step to moving to a larger SD card is to create an image of the existing card . If you have access to two SD card readers, you can skip this step and, in the later instructions, replace the name of the image file with the device address of the SD card reader with the Pi’s original card inserted . -
Page 95: Imaging From Os X
The Windows Image Writer tool that you used to flash the SD card in Chapter 1, “Meet the Raspberry Pi”, doesn’t support the creation of images . Instead, you’ll need to use the Parted Magic disc to gain access to the Linux utility, as follows: 1 ... - Page 96 Now that you have your disk image, use the instructions on flashing an SD card from Chapter 1, “Meet the Raspberry Pi”, to write it to the new card . Remember that writing an image takes time, so be patient and let it finish fully .
-
Page 97: Configuring The Raspberry Pi
Chapter Conf igurin g the Ras pb er ry Pi... -
Page 98: Hardware Settings-Config .Txt
BCM2835 chip at the heart of the Raspberry Pi doesn’t have anything like a PC’s BIOS menu where various low-level system settings can be configured . Instead, it relies on text files containing configuration strings that are loaded by the chip when the power is switched on . -
Page 99: Modifying The Display
. Sometimes, however, this automatic detection doesn’t work . This is often the case when a Raspberry Pi from one country is connected to an older TV from another country . If you connect your Pi to your TV and there’s nothing to see, you may need to override these defaults . - Page 100 R A S P B E R R Y P I U S E R G U I D E ❍ overscan_bottom—This can be used to skip a number of pixels from the bottom of the display . Typically, the values for all the settings would be the same, overscan_ creating a regular border around the display .
- Page 101 • 2—HDMI output voltages . In this mode, audio is included on the HDMI cable . ❍ hdmi_force_hotplug—Forces the Raspberry Pi to use the HDMI port, even if it doesn’t detect a connected display . A value of allows the Pi to attempt to detect the display, while a value of forces the Pi to use HDMI regardless .
-
Page 102: Boot Options
. Boot Options file can also be used to control how Linux is loaded on the Raspberry Pi . config.txt Although the most common method for controlling the loading of the Linux kernel is to use a separate file called (which you’ll learn about later in this chapter), it is pos-... -
Page 103: Overclocking The Raspberry Pi
Damage caused when using these settings will not be put right by the Raspberry Pi Foundation or by the retailer from whom you purchased your Pi. If in doubt, don’t alter these settings: the performance gains through overclocking are rarely worth the risk to the Pi. -
Page 104: Overclocking Settings
R A S P B E R R Y P I U S E R G U I D E The reason the Pi isn’t provided with higher operating speeds in the first place is related to the chips’ lifespan . The BCM2835 is rated by its manufacturer, Broadcom, to operate at a speed of 700 MHz . -
Page 105: Overvoltage Settings
C H A P T E R 6 C O N F I G U R I N G T H E R A S P B E R R Y P I As an example, to overclock the CPU to 800 MHz, the GPU to 280 MHz and the RAM to 420 MHz, enter the following options into , one per line: config.txt... -
Page 106: Disabling L2 Cache
R A S P B E R R Y P I U S E R G U I D E The voltage adjustment settings have upper and lower limits of 8 and -16, equivalent to 0 .2 V above stock voltage or 1 .4 V absolute and 0 .4 V below stock voltage or 0 .8 V absolute . The voltage must be adjusted in whole numbers, and it cannot be adjusted below 0 .8 V (-16) or above 1 .4 V (8 .) The following settings are accessible from... -
Page 107: Enabling Test Mode
. Used during production of the Raspberry Pi at the factory, the test mode—combined with special hardware used to electri- cally check the board—allows the factory staff to make sure the Pi is operating as it should . -
Page 108: Memory Partitioning-Start .Elf
U S E R G U I D E Memory Partitioning—start elf Although the Raspberry Pi only has a single 256 MB memory chip, that memory can be apportioned to the hardware in a variety of ways . The BCM2835 is split into two main sec- tions: the general-purpose CPU and the graphics-oriented GPU . -
Page 109: Software Settings-Cmdline .Txt
C H A P T E R 6 C O N F I G U R I N G T H E R A S P B E R R Y P I The first file, , is configured to split the memory down the middle, with arm128_start.elf 128 MB available to the BCM2835’s ARM CPU and 128 MB available to the VideoCore IV GPU . - Page 110 R A S P B E R R Y P I U S E R G U I D E Figure 6-3: The cmdline .txt file in /boot In a Linux-based desktop or laptop, these options are normally passed to the kernel by a tool known as a bootloader, which has its own configuration file .
- Page 111 C H A P T E R 6 C O N F I G U R I N G T H E R A S P B E R R Y P I option tells Linux that it should create a serial console—device —...
- Page 112 R A S P B E R R Y P I U S E R G U I D E next . Entries that work on Fedora Remix may not work on Debian, and vice versa . The options available to depend on what kernel the distribution is using and cmdline.txt what features were included when the kernel was built .
-
Page 113: Part Ii: Using The Pi As A Media Centre
Part II Using the Pi as a Media Centre, Productivity Machine and Web Server Chapter 7 The Pi as a Home Theatre PC Chapter 8 The Pi as a Productivity Machine Chapter 9 The Pi as a Web Server... -
Page 115: The Pi As A Home Theatre Pc
Chapter T he Pi as a Hom e Th eat r e PC... -
Page 116: Playing Music At The Console
R A S P B E R R Y P I U S E R G U I D E ONE OF THE most popular tasks for a Pi to carry out is that of a home theatre PC, or HTPC . The Broadcom BCM2835 at the Pi’s heart is specifically designed as a multimedia power- house, originally developed for use in HTPCs . - Page 117 C H A P T E R 7 T H E P I A S A H O M E T H E A T R E P C To get started, just enter the console—or a terminal window if you’re using a desktop environment—and type the following: mocp The standard...
-
Page 118: Dedicated Htpc With Rasbmc
Dedicated HTPC with Rasbmc Being able to play music on the Raspberry Pi is one thing, but the BCM2835 can do much more than that . Using its VideoCore IV GPU, it can decode and play back Full HD 1080p H .264 video, making the Pi a powerful media centre machine in a tiny package and with... - Page 119 C H A P T E R 7 T H E P I A S A H O M E T H E A T R E P C If you already have an SD card you use with the Pi, be aware that installing Rasbmc on it will WARNING delete the contents of the card.
-
Page 120: Streaming Internet Media
U S E R G U I D E Streaming Internet Media By default, Xbmc is configured to play only files it can find on the Raspberry Pi itself . If you choose Add-ons from beneath the Video menu, you’ll be able to add some impressive Internet streaming capabilities to the device, including access to various TV channels and Internet- only streaming services . -
Page 121: Streaming Local Network Media
C H A P T E R 7 T H E P I A S A H O M E T H E A T R E P C in the centre of the screen or press Enter, and then choose Video Add-ons from the options that appear . - Page 122 Browse to retrieve a list of source types (see Figure 7-5) . These source types include local drives connected to the Raspberry Pi, which are highlighted with a blue icon as well as network devices, which are highlighted with a red icon . Choose the type of server you’re try- ing to connect to from the list, and then click on the server that appears .
-
Page 123: Configuring Rasbmc
(see Chapter 4, “Network Configuration”, for more details) . If you needed to set the Raspberry Pi to use a manual network configuration in other distributions, this is the place to do the same in Rasbmc . - Page 124 R A S P B E R R Y P I U S E R G U I D E Figure 7-7: Configuring Rasbmc in the Settings menu The second tab, marked XBMC, allows you to install the nightly build of the XBMC software . The nightly build is so called because it is created from the program’s source code automati- cally every night, and contains the latest changes made by the software’s developers .
-
Page 125: The Pi As A Productivity Machine
Chapter T he Pi as a Prod uct i vi t y Machine... -
Page 126: Using Cloud-Based Apps
U S E R G U I D E THE FLEXIBILITY OF the Raspberry Pi makes it a good choice as a low-power general- purpose desktop computer . Although it will never reach the same levels of performance as a standard desktop or laptop, its low cost and environmentally-friendly power consumption help to make up for any problems with occasionally sluggish performance . - Page 127 . If you have a Gmail web-based email account, it will automatically work for Google Drive . You can access the service at http:// docs.google.com Figure 8-1: Google Drive running in Chromium on the Raspberry Pi...
- Page 128 Microsoft Office 365—and logging in . If you find performance slow, changing the mem- ory partitioning to give the ARM processor a larger share can help . Chapter 6, “Configuring the Raspberry Pi”, has full instructions for how to do this .
-
Page 129: Using Openoffice .Org
C H A P T E R 8 T H E P I A S A P R O D U C T I V I T Y M A C H I N E Using OpenOffice org If you would prefer not to use a cloud-based service, the alternative is to install OpenOffice . o rg . Designed as an open-source, cross-platform alternative to the popular Microsoft Office suite, OpenOffice . - Page 130 OpenOffice .org Writer running on the Raspberry Pi By default, OpenOffice .org saves and loads files in a format known as the Open Document Format (ODF) . This is a standards-based, royalty-free file format supported by the majority of office suite packages—including newer versions of Microsoft Office .
-
Page 131: Image Editing With The Gimp
Adobe Photoshop package (see Figure 8-3) . Figure 8-3: The Gimp running on the Raspberry Pi... - Page 132 U S E R G U I D E The Gimp is not installed by default in most Raspberry Pi distributions, so you’ll have to con- nect your Pi to the Internet and install it through the package management system (see Chapter 2, “Linux System Administration”, for details) .
- Page 133 C H A P T E R 8 T H E P I A S A P R O D U C T I V I T Y M A C H I N E Figure 8-4: Exporting a file from The Gimp...
-
Page 135: The Pi As A Web Server
Chapter T he Pi as a We b Ser ve r... -
Page 136: Installing A Lamp Stack
. Using a LAMP-based server, you can run some quite complex packages rang- ing from content management systems like WordPress to interactive forums like phpBB . All of this is possible with the Raspberry Pi, so long as you don’t expect performance similar to that of a powerful commercial server . - Page 137 C H A P T E R 9 T H E P I A S A W E B S E R V E R you can remember! You’ll be asked to confirm the password—to check for typing errors— and then the installation will continue . Figure 9-1: Installing the LAMP stack on...
- Page 138 Linux parlance as daemons—will be running in the background . To check that the server is working correctly, use another computer on the network to connect to the Raspberry Pi using a web browser . In the address bar, type the IP address of the Pi to display the default Apache installation page (see Figure 9-3) .
- Page 139 PHP to create an information page for diagnostic purposes . Visit this using either a browser on another computer by typing (replacing http://ipaddress/phptest.php with the IP address of the Raspberry Pi) or on the Pi itself by typing ipaddress http:// into the address bar (see Figure 9-4) .
-
Page 140: Installing Wordpress
. For example, some of the most popular news sites in the world are built on a customised WordPress platform . To install WordPress on the Raspberry Pi, type the following command at the terminal or console: sudo apt-get install wordpress Like the LAMP stack, WordPress comes with a selection of dependencies (see Figure 9-5) . - Page 141 Raspberry Pi to continue the installation . This instruction is slightly incorrect: the address you need to visit to finish the WordPress installation is http://localhost/wordpress (see Figure 9-6) .
- Page 142 WordPress, click the Log In button at the bottom of this page to log into WordPress with the user name and password you chose at the earlier screen (see Figure 9-7) . Figure 9-7: Logging in to WordPress on the Raspberry Pi...
- Page 143 -s /etc/wordpress/config-localhost.php Æ /etc/wordpress/config-ipaddress.php Replace in this code with the IP address of your Raspberry Pi . If you’ve given the ipaddress Raspberry Pi a hostname in DNS, you can also create a configuration file for that hostname using the same command, but replacing with the chosen hostname .
- Page 144 R A S P B E R R Y P I U S E R G U I D E WordPress is very memory intensive. For best results, use the Pi as a headless server, which is a system that runs without a graphical user interface loaded. Then use a web browser on another computer connected to the network to access the WordPress Dashboard at http:// /wordpress/wp-login.php.
-
Page 145: Part Iii: Programming And Hacking
Part III Programming and Hacking Chapter 10 An Introduction to Scratch Chapter 11 An Introduction to Python Chapter 12 Hardware Hacking Chapter 13 Add-on Boards... -
Page 147: An Introduction To Scratch
Chapter An Intro duction t o Scrat ch... -
Page 148: Introducing Scratch
Raspberry Pi . The chief goal of the Raspberry Pi project is to get people writ- ing their own programs, however—and not just adults . The Raspberry Pi Foundation is working to get the device adopted as an educational tool for all age ranges . -
Page 149: Example 1: Hello World
. The stage itself is at the top-right of the window, which is where you will see the program running . Finally, the middle of the window is where the program itself is constructed . Figure 10-1: The main Scratch interface, shown running on the Raspberry Pi... - Page 150 R A S P B E R R Y P I U S E R G U I D E To get the user started, a new Scratch project already includes a blank stage and a single sprite . What it lacks is a program, so clicking the green flag icon at the top-right of the win- dow achieves nothing, because Scratch doesn’t yet know what you want it to do .
- Page 151 C H A P T E R 1 0 A N I N T R O D U C T I O N T O S C R A T C H Figure 10-3: A Control block joined to a Looks block in Scratch This concept of connecting multiple bricks together is the heart of Scratch .
-
Page 152: Example 2: Animation And Sound
R A S P B E R R Y P I U S E R G U I D E Figure 10-4: The Hello World program executing in Scratch Example 2: Animation and Sound While Hello World is a very traditional example, it’s not particularly interesting . It also fails to show off the true power of Scratch, which lies in its impressive multimedia capabilities and sprite-handling system . - Page 153 C H A P T E R 1 0 A N I N T R O D U C T I O N T O S C R A T C H Ten steps isn’t a very large value, so click on the value and change it to .
- Page 154 R A S P B E R R Y P I U S E R G U I D E This simple animation program can be extended in a variety of ways . Using the New Sprite option just below the stage on the right side of the Scratch window allows the programmer to add more sprites that can move and play sounds independently .
-
Page 155: Example 3: A Simple Game
C H A P T E R 1 0 A N I N T R O D U C T I O N T O S C R A T C H Example 3: A Simple Game Using Scratch for simple animation is one thing, but the software also allows users to read inputs from the keyboard to introduce interactivity . - Page 156 R A S P B E R R Y P I U S E R G U I D E Figure 10-7: Using input blocks to control the motion of a sprite in Scratch Now that the sprite can be moved by the player, it’s time to give the sprite something to do . As this is just a very simple game, the goal should also be simple: to collect some food .
- Page 157 C H A P T E R 1 0 A N I N T R O D U C T I O N T O S C R A T C H Figure 10-8: Adding the Cheesy-Puffs sprite to the Scratch game project By default, any sprite added into a Scratch project will appear in the dead centre of the stage .
- Page 158 R A S P B E R R Y P I U S E R G U I D E Try using the arrow keys on the keyboard to move the cat sprite towards the Cheesy-Puffs sprite now . As you can see, when the two sprites meet, nothing happens . That’s because the program doesn’t contain any instructions for what to do when the two sprites overlap—known as a sprite collision—so it doesn’t do anything .
- Page 159 C H A P T E R 1 0 A N I N T R O D U C T I O N T O S C R A T C H Figure 10-9: Controlling the Cheesy-Puffs with a Scratch if block Boolean Logic Named for George Boole, Boolean logic or Boolean algebra is a key concept to understand-...
- Page 160 R A S P B E R R Y P I U S E R G U I D E Double-click the cat sprite on the stage to return to editing its scripts . The script you created for the Cheesy-Puffs sprite will disappear, but don’t worry—it’s still saved but only appears when you’re editing that particular sprite .
-
Page 161: Robotics And Sensors
USB connection . The latter is supported by the Raspberry Pi . Simply connect it to a free USB port or a port on a USB hub connected to the Pi, restart Scratch, and you’ll be able to use its various functions within the Scratch interface . -
Page 162: Robotics With Lego
MIT also runs a user forum for Scratch, allowing enthusiasts of the software to learn together and share solutions for common problems . Membership is free, and the site works well using the Midori web browser included in the Debian distribution for the Raspberry Pi . The forums can be accessed at http://scratch.mit.edu/forums/... -
Page 163: An Introduction To Python
Chapter An Intro duction t o Pyt h on... -
Page 164: Introducing Python
Python make it a valuable tool for anyone who wants to learn to program . It is also the language that is recommended by the Raspberry Pi Foundation for those looking to progress from the simple Scratch (described in Chapter 10, “An Introduction to Scratch”) to more “hands-on”... - Page 165 C H A P T E R 1 1 A N I N T R O D U C T I O N T O P Y T H O N environment (IDE) such as IDLE, which provides Python-specific functionality that’s missing from a standard text editor, including syntax checking, debugging facilities and the ability to run your program without having to leave the editor .
- Page 166 R A S P B E R R Y P I U S E R G U I D E It’s good practice to start all Python programs with a line known as a shebang, which gets its name from the characters at the beginning of the line.
- Page 167 C H A P T E R 1 1 A N I N T R O D U C T I O N T O P Y T H O N to understand at a glance . It also makes it easy to spot so-called syntax errors caused by for- getting to put an end-quote in a command or forgetting to comment out a remark .
- Page 168 R A S P B E R R Y P I U S E R G U I D E Figure 11-3: Running helloworld .py in IDLE If you created the program in a text editor, you’ll need to open a terminal helloworld.py window from the Accessories menu on the desktop .
- Page 169 C H A P T E R 1 1 A N I N T R O D U C T I O N T O P Y T H O N Making Python Programs Executable Normally, the only way to run a Python program is to tell the Python software to open the file.
-
Page 170: Example 2: Comments, Inputs, Variables And Loops
Æ symbol: # Example 2: A Python program from the Æ Raspberry Pi User Guide In Python, anything following a hash symbol—with the exception of the shebang line—is treated as a comment . When a comment is found, Python ignores it and skips to the next line . - Page 171 C H A P T E R 1 1 A N I N T R O D U C T I O N T O P Y T H O N This small line actually achieves quite a lot . The first part, , tells Python to cre- userName = ate a new variable—a location for storing a piece of information—called...
- Page 172 R A S P B E R R Y P I U S E R G U I D E Why ==? Previously, you’ve been using a single equals symbol to set the value of variables. The while loop, however, uses two. Using two equals symbols next to each other performs an evaluation, which compares a variable’s value to whatever follows.
- Page 173 The finished program should look like this, remembering that anything marked with Æ should be entered onto a single line: #!/usr/bin/env python # Example 2: A Python program from the Æ Raspberry Pi User Guide userName = raw_input(“What is your name? “) print “Welcome to the program,”, userName...
-
Page 174: Example 3: Gaming With Pygame
R A S P B E R R Y P I U S E R G U I D E Save the program as , and run it by choosing Run Module from the Run calculator.py menu in IDLE or by typing at the terminal . - Page 175 C H A P T E R 1 1 A N I N T R O D U C T I O N T O P Y T H O N Before you can write a pygame program, you need to install the pygame library . If you’re using the recommended Debian distribution, this is as simple as typing the following at the console or terminal: sudo apt-get install python-pygame...
- Page 176 R A S P B E R R Y P I U S E R G U I D E The first line tells pygame to initialise itself, and the second line sets up a new variable called , which will be used to control the speed of the game . Next, set up a new pygame fpsClock display surface—the canvas onto which in-game objects will be drawn—with the following two lines:...
- Page 177 C H A P T E R 1 1 A N I N T R O D U C T I O N T O P Y T H O N multiple points in the same program, using to create a function means you’ll only have to type them once—and only have to change them in a single place if you alter the program later .
- Page 178 R A S P B E R R Y P I U S E R G U I D E Continue the program with the following lines, paying attention to the indentation levels: for event in pygame.event.get(): if event.type == QUIT: pygame.quit() sys.exit() elif event.type == KEYDOWN:...
- Page 179 C H A P T E R 1 1 A N I N T R O D U C T I O N T O P Y T H O N These instructions modify the value of the variable, used to control the changeDirection direction the player’s snake is travelling during the game .
- Page 180 R A S P B E R R Y P I U S E R G U I D E operators are used to change the value of a variable by a certain amount: sets the variable to its previous value plus the new value, while sets the variable to its previous value minus the new value .
- Page 181 C H A P T E R 1 1 A N I N T R O D U C T I O N T O P Y T H O N instruction is simple but clever: it returns the oldest value from the list but also removes it, making the list one item shorter .
- Page 182 R A S P B E R R Y P I U S E R G U I D E These tell pygame to fill in the background of the playing surface in black, draw the snake’s head and body segments in white, and finally, draw a raspberry in red . The last line, pygame.
-
Page 183: Example 4: Python And Networking
Raspberry Pi A full copy of the program listing for Raspberry Snake is included in Appendix A, “Python Recipes”, and on the Raspberry Pi User Guide website at http://www.wiley.com/go/ . Downloading the source code from the website will save you... - Page 184 As usual, create a new project in IDLE or a text editor and enter the shebang line along with a comment describing the purpose of the program: #!/usr/bin/env python # IRC Channel Checker, written for the Æ Raspberry Pi User Guide by Tom Hudson Next, import the modules required by the program— —with the fol- socket...
- Page 185 = { ‘nick’ : ‘botnick’, ‘username’ : ‘botuser’, ‘hostname’ : ‘localhost’, ‘servername’ : ‘localhost’, ‘realname’ : ‘Raspberry Pi Names Bot’ As with , all these variables are stored within a dict called to make it clear which user variables pertain to which section . The...
- Page 186 R A S P B E R R Y P I U S E R G U I D E Next, you need to tell the program to try connecting to the IRC server specified in the vari- ables at the start of the program . Type the following lines: print ‘Connecting to %(host)s:%(port)s...’...
- Page 187 C H A P T E R 1 1 A N I N T R O D U C T I O N T O P Y T H O N Receiving data from the socket is a little more complicated . First, you’ll need to create an empty string variable that will act as the receive buffer, holding data from the server as it’s received until it can be processed .
- Page 188 R A S P B E R R Y P I U S E R G U I D E sure that only full lines are removed from the : because responses from the read_buffer server are read in 1 KB chunks, it’s likely that at any given time the buffer will contain only fractions of a line .
- Page 189 C H A P T E R 1 1 A N I N T R O D U C T I O N T O P Y T H O N This tells Python that when the response has been received, it should print out the now- complete list of names to the standard output before blanking the list again .
-
Page 190: Further Reading
U S E R G U I D E A full copy of the program listing for the IRC user list is included in Appendix A, “Python Recipes”, and on the Raspberry Pi User Guide website at http://www.wiley.com/go/ . Downloading the source code from the website will save you... - Page 191 Chapter Har d ware Hackin g...
-
Page 192: Electronic Equipment
U S E R G U I D E IN EARLIER CHAPTERS, you learned how the Raspberry Pi can be turned into a flexible platform for running a variety of software . In this, it’s not alone: any desktop or laptop can run the same software, and in many cases run it far faster than the Pi’s low-power processor... -
Page 193: Chap Te R 1 2 Hardware Hacking
C H A P T E R 1 2 H A R D W A R E H A C K I N G ❍ Push-Buttons—A very common input component, a push-button completes an elec- trical circuit when pushed . At the most basic level, a keyboard is little more than a col- lection of push-buttons . -
Page 194: Reading Resistor Colour Codes
. Thankfully, the resistor colour codes follow a logical pattern . Figure 12-1 shows a typical four- band resistor . A high-resolution colour version of this diagram is available on the Raspberry Pi User Guide website at . - Page 195 C H A P T E R 1 2 H A R D W A R E H A C K I N G Figure 12-1: A four-band resistor and the decoding table for its colour code To read the example resistor, first take the two resistance bands starting from the left: these are coloured red and red .
-
Page 196: Sourcing Components
. At the time of this writing RS Components and Farnell were the only two companies licensed to produce the Raspberry Pi hardware by the Raspberry Pi Foundation, so unless you’re reading this book while considering the purchase of a Raspberry Pi, you’ll have ordered the device from one of the two . -
Page 197: Offline Sources
C H A P T E R 1 2 H A R D W A R E H A C K I N G Offline Sources You may find that you need a component immediately, and even next-day delivery would not be soon enough . -
Page 198: Hobby Specialists
The GPIO Port The Raspberry Pi’s GPIO port is located on the top-left of the printed circuit board, labelled P1 . It’s a 26-pin port, fitted with two rows of 13 male 2.54 mm headers at the factory . The spacing of these headers is particularly important: 2 .54 mm pin spacing (0 .1 inches in impe-... - Page 199 C H A P T E R 1 2 H A R D W A R E H A C K I N G Each pin of the GPIO port has its own purpose, with several pins working together to form particular circuits .
-
Page 200: Uart Serial Bus
3 .3 V logic or are passing the circuit through a voltage regulator before it reaches the Pi . Connecting a 5 V supply to any pin on the Raspberry Pi’s GPIO port, or directly shorting either WARNING of the power supply pins (Pin 1 and Pin 2) to any other pin will result in damage to the Pi. -
Page 201: I²C Bus
Pin 5 providing the Serial Clock (SCL) signal . The I²C bus available on these pins is actually only one of two provided by the BCM2835 chip itself, and is known as I²C0 . The second, I²C1, is terminated at resistors on the Raspberry Pi circuit board itself and is not available for general-purpose use . -
Page 202: Installing The Gpio Python Library
. Just follow these steps: 1 Open a terminal window on your Raspberry Pi from the Accessories menu, or use the console if you haven’t loaded a desktop environment . - Page 203 RPi.GPIO as GPIO this in the following examples . The Raspberry Pi’s GPIO port does not provide any protection against voltage spikes or electrical WARNING shorts. Always make sure you’ve checked that your circuit is sound before connecting it to the Pi.
-
Page 204: Gpio Output: Flashing An Led
(direction-insensitive) device . 3 Using a jumper wire, connect Pin 11 of the Raspberry Pi’s GPIO port (or the corre- sponding pin on an interface board connected to the GPIO port) to the same row as the long leg of the LED . - Page 205 To GPIO Pin 6 To GPIO Pin 6 At this point, nothing will happen . That’s perfectly normal: by default, the Raspberry Pi’s GPIO pins are switched off . If you want to check your circuit immediately, move the wire from Pin 11 to Pin 1 to make the LED light up .
- Page 206 . In this example, Pin 11 is an output, so add the following line to the project: GPIO.setup(11, GPIO.OUT) This tells the GPIO library that Pin 11 on the Raspberry Pi’s GPIO port should be set up as an output . If you were controlling additional devices, you could add more lines GPIO.setup...
- Page 207 C H A P T E R 1 2 H A R D W A R E H A C K I N G Next, add the following lines to switch the pin on, wait 2 seconds, and then switch it off again before waiting another 2 seconds .
-
Page 208: Gpio Input: Reading A Button
. If you’re using a Python development environment such gpiooutput.py as SPE, don’t try to run the program from within the editor . Most Raspberry Pi Linux distri- butions restrict the use of the GPIO port to the root user, so the program will need to be run using the command at the terminal to get it started . - Page 209 . This is a pull-up resistor, and will provide the Pi with a reference voltage so it knows when the button has been pressed . 3 Connect the unused leg of the pull-up resistor to Pin 1 of the Raspberry Pi’s GPIO port . This provides the 3 .3 V reference voltage . 4 ...
- Page 210 The circuit you just built creates a situation whereby the input pin, which in this instance is Pin 12 of the Raspberry Pi’s GPIO port, is constantly high thanks to the pull-up resistor connected to a 3 .3 V supply . When the push-button is pressed, the circuit is grounded and becomes low, providing the cue for your Python program to know that the button has been activated .
- Page 211 . Even on the Raspberry Pi’s processor, which is relatively underpowered when compared to high-performance desktop and laptop processors, Python runs very quickly . This embedded loop tells Python to keep checking the status of Pin 12 until it’s no longer low, at which point it knows the button has been released .
-
Page 212: Moving Up From The Breadboard
Raspberry Snake game from Chapter 11, “An Introduction to Python”, to turn the Raspberry Pi into a simple games console . You can also combine both input and output examples into a single program, which waits for the button to be pushed and then turns on the LED by sending the output pin high . - Page 213 This, among other reasons, is why the Raspberry Pi itself is built on a printed circuit board (PCB) rather than a breadboard—although the breadboard method was certainly used in the early days of prototyping the device . It’s possible to print and etch your own PCBs at home, but there is a simpler intermediate step you can take: using stripboard to create permanent stand-alone circuits .
- Page 214 R A S P B E R R Y P I U S E R G U I D E Figure 12-8: The copper tracks on the underside of a piece of stripboard Stripboard is extremely easy to use, which makes it a great stepping-stone to custom circuit board design and manufacturing .
-
Page 215: A Brief Guide To Soldering
Soldering works by melting a small quantity of metal to form a join between two compo- nents . If you turn the Raspberry Pi over, you’ll see plenty of evidence of this . All the larger components are connected using what’s called through-hole soldering, where the components’... - Page 216 R A S P B E R R Y P I U S E R G U I D E When you’re starting a soldering project, make sure you have a clean, well-lit workspace . Also make sure the area is well ventilated . Solder fumes aren’t very healthy, and while they’re extremely unlikely to build up to dangerous levels in low-volume hobby soldering, it’s still a good idea to keep exposure to a minimum .
-
Page 217: C H A P T E R 1 2
C H A P T E R 1 2 H A R D W A R E H A C K I N G With your work surface chosen and protected, lay out your equipment . The iron should be placed on the side of your dominant hand, and positioned so that the cable isn’t trailing across your work area . - Page 218 R A S P B E R R Y P I U S E R G U I D E This process of tinning the tip protects it against damage and ensures that it will efficiently trans- fer heat onto the surfaces to be soldered . Failure to properly tin the iron’s tip is one of the most common causes of bad solder joints .
-
Page 219: Chapter
. Some add-on boards for the Raspberry Pi are also provided in kit form and require soldering, including the Slice of Pi from Ciseco . You’ll learn about these in... -
Page 221: Add-On Boards
Chapter Add-on Bo ards... -
Page 222: Ciseco Slice Of Pi
The compact Slice of Pi is designed to be connected directly to the GPIO headers on the top of the Raspberry Pi, with the rest of the board covering part of the Pi’s surface—but not extending beyond the edges of the board nor obscuring any commonly used ports . The Slice of Pi does, however, sit over the DSI video output connector . - Page 223 C H A P T E R 1 3 A D D - O N B O A R D S Figure 13-1: The Ciseco Slice of Pi The primary advantages over using the low-cost Slice of Pi rather than just connecting directly to the Pi’s GPIO header are the labelling on the circuit board, which the GPIO header lacks, and the use of female headers .
- Page 224 5 V components that can damage the Pi’s 3 .3 V logic circuits . The labelling is also different to that used to typically describe the Raspberry Pi’s GPIO pins, which can lead to confusion when using a GPIO library not written with the Slice of Pi in mind . Table 13-1 provides a...
- Page 225 C H A P T E R 1 3 A D D - O N B O A R D S Figure 13-3: The Slice of Pi, connected to the Pi’s GPIO port Table 13 1 Slice of Pi GPIO Translations Physical Pin Number Official Designation Slice of Pi Label...
-
Page 226: Adafruit Prototyping Pi Plate
R A S P B E R R Y P I U S E R G U I D E Adafruit Prototyping Pi Plate The Prototyping Pi Plate by Adafruit is based around the same general principle as Ciseco’s Slice of Pi . The add-on is provided in kit form, and offers you a prototyping surface along with easy access to the Pi’s GPIO pins (see Figure 13-4) . - Page 227 C H A P T E R 1 3 A D D - O N B O A R D S The design and layout of the Prototyping Pi Plate will be familiar to anyone who has used an Arduino microcontroller . An add-on board with the same footprint as the target device, designed to connect to on-board headers and sit above the surface of the original board is a common sight in the Arduino world, where such add-on boards are known as shields .
- Page 228 Pi, rather than the width or length, and because it includes the screw terminals for side-on access to GPIO pins, it’s also compatible with a surprising number of Raspberry Pi cases (see Figure 13-6) . If you’re planning to use the Pi and Pi Plate combination with a case, however, be sure to check that the case can be adjusted for height or has access to the GPIO port through its lid .
-
Page 229: Fen Logic Gertboard
Gert van Loo . An employee of Broadcom and a member of the team that designed the BCM2835 SoC processor at the heart of the Raspberry Pi, van Loo created the Gertboard as a way of unlocking some of the power of the chip hidden by the Pi’s overall... - Page 230 . The Gertboard is almost two-and-a-half times larger than the Raspberry Pi itself, mak- ing it both the most powerful and the largest add-on board for the Pi available at the time of writing .
- Page 231 The Gertboard connected to a Raspberry Pi Perhaps the most important feature of the Gertboard is the protection it offers to the Pi . Using a 3 .3 V regulator, the Gertboard is designed to prevent the Pi’s GPIO port from receiv- ing voltages it cannot handle .
- Page 232 For project building, the Gertboard offers significantly more functionality than a bare Raspberry Pi . The 12 buffered IO ports, located at the top of the board, can be configured as inputs or outputs and provide more connectivity than the seven or eight general-purpose IO pins provided on the Pi’s own GPIO port .
- Page 233 . When fitted, the Gertboard can be wired to address either the Raspberry Pi’s GPIO port or the microcontroller, or a combination of the two . The Gertboard is designed to operate with an Atmel ATmega168 or ATmega328 microcon- troller—the same type of microcontroller used in the Arduino prototyping project .
- Page 234 Slice of Pi will usually be enough . However, for in-depth experimentation of just what is possible with the Raspberry Pi’s BC2835 processor and/or to ensure that you’ll be able to interface almost any hardware with your Pi, it’s a great choice and a powerful extension to the Pi’s already impressive abilities .
- Page 235 Part IV Appendixes Appendix A Python Recipes Appendix B HDMI Display Modes...
-
Page 237: Ap Pen D Ix A Python Recipes
Appendix A P y tho n Re cip es... -
Page 238: Raspberry Snake (Chapter 11, Example 3)
Enter until you reach the end that doesn’t have a symbol present . Raspberry Snake (Chapter 11, Example 3) #!/usr/bin/env python # Raspberry Snake # Written by Gareth Halfacree for the Raspberry Pi User Guide import pygame, sys, time, random from pygame.locals import * pygame.init() fpsClock = pygame.time.Clock() - Page 239 A P P E N D I X A P Y T H O N R E C I P E S time.sleep(5) pygame.quit() sys.exit() while True: for event in pygame.event.get(): if event.type == QUIT: pygame.quit() elif event.type == KEYDOWN: if event.key == K_RIGHT or event.key == ord(‘d’): changeDirection = ‘right’...
-
Page 240: Irc User List (Chapter 11, Example 4)
== snakeBody[1]: gameOver() fpsClock.tick(30) IRC User List (Chapter 11, Example 4) #!/usr/bin/env python # IRC User List # Written by Tom Hudson for the Raspberry Pi User Guide # http://tomhudson.co.uk/ import sys, socket, time RPL_NAMREPLY = ‘353’ RPL_ENDOFNAMES = ‘366’... - Page 241 A P P E N D I X A P Y T H O N R E C I P E S ‘hostname’: ‘localhost’, ‘servername’: ‘localhost’, ‘realname’: ‘Raspberry Pi Names Bot’ s = socket.socket(socket.AF_INET, socket.SOCK_STREAM) print ‘Connecting to %(host)s:%(port)s...’ % irc try: s.connect((irc[‘host’], irc[‘port’])) except socket.error: print ‘Error connecting to IRC server Æ...
-
Page 242: Gpio Input And Output (Chapter 12)
U S E R G U I D E GPIO Input and Output (Chapter 12) #!/usr/bin/env python # Raspberry Pi GPIO Input/Output example # Written by Gareth Halfacree for the Raspberry Pi User Guide import RPi.GPIO as GPIO GPIO.setup(11, GPIO.OUT) GPIO.setup(12, GPIO.IN) GPIO.output(11, False) -
Page 243: Ap Pen D Ix Bhdmi Display Modes
Appendix B HDMI Disp lay M ode s... - Page 244 Table B-1 and Table B-2 with the option in hdmi_mode to alter the HDMI video output stream . For more information, see Chapter 6, config.txt “Configuring the Raspberry Pi” . Table B-1 HDMI Group 1 (CEA) Value Description...
- Page 245 A P P E N D I X B H D M I D I S P L A Y M O D E S Value Description 576p 50Hz (Pixel doubling enabled) 576p 50Hz (Pixel doubling enabled) (16:9 aspect ratio) 1080p 50Hz 1080p 24Hz 1080p 25Hz...
- Page 246 640×480 85Hz 800×600 56Hz 800×600 60Hz 800×600 72Hz 800×600 75Hz 800×600 85Hz 800×600 120Hz 848×480 60Hz 1024×768 43Hz, incompatible with the Raspberry Pi 1024×768 60Hz 1024×768 70Hz 1024×768 75Hz 1024×768 85Hz 1024×768 120Hz 1152×864 75Hz 1280×768 (Reduced blanking) 1280×768 60Hz 1280×768 75Hz...
- Page 247 A P P E N D I X B H D M I D I S P L A Y M O D E S Value Description 1280×960 120Hz (Reduced blanking) 1280×1024 60Hz 1280×1024 75Hz 1280×1024 85Hz 1280×1024 120Hz (Reduced blanking) 1360×768 60Hz 1360×768 120Hz (Reduced blanking) 1400×1050 (Reduced blanking)
- Page 248 R A S P B E R R Y P I U S E R G U I D E Table B-2 continued Value Description 1920×1200 (Reduced blanking) 1920×1200 60Hz 1920×1200 75Hz 1920×1200 85Hz 1920×1200 120Hz (Reduced blanking) 1920×1440 60Hz 1920×1440 75Hz 1920×1440 120Hz (Reduced blanking) 2560×1600 (Reduced blanking)
-
Page 249: Index
Index SPECIAL CHARACTERS apt-cache utility, 41–42, 62 apt-get command, 42–43 # (hash symbol), Python, 158 apt-get remove utility, 62 #! (shebang), Python, 154 Arduino, 186, 188, 190 | (pipe), 61 ARM architecture, 12–13 += operator, 168, 175 arm_freq setting, config.txt file, 92–93 <... - Page 250 R A S P B E R R Y P I U S E R G U I D E CPU (central processor) L2 cache, 95 Calc app, OpenOffice.org, 117 memory partitioning, 96–97 calculator.py program, 158–162 overclocking, 91–93 cathode-ray tube (CRT) TVs, connecting to, CRT (cathode-ray tube) TVs, connecting to, 14–15 14–15...
- Page 251 I N D E X dmesg command, 60–62 DNS (Domain Name Service) servers, 58 -f flag, 106 domain names (hostnames), 58–59 Farnell, 184 dotted-quad format, 57 fdisk tool, 74 downloading Fen Logic Gertboard, 217–222 Rasbmc distribution installer, 106 file system raspberry-gpio-python library, 190 defined, 29 Draw app, OpenOffice.org, 117...
- Page 252 R A S P B E R R Y P I U S E R G U I D E resistor colour codes, 182–184 soldering, 203–207 -G flag, 36, 106 sourcing components, 184–186 gameOver function, Python, 165, 170 stripboards, 200–203 gaming hardware settings with pygame library, 162–171...
- Page 253 I N D E X hostname variable, Python, 173 pygame library, 163 raspberry-gpio-python library, 190 hostnames (domain names), 58–59 HTPC. See home theater PC software, 40–43 Hudson, Tom, 171 WordPress, 128–132 Hwaddr, ifconfig tool output, 51 in-system programming (ISP), 189 int (integer) instruction, Python, 160 Interface Name, iwconfig command output, 64...
- Page 254 36 mocp command, 104–106 lists, Python, 164 Mode, iwconfig command output, 65 Live CD, 29 Model A, Raspberry Pi Lomas, Pete, 4 networking, 23 Looks blocks, Scratch, 138, 146, 148 power requirement, 47 loops, 142, 158–162, 165–166, 175–177, Model B, Raspberry Pi 194–195, 198–199...
- Page 255 I N D E X Monitor (mode), iwconfig command non-polarised devices, 192 not block, Scratch, 147 output, 65 Monitor Settings tool, 33 NTSC video standard, 88 MOSI (SPI Master Output, Slave Input) signal, 189 Motion blocks, Scratch, 140, 143 object-oriented languages, 144 motor controllers, 219–220 ODF (Open Document Format), 118 mount command, 75...
- Page 256 106–107 piping, 61 streaming Internet media, 108–109 play sound block, Scratch, 141 streaming local network media, 109–111 polyfuse component, 46 Raspberry Pi pop instruction, Python, 169, 175–176 audio connections, 16–17 port variable, Python, 173 community, 6–7 porting, defined, 14 display connections, 14–16...
- Page 257 I N D E X raspi-config tool, 76–77 Scratch animation and sound example, 140–142 raw_input command, Python, 159, 160 RCA phono connector, 14–15, 17, 49 defined, 32–33 read_buffer variable, Python, 175–176 further reading, 150 Ready To Send/Clear To Send (RTS/CTS) Hello World example, 137–140 handshaking, 65 overview, 136...
- Page 258 R A S P B E R R Y P I U S E R G U I D E side cutters, 181 superuser, 29, 36, 74, 196 SLCK (Serial Clock), 189 surface-mount soldering, 203 Smalltalk language, 136 swap partitions, 79 SMB (Server Message Block) standard, 110 Sweigart, Al, 178 socket module, Python, 172–174...
- Page 259 USB-connected Ethernet adapters, 23 Rasbmc distribution installer, 106 user accounts, creating, 36 Raspberry Pi blog, 6–7 user attributes, 37 Raspberry Pi User Guide, 171, 178, 182 User ID (UID), 37 raspberry-gpio-python library, 190 user input, requesting, 158–162 RS Components, 184...
- Page 260 R A S P B E R R Y P I U S E R G U I D E Windows flashing SD cards from, 21–22 -x flag, 106 imaging SD cards from, 83–84 X11, 29 Linux versus, 13–14 x86 architecture, 12–13 Wired Equivalent Privacy (WEP) encryption, Xarchiver tool, 32 67–68...
Need help?
Do you have a question about the Raspberry Pi and is the answer not in the manual?
Questions and answers