Honeywell VisionPRO Series User Manual
With redlink touch screen programmable thermostat
Hide thumbs
Also See for VisionPRO Series:
- User manual (132 pages) ,
- Installation manual (25 pages) ,
- User manual (72 pages)
Table of Contents
Advertisement
Advertisement
Table of Contents

Related Manuals for Honeywell VisionPRO Series


Summary of Contents for Honeywell VisionPRO Series
-
Page 1: User Guide
VisionPRO ® Series ™ with RedLINK User Guide... - Page 2 Honeywell’s Total Connect Comfort is the perfect solution if you travel frequently, own a vacation home, a business or manage an investment property or if you are simply...
- Page 3 Features of your VisionPRO thermostat With your new thermostat, you can: • Connect to the internet to monitor and control your heating/cooling system and receive alerts by email (requires optional RedLINK Internet Gateway) • View outdoor temperature and humidity (requires optional Wireless Outdoor Sensor) •...
-
Page 4: Table Of Contents
Table of contents Programming and Operation Setting ventilation ........24 Setting preferences ........26 Quick reference ........... 3 Cleaning the thermostat screen ....27 Setting the time/date ........5 Security settings ........28 Setting the fan ..........6 Viewing dealer information ......29 Setting system mode ........ -
Page 5: Quick Reference
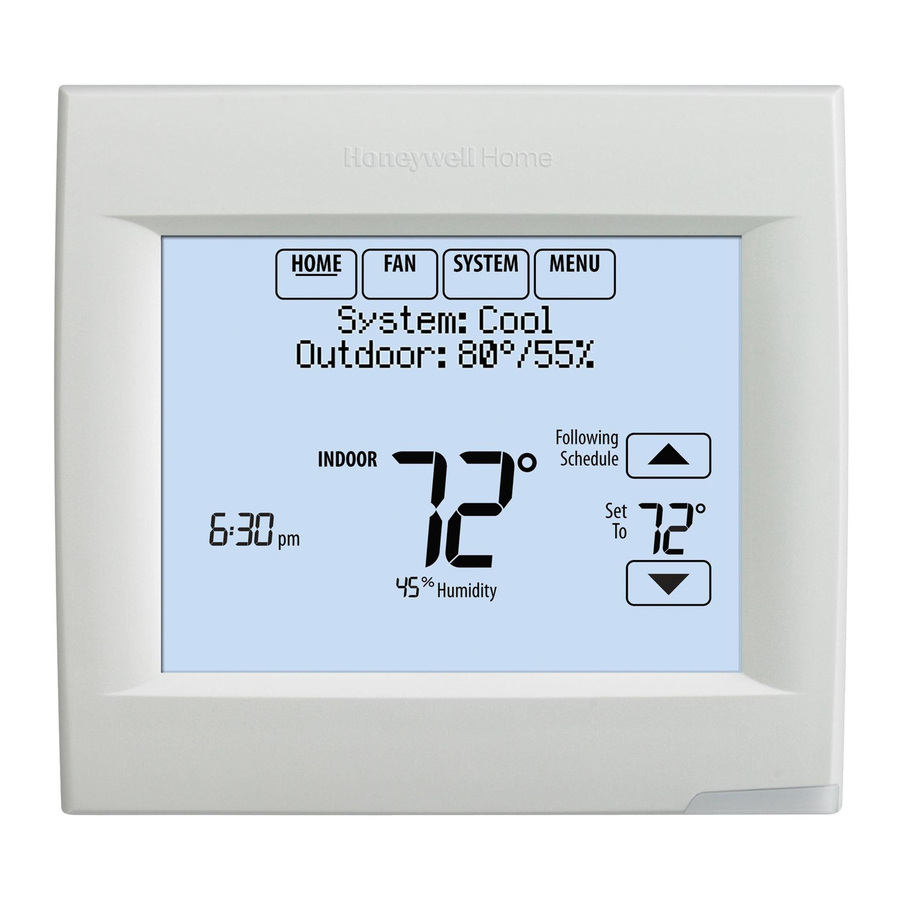
Quick reference: residential use HOME. Touch to display Home screen. FAN. Select fan mode. SYSTEM. Select system mode (Heat/Cool). MENU. Touch to display options. Start here to set a program schedule. Current status. Shows system mode (heat/ cool), outdoor temperature and humidity (with optional outdoor sensor). - Page 6 Quick reference: commercial use HOME. Touch to display Home screen. FAN. Select fan mode. SYSTEM. Select system mode (Heat/Cool). MENU. Touch to display options. Start here to set a program schedule. Current status. Shows system mode (heat/cool), outdoor temperature and humidity (with optional outdoor sensor).
-
Page 7: Setting The Time/Date
Setting the time/date 1 Touch the current time. The screen displays Select Option. 2 Touch Time or Date, then touch Select. 3 Touch until the proper time/date is displayed. MCR34092 Done Cancel 4 Touch to save or to ignore changes. Select Option Home 5 Touch... -
Page 8: Setting The Fan
Setting the fan 1 Touch to display fan settings. 2 Touch On, Auto, Circ, or Follow Schedule. MCR34096 Done 3 Touch to save and exit. On: Fan is always on. Auto Circ Auto: Fan runs only when the heating or cooling system is on. Circ: Fan runs randomly about 35% of MCR34097 the time (residential use only). -
Page 9: Setting System Mode
Setting system mode SYSTEM 1 Touch to display system settings. MCR34098 2 Touch desired option: Heat: Controls only the heating Heat Cool Auto system. Cool: Controls only the cooling system. MCR34099 Off: Heating/cooling systems are off. NOTE: The Auto and Em Auto: Selects heating or cooling Heat system settings may not depending on the indoor temperature. -
Page 10: Preset Energy-Saving Schedules
Preset energy-saving schedules This thermostat uses default Energy Saver settings that can reduce your heating/cooling expenses. To customize settings, see next page. Heat Cool Heat Cool Period Start time (Mon-Fri) (Mon-Fri) (Sat-Sun) (Sat-Sun) Wake 6:00 am 70° 78° 70° 78° Leave 8:00 am 62°... -
Page 11: Adjusting Program Schedules
Adjusting program schedules 1 Touch MENU. Edit Schedule to display Use 2 Select MCR34100 Scheduling Assistant? • Touch to create a schedule by answering simple questions. Edit Schedule View Schedule • Touch to manually create a program schedule. See page MCR34101 NOTE: To reduce costs, use the pre-... - Page 12 Adjusting program schedules (continued) 3 Select the days to schedule, touch Next. 4 Touch to set your Wake time for Select the days selected day(s). to schedule 5 Touch to set Heat and Cool temperatures for the Wake period. 6 Touch other time periods (Leave, Return, Sleep) to set time and temperatures for each.
-
Page 13: Schedule Overrides
Overriding schedules: residential use 1 Touch to adjust the temperature (right side of screen) Temporary Hold and the Hold Until time (left side). The Permanent Hold schedule will resume when the Hold Until time expires. Permanent Hold 2 Select to keep the same temperature until you change it or resume the program schedule. - Page 14 Overriding schedules: commercial use Touch to adjust the temperature. It will be maintained until the hold time you set. • To change the hold time, touch the Hold Until arrow buttons. This time can be adjusted up to the maximum time set by the installer.
-
Page 15: Viewing Equipment Status
Viewing equipment status 1 Touch MENU. Equipment Status. 2 Select MCR34100 3 Touch to view the status of all the equipment your thermostat is controlling. Depending on how Equipment Status your thermostat was installed, the Date/Time Equipment Status screen can report data about the following systems: MCR34108 •... -
Page 16: Setting Vacation, Holiday, And Events
Setting vacation hold: residential use This feature helps you save energy while you are away, and restores comfortable MCR34100 settings just before you return home. 1 Touch MENU. Vacation Mode. 2 Select Vacation Mode Equipment Status 3 Touch to select the date Next you leave, then touch for further... -
Page 17: Setting Holiday/Event Schedules: Commercial Use
Setting holiday/event schedules: commercial use This feature helps you conserve energy when the workplace is unoccupied for MCR34100 special events and holidays. 1 Touch MENU. Holiday Schedule. 2 Select Holiday Schedule Holiday Mode 3 Select the item you want to schedule Next and touch for further scheduling... - Page 18 Setting custom events: commercial use This feature lets you customize temperature settings to be maintained during a specific Custom Events event. You can set up an event for a specific US Holidays date or day in a month. The thermostat resumes normal scheduling after the event.
- Page 19 Setting holiday schedule: commercial use This feature lets you customize temperature settings to be maintained on specified national Add / Edit Holidays holidays. The thermostat resumes normal scheduling between selected holidays. US Holidays Canadian Holidays 1 Select from MCR34119 the Holiday Schedule menu. Add/Edit Holidays.
- Page 20 Setting holiday override: commercial use This feature lets you customize temperature settings to be maintained from now until MCR34100 a specified date. The thermostat resumes normal scheduling on the date you select. 1 Touch MENU. Holiday Mode Equipment Status Holiday Mode 2 Select to display Temperature While Away.
- Page 21 Initiating occupancy mode: commercial use This feature keeps temperature at an energy- HERE saving level until you touch Press Press HERE Start Occupancy. When you arrive, touch Start Occupancy the message to maintain a comfortable temperature while the room is occupied. Touch the buttons to set the temperature or the Hold Until time.
- Page 22 Remote setback (commercial use) During Occupied program periods, an occupancy sensor directs the thermostat to go to REMOTE SETBACK settings when the room is empty. If someone is in the room, it uses the Occupied program period settings. The thermostat ignores the occupancy sensor during Unoccupied program periods.
- Page 23 Adjusting humidification settings MENU and select Humidification. 1 Touch 2 Select Auto. MCR34100 3 Touch to select humidity level. Done 4 Touch to save your settings. Touch Humidification Cancel to ignore changes. Window Protection 5 If frost or condensation appears on the windows, touch MENU, then select Window MCR34128...
-
Page 24: Dehumidification
Adjusting dehumidification settings: residential use This feature can control a dehumidifier or use your air conditioner to reduce humidity. MCR34100 MENU and select Dehumidification. 1 Touch 2 Select Auto. Dehumidification 3 Touch to select humidity level. Equipment Status Done 4 Touch to save your settings. - Page 25 Adjusting dehumidification settings: commercial use This feature can control a dehumidifier or use your air conditioner to reduce humidity. MCR34100 MENU and select Dehumidification. 1 Touch 2 Select Auto. Dehumidification 3 Touch to select humidity level. Equipment Status Done 4 Touch to save your settings.
-
Page 26: Setting Ventilation
Adjusting ventilation settings 1 Touch MENU, and select Ventilation. 2 Select Mode, Temporary Boost, or MCR34100 Lockout, then select appropriate options. (For options, see next page.) Done 3 Touch to save your settings. Ventilation Equipment Status Cancel Touch to ignore changes. MCR34132 Mode Temporary Boost... - Page 27 Ventilation options Mode: Auto: Ventilation runs as programmed by Ventilation Mode Auto the installer. Off: Ventilation remains off unless turned MCR34135 on using the timer. On: Ventilation is always on. Temporary Boost: Touch to select how Run Ventilation For 60 minutes long to run ventilation temporarily.
-
Page 28: Setting Preferences
Setting preferences Preference menu options let you select how the thermostat displays information or MCR34100 responds to certain situations. MENU and select Preferences. 1 Touch 2 Select an option and follow prompts: Preferences Clean Screen • Reminders to change filters •... -
Page 29: Cleaning The Thermostat Screen
Cleaning the thermostat screen When you select the Clean Screen option, the screen is locked so you don’t accidentally MCR34100 change settings while you clean. 1 Touch MENU. Clean Screen. A prompt asks if you 2 Select Clean Screen Security Settings want to clean the screen for 30 seconds. -
Page 30: Security Settings
Adjusting security settings You can adjust security options to prevent unauthorized changes to system settings. MCR34100 MENU Security Settings. 1 Touch and select 2 Select an option and follow prompts: Security Settings Unlocked: Full access allowed. Dealer Information Partially locked: Only temperature can be changed. -
Page 31: Viewing Dealer Information
Viewing dealer information Check dealer information if you need to contact your installer for maintenance, repairs, or MCR34100 upgrades. 1 Touch MENU. Dealer Information. 2 Select Dealer Information Installer Options 3 Scroll through the displayed information. Done 4 Touch to return to the menu. MCR34022 ABC HEATING &... -
Page 32: Advanced Features
Advanced features Adaptive Intelligent Recovery (residential use only)—Over time, the VisionPRO ® thermostat “learns” how long it takes your system to reach the temperature you want. It turns on the heating or cooling system earlier to make sure you’re comfortable at the time you expect. -
Page 33: Installer Options
Installer options Installer options require a password and should only be changed by a qualified MCR34100 technician. To prevent unintended changes or damage to your equipment, do not change these Installer Options options yourself. MCR33976 Enter password 0 0 0 MCR33977 69-2761EFS—03... -
Page 34: Replacing Thermostat Batteries
Replacing thermostat batteries Install fresh batteries when the REPLACE BATTERIES warning begins flashing. The Replace Batteries warning flashes about 60 days before Press HERE for info batteries are depleted. Even if the warning does not appear, it is recommended to replace batteries once a year, or before leaving home for more than a month. - Page 35 Replacing outdoor sensor batteries Replace batteries in your outdoor sensor when a warning appears on the thermostat Outdoor Sensor screen, about 60 days before batteries are has low batteries depleted. To replace the batteries: MCR34145 1 Remove the sensor from the bracket. 2 Detach cover.
- Page 36 Replacing indoor sensor batteries Replace batteries in your indoor sensor when a warning appears on the thermostat screen, Indoor Sensor about 60 days before batteries are depleted. has low batteries When the sensor status light begins flashing red, battery power is critically low and will be MCR34146 depleted within 2–3 weeks.
-
Page 37: Temperature And Humidity Display
Using the temperature display In some circumstances, the temperature displayed on the Home screen may not match the temperature near the thermostat. If your system is set up to use remote indoor sensors, it may be reading a sensor in another location. MCR33985 Temperature reading depends on location... - Page 38 Using the humidity display In some circumstances, the humidity displayed on the Home screen may not match humidity near the thermostat. Some systems are set up to use two sensors, one to control humidification, the other for dehumidification. These sensors are often installed in different locations.
-
Page 39: Optional Accessories
Optional accessories Portable Comfort Control If you have only one thermostat, you move this remote control from room to room (like a portable thermostat), to make sure the temperature is comfortable in the room you’re using. If you have multiple thermostats, you can view and adjust the temperature in each room from your armchair. - Page 40 Optional accessories RedLINK™ Internet Gateway The Honeywell RedLINK Internet Gateway gives you remote access to your VisionPRO ® thermostat from the web, smart phone or tablet. You can view or adjust indoor temperature, system mode and other settings. The Gateway can also send alerts to as many as 6 email addresses to notify you if a problem occurs.
-
Page 41: Troubleshooting
Troubleshooting If you have difficulty with your thermostat, try these suggestions. Most problems can be corrected quickly and easily. Screen is blank • Check circuit breaker and reset if necessary. • Make sure power switch at heating and cooling system is on. •... - Page 42 55422, or whether a replacement product can be sent to you. This warranty does not cover removal or reinstallation costs. This warranty shall not apply if it is shown by Honeywell that the defect or malfunction was caused by damage which occurred while the product was in the possession of a consumer.
-
Page 43: Regulatory Information
Regulatory information FCC Compliance Statement (Part 15.19) (USA only) Equipment interface module, thermostats and outdoor This device complies with Part 15 of the FCC Rules. Operation sensor is subject to the following two conditions: To comply with FCC and Industry Canada RF exposure limits 1 This device may not cause harmful interference, and for general population/ uncontrolled exposure, the antenna(s) 2 This device must accept any interference received, including...
Need help?
Do you have a question about the VisionPRO Series and is the answer not in the manual?
Questions and answers
I replaced the batteries? The red indicator has not turned off.
How do you change the batteries?