Advertisement
Advertisement
Table of Contents

Related Manuals for IAG IOM9SE4


Summary of Contents for IAG IOM9SE4
- Page 1 900mm Built-In Oven Manual MODEL IOM9SE4 Installation and Operation...
-
Page 2: Using This Manual
IOM9SE4 Installation and Instructions for Use Using This Manual This Owner’s Manual contains important information on safety and instructions intended to assist you in the operation and maintenance of your appliance. Please take the time to read this Owner’s Manual before using your oven and keep this book for future reference. - Page 3 IOM9SE4 Installation and Instructions for Use Safety during operation (Continued) When cooking dishes that contain alcohol, the alcohol may evaporate due to the high temperatures and the vapour can catch fire if it comes into contact with a hot part of the oven.
- Page 4 IOM9SE4 Installation and Instructions for Use Cleaning Safety WARNING Make sure the oven is cool before cleaning. We recommend turning the oven off prior to cleaning Clean and user maintenance shall not be made by children without supervision Do not clean the appliance while it is still hot.
- Page 5 IOM9SE4 Installation and Instructions for Use Cleaning Safety (Continued) Catalytic Liners (removable) - enamel surface The removable cover casing is coated with a dark gray catalytic enamel that can become coated with oil and fat distributed by circulating air during convection heating. These deposits will burn off at oven temperatures of 200 °C and higher, for example, when baking or roasting.
-
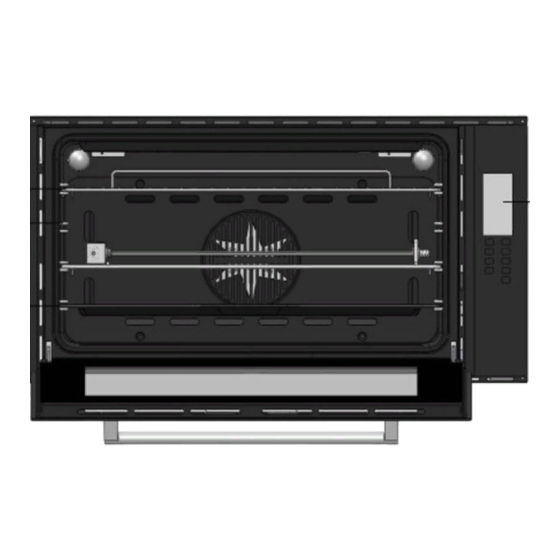
Page 6: Close-Up View
IOM9SE4 Installation and Instructions for Use Close-up view Control Panel Oven Rack Guides for sliding the racks or dripping in and out Dripping Pan or Baking Sheet How to use your oven This multi-function oven combines the advantages of traditional convection ovens with those of the more modern fan assisted models in a single appliance. -
Page 7: Operating The Oven
IOM9SE4 Installation and Instructions for Use Before using for the first time Setting and changing the current time The oven only operates when the time has been set. When the appliance is connected to the electrical supply or when there has been a power cut, the symbol for Time flashes automatically. -
Page 8: Memory Function
IOM9SE4 Installation and Instructions for Use General instructions · Always switch the appliance on first by pressing the On/Off button. · When the selected function is lit, the oven begins to heat up or the time set begins to count down. -
Page 9: Clock Functions
IOM9SE4 Installation and Instructions for Use Starting the Memory function 1. Switch the oven on using the button On/Off 2. Using the button call up the saved setting. Clock Functions Countdown To set a countdown. A signal sounds after the time has elapsed. -
Page 10: Other Functions
IOM9SE4 Installation and Instructions for Use End time 1. Select oven function and using button select temperature. 2. press the Clock Functions button repeatedly until the symbol for End time flashes. 3. using the button set the desired switch-off time. -
Page 11: Oven Functions
IOM9SE4 Installation and Instructions for Use Button Beep Switching off button beep 1. Switch off the appliance using the On/Off button. 2. press and hold buttons at the same time until a signal sounds (approx.2 seconds). The button beep is now switched off. - Page 12 IOM9SE4 Installation and Instructions for Use Pizza Mode 3166-3660W The bottom and circle heating elements, as well as the fan ,will come on. This combination rapidly heats the oven due to the large amounts of power used by the appliance, which results in the production of considerable heat coming prevalently from the bottom.
- Page 13 IOM9SE4 Installation and Instructions for Use The rotisserie (only available on certain models) To start the turnspit, proceed as follows: · Insert the rotisserie rod “A” into the drive unit and groove “B” into bend “C”; ·Turn the plastiv handle “D” anti clockwise and slide the rack into the oven runners ensuring that the rod “E”...
- Page 14 IOM9SE4 Installation and Instructions for Use How to Keep Your Oven in Shape Before cleaning your oven, or performing maintenance, disconnect it from the power supply. To extend the life of your oven, it must be cleaned frequently, keeping in mind that: ·...
-
Page 15: Practical Cooking Advice
IOM9SE4 Installation and Instructions for Use Practical Cooking Advice The oven offers a wide range of alternatives which allow you to cook any type of food in the best possible way. With time you will learn to make the best use of this versatile cooking appliance and the following directions are only a guideline which may be varied according to your own personal experience. - Page 16 IOM9SE4 Installation and Instructions for Use Therefore the best results when using the grill modes are obtained by placing the grid on the lower racks (see cooking table) then, to prevent fat and grease from dripping onto the bottom of the oven and smoke from forming, place a dripping-pan on the 1st oven rack from the bottom.
- Page 17 IOM9SE4 Installation and Instructions for Use Selector knob Food to be cooked Weight Cooking rack Preheating Thermostat Cooking setting (in kg ) position from time knob time bottom (Minutes) setting (Minutes) 1 Convection Duck 65-75 Roast veal or beef 70-75...
-
Page 18: Installation
IOM9SE4 Installation and Instructions for Use 8 Fast cooking Frozen food Pizza Courgette and prawn pie Country style spinach pie 30-35 Turnovers Lasagne Golden Rolls 25-30 Chicken morseis 15-20 Pre-cooked food Golden chicken wings 20-25 Fresh Food Biscuits(short pastry) 15-18... - Page 19 IOM9SE4 Installation and Instructions for Use Electrical Connection Those ovens equipped with a three-pole power supply cable are designed to operate with an alternating current .The wire for earthling the appliance is yellow-green in color. Fitting on a Power Supply Cable Opening the terminal board: ·Using a screwdriver, prize the bolt on the side tabs of the...
-
Page 20: Technical Data
IOM9SE4 Installation and Instructions for Use Technical Data Model IOM9SE4 Voltage & Frequency of Power Supply 220-240V ~ 50/60Hz Volume (usable capacity) 105 L Output Power 3,166-3,660 W Weight 51kg approx Shipping 58.5 kg approx Dimensions (W x H x D) Outside 900 x 480 x 560.5mm...
Need help?
Do you have a question about the IOM9SE4 and is the answer not in the manual?
Questions and answers