Table of Contents
Advertisement
Advertisement
Table of Contents

Subscribe to Our Youtube Channel
Related Manuals for Abcon ProShip

Summary of Contents for Abcon ProShip
- Page 1 INSTRUCTION MANUAL...
-
Page 3: Safety Precautions
• Matter charged with static electricity could affect accuracy. Discharge all static electricity. For example, one method is to use Static-Guard spray, and spray it on both sides of the weighing platform. • Do not operate a mobile or cordless phone or any other electronic device with strong magnetic field (i.e. computer, radio, TV) within 3m of this device. PROSHIP ®... -
Page 4: Battery Installation And Replacement
• Always replace a whole set of batteries at one time. DO NOT mix old and new batteries. • Only use the same or equivalent recommended type of batteries, DO NOT mix type. • Always store unused batteries in their packaging and away from metal objects that may cause a short circuit. • Remove dead batteries from the product and remove batteries if you will not be using the product for an extended period. • Always make sure battery compartments are secure • NEVER dispose of batteries in fire - Risk of batteries exploding. • NEVER attempt to recharge normal batteries. • Rechargeable batteries should be removed from the appliance before being charged. 4 PROSHIP ®... -
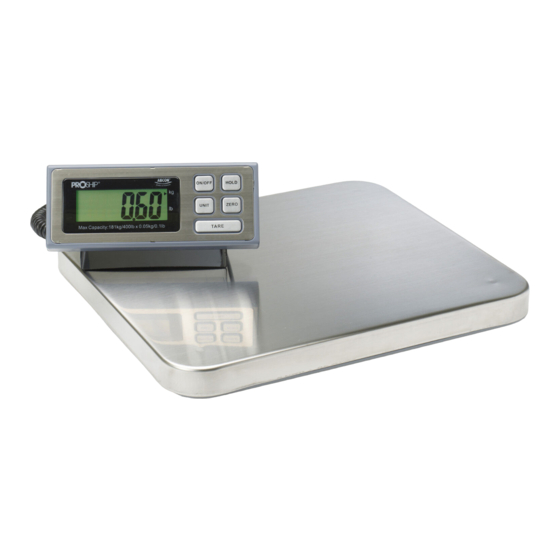
Page 5: Parts Description
Zero Range (4% to full capacity) F TARE BUTTON TARE Tare Range (100% to full capacity) LCD DISPLAY G Low battery indicator H Weighing unit I Negative value indicator J ZERO indicator ZERO K Hold indicator REAR OF DISPLAY L Use 6 x AA 1.5V batteries M Battery compartment cover For wall mounting see Pg.14 PROSHIP ®... -
Page 6: Hold Function
Function mode by firstly ensuring the scale is switched OFF. Then press and hold the [ZERO] button whilst pressing the [ON/OFF] button. Now the display will show :- A_ON or A_OFF 1. SELECTION OF AUTO HOLD: Press [UNIT] button, the display will show H_ON or H_OFF. Press [ZERO] to choose ON or OFF, this means AUTO-HOLD function is either active (ON) or inaction (OFF). 6 PROSHIP ®... -
Page 7: Selection Of Auto Shut Off Mode
OFF, this means auto shut off function inactive. 3. SELECTION OF AUTO BACKLIGHT MODE: Whilst the scale is in Change Function Mode, press the [UNIT] button until the display will show L_ON (or OFF). press [ZERO] to choose ON or OFF: selection display ON, this means auto backlight function active, press [ZERO] again, the display will show OFF, this means auto backlight function is inactive, i.e. shut off backlight function. Press [ON/OFF] button to exit Change Function Mode. PROSHIP ®... -
Page 8: Before Weighing
Press [UNIT] to select a weighing unit “kg”, “lb”. Once the unit has been selected, the selected unit will be displayed next to the weight value. 3. START WEIGHING: If you do not use a container for weighing: • Verify the reading is “0”. If not, press [ZERO] to display “0”. • Place the items to be weighed on the platform. If you use a container for weighing: • Place an empty container on the platform. • Wait for the stability weighing to be displayed and press [ZERO]. • Place the objects to be weighed in the container. 8 PROSHIP ®... -
Page 9: How To Calibrate
• Press [ZERO] to enter the Weight Selection Mode. In this mode you are now able to enter the exact weight of the item you are using to calibrate the scale. Press [HOLD] = increases the value of the flashing number Press [UNIT] = moves to next number on the right PROSHIP ®... - Page 10 If a mistake has been made, pressing [ON/OFF] before the end of step 3, will turn the scale off and calibration will not have taken place. To test the calibration was successful, turn on the scale by pressing [ON/OFF], once the scale has finished self testing and the display shows 0, put item(s) used for calibration on the platform and check the scale is weighing correctly. If not, repeat steps 2 & 3 again. 10 PROSHIP ®...
- Page 11 • Auto hold (programmable on/off) Ideal for fast weighing large items which may hide display • Auto power-off (programmable on/off) To save energy consumption when not in use • Illuminated / backlit LCD display (programmable on/off) Easier reading in darker environments • Stainless steel remote “damage resistant” display front • Angle adjustable mounting bracket & 1.8m cable Perfect for quick installation on any table or wall • Extra large easy press buttons • Displays and converts weight in lb or kg • Last unit memory (defaults to last unit used) • Low 0.05kg / 0.1lb minimum weight to a maximum of 400lbs / 181Kgs • Full range Tare / Zero function • Runs on batteries (6 x 1.5V AA not included) or AC adapter (optional) • 5 Year warranty *Worldwide Patents Pending PROSHIP ®...
-
Page 12: Specifications
5.3kg/6.5kg Standard carton: 530 x 470 x 130mm Package 4 Units in one box: 555 x 485 x 570mm Operating Temperature 0-40º (32-104ºF) : Optimum 19-30ºC (66-86ºF) 6 × AA 1.5V batteries (not included) Power source AC Adapter 9V-12V/100mA DC output (optional) * Due to continual product improvement, specifications and/or appearance may change. **SPECIAL WARNING** Mobile phones, cordless phones, and any radio-frequency device can cause temporary interference and cause the scale to temporarily not work properly. Please do not use any electronic device near the SCALE. Just like in an airplane, DO NOT use your mobile phone near the scale when it is in use. While there is NO risk of permanent damage to the scale, interference can cause an incorrect calibration or incorrect weight readings. 12 PROSHIP ®... - Page 13 4. THE DISPLAY IS PERMANENTLY SHOWING ON EEEEE: This indicates the scale was dropped, shocked or somehow damaged and the delicate load cells have been damaged. Try recalibrating as described on Pg 9. If this does not resolve the problem contact your supplier. 5. THE DISPLAY SHOWS Err-0: The scale has been overloaded. Ensure that you have not placed a total or combined weight (including when using TARE) in excess of the scales maximum capacity. 6. THE DISPLAY SHOWS UNST OR FLASHES Err-S: This indicates that the scale is not on a level stable surface. Reposition the scale and ensure that there is nothing jamming or stuck between the scale body and platform. If this does not resolve the problem contact your supplier as the load cells may be fatally damaged. PROSHIP ®...
-
Page 14: Wall Mounting
Spray a general purpose cleaner onto a dry clean cloth and wipe scale body with cloth. Cloth must not be dripping wet. WALL MOUNTING The display has a bracket fitted which can be used to wall mount the display. 12.0cm 1. Mark on the wall the position of where the holes need to be drilled (12.0cm apart). It is recommended to use a spirit level / bubble level to make sure display will be level. 2. Using an appropriate drill two holes in the marked positions approximately 40mm deep using a 6mm drill bit. 3. Insert 6mm wall plugs into the holes so that they are flush with the wall surface and then using a screwdriver tighten 4mm diameter x 35mm long screws into the wall plug leaving only @3-4mm of the screw protruding out of the wall. 4. Align the holes on the display bracket over screws and push bracket towards the wall so that the screws go through the holes. Then release the bracket so that the display is now sitting on screws and tighten the screws so that the bracket will not move from this position. 14 PROSHIP ®... - Page 15 NOTES PROSHIP ®...
- Page 16 ABCON Glenwood House, RM14 3SL, UK TEL: +44 (0) 871 234 7678 FAX: +44 (0) 871 234 7688 EMAIL: sales@abcongroup.co.uk Developed in UK, Engineered in USA, Made in China POSTSHIP and Any Weight Calibration ® ® registered trademarks of ABCON. Worldwide Patents Pending.
Need help?
Do you have a question about the ProShip and is the answer not in the manual?
Questions and answers