Table of Contents
Advertisement
Available languages
Available languages
Parrilla de Pellet Combustible
OWNER'S MANUAL / MANUAL DEL PROPIETARIO
GUARDE ESTE MANUAL PARA REFERENCIA FUTURA
NOTICE TO INSTALLER:
LEAVE THESE INSTRUCTIONS
WITH THE GRILL OWNER FOR
FUTURE REFERENCE .
AVISO PARA EL
INSTALADOR:
ENTREGUE ESTAS
INSTRUCCIONES AL
PROPIETARIO DE LA PARRILLA
PARA REFERENCIA FUTURA.
Pellet Fuel Grill
ASSEMBLY AND OPERATING IN STRUC TIONS
INSTRUCCIONES DE ARMADO Y OPERACIÓN
SAVE THIS MANUAL FOR FUTURE REFERENCE
HAZARDOUS EXPLOSION MAY RESULT IF THESE WARNINGS AND INSTRUCTIONS
ARE IGNORED. READ AND FOLLOW ALL WARNINGS AND INSTRUCTIONS IN THIS
MANUAL TO AVOID PERSONAL INJURY, INCLUDING DEATH OR PROPERTY DAMAGE.
SE PUEDE PRODUCIR UNA EXPLOSIÓN PELIGROSA SI SE HACE CASO OMISO A
ESTAS ADVERTENCIAS E INSTRUCCIONES. LEA Y SIGA TODAS LAS ADVERTENCIAS
E INSTRUCCIONES EN ESTE MANUAL PARA EVITAR LESIONES PERSONALES,
PELLET FUEL
PELLET FUEL
GRILL
GRILL
S
275
M
O
250
300
K
325
E
225
180
350
Smoke
375
˚F
Off
High
WARNING/ADVERTENCIA
INCLUSO LA MUERTE, O LOS DAÑOS MATERIALES.
Advertisement
Chapters
Table of Contents

Related Manuals for Brinkmann 3091 Pellet Fuel Grill


Summary of Contents for Brinkmann 3091 Pellet Fuel Grill
- Page 1 Pellet Fuel Grill Parrilla de Pellet Combustible OWNER’S MANUAL / MANUAL DEL PROPIETARIO ASSEMBLY AND OPERATING IN STRUC TIONS INSTRUCCIONES DE ARMADO Y OPERACIÓN SAVE THIS MANUAL FOR FUTURE REFERENCE GUARDE ESTE MANUAL PARA REFERENCIA FUTURA WARNING/ADVERTENCIA NOTICE TO INSTALLER: HAZARDOUS EXPLOSION MAY RESULT IF THESE WARNINGS AND INSTRUCTIONS LEAVE THESE INSTRUCTIONS ARE IGNORED.
- Page 2 IMPORTANT SAFETY WARNINGS WE WANT YOU TO ASSEMBLE AND USE YOUR GRILL AS SAFELY AS POSSIBLE. THE PURPOSE OF THIS SAFETY ALERT SYMBOL IS TO ATTRACT YOUR ATTENTION TO POSSIBLE HAZARDS AS YOU ASSEMBLE AND USE YOUR GRILL. WHEN YOU SEE THE SAFETY ALERT SYMBOL PAY CLOSE ATTENTION TO THE INFORMATION WHICH FOLLOWS! READ ALL SAFETY WARNINGS AND INSTRUCTIONS CAREFULLY BEFORE ASSEMBLING AND OPERATING YOUR GRILL.
-
Page 3: Table Of Contents
TABLE OF CONTENTS: General Warnings ..........3-4 Operating the Grill . -
Page 4: General Warnings
GENERAL WARNINGS: WARNING When using electric appliances, basic safety precautions should always be followed including the following: • Operate only per manufacturers instructions. • Keep all combustible materials at least 72 inches (183 cm) away from the grill at all times. Do not use this grill under any overhang or near any combustible structures. - Page 5 • Outdoor extension cords must be used with outdoor use products and are marked with suffix “W” and with the statement “Suitable for Use with Outdoor Appliances.” • Only use a properly-grounded power source. • Use only with a properly-grounded GFCI (Ground Fault Circuit Interrupter) household circuit. •...
-
Page 6: Operating The Grill
OPERATING THE GRILL: WARNING Read and follow all warnings and instructions contained in the preceding sections of this manual. BREAKING IN YOUR GRILL: • In manufacturing and preserving the components of your grill, oil residue may be present on the cooking surfaces of your grill. - Page 7 TURNING ON THE GRILL: Initial Lighting Instructions (To be used on initial fi ring or anytime the grill runs out of pellets) Always allow the auger tube to fully load with pellets to ensure proper lighting of the grill. Step 1 Open lid to cooking chamber and remove cooking grills, grease tray and heat distribution plate from inside the grill.
- Page 8 Step 2 Open cooking chamber lid and turn temperature control knob to “SMOKE”. You should see smoke coming out of the cooking chamber as the pellets ignite in about 2 minutes. NOTE: Always start the grill on “SMOKE” setting with the cooking chamber lid open. Step 3 Close cooking chamber lid and set the temperature control knob to the desired setting.
-
Page 9: Cook Mode
• Smoke stack cap can be adjusted up or down to provide additional temperature and smoke control. SMOKE MODE: 1.2.0. SMOKE ˚F • The “SMOKE” settings is for smoking and adding smoke fl avor to foods being cooked. • Smoke Mode can be adjusted from P0 to P7. P0 provides less smoke into the cooking chamber and can be adjusted up to P7 for maximum smoke. -
Page 10: Proper Care And Maintenance
PROPER CARE & MAINTENANCE: CLEANING AND MAINTENANCE: • Keep the appliance free and clear of combustible materials, gasoline and other fl ammable vapors and liquids. • For safe grilling and peak performance of your grill, perform these checks at least twice per year or after extended periods of storage. -
Page 11: Transporting And Storage
TRANSPORTING AND STORAGE: WARNING • Never move a grill when it is hot or when objects are on the cooking surfaces. • Never store fl ammable liquids or spray canisters under or near the grill. • DO NOT extinguish grease fi res using water. BEFORE STORING YOUR GRILL: •... -
Page 12: Trouble Shooting
TROUBLE SHOOTING: To see trouble shooting or assembly videos, visit us at: PROBLEM CAUSE CORRECTION Electric 1. Check that the 3-wire plug is fully seated 1. Reseat plug in a 3-wire grounded GFCI into a 3-wire grounded GFCI outlet wired outlet wired for 120 volts and protected at element will not... -
Page 13: Wiring Diagram
WIRING DIAGRAM: POWER CORD MOLEX TYPE CONNECTOR 4-TYPICAL BLACK WHITE ORANGE WHITE WHITE Smoke ˚F High PURPLE WHITE BLOWER FAN AUGER MOTOR FIRE POT HOT ROD NOTE: FUSE IS LOCATED ON BACK OF CONTROL. -
Page 14: Assembly Instructions
ASSEMBLY INSTRUCTIONS: Make sure you have all items listed under PARTS LIST and PARTS CARD CONTENTS before you begin the installation process. PARTS CARD CONTAINS: 30 M6 X 12 mm Bolts 2 M12 Nuts 16 M6 Flat Washers 1 M6 X 14 Shoulder Bolt 26 M6 Nuts M6 X 12 mm Bolts M6 Nuts... - Page 15 READ ALL SAFETY WARNINGS & ASSEMBLY INSTRUCTIONS CAREFULLY BEFORE ASSEMBLING OR OPERATING YOUR GRILL. WE RECOMMEND TWO PEOPLE WORK TOGETHER WHEN AS SEM BLING THIS UNIT. ® The following provided tools are required to assemble this Brinkmann Pellet Fuel Grill: • Screwdriver • Adjustable Wrench...
- Page 16 FOR COVERS, ACCESSORIES AND OTHER PRODUCTS, PLEASE VISIT US ONLINE AT: Inspect contents of the box to ensure all parts are included and undamaged.
- Page 17 Smoke Stack Clear an assembly area and get a friend to Opening help you put your smoker together. Lay card- board down to protect smoker fi nish and Grease Hole assembly area. Grill Body Assembly Step 1 Place the grill body assembly on its end with the lid open.
- Page 18 Bottom View Grill Body Step 4 Assembly Attach the left front and rear legs (with M6 X12 mm wheel axle holes) to the grill body Bolts assembly. First, insert the bottom M6 Flat shelf into the left rear leg, then move Washers bolted end of leg until bolts align with holes in the grill body assembly.
- Page 19 Step 6 Wood Pellet Hopper Attach the wood pellet hopper assembly to the left side of grill body assembly using four M6 X 12 mm bolts. When installing pellet hopper assembly, insert thermocouple into hole on left side of grill body assembly and secure with pre- installed bolt and nut.
- Page 20 Smoke Stack Cap Step 8 Screw on smoke stack cap to the top of smoke stack. Then insert one M6 X 14 mm shoulder bolt in grease drainage tray spout as illustrated. M6 X 14 Shoulder Bolt Grease Drainage Tray Spout...
- Page 21 Cooking Grills Step 9 Open lid. Place heat distribution plate on top of fi re pot down inside grill body assembly. Grease Tray Step 10 Place grease tray on support ribs directly above heat distribution plate. Heat Distribution Plate Step 11 Place cooking grills on support ribs directly above grease tray.
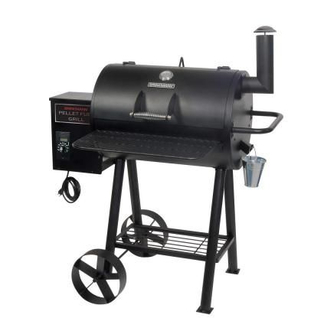
- Page 22 ® Brinkmann 3091 (Assembled) Smoke ˚F High...
- Page 23 IMPORTANTES ADVERTENCIAS DE SEGURIDAD ES NUESTRO DESEO QUE ARME Y UTILICE SU PARRILLA EN LA FORMA MÁS SEGURA POSIBLE. EL PROPÓSITO DE ESTE SÍMBOLO DE ALERTA DE SEGURIDAD ES QUE USTED PRESTE ATENCIÓN A LOS POSIBLES PELIGROS CUANDO ARME Y UTILICE SU PARRILLA. ¡CUÁNDO VEA ESTE SÍMBOLO DE ALERTA DE SEGURIDAD PRESTE ESPECIAL ATENCIÓN A LA INFORMACIÓN A CONTINUACIÓN!
- Page 24 TABLA DE CONTENIDOS: Advertencias Generales ........24-25 Funcionamiento de la Parrilla .
-
Page 25: Advertencias Generales
ADVERTENCIAS GENERALES: ADVERTENCIA Cuando se usan aparatos eléctricos, las precauciones básicas de seguridad siempre se deben seguir incluyendo las siguientes: • Operar sólo por instrucciones del fabricante. • Mantenga todos los materiales combustibles por lo menos 72 pulgadas (183 cm) de distancia de la parrilla en todo momento. - Page 26 • Utilice sólo una fuente de energía adecuada a tierra. • Utilícelo únicamente con un circuito para el hogar GFCI (Interruptor del circuito de fallos de conexión a tierra) con una conexión a tierra adecuada. • No utilice este producto en condiciones de lluvia o humedad. No permita que este producto entre en contacto con el agua.
-
Page 27: Funcionamiento De La Parrilla
FUNCIONAMIENTO DE LA PARRILLA: ADVERTENCIA Lea y siga todas las advertencias e instrucciones contenidas en las secciones anteriores de este manual. PREPARACIÓN DE LA PARRILLA PARA USARLA POR PRIMERA VEZ: • Debido al proceso de fabricación y preservación de los componentes de la parrilla, puede haber residuo de aceite presente en la hornillas y en las superfi cies de cocción de la parrilla. - Page 28 CÓMO ENCENDER LA PARRILLA: Instrucciones de encendido para la primera vez (Para utilizar la primera vez que se enciende o una vez que se han acabado los pellets en la parrilla) Controle siempre que el tubo de la barrena esté completamente lleno de pellets para un correcto encendido de la parrilla.
-
Page 29: Apagado De La Parrilla
Instrucciones para el Encendido Posterior Paso 1 Abra la tapa de la tolva para pellets y verifi que la cantidad de pellets. Agregue más pellets en caso de ser necesario. ADVERTENCIA: NUNCA agregue pellets para cocinar a una olla caliente con la mano. Usted podría sufrir quemaduras. - Page 30 NUNCA coloque agua en la olla de cocción. Esto hará que la barrena no gire normalmente. • La parrilla de combustible pellets Brinkmann está diseñada para funcionar con la tapa cerrada. Cocinar con la tapa abierta demora en gran medida la cocción. •...
-
Page 31: Cuidado Y Mantenimiento Adecuados
• “. . .” – Los puntos parpadeantes indican que el encendedor es “ON”. El encendedor 1.0.5. ˚F permanecerá encendida durante 5 minutos y luego se apaga. COOK • “ErH” – Límite de temperatura alta indica que la temperatura en la cámara de cocción ha superado 565˚... -
Page 32: Transporte Y Almacenamiento
Utilice un termómetro para carne para verifi car que haya alcanzado una temperatura interna segura. Puede ordenar un termómetro de calidad comercial de Brinkmann. Para obtener más información sobre este producto y otros accesorios Brinkmann, consulte las páginas de accesorios al fi nal de este manual. •... -
Page 33: Solución De Problemas
SOLUCION DE PROBLEMAS: Para ver videos de montaje o solución de problemas, visítenos en: PROBLEMA CAUSA CORRECCION 1. Asegúrese que el cable de 3 alambres este 1. Enchufe de nuevo al cable de 3 alambres Elemento enchufado bien en una tomacorriente de 120 voltios que es protegido por GFCI eléctrico aterrizador de 3 alambres de 120 voltios... -
Page 34: Diagrama De Cableado
DIAGRAMA DE CABLEADO: CABLE DE ALIMENTACIÓN CONECTOR CLÁSICO TIPO MOLEX 4-PIN NEGRO BLANCO NARANJA ROJO BLANCO BLANCO Smoke ˚F High VIOLETA BLANCO VENTILADOR MOTOR DE BARRENA OLLA DE FUEGO VARILLA CALIENTE NOTA: EL FUSIBLE ESTÁ SITUADO EN LA PARTE POSTERIOR DE CONTROL. -
Page 35: Instrucciones De Montaje
INSTRUCCIONES DE MONTAJE: Verifi que que tiene todos los artículos indicados en la LISTA DE PARTES y en el CONTENIDO DE LA BOLSA DE PARTES antes de comenzar con el proceso de instalación. LA BOLSA DE PARTES INCLUIRÁ LO SIGUIENTE: Cant. - Page 36 LEA DETENIDAMENTE TODAS LAS ADVERTENCIAS DE SEGURIDAD E INSTRUCCIONES ANTES DE ARMAR Y USAR LA PARRILLA RECOMENDAMOS QUE ESTA UNIDAD SEA ARMADA POR DOS PERSONAS Se necesitan las siguientes herramientas incluidas para armar esta Parrilla de Pellet Combustible de Brinkmann ® • Destornillador •...
- Page 37 PARA CUBIERTAS, ACCESORIOS Y OTROS PRODUCTOS, FAVOR DE VISITARNOS POR LA RED MUNDIAL EN: Inspeccione el contenido de la caja para verifi car que todas las partes estén incluidas e intactas.
- Page 38 Elija un área de montaje buena, despejada y consiga un amigo para que lo ayude a armar la parrilla. Coloque cartones debajo para Agujero para la Grasa proteger el acabado de la parrilla y el área de montaje. Montaje del Cuerpo de la Parrilla Paso 1 Coloque la unidad de la parrilla sobre el...
- Page 39 Vista Inferior Montaje del Cuerpo Paso 4 de la Parrilla Adhiera las patas frontal y trasera M6 X12 mm izquierdas (con los agujeros del eje de Pernos la manivela) a la unidad de la parrilla. M6 Arandelas Planas Primero, inserte el estante inferior en la pata izquierda trasera, luego mueva el extremo de la pata atornillado hasta M6 Tuercas...
- Page 40 Paso 6 Tolva para Pellets de Madera Adhiera la tolva para pellets de madera al costado izquierdo de la unidad de ensamblaje de la parrilla con cuatro pernos M6 x 12 mm. Al instalar pellet tolva montaje, inserte termopar en el orifi...
- Page 41 Tapa de la Chimenea Paso 8 Atornille la tapa de la chimenea al perno previamente adherido en la punta de la chimenea. Luego inserte un perno de tope M6 x 14 mm en la boca de la bandeja para drenaje de grasa como se muestra en el dibujo.
- Page 42 Rejillas para Cocinar Paso 9 Abra la tapa. Coloque la placa de distribución del calor arriba de la olla de cocción, en el interior y en la parte inferior de la unidad de la parrilla. Bandeja para la Grasa Paso 10 Coloque la bandeja para grasa sobre las Placa de Distribución varillas de soporte, directamente sobre la...
- Page 43 ® Brinkmann 3091 (Armada) Smoke ˚F High...
- Page 44 This warranty extends to the original purchaser only and is not trans fer able or assignable to subsequent purchasers. The Brinkmann Corporation requires reasonable proof of purchase. Therefore, we strongly recommend that you retain your sales receipt or invoice. To obtain replacement parts for your Brinkmann ®...
Need help?
Do you have a question about the 3091 Pellet Fuel Grill and is the answer not in the manual?
Questions and answers