
Related Manuals for Miele Freezer


Summary of Contents for Miele Freezer
- Page 1 Operating and installation instructions Freezer To avoid the risk of accidents or damage to the appliance it is essential to read these instructions before it is installed and used for the first time. en - GB M.-Nr. 09 954 130...
-
Page 2: Table Of Contents
Setting the temperature in the freezer ........ - Page 3 Contents Ice/water dispenser ..........35 Before using the ice/water dispenser for the first time .
- Page 4 Contents Installation advice ..........62 Location .
-
Page 5: Description Of The Appliance
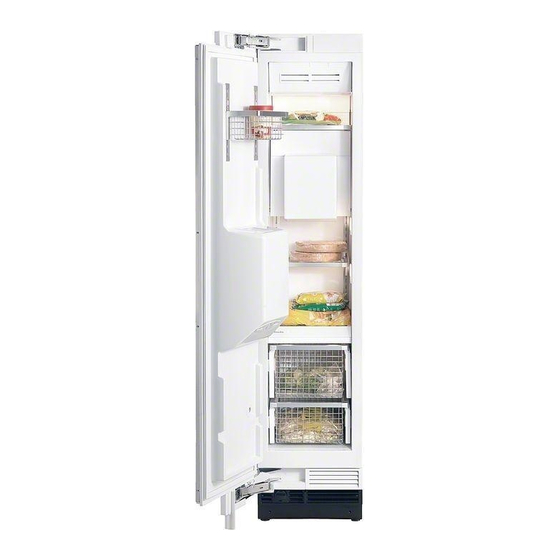
Description of the appliance Control panel for the freezer a Access sensor d On/Off sensor for the ice/water dispenser b Sensor for selecting the temperature e Sensor for switching off the in the freezer (X for colder; Y for warmer) - Page 6 Ice/water dispenser in the door e Cover for ice/water dispenser (to l Control panel for the ice/water save energy) dispenser f Adjustable shelf m Dispensing spout for ice/water g Control panel for the freezer n Drip tray cover with grille underneath...
-
Page 7: Caring For The Environment
Caring for the environment Disposing of the packaging Disposing of your old materials appliance The packaging is designed to protect Electrical and electronic appliances the appliance from damage during often contain valuable materials. They transportation. The packaging materials also contain materials which, if handled used are selected from materials which or disposed of incorrectly, could be are environmentally friendly for disposal... -
Page 8: Warning And Safety Instructions
They contain important information on installation, safety, use and maintenance. Miele cannot be held liable for damage caused by non- compliance with these Warning and Safety instructions. Keep these instructions in a safe place and ensure that new users are familiar with the content. - Page 9 The appliance is also not suitable for use in areas susceptible to explosion. Miele cannot be held liable for any damage resulting from incorrect or improper use or operation. The appliance can only be used by people with reduced...
- Page 10 Warning and Safety instructions Technical safety The coolant system is tested for leaks. The appliance complies with statutory safety requirements and the appropriate EU guidelines. This appliance contains the coolant Isobutane (R600a), a natural gas which is environmentally friendly. Although it is flammable, it does not damage the ozone layer and does not increase the greenhouse effect.
- Page 11 If the electrical connection cable is faulty it must only be replaced by a Miele authorised service technician to protect the user from danger. Do not connect the appliance to the mains electrical supply by an extension lead or a multi-socket adapter.
- Page 12 Unauthorised installation, maintenance and repairs can cause considerable danger to users. Installation, maintenance and repair work must only be carried out by a Miele authorised technician. While the appliance is under guarantee, repairs should only be undertaken by a Miele authorised service technician. Otherwise the guarantee is invalidated.
- Page 13 Warning and Safety instructions The ice cube maker is not suitable for connection to a hot water supply. Before making plumbing connections, ensure that the machine is disconnected from the mains electrical supply. Never tamper with the movable components on the ice cube maker, including the ice cube expulsion mechanism or the element on the ice cube maker.
- Page 14 Danger of frost burn. Do not take ice cubes out with your bare hands and never place ice cubes or ice lollies in your mouth straight from the freezer. The very low temperature of the frozen ice or lollies can cause frostburn to the lips or tongue.
- Page 15 Warning and Safety instructions Only use genuine original Miele accessories with this appliance. Using spare parts or accessories from other manufacturers will invalidate the guarantee, and Miele cannot accept liability. Cleaning and care Do not use any oils or grease on the door seal, as these will cause the seal to deteriorate and become porous with time.
- Page 16 Warning and Safety instructions Disposal of your old appliance Before disposing of an old appliance, first make the door latch or lock unusable. This way you will prevent children from accidentally locking themselves in and endangering their lives. Be careful not to damage any part of the pipework whilst awaiting disposal, e.g.
-
Page 17: How To Save Energy
Where there is a high temperature is approx. 20 °C. ambient room temperature. Ventilation gaps uncovered Ventilation gaps covered or and dusted regularly. dusty. Temperature Freezer section -18°C The lower the temperature is setting set, the higher the energy consumption. - Page 18 How to save energy Normal energy Increased energy consumption consumption Drawers, shelves and racks arranged as they were when the appliance was delivered. Putting the cover on the ice/ Using the appliance without water dispenser if the ice/ the cover on the ice/water water dispenser is not going to dispenser.
-
Page 19: Switching On And Off
Do not place food in the freezer until Important: the temperature is at least -18°C. To ensure the correct functioning of the appliance, let it stand for approx. -
Page 20: Switching Off
Switching on and off Further settings You can now – adjust the temperature, or You can select further settings in settings mode and then select certain – select the Super freeze function or appliance functions and adjust their – switch the ice/water dispenser on or settings. - Page 21 Switching on and off ^ By touching the X sensor, you can Switching the sensor tone on/off now select whether the sensor tone is The tone which sounds each time a switched on or off: sensor is touched can be deactivated. = 0: Sensor tone switched off = 1: Sensor tone switched on = –: Return to menu...
-
Page 22: Switching Off For Longer Periods Of Time
Switching on and off Switching off for longer periods of time If the appliance is not going to be used for a longer period of time, e.g. whilst on holiday: ^ switch the appliance off, ^ disconnect it from the mains. ^ turn off the stopcock to the water supply (a few hours before you switch off the appliance),... -
Page 23: The Correct Temperature
The correct temperature Setting the temperature in the It is very important to set the correct temperature for storing food in the freezer appliance. Micro-organisms will cause food which is not stored at the correct temperature to deteriorate rapidly. Temperature influences the growth rate of these micro-organisms. -
Page 24: Temperature Range
Temperature range ^ Take note of the position of the X sensor (but do not touch it!). The temperature in the freezer can be adjusted: ^ Touch the access sensor until it is highlighted in white and all of the –... -
Page 25: Temperature Display
However, if the temperature in the settings mode. As soon as the door freezer remains above -18 °C for a is closed, the door alarm is long time, check that the frozen food activated again. -
Page 26: Temperature And Door Alarm
– if the freezer door has been left open for a while, e.g. in order to load, re- arrange or take food out. – when freezing large amounts of food at once. -
Page 27: Door Alarm
Temperature and door alarm Door alarm The alarm will sound if the door is left open for more than 5 minutes. The sensor for switching the temperature or door alarm off will also light up. The alarm will stop and the sensor for switching the temperature or door alarm off will go out as soon as the door is closed. -
Page 28: Super Freeze
To save energy, the Super freeze Super freeze is not necessary: function can be switched off once the temperature in the freezer is low – when placing food in the freezer that enough. is already frozen. – when freezing up to 2 kg fresh food in any one day. -
Page 29: Arranging The Interior Fittings
Arranging the interior fittings Moving the shelves Moving the door basket The shelves can be adjusted according The door basket can be moved or to the height of the food. totally taken out for loading, unloading and for cleaning. ^ Hold the shelf on both sides and ^ Hold the door basket by its frame raise it slightly so that it can be lifted over the catches at the back. -
Page 30: Freezer Baskets
Arranging the interior fittings Freezer baskets The freezer baskets can also be removed for cleaning. ^ Pull the freezer basket out as far as it will go. There is a safety catch on the door opening side which needs to be turned to a horizontal position in order to remove the basket. -
Page 31: Freezing And Storing Food
Freezing fresh food cool bag or cool box to transport it. Fresh food should be frozen as quickly ^ Store it in the freezer as soon as as possible. This way the nutritional possible. value of the food, its vitamin content, appearance and taste are not impaired. -
Page 32: Home Freezing
- plastic clips solid blocks when packed, separate - string or bag ties with a sheet of plastic freezer film. - freezer tape. Freezer bags may also be sealed using home heat sealing kits. -
Page 33: Defrosting
Super freeze function some time before Defrosting placing the food in the freezer (see "Super freeze"). Frozen food can be defrosted in This also helps to prevent food that is different ways: already in the freezer from starting to –... -
Page 34: Cooling Drinks
Defrosted food may only be re-frozen after it has been cooked. Cooling drinks When cooling drinks quickly, make sure bottles are not left in the freezer for more than one hour, as they could burst. -
Page 35: Ice/Water Dispenser
Ice/water dispenser Rinsing the pipework The ice/water dispenser must be connected to the mains water supply (see "Mains water connection"). ^ Touch the access sensor to highlight Use a suitable container to dispense it in yellow. water and ice cubes into. Danger of glass splinters. -
Page 36: Switching On The Ice/Water Dispenser
(see container is correctly located "Cleaning and care"). underneath the ice/water dispenser. Once the freezer has cooled down to its The ice cube container must be set temperature, the ice cube maker will completely shut for ice cubes to be fill with water. -
Page 37: Chilled Water
The amount of ice cubes which the Fill the container with ice cubes appliance makes depends on the beforehand if you want it to be temperature in the freezer. The lower colder. the temperature, the more ice cubes are produced within a certain time... -
Page 38: System Lock
Ice/water dispenser System lock If the 0 sensor is flashing, the drip You can use the system lock to prevent tray needs to be emptied and the ice/water dispenser from being dispensing is stopped automatically. used without your knowledge, by Mop out the drip tray with a sponge children, for example. -
Page 39: Switching Off The Ice/Water
Ice/water dispenser Switching off the ice/water The colour of the other sensors show whether the function associated with dispenser that sensor is switched on (yellow) or switched off (white): The appliance must be disconnected from the mains water De-misting function supply a few hours before the ice/ Ice cube separation water dispenser is switched off. - Page 40 Ice/water dispenser Ice cube separation Keypad tone To prevent the ice cubes and crushed The tone which sounds each time a ice from freezing together and blocking sensor is touched can be deactivated. the dispensing spout, the spindle in the The appliance is delivered with this ice cube container moves at regular function activated.
-
Page 41: Automatic Defrost
The moisture generated by defrosting collects in the condensor and is automatically dissipated by the condensor from time to time. This automatic defrosting system enables the freezer to remain permanently ice-free, however the food stored in the freezer will not defrost. -
Page 42: Cleaning And Care
– stainless steel cleaning agent: To avoid damaging the surfaces of this will damage the surface. your appliance, do not use: – Miele stainless steel conditioning – cleaning agents containing soda, agent: ammonia, acids or chlorides, this will cause noticeable smearing. -
Page 43: Before Cleaning
Cleaning and care Aluminium frames Remove any soiling immediately. If The frames to the shelves inside the this is not done, it might become appliance and the door basket are impossible to remove and could made from aluminium. cause the surface to alter or discolour. -
Page 44: Drip Tray
^ remove the drip tray cover and the ^ Switch on the Super freeze function grille. so that the freezer can cool down quickly. ^ Mop out the drip tray using a sponge ^ Once the freezer has reached the or tea towel and then clean it. -
Page 45: Problem Solving Guide
^ Check the temperature settings. To save energy, the compressor runs at a lower speed, but for longer, when . . . the temperature in the freezer is less cooling is required. too low. ^ Increase the temperature. ^ Switch off the Super freeze function if this is switched on. - Page 46 Check the condition of the food in the freezer. If it has defrosted or started to . . . food has frozen together. defrost, check that it is still safe to use ^ Use a blunt instrument, e.g.
- Page 47 ^ Check whether the appliance is positioned correctly. connected to the electricity supply. ^ Check that the temperature in the freezer is low enough..the ice/water dispenser is not ready immediately after switching it ^ Check whether there is sufficient water pressure.
- Page 48 Remember it can take up to 10 hours ^ Check that the temperature in the to produce the first ice cubes. freezer is low enough..the ice/water dispenser is only ^ Change the water filter. producing small ice cubes.
- Page 49 Problem solving guide ^ Switch the appliance off by pressing . . . water is pouring out of the the On/Off rocker switch to the right appliance. hand side underneath the control ^ Close the stopcock immediately. panel. ^ Check whether the water pipework ^ Disconnect the appliance from the inside the appliance is damaged.
- Page 50 If you still cannot remedy the fault place at the front. having followed these suggestions, please contact the Miele Service Side lighting Department. To prevent unnecessary loss of temperature it is advisable not to open the door while waiting for the appliance to be serviced.
-
Page 51: Water Filter
Replacement water filters (standard – When the reminder to change the and active charcoal) are available water filter lights up red, this from Miele. indicates that the filter will soon need to be changed. ^ Make sure that you have a spare... -
Page 52: To Change The Water Filter
Water filter To change the water filter Air in the system can cause water to gush out and the filter to spring out when it is removed. Take great care, therefore, when changing the filter. ^ Remove the cap from the old filter cartridge (3). -
Page 53: To Confirm That The Water Filter Has Been Changed
Confirm that the filter has been reminder to change the water filter, changed. please contact the Miele Service Department. To confirm that the water filter has been changed ^ Place a finger on the water filter change display and leave it there. -
Page 54: Noises
Noises Normal noises What causes them Brrrrr ... A humming noise is made by the motor (compressor). This noise can get louder for brief periods when the motor switches on. Blubb, blubb ... A gurgling noise can be heard when coolant is circulating through the pipes. -
Page 55: After Sales / Guarantee
See end of this booklet for contact been resolved as described in this details. booklet. When contacting your Dealer or Miele, please quote the model and serial number of your appliance. This information is given on the data plate inside your appliance. -
Page 56: Information For Test Institutes
Information for test institutes All tests must be carried out according to relevant standards and directives. In addition, the following information provided by the manufacturer must be observed: – Loading instructions, – Information contained in the Operating and installation instructions. -
Page 57: Mains Water Connection
3 m long and must not be lengthened. supply. A faulty stainless steel hose must Close the stopcock before only be replaced by a genuine Miele connecting the water intake hose to replacement hose (available from the appliance. Miele). Make sure that the water hose is suitable for food use. -
Page 58: Preparing For Plumbing The Appliance Into The Mains Water Supply
Mains water connection The appliance is only suitable for The stopcock should be easily connection to a cold water supply, accessible after the appliance has which been built in. – is connected directly to the fresh water supply, to guarantee Preparing for plumbing the circulation of water throughout the appliance into the mains water... - Page 59 Mains water connection Before using the appliance for the first Appliances with an opening for feeding time the water inlet pipe should be the hose through: purged of air by a qualified and competent person. – To do so the stainless steel hose should be filled as far as possible with water before being connected to the appliance.
-
Page 60: Fitting The Stainless Steel Hose To The Appliance
Mains water connection Fitting the stainless steel hose to the appliance When fitting the stainless steel hose, make sure that it is neither kinked nor damaged. ^ Remove cap (1) from the water connection at the front of the appliance. ^ Screw coupling nut (2) on stainless steel hose (3) onto the threaded union. -
Page 61: Electrical Connection
Electrical connection Electrical connection U.K. If the connection cable has to be replaced, this must be done by a All electrical work should be carried out suitably qualified and competent by a suitably qualified and competent person. person in strict accordance with current local and national safety regulations Do not plug other appliances in behind (BS 7671 in the UK). -
Page 62: Installation Advice
Installation advice Location Important. In environments with This appliance should not be installed high humidity condensation can where it is exposed to direct sunlight or build up on the exterior of the directly adjacent to a heat-producing appliance. This can cause corrosion appliance such as an oven or a of the appliance walls. - Page 63 Installation advice Safe operation of the appliance is only assured if it has been installed and connected in accordance with these operating and installation instructions. Warning! This appliance is very heavy and can tip forwards when the door is open. Keep the door shut until the appliance has been built in and secured within the building-in niche in accordance with these...
-
Page 64: Floor
Installation advice Floor Adjoining furniture/units To ensure the safe installation of the The appliance is screwed to the appliance and to guarantee its correct adjoining furniture/units to the side and functioning, the floor to the niche where above. the appliance is to be installed must be For this reason, it is essential that all smooth and even. -
Page 65: Side-By-Side Installation
The partition wall must be at least refrigerator or freezer. 16 mm thick. A side-by-side installation kit, available from Miele, is required. Ask your dealer which appliances are suitable for side-by-side installation with this appliance. See the instructions supplied with the side-by-side installation kit for how to fix the appliances together. -
Page 66: Appliance Door Dimensions (Opening Angle 115°)
Door front (max. 38 mm)* Door handle* 234 mm F 1472 Vi * The dimensions for the door fronts and handles will vary according to the individual kitchen. Miele recommends using the full door opening angle of 115° for this freezer. -
Page 67: Building-In Dimensions
Building-in dimensions Niche width F 1472 Vi 457 mm – 460 mm... -
Page 68: Laying The Electrical Cabling And The Pipework For The Mains Water Supply
Building-in dimensions Laying the electrical cabling Door front dimensions and the pipework for the mains water supply... -
Page 69: Installation
Installation Other Due to the size and weight of the – Step ladder appliance, it is essential that – Sack barrow installation is carried out by two people. – Wooden beams (min. 75 mm x 100 mm) if required, to prevent Tools and accessories tipping;... -
Page 70: Weight Of The Door Front
When built into a peninsular run, the look plinth grilles are available from rear of the building-in niche must be your dealer or the Miele Spare Parts fitted with a kitchen furniture panel. Department. Building-in at the end of a run... -
Page 71: Aligning The Building-In Niche
Installation Aligning the building-in niche Checking the building-in niche – The building-in dimensions now need to be checked. – Check the position of the electrical and plumbing connections (see "Electrical connection" and "Mains water connection"). – Check that all surrounding furniture/ units are securely fixed to the wall. -
Page 72: Preparing The Niche
Installation The appliance can be rolled along the floor using the wheels at the back. Preparing the niche Keep the door to the appliance closed until it is fixed inside the building-in niche. ^ Do not remove the installation aids from the appliance door. -
Page 73: Anti-Tipping Mechanism
Installation Anti-tipping mechanism Use two anti-tipping mechanisms for each appliance or four for each side- The anti-tipping mechanism a supplied by-side pair of appliances. is used to secure the building-in niche b, to the wall, preventing the appliance from tipping forwards. ^ Place the anti-tipping mechanisms a on the left- and right-hand sides of the building-in niche, leaving... - Page 74 Installation For a building-in niche with a back For a building-in niche without a back panel panel ^ screw the back panel directly onto ^ screw the building-in niche to the wall the wall behind in a number of behind using a number of suitable places.
-
Page 75: An Alternative Anti-Tipping Mechanism
Installation ^ Mark the position of the lower edge of An alternative anti-tipping the wooden beam on the rear wall of mechanism the building-in niche. The appliance can alternatively be ^ Select screws of a length depending secured with a wooden beam across the top of the appliance. -
Page 76: Placing The Appliance In The Niche
Installation Placing the appliance in the Connection should be made via a niche suitable switched socket. The socket should be close to the If you are installing two appliances appliance and easily accessible. side by side, now secure the Otherwise the appliance should be appliances to one another (see the connected via an external all-pole instructions for the side-by-side... -
Page 77: Aligning The Appliance
Installation ^ A mark is located on the appliance Aligning the appliance base. When adjusting the height, this ^ Align the appliance with mark needs to be aligned at 32 mm neighbouring furniture fronts. from the floor. Unscrew the feet until the mark on the base has reached 32 mm. -
Page 78: Securing The Appliance In The Niche
Installation – If a wooden beam has been fitted above the appliance to prevent tipping, the appliance height needs to be adjusted to fit snuggly under the wooden beam. Securing the appliance in the niche ^ Pull out the lugs for the side fixing plates g. - Page 79 Installation ^ Open the appliance door. When installing two appliances side by side, the filler strips for the two appliances need to be joined together to form one long strip. ^ Insert the joining peg from the side- by-side kit halfway into the channel in the filler strip for the left-hand appliance.
-
Page 80: Preparing The Furniture Front
Installation Preparing the furniture front ^ Remove the door basket. ^ Open the appliance door as far as it ^ Measure gap X between the will go. adjusting bar and the upper edge of ^ Unscrew the installation aids l and the adjacent furniture front. - Page 81 Installation – The fixing frame has several different types of holes to take account of a variety of furniture fronts. – When securing the frame, always screw into the strongest part of the furniture door. – To do this, select screws which are slightly shorter than the thickness of the furniture door.
-
Page 82: Securing And Aligning The Furniture Door
Installation Securing and aligning the furniture door ^ Press the angle trim on both sides into the white plastic frame, and screw them down securely. Replacement screws for this can be found in the plastic bag marked with the letter E. ^ Screw the nuts o loosely onto the threaded bolts - but do not tighten yet. -
Page 83: Securing The Covers
Installation Securing the covers ^ Now attach the covers onto the ^ Fit the plastic cover strips to the retaining clips on both sides. In the case of side-by-side sides of the appliance door, clicking them into the space between the installation, the cover strips are only required on the outer side. -
Page 84: Fitting The Plinth Facing
Installation Fitting the plinth facing Fitting the air separator The air separator in the bottom of the Do not cover the vents in the plinth. ventilation grille separates air entering This could result in damage to the the appliance from that leaving it. appliance. -
Page 85: Aligning The Ice/Water Dispenser
Installation Aligning the ice/water dispenser If necessary the depth of the ice/water dispenser can be aligned to line up with the furniture front. Disconnect it from the mains. ^ Remove the drip tray cover and the grid. ^ Push back on the dispenser spout and then pull it downwards to remove ^ Loosen the screws in the back cover. - Page 86 Installation Once the drip tray has been removed you can align the position of the ice/ water dispenser using the four metal strips. ^ Loosen the screws in the four metal ^ Remove the rear cover. strips. ^ Then insert a screwdriver into one of the four slits and push the ice/water dispenser sideways until it is correctly aligned with the furniture...
-
Page 87: Securing The Ice/Water Dispenser Frame
Installation Securing the ice/water dispenser frame The word "TOP" is marked on the rear of the frame at the top. With 19 mm thick furniture fronts: ^ Fit the frame onto the ice/water dispenser and press it firmly into position so that it sits evenly with the furniture front. -
Page 91: Addresses
Building 6 / Offices Nos. 6-214 to 6-220 Tel: (01) 461 07 10, Fax: (01) 461 07 97 Dubai E-Mail: info@miele.ie, Internet: www.miele.ie Tel: +971-4-341 84 44 Fax: +971-4-341 88 52 Manufacturer: Miele & Cie. KG E-Mail: info@miele.ae Carl-Miele-Straße 29, 33332 Gütersloh, Germany Internet: www.miele.ae... - Page 92 F 1472 Vi en - GB M.-Nr. 09 954 130 / 00...
Need help?
Do you have a question about the Freezer and is the answer not in the manual?
Questions and answers