Table of Contents
Advertisement
Advertisement
Table of Contents

Related Manuals for NOVO 475 PRO SERIES


Summary of Contents for NOVO 475 PRO SERIES
- Page 1 How To Install, Operate and Maintain Your Reverse Osmosis System FILTER CARTRIDGE CONFIGURATION MAY BE SUBJECT TO CHANGE. 475BP PRO SERIES 475 PRO SERIES PLEASE READ ALL INSTRUCTIONS BEFORE INSTALLING AND USING THIS SYSTEM REVISION # REVISION DATE JUNE 14/12...
-
Page 2: Table Of Contents
How Your System Works For best results it is recommended to install the R/O on a COLD softened water supply. The 475 Pro Series systems use four stages of treatment to filter your water: Stage 1 - Remove sand, dirt, sediment Stage 2 - Remove chlorine, taste &... -
Page 3: Before You Start
Before You Start Your system contains filters which must be replaced periodically for proper operation. (Refer to Filter Change Schedule on page 8.) Read all steps and guides carefully before installing and using your RO system. Follow all steps exactly to correctly install. -
Page 4: Parts Of The System
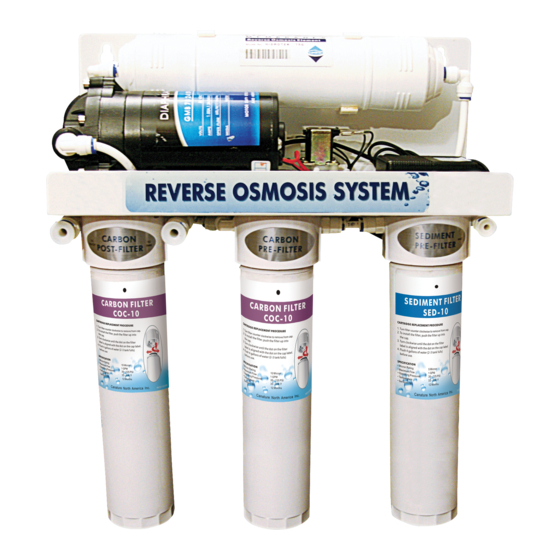
Parts Of The System OPTIONAL DRAIN LINES (AIR GAP FAUCET) Figure 1. Typical Installation The following components make up your Reverse Osmosis Drinking Water System: 1. Pre-filter (SED-10) removes larger particles such as sand, silt, and rust. 2. Pre-Carbon Filter (COC-10) removes chlorine in the feed water to protect the reverse osmosis mem- brane. -
Page 5: Installing The Filters
Installing the Filters To install the filter simply push it up inside the cap and turn clock wise until the arrow aligns with the center of the cap. To remove the filter reverse the procedure. The filter head contains an Automatic Shut-off Device. This enables the filters to be changed without shutting the inlet water off. -
Page 6: Installing The Self-Piercing Inlet Saddle Valve
Installing the Self-Piercing Inlet Saddle Valve The self-piercing saddle valve is designed for use with 3/8” to 1/2” OD soft copper supply tubing. 1. Turn off cold water valve from under sink or main water line valve for whole house. 2. -
Page 7: Installing Tubing Into Fittings
Installing Tubing Into Fittings Step 1 Cut the tube square and remove burrs and sharp edges. Ensure that the out- side diameter is free from score marks. For soft or thin walled plastic tubing we recommend the use of a tube insert. Push the tube into the fitting and up to the Step 2 tube stop... -
Page 8: Flush System And Check Operation
Flush System and Check Operation Start-up 1. Check all connections to be sure they are secure. 2. Turn on feed water valve and check for leaks. (turn off and correct leaks if leaks occur). 3. Close faucet and wait 5 minutes to see if leaks result. (turn off and correct leaks if leaks occur). Flush System and Check Operation 1. -
Page 9: Trouble Shooting
Filter Change Schedule (Continued) To Disconnect Figure 5. R/O Membrane To disconnect, ensure that the system is depressurized, push the collect square against the fitting. With the collet held in this position the tube can be removed. Trouble Shooting PROBLEM CAUSE SOLUTION 1. -
Page 10: Spare Parts List
PRODUCT WATER CHECK VALVE 80010041 UNION ELBOW 1/4 70030029 SELF PIERCING INLET SADDLE VALVE 65030027 WASTE WATER SADDLE 70030022 BOOSTER PUMP 475 PRO SERIES 70030041 TANK CUT-OUT PRESSURE SWITCH 70030032 LOW PRESSURE SWITCH 70030026 TRANSFORMER (475 BOOSTER PUMP) 70030027 SOLENOID VALVE (475 PRO SERIES) -
Page 11: Flow And Electrical Diagrams
Flow And Electrical Diagrams 475 Pro-Series (No Pump) 3.0 GAL TANK INLET TO DRAIN 475BP Pro-Series (With Pump) 3.0 GAL TANK INLET TO DRAIN Wiring Diagram 475BP Pro-Series (With Pump) -
Page 12: Operation Specifications
Novo will replace any part which fails two (2) years from date of manufacture as indicated by the serial number or date code, provided the failure is due to a defect in material or workmanship.
Need help?
Do you have a question about the 475 PRO SERIES and is the answer not in the manual?
Questions and answers