Advertisement
Quick Links
T0344
INSTRUCTION MANUEL
GEBRUIKSAANWIJZING
PLAN DE MONTAGE
ANLEITUNG
WARNING ! This R/C kit and
LET OP ! Deze bouwdoos van
ATTENTION ! Ce kit R/C d'un
ACHTUNG ! Dieser Bausatz
the model you will build is not
een radiobestuurd vliegtuig is
avion n'est pas un jouet.
von ferngesteurte model
a toy.
geen speelgoed.
ist kein Spielzeug.
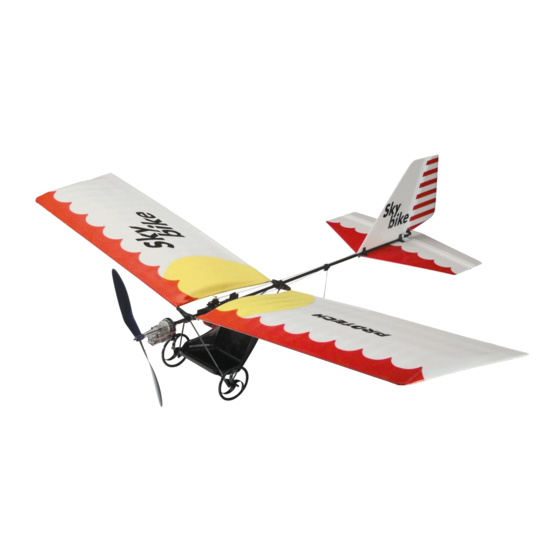
Sky Bike - 1
Advertisement

Related Manuals for protech Sky Bike T0344


Summary of Contents for protech Sky Bike T0344
- Page 1 T0344 INSTRUCTION MANUEL GEBRUIKSAANWIJZING PLAN DE MONTAGE ANLEITUNG WARNING ! This R/C kit and LET OP ! Deze bouwdoos van ATTENTION ! Ce kit R/C d’un ACHTUNG ! Dieser Bausatz the model you will build is not een radiobestuurd vliegtuig is avion n’est pas un jouet.
- Page 2 Kit content / Inhoud van de bouwdoos / Installationssatzinhalt / Contenu de kit Carbon tube fuselage Main Wings Horizontal Stabilizer Vertical Stabilizer Cockpit Seat Instruction Manual Decal Sheet Under carriage parts bag Carbon spar 3 mm diameter 27,3 cm long - 4 PCs Carbon spar 3 mm diameter 21,4 cm long - 1 PC 10.
- Page 3 Plastic frames / Plastiek ramen / Kunststoff Rahmen / Cadres en plastique Plastic frames A 1. Engine mount Wing holder (1) Wing holder (2) Link for undercarriage Push rod holder (middle) 6a. Vertical stabilizer mount (front) 6b. Vertical stabilizer mount (back) Three-Axis joint (R) Three-Axis joint (L) 9a.
-
Page 4: Important Safety Notes
Important Safety Notes. Be sure to read right through the instructions covering assembly and operation of your model before you attempt to operate it for the first time. You alone are responsible for the safe operation of your radio-controlled model. Young people should only be permitted to build and fly these models under the instruction and supervision of an adult who is aware of the hazards involved in this activity. -
Page 5: Wichtige Sicherheitshinweise
Wichtige Sicherheitshinweise Vor dem Versuch der ersten Inbetriebnahme muß die gesamte Betriebs- und Montageanleitung sorgfältig gelesen werden. Sie alleine sind verantwortlich für den sicheren Betrieb Ihres RC-Flugmodells. Bei Jugendlichen muß der Bau und Betrieb von einem Erwachsenen, der mit den Gegebenheiten und möglichen Gefahren eines RC-Flugmodells vertraut ist, verantwortlich überwacht werden. - Page 6 Tools & items / Gereedschap & benodigdheden / Werkzeuge und erforderliches / Outils et équipements To assamble this airplane some tools are needed. Voor het samenstellen van het vliegtuig zijn er enkele gereedschappen nodig. Zum bauen dieses Flugzeug werden einige Werkzeuge gebraucht . Certain outils sont requis pour assembler cet avion.
- Page 7 Decals / Decals / Autocollants / Dekor To work more easely you must attach all the decals to the horizontal and vertical fin. Take the foil from the decal (see fig. 1). Place the decals in the wright position en moist the topside thoroughly. Carefully remove the toplayer.
- Page 8 Assembly of the fuselage / Samenstelling van de romp / Zusammenbau des Rumpfs / Assemblage du fuselage 63mm 110mm 314mm 493mm 596mm 741mm 3 + 4 To assemble the fuselage you will need following plastic parts from frame A. Engine mount Wing holder (1) Wing holder (2) Link for undercarriage...
- Page 9 Um den Rumpf zusammen zubauen benötigen Sie folgende Plastikteile von Rahme A. Motorträger Flügelhalterung (1) Flügelhalterung (2) Link für Fahrgestell Gestange Halterung (mittlere) 6a. Seitenleitwerkmontierung (vorseite) 6b. Seitenleitwerkmontierung (rückseitig) Drei Achsen verbindung (R) Drei Achsen verbindung (L) 9a. Radstopper 9b. Radstopper 10.
- Page 10 Fixing the seat / Samenstellen van het zitje / Befestigung der Sitz / Montage du siège Assembling the undercarriage to the fuselage is a major part of completing this model. Before assembly, check to recognize and prepare all the parts needed in this procedure. Be sure all the carbon spars, the two (Right &...
- Page 11 Mounting the motor / Bevestigen van de motor / Montierung des motor / Montage du moteur Screw the gearbox to the gearbox unit by using several drops of CA glue and self tapping screws. After you have installed the speedcontroller (see page 11) you can connect the motor wires to the speedcontroller red to red and black to black.
- Page 12 Assembling the vertical stabilizer / Samenstellen van het richtingsroer / Montierung von das Seitenruder / Montage du gouvernail de direction Cut off the stabilizer fin with a knife. Then stick them back togheter using tape at both sides. For better movement you must press with a ruler between the stabilizer and the stabilizer fin until the tape at the bottom sticks to the tape at the top.
- Page 13 Schneiden Sie das Seitenruder mit einem Messer ab. Kleben Sie beide Seiten zusammen mit Doppelseitige Klebeband. Für bessere Bewegung müssen Sie mit eine Latte zwischen dem Seitenruder drucken, bis das Klebeband an der Unterseite am Klebeband an der Oberseite haftet. Schneiden Sie jedes nicht notwendige Klebeband ab.
- Page 14 Fixing the control horns / Bevestigen van de stuurhoornen / Montierung des Ruderhornen / Montage des guignols For mounting the control horns in the vertical and horizontal stabilizer fin you need following plastic parts of frame B: 3a. 3b. Control horn (1) 4a.
- Page 15 Placing the receiver / Plaatsen van de ontvanger / Montierung des Empfanger / Montage du récepteur Place the receiver on the back of the battery holder by using double sided tape. Bevestig de ontvanger met dubbelzijdige kleefband op de achterzijde van de batterijhouder. Plazieren Sie den Empfanger auf die Rückseite der Batteriehalterung mit doppelseitige Klebeband.
- Page 16 Fixing the pushrods / Plaatsen van de stuurstangen / Montierung des Stosselstange / Montage des tiges pousseur The push rod should be bent on one end with a Z-bender. This side should go into the servo horn as shown on the picture. Put the push rod in the holes of the pastic parts along the fuselage. One for the vertical stabilizer and one for the horizontal stabilizer.
- Page 17 Fixing the kwiklinks / Bevestigen van de snelkoppelingen / Montierung von die Gabelkopfe / Montez les chapes The fixing of the kwiklink is the same for both horizontal and vertical stabilizer. At the end of the push rod you should bent a 90 degrees hook to put the first part of the kwiklink on as shown on the pictures.
- Page 18 Placing the wing / Plaatsen van de vleugel / Montierung des Haupt-Flügel / Placer l’aile principale For placing the carbon wing spars you can stick tape to one side of the wing as shown on the picture. Now you must place the carbon spar on the tape against the cut-out off the wing. Pull hte tape back on to the wing to secure the carbon spar.
- Page 19 Final check / Laatste controle / Letzte Überprüfung / Contrôle final C.G. location: ± 121,6 mm from the 1. After the aircraft is assembled completely, leading edge of main wings. check to be sure that all the parts are Locatie Z.P.: ± 121,6 mm van de neuslijst snapped together securely.
- Page 20 été used. en gebruikt. angefaßt worden, mißbraucht worden, endommagés. beschädigt worden, geändert worden und benutzt worden sind. © Copyright PROTECH 20 - Sky Bike...
Need help?
Do you have a question about the Sky Bike T0344 and is the answer not in the manual?
Questions and answers