Tomahawk S Series User Manual
Hide thumbs
Also See for S Series:
- User manual (32 pages) ,
- User manual (27 pages) ,
- User manual (28 pages)
Advertisement
Quick Links
S-SERIES
Indoorcycling Group GmbH
Happurger Strasse 84-88
90482 Nuernberg – Germany
info@indoorcycling.com
Tomahawk S- Series
Model no. 2008 S – Chain drive
Model no. 2008 SB – Belt drive
CAUTION !
Read all precautions and instructions in this manual before using this equipment. Keep this manual
for future reference.
Improper assembly, maintenance or use can void the warranty terms.
|
Version 2.1 Copyright by Indoorcycling Group GmbH 2009
www.indoorcycling.com
ENG 1
Advertisement

Related Manuals for Tomahawk S Series


Summary of Contents for Tomahawk S Series
- Page 1 Indoorcycling Group GmbH Happurger Strasse 84-88 90482 Nuernberg – Germany info@indoorcycling.com Tomahawk S- Series Model no. 2008 S – Chain drive Model no. 2008 SB – Belt drive CAUTION ! Read all precautions and instructions in this manual before using this equipment. Keep this manual for future reference.
- Page 2 28-30 Technical specifications: The Tomahawk S-Series Bike is according to EN 957 a Class S product for professional and / or commercial use. Such training equipment is intended for the use in training areas of organizations such as fitness clubs or sport associations, where access and control is specially regulated by the person who has the legal responsibility.
-
Page 3: Important Precautions
S-SERIES IMPORTANT PRECAUTIONS WARNING! To reduce the risk of serious injury, read the following important precautions and information before operating the indoor cycle. It is the responsibility of the owner to ensure that all users of the indoor cycle are informed of all warnings and precautions. - Page 4 S-SERIES BEFORE YOU BEGIN Dear Customer, Congratulations for selecting the TOMAHAWK indoor cycle. The TOMAHAWK indoor cycle offers an impressive array of features designed to enhance cardiovascular fitness, tone muscles, and develop endurance. Whether users are beginners or experienced athletes, the indoor cycle offers workouts that will help users to reach their individual fitness goals.
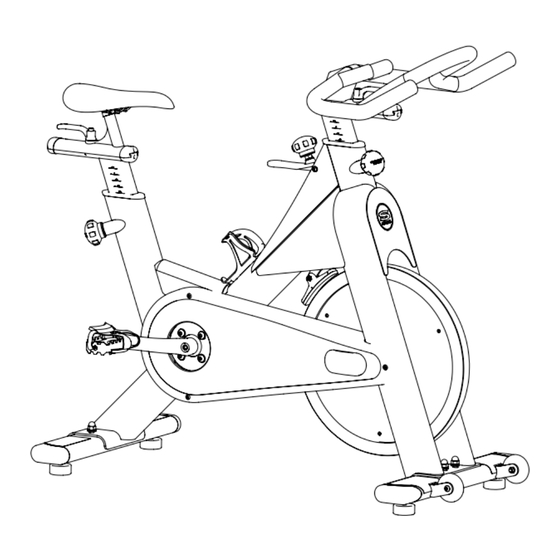
- Page 5 S-SERIES HOW TO ASSEMBLE THE INDOOR CYCLE SW 17/19mm SW 13/15mm hand tight Version 2.1 Copyright by Indoorcycling Group GmbH 2009 www.indoorcycling.com ENG 5...
- Page 6 S-SERIES SW 17/19mm SW 13/15mm hand tight Stop mark Stop mark Version 2.1 Copyright by Indoorcycling Group GmbH 2009 www.indoorcycling.com ENG 6...
- Page 7 S-SERIES SW 17/19mm SW 13/15mm hand tight Version 2.1 Copyright by Indoorcycling Group GmbH 2009 www.indoorcycling.com ENG 7...
- Page 8 S-SERIES HOW TO ADJUST THE INDOOR CYCLE The indoor cycle can be adjusted for maximum comfort and exercise effectiveness. The instructions below describe one approach to adjusting the indoor cycle to ensure optimal user comfort and ideal body positioning; you may choose to adjust the indoor cycle differently.
- Page 9 S-SERIES Saddle horizontal adjustment: Proper horizontal adjustment of the saddle is very important in avoiding injury to the knees. Sit on the saddle and move the pedals until the crank arms are in horizontal position. Using your forward most leg as a marker, your kneecap should be directly above the center of the pedal so that a straight line is created between knee and center of the pedal (see the dotted line in image below).
- Page 10 Handlebar adjustment: Begin with the top of the handlebar at relatively the same height or just slightly higher than the top of the saddle (dotted horizontal line A in the drawing below) and at a neutral fore/aft position (see dotted vertical line B in drawing below). If your knees touch the handlebars or if you experience back discomfort while pedalling for extended periods of time, the height of the handlebars can be adjusted.
- Page 11 S-SERIES HOW TO OPERATE THE INDOOR CYCLE Resistance adjustment: The preferred level of difficulty in pedalling (resistance) can be regulated in fine increments by use of the resistance knob. To increase the resistance, turn the resistance knob clockwise. To decrease the resistance, turn the knob counter clockwise. IMPORTANT: To stop the flywheel (wheel) while pedalling, pull up the red emergency handle.
- Page 12 S-SERIES PREVENTATIVE MAINTENANCE Regular maintenance must be performed on the indoor cycle for optimal per- formance and longevity. Please read and follow all instructions below. If the indoor cycle is not maintained as described, components may wear excessively and the indoor cycle may become damaged.
- Page 13 S-SERIES Bi-weekly maintenance: 1. The indoor cycle should not be used if the emergency brake system is not working properly. While sitting on the saddle and pedalling, test the brake by pulling the emergency brake handle upward. The flywheel should come to a quick and complete stop.
- Page 14 S-SERIES 3. To maintain the easy adjustability of the hand- lebar post, the handlebar post should be cleaned and lubricated. First, turn the front adjustment knob counter clockwise and slide the handlebar post out of the frame. Apply a small amount of lubricant spray to a lint-free cloth, and clean the handlebar post (A).
- Page 15 S-SERIES 2. To maintain the easy adjustability of the Resistance system, the threads on the lower end of the brake rod should be lubricated. First, turn the Resistance knob clockwise until it stops. Next, look under the right or left side of the frame and locate the brake rod, which has two lock nuts on its lower end.
- Page 16 S-SERIES Finally, retighten the two inner adjustment nuts (D) and the two axle nuts (B), and reattach the maintenance covers. To correct a loose chain: To adjust the chain, pull off the right and the left maintenance covers (A). Loosen the axle nut (B) on both ends of the flywheel axle by two full turns.
- Page 17 S-SERIES ! ONLY CHAIN DRIVE ! 4. Check the chain for proper lubrication. To do this, run your fingers along the chain (not shown) in the service opening provided (A). Make sure that the chain is not in movement during this checkup! If the chain feels dry, slowly turn the flywheel with one hand while equally applying a small amount of bicycle chain grease along the chain.
- Page 18 S-SERIES MAINTENANCE ACTIVITY REQUIRED SCHEDULE Activity Rotation Details found on Feet leveling, disinfection and cleaning of the bike daily page 11-12 Servicing brake pads, detailed cleaning of the entire bike weekly page 12 Check emergency brake function bi-weekly page 13 Clean and lubricate saddle and handlebar sliders / posts bi-weekly page 13-14...
- Page 19 S-SERIES Bi-Weekly Maintenance Checklist Bike No. Production code Observations Action Taken Result Name / date Monthly Maintenance Checklist Bike No. Production code Observations Action Taken Result Name / date Version 2.1 Copyright by Indoorcycling Group GmbH 2009 www.indoorcycling.com ENG 19...
-
Page 20: Spare Parts
S-SERIES SPARE PARTS Drive Gear Parts 02 40 C MD20 08 02 40 BE 02 40 90 02 40 CrMO L SX 08 02 40 CrMo R SX 08 02 40 C S 08 For optional chain guard please refer to page 23. Brake Parts 02 50 A SX 02 50 03 A SX... - Page 21 S-SERIES Flywheel 02 40 02 02 40 H L Version 2.1 Copyright by Indoorcycling Group GmbH 2009 www.indoorcycling.com ENG 21...
- Page 22 S-SERIES Chain Guard 02 42 01 SX 08 02 42 02 SX 08 02 99 05 02 42 03 SX 08 02 42 04 02 99 03 Frame 02 10 A 02 20 04 02 99 02 SX 08 2004 RA SX Version 2.1 Copyright by Indoorcycling Group GmbH 2009 www.indoorcycling.com ENG 22...
- Page 23 S-SERIES Chain Drive Kit 02 40 F 4 02 40 D Cycle Well Kit (Optional) 01 21 S 02 32 10 02 32 00 Version 2.1 Copyright by Indoorcycling Group GmbH 2009 www.indoorcycling.com ENG 23...
- Page 24 S-SERIES 0121VL-3125sw Saddle Support 02 21 AK 02 10 E 02 21 05 AL Pedals 01 40 A2 Version 2.1 Copyright by Indoorcycling Group GmbH 2009 www.indoorcycling.com ENG 24...
-
Page 25: Rear Stabilizer
S-SERIES Rear Stabilizer 02 11 02 SX08 02 11 E 02 11 06 SX 08 02 11 05 B Front Stabilizer 02 11 B 02 11 01 SX 08 02 11 A Version 2.1 Copyright by Indoorcycling Group GmbH 2009 www.indoorcycling.com ENG 25... - Page 26 S-SERIES Protection Plates 02 99 10 02 99 11 Version 2.1 Copyright by Indoorcycling Group GmbH 2009 www.indoorcycling.com ENG 26...
-
Page 27: Spare Parts List
Cycle Well Modul 02 40 H Flywheel axle Saddle Support 02 40 02 Chain tensioner 0121VL-3125sw Tomahawk Saddle 02 40 H L Flywheel bearing 6001Z 02 21 AK Saddle mounting bracket 02 40 08 ES 08 S-Series flywheel 02 21 05 AL Horizontal &... - Page 28 S-SERIES SPARE PARTS LIST Front Stabilizer Rear Stabilizer 02 11 E PVC gasket 02 11 01 SX 08 Front Stabilizer 02 11 02 SX 08 Rear stabilizer 02 11 B Stabilizer mounting kit 02 11 06 SX 08 Plastic end cover 02 99 10 Front protection plates (3pc.)
Need help?
Do you have a question about the S Series and is the answer not in the manual?
Questions and answers