Table of Contents
Advertisement
Identification Data
The Engine and Frame serial numbers are used
to register the vehicles. They are the only
means of identifying your particular vehicle
from the other of the same model and type.
These serial numbers may be needed by your
dealer when ordering the parts. In the event of
theft, the investigating authorities will require
both these numbers in addition to the model,
type and any special features of your vehicle
that can help identifications.
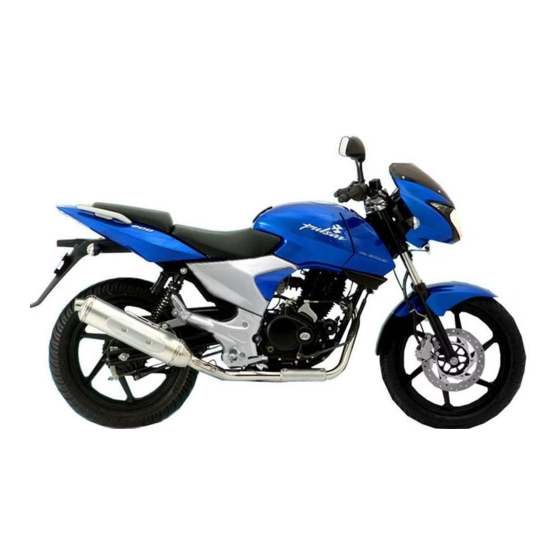
Location of Parts
8
3
2
1
1. Control Switch RH
5. Hall Sensor for Indicator
2. LCD Speedo Console
6. Vehicle Speed Sensor
3. Control Switch LH
7. ExhausTEC
4. Body Control Unit
8. Tail Light LED display
(Placed inside Head Light fairing)
1
Pulsar DTS-i UG-III-180cc Training Notes
4
5
6
7
Dealer Development Center
Salient Features
Performance :
Refined engine power delivery by optimization of
location and revised ignition timing with intelligent CDI
New clutch
smooth, positive, virtually friction-free gear shift feel
New Bigger twin foam filter with an optimized intake system to
provide better torque
Optimized valve timing and Roller rocker with NR bearing for
friction reduction that improves drivability.
LED tail lamp that consumes negligible power & require zero
maintenance
Stainless steel silencer that overcomes rusting problem
All sensor type electrical switches
function for the life of the bike. Absolutely no maintenance in
absence of mechanical
Style :
Stylish fairing and head lamp assembly with owleye
A new black mask that separates headlamp from parking lights
adds to aesthetics.
Clear lens indicator with amber bulbs.
New age, sharp and attractive 2 Row Tail lamp with LED lights
New seat cowl to match stylish LED tail lamp.
Louver type LH & RH covers with wire mesh gives sturdy look.
Ergonomically designed self-letting switches
Convenience and Comfort
LCD Speedo Console with digital fuel gauge (12 level indicator)
Digital speed display, odometer and two trip meter with resetting
provision.
Self-canceling indicators After completion of turn, the indicator
will be switched off automatically.
Engine oil level window for easy to monitor level.
Maintenance free battery once a year electrolyte top up.
In addition to Fuel gauge, Reserve indicator bulb is provided that
glows continuously till the petrol filled to main level.
Self check provision for Tachometer for its functioning
Dealer Development Center
Exhau
s TEC
& revamped gear shifting mechanism that gives
that enables switches to
contacts.
Pulsar DTS-i UG-III-180cc Training Notes
2
Advertisement
Table of Contents

Related Manuals for Pulsar DTS-i 180 UG III


Summary of Contents for Pulsar DTS-i 180 UG III
- Page 1 Self check provision for Tachometer for its functioning 3. Control Switch LH 7. ExhausTEC 4. Body Control Unit 8. Tail Light LED display (Placed inside Head Light fairing) Pulsar DTS-i UG-III-180cc Training Notes Dealer Development Center Dealer Development Center Pulsar DTS-i UG-III-180cc Training Notes...
-
Page 2: Salient Features
1.75 kg/cm (24.5 Psi) Rear Solo 2.00 kg/cm (28.0 Psi) Rear Pillion 2.25 kg/cm (32.0 Psi) Rims (Alloy Wheels) Front 1.60 x 17 Rear 2.15 x 17 Pulsar DTS-i UG-III-180cc Training Notes Dealer Development Center Dealer Development Center Pulsar DTS-i UG-III-180cc Training Notes... - Page 3 What is so special in this 'PULSAR DTS-i 180 UG III '? 2.0 liters Usable reserve Pulsar UGIII is next version of Pulsar breed. It is loaded with lots of unique & CONTROLS contemporary features and that distinguishes the Pulsar not only in the category of Power, Performance &...
-
Page 4: Frequently Asked Questions (Faqs)
What do Self-canceling Indicators switches means? Moreover, the Battery of this new Pulsar 180 is special & maintenance free. In conventional type of switches, the rider has to manually depress or turn knob of indicator switch for putting 'OFF' the indicator bulbs. In case of this Self-canceling' What is this maintenance free Battery? switches the indicator goes off automatically after the rider takes a turn &... -
Page 5: Pre Delivery Inspection Checklist
Pulsar 150cc also. HORN :- DISTORTED/WEAK SOUND(DO NOT SET) Speedo : Can one alter the current Pulsar model & incorporate these features? SPEEDO NOT SENSING. ` No. It is not possible. Physically lot of changes are there that are not easily SPEEDO Needle flickering. - Page 6 Fork Spanner 0.20 Ring Spanner Handle bar for free movement. Front Marked if the ok observed Check front mudguard alignment Front 0.05 wrt Front Wheel Pulsar DTS-i UG-III-180cc Training Notes Dealer Development Center Dealer Development Center Pulsar DTS-i UG-III-180cc Training Notes...
-
Page 7: Periodic Maintenance And Lubrication Chart
Note: Parts / Lubricants to be replaced as per Periodic Maintenance and Expected Output in 480 Minutes / Man / 27 Vehicles Check Replace Lubrication Chart are mandatory and the same are chargeable to customer. Pulsar DTS-i UG-III-180cc Training Notes Dealer Development Center Dealer Development Center Pulsar DTS-i UG-III-180cc Training Notes... - Page 8 • Rear view mirror Cloth, Graphite 20-22, 24-27 Ring Check/ Adjust Grease, Fine Rear 0.50 Spanner, 10-11, Air Gun Polish Paper 14-15 OE Spanner Pulsar DTS-i UG-III-180cc Training Notes Dealer Development Center Dealer Development Center Pulsar DTS-i UG-III-180cc Training Notes...
- Page 9 Expert Clean the vehicle at the Will be done time of delivery. by Delivery boy PNR = Pneumatic Nut Runner Pulsar DTS-i UG-III-180cc Training Notes Dealer Development Center Dealer Development Center Pulsar DTS-i UG-III-180cc Training Notes...
-
Page 10: Schedule Maintenance
• Pump with strainer. • C l i p ( B ) a n d t a k e o u t ‘ O i l Strainer’ from oil pump. Pulsar DTS-i UG-III-180cc Training Notes Dealer Development Center Dealer Development Center... - Page 11 Because of the danger of highly flammable liquid, do not use gasoline/petrol or a low-flash point solvent to clean the element. Pulsar DTS-i UG-III-180cc Training Notes Dealer Development Center Dealer Development Center...
- Page 12 The higher the adjuster sleeve is positioned, the stronger the spring tension, and the harder the ride. Check to see that both sleeves are turned to the same relative position. Pulsar DTS-i UG-III-180cc Training Notes Dealer Development Center Dealer Development Center Pulsar DTS-i UG-III-180cc Training Notes...
- Page 13 • Exhaust Valve : 0.1 mm Special Tools : Feeler Gauge - 69 7502 51 : Valve Adjusting Screw Holder - 37 1031 53 Pulsar DTS-i UG-III-180cc Training Notes Dealer Development Center Dealer Development Center Pulsar DTS-i UG-III-180cc Training Notes...
- Page 14 • Tighten both the lock nuts on bracket by holding one nut and continuity. tightening the other, after ensuring the required free play. Accelerator Grip Free Play : 2 ~ 3 mm Pulsar DTS-i UG-III-180cc Training Notes Dealer Development Center Dealer Development Center Pulsar DTS-i UG-III-180cc Training Notes...
- Page 15 Adjustment : • Adjust the rear brake light switch (A) by rotating the switch nut to create adequate tension in spring to operate the switch. Pulsar DTS-i UG-III-180cc Training Notes Dealer Development Center Dealer Development Center Pulsar DTS-i UG-III-180cc Training Notes...
- Page 16 • Through this harness the following testing can be carried out : above the piston and ultimately leading to smoky exhaust. - Vehicle sensor speed. - Hall sensor. - Starter relay. Pulsar DTS-i UG-III-180cc Training Notes Dealer Development Center Dealer Development Center Pulsar DTS-i UG-III-180cc Training Notes...
-
Page 17: Special Tools
Details of Exclusive Special Tool LCD Speedo Console Test For carrying out repairs / overhauls, 1 new special tools for Pulsar DTS-i UG III have been • Connect wiring harness number 2 to C2 connector. developed. Rest of the special tools required remains the same which were earlier required for Pulsar and Pulsar DTSi •... - Page 18 Application : Used for removing the lower bearing To align the clutch hub concentricity race from ‘T’ w.r.to clutch wheel, clutch housing and thrust plate Pulsar DTS-i UG-III-180cc Training Notes Dealer Development Center Dealer Development Center Pulsar DTS-i UG-III-180cc Training Notes...
- Page 19 Application : Used for removing front fork inner tube from outer tube. Pulsar DTS-i UG-III-180cc Training Notes Dealer Development Center Dealer Development Center Pulsar DTS-i UG-III-180cc Training Notes...
- Page 20 Because of the danger of highly flammable liquids, do not use gasoline or low- flash point solvents to clean the tank. Pulsar DTS-i UG-III-180cc Training Notes Dealer Development Center Dealer Development Center...
- Page 21 • Pour high flash point solvent through the cock in all lever positions. • Dry the tank and the fuel cock with compressed air. • Install the cock in the tank. Pulsar DTS-i UG-III-180cc Training Notes Dealer Development Center Dealer Development Center...
- Page 22 (VC) screw turned clockwise and rich when it is mixed with the air and the mixture is drawn into the engine through the outlet passage. turned Anticlockwise direction. Pulsar DTS-i UG-III-180cc Training Notes Dealer Development Center Dealer Development Center...
- Page 23 / atomized form is discharged through the bypass ports when the butterfly valve is opened increases and approaches atmospheric pressure, & the spring pushes the piston valve along with jet from idling further. needle down. Pulsar DTS-i UG-III-180cc Training Notes Dealer Development Center Dealer Development Center Pulsar DTS-i UG-III-180cc Training Notes...
- Page 24 Digital Twin Spark Plug Ignition (DTS-i) Do’s Don’ts Pulsar DTSi is the first bike in the world (In small cc engine) to have twin spark ignition system. Do’s Don’ts The most obvious feature is the Twin Spark Plug configuration o f Handling the Engine.
-
Page 25: Important Points To Remember
• Blow pressurised air to oil passages in reverse direction to that of oil flow. Chock lever 2 stage with push pull type mechanism Pulsar DTS-i UG-III-180cc Training Notes Dealer Development Center Dealer Development Center Pulsar DTS-i UG-III-180cc Training Notes... - Page 26 This indicated that the piston is at TDC position. This procedure should be carried before fitting the ‘Clutch Housing’ & this position should not be disturbed while fitting the ‘Clutch Housing’. Pulsar DTS-i UG-III-180cc Training Notes Dealer Development Center Dealer Development Center...
- Page 27 • Bracket bolts securing clutch cable on clutch cover. • Drive sprocket along with • Spark plug cap RH the chain. • Neutral switch coupler (B). Pulsar DTS-i UG-III-180cc Training Notes Dealer Development Center Dealer Development Center Pulsar DTS-i UG-III-180cc Training Notes...
-
Page 28: Dismantling Engine
• Ensure both tappets are at free state (i.e. at the end of compression stroke) Remove : • 2 dummy plug • 2 gaskets Pulsar DTS-i UG-III-180cc Training Notes Dealer Development Center Dealer Development Center Pulsar DTS-i UG-III-180cc Training Notes... - Page 29 • 5 bolts (A) • Gasket cylinder head Remove : Remove : • Cover magneto. • Non tensioner side chain guide • Cylinder block assembly Pulsar DTS-i UG-III-180cc Training Notes Dealer Development Center Dealer Development Center Pulsar DTS-i UG-III-180cc Training Notes...
- Page 30 Note : The oil which is in the oil pump housing should also be drained out into the oil drain tray for measuring drained oil. Pulsar DTS-i UG-III-180cc Training Notes Dealer Development Center Dealer Development Center...
- Page 31 Note : The existing Special Nut Puller 37 10DJ 43 can be used by • Parallel Pin grinding the tool OD to 25.9 + 0.1 mm Dia. = 25.9+0.1 Pulsar DTS-i UG-III-180cc Training Notes Dealer Development Center Dealer Development Center Pulsar DTS-i UG-III-180cc Training Notes...
- Page 32 • Crankcase gasket Engine Central Part : • 2 dowels Remove : • Crankshaft assly • Bolt (A) on RH side crankcase (Clutch side) Pulsar DTS-i UG-III-180cc Training Notes Dealer Development Center Dealer Development Center Pulsar DTS-i UG-III-180cc Training Notes...
Need help?
Do you have a question about the DTS-i 180 UG III and is the answer not in the manual?
Questions and answers