
Subscribe to Our Youtube Channel
Related Manuals for MIR MIROxi


Summary of Contents for MIR MIROxi
-
Page 1: User Manual
MIROxi User Manual User Manual Rev. 1.6 Issued on: 06/10/2008 Approved on: 06/10/2008 MIROxi User Manual cod. 980265 Rev 1.6 Page 1 of 32... - Page 2 The winspiroPRO PC software supplied with the device MUST be correctly installed on the PC before connecting MIROxi to the PC. At the end of the installation, connect the device to the PC and the hardware will be "recognised" by the PC. The device can then be used with the winspiroPRO software.
-
Page 3: Table Of Contents
1.4.8 FCC Warnings............................. 8 Product description ............................8 Technical specifications ........................... 9 1.6.1 Other features ............................11 FUNCTIONING OF THE MIROxi..........................11 Keyboard................................ 11 Battery Level ..............................13 Information ..............................13 Initial Set-up ..............................13 Patient Data ..............................15 Displaying data in memory ..........................16 Online operating mode (connected to a PC) .................... -
Page 4: Introduction
INTRODUCTION Intended Use The MIROxi pulse oximeter is intended to be used by a physician or by a patient under the instruction of a physician or paramedic. The device is intended to test lung function and can make oximetry testing in people of all ages. -
Page 5: Important Safety Warnings
Important safety warnings MIROxi has been examined by an independent laboratory which has certified the conformity of the device to the European Safety Standards EN 601-1 and guarantees the EMC Requirements within the limits laid down in the European Standard EN 60601-1-2. -
Page 6: Device
Use only MIR sensors supplied with or specifically intended for use with the MIROxi. The use of sensors not intended for use with the MIROxi may cause inaccurate readings. Oximetry measurements may be inaccurate in the presence of high ambiental light. Shield the sensor area (with a surgical towel, for example) if necessary. -
Page 7: Labels And Symbols
As laid down in the European Directive 2002/96/EEC requirements regarding the disposal of electrical and electronic devices (WEEE), at the end of its useful life this device must not be thrown away with normal domestic waste as it MIROxi User Manual cod. 980265 Rev 1.6... -
Page 8: Fcc Warnings
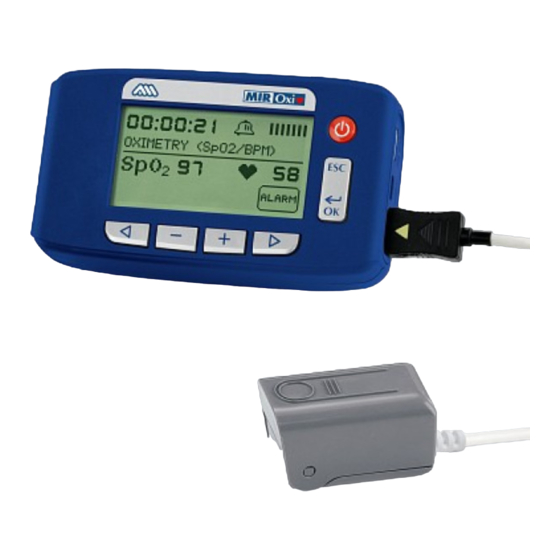
Labels and symbols are displayed on the device like shown in the following images: Product description MIROxi is a pocket oximeter. It can operate in stand alone mode and it can be connected to a PC or to a printer using any one of several available connection methods: RS232, USB, Bluetooth. -
Page 9: Technical Specifications
Pulse frequency minimum during walking BPM Max Pulse frequency maximum during walking BPM Mean Pulse frequency average during walking T < 90% Time passed with SpO2 < 90 % % hh:mm:ss MIROxi User Manual cod. 980265 Rev 1.6 Page 9 of 32... - Page 10 Time passed with pulse frequency > 120 BPM % hh:mm:ss N° Events < 40 BPM Bradycardia events during the entire analysis period N° Events > 120 BPM Tachycardia events during the entire analysis period ∆= DELTA MIROxi User Manual cod. 980265 Rev 1.6 Page 10 of 32...
-
Page 11: Other Features
Electrical Safety Standard IEC 60601-1 Applied norms Electro Magnetic Compatibility IEC 60601-1-2 FUNCTIONING OF THE MIROXI Keyboard The MIROxi keyboard is composed of 7 keys: Key functions are as followed: On/Off esc/ok previous page OK/confirm (with corresponding icon on display) - Page 12 The icons used in the various function screens and their meanings are shown in the following table: ICON DESCRIPTION To access the MIROxi set up (Service Menu) To manage or enter new patient data from the main screen To enter new patient data...
-
Page 13: Battery Level
IF no key is pressed for 1 minute the instrument will ‘beep’, and if no key is pressed for a further 10 seconds the device will automatically switch off. If MIROxi is powered by a USB connection to a PC, this auto power-... - Page 14 Bluetooth Setup Access with OK to search for available devices, select “Search Device” and then press OK; MIROxi will start to search for Bluetooth devices in the area; once one or more devices are found the screen will display profiles, press OK to set the device as printer or phone, select one of the two options and then press OK.
-
Page 15: Patient Data
• Sex (S) • Patient ID code • Function icons 2.5 Patient Data Switch on MIROxi by pressing , or if already switched on, press icon); to access the “PATIENT DATA MANAGEMENT” screen The following table describes the functions and displayed icons:... -
Page 16: Displaying Data In Memory
The values shown are the MIROxi default settings. WARNING The sensor described below is for illustration purposes only. MIROxi is enabled for the use of any of the sensors described in the previous Paragraph 1.2.2. MIR does not recommend the use of a specific type of senor;... - Page 17 During the oximetry test MIROxi cannot be switched off, to switch off the device it is necessary to interrupt the test in progress, this avoids unwanted interruptions which could compromise the accuracy of the data obtained. For the non-invasive measurement of the SpO oxygen saturation and the blood pulse rate, utilize the re-usable finger sensor.
-
Page 18: Walk Test (6Mwt)
If the phase lasts for more than 6 minutes then MIROxi will emit a ‘beep’ as a reminder to pass to the following walking phase. The number of bars (“... -
Page 19: Sleep Oximetry
Providing the Energy saving option is abilitated in the initial set up (see paragraph 2.4), after approximately 5 minutes, MIROxi will go on standby i.e., it stops beeping and the display turns off. The led signal remains on. To control the correct functioning while on standby, press , then after 1 minute MIROxi will return to standby. -
Page 20: Spo2 Bpm Test
Adult Single Patient Sensor – Instructions for Use WARNING The sensor described below is for illustration purposes only MIROxi is enabled for the use of any of the sensors described in the previous Paragraph 1.2.2. MIR does not recommend the use of a specific type of sensor;... -
Page 21: Instruction For The Belt And Holder
2 and 5 cm • Place the microphone of the telephone (the microphone is nearest to the cable) near to the MIROxi as shown in the diagram, with the phone receiver (beneath the device’s ID label). The hole should be close to (2 to 5 cm) the microphone hole on the receiver. -
Page 22: Data Transmission Via Bluetooth To A Cell Phone
MIROxi includes a “Bluetooth” wireless data transmission system. This connection is via radio and allows MIROxi to be connected to a suitable cell phone. The method of data transmission allows the transferring of all the data in MIROxi. The sequence of operations to follow is described below. -
Page 23: Connection To A Pc Through Usb Port
Printing of data from the patient management function is enabled only if the printer has a Bluetooth connection; alternatively a USB key can be installed on the printer in order to enable a Bluetooth connection. The Bluetooth system enables MIROxi to transfer test data directly to a Bluetooth enabled printer. The steps are as follows: •... -
Page 24: Cleaning The Oximetry Sensor
Warning change lithium battery Call a service centre or the manufacturer for replacement. PROBLEM SOLVING A list of problems follows that may arise when working with MIROxi. Diagnostic messages are also shown on the display indicating the type of malfunction: MIROxi User Manual cod. -
Page 25: Causes And Solutions
5.1 Causes and Solutions • MIROxi does not switch on Check that batteries are correctly inserted in the compartment on the back of the instrument. If they are correctly positioned then replace them with new ones. • During operation the machine switches itself off and on again Change the batteries. - Page 26 Notified Body CERMET No. 0476 - Certificate No. MED – 9826 MIR srl Medical International Research, declares that the Device subject of this declaration together with its standard accessories conforms to the requirements of the Council Directive 93/42/EEC Annex I.
-
Page 27: Limited Warranty Conditions
If units are to be returned to the manufacturer then written or verbal permission must be received before any instruments are returned to MIR. MIR – Medical International Research reserves the right to modify the instrument if required, and a description of any modification made will be sent along with the returned goods. -
Page 28: Annex 1 Oxymetry Test Report Examples
ANNEX 1 OXYMETRY TEST REPORT EXAMPLES MIROxi User Manual cod. 980265 Rev 1.6 Page 28 of 32... - Page 29 MIROxi User Manual cod. 980265 Rev 1.6 Page 29 of 32...
- Page 30 MIROxi MIROxi User Manual cod. 980265 Rev 1.6 Page 30 of 32...
-
Page 31: Annex 2 Information For Correct Use In An Electromagnetic Environment
Guidance and manufacturer’s declaration – electromagnetic emissions The MIROxi is intended for use in the electromagnetic environment specified below. The customer or the user of the MIROxi should assure that it is used in such an environment. Emissions test Compliance Electromagnetic environment –... - Page 32 TV broadcast cannot be predicted theoretically with accuracy. To assess the electromagnetic environment due to fixed RF transmitters, an electromagnetic site survey should be considered. If the measured field strength in the location in which the MIROxi is used exceeds the applicable RF compliance level above, the MIROxi should be observed to verify normal operation.
Need help?
Do you have a question about the MIROxi and is the answer not in the manual?
Questions and answers