Advertisement
Quick Links
I itChenAid
®
HOME APPLIANCES
APPAREILSI_LECTROM_:NAGERS
www.kitchenaid.com
_---------._
\
Quick Reference
Section
Introduction
Page
2
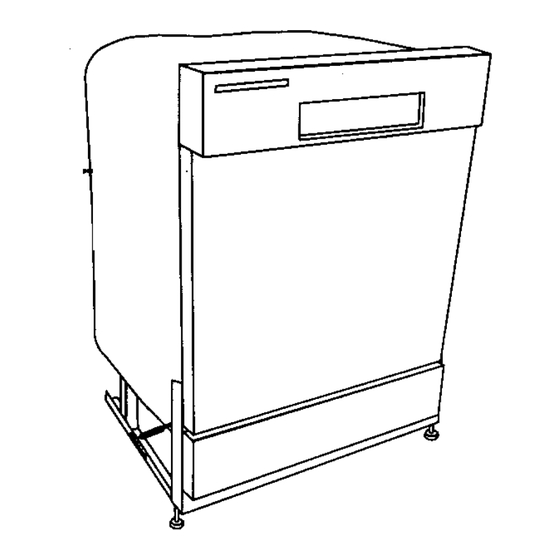
Product dlmenslons
3
Bullt-ln opening dlmenslons
3
Electrical requlremonts
4
Water requlrements
4
Draln requlrements
4
Installation steps
5 -
Need assistance?
Back cover
The KitchenAid Consumer Assistance Centeris open 24 hoursa
day,7 daysa week. Call 1-(800) 422-1230. The call is free withinthe
continental UnitedStates.In Canada,call 1-(800) 461-5681 for
English,and 1-(800) 461-5703 for French.
Call t_ KitchenAtd Consumer Assistance Centerwhen you:
Havequestionsaboutdishwasher installation or operation.
1_ Needto obtainthe nameand numberofa KitchenAid-authorized
service
company,
Important:
• Installer:. LeaveInstalLation Instructions withthe homeowner.
• Homeowner: KeepInstallationInstructionsfor future
reference.
• Save Installation Instructionsfor local electricalinspector's use,
PartNo. 9743822 Rev,C
Piece n° 9743822 R_. C
Advertisement

Related Manuals for KitchenAid 9743822


Summary of Contents for KitchenAid 9743822
- Page 1 Water requlrements Draln requlrements Installation steps Need assistance? The KitchenAid Consumer Assistance Centeris open 24 hoursa day,7 daysa week. Call 1-(800) 422-1230. The call is free withinthe continental UnitedStates.In Canada,call 1-(800) 461-5681 for English,and 1-(800) 461-5703 for French. Call t_ KitchenAtd Consumer Assistance Centerwhen you: Havequestionsaboutdishwasher installation or operation.
- Page 2 In_on s_s cont fmm _ If connecting dishwasher with power supply cord, check that power supply is dlsconne_ed. ElectricalShockHazard PlugIntoa grounded3 prongoutlet. Do not removegroundprong. Do not usean adapter. Do not usean extansloncord. Failureto followthese InstructionscanresultIn death,fire, or electricalshock. Usepower •...
- Page 3 A. electric drill N. level O. safety glasses B. Phillips screwdriver ® C. flat-blade screwdriver P. gloves D. 2 adjustable wrenches R. Teflon tape S. Drain tube adapter E. pliers Part No. 9741366 F. measuring tape or ruler (available from your G.
- Page 4 Leveling legs and wheels adjust to fit34-inch (86.4cm) to 35-inch (88.9cm) cabinet opening height. Iflevelinglegsand wheels are removed from dishwasher, 33-13/16inches (85.9cm) is the minimum cabinet opening height.Measure thisdistance from the lowestpoint ofthe underside ofthe countertop. Corner locations requirea 2"(5.1cm) minimum clearancebetween side of dishwasherdoor and the wallor cabineL Checklocation where dishwasherwill be installed.Do Notinstalldishwasher...
- Page 5 • The hot water line to the dishwasher must provide between 20-125 psi (138-862 kPa) water pressure. • The hot water heater should be set to deliver 120°F (49°C) minimum water temperature to the dishwasher for best results. • A 3/8" minimum O.D. copper tubing inlet line is recommended.
-
Page 6: Direct Wire Method
Direct wire method Localcodes maypermitusingarmored ornon-metallic sheathed, copper wire(A) (withgroundwire) to connectdishwasher to unctionbox. 5. Cut a 3/4"(l.gcm) hole in la_, side or floorof cabinet(B) for directwiring.Rightside is easiestlocation. Wood cabinet: Sandhole untilsmooth. Metal cabinet: Coverhole withgrommet (Part No.302797) availablefrom your dealeror parts supplier. 6. - Page 7 Tilt dishwasher backwards on wheels when moving across floor to prevent damage to floor covering. Latch (I) the dishwasher door. Grasp the sides of the dishwasher door near the console (J). Tilt dishwasher backwards on wheels. Move dishwasher close to cabinet opening. Do Not push on the center of the console.
- Page 8 Altemate Connection Methods NoAir Gap Iflocal codes permit,the dishwasher drainhose maybe connected direcOy toawaste tee o r waste dispo . Drain hose (A) to waste tee (B) Cut drain end of drain hose as shown(C). Do Notcot fibbed sectionto shortendrainhose (D).
- Page 9 • Installa U.L-listed/t_-certiliedstrainrelief(F) to the terminal box. Runpowersupplywire throughstrainrelief,ff usingconduit, use a U.L.-listed/CA_-cer through connector. • Connectthe whitewire (G) from the power supplywire to the whitewire in the terminalboxwith twist-on wire connector. • Connectthe blackwire (H) fi'omthe power supplywire to the black wire in the terminal b ox withtwist-onwire connector.
- Page 10 • Connect t he white wire (Q) fromthe powersupplycordto the whitewirein the terminal b ox with twist-on wireconnector. • Connect t he black_ blackwirein the terminal b ox with twist-on wire connector. If the ground connector (S) looks like this: •...
- Page 11 Opendoor about 3 inches (7.6cm) and check for equalspacing (C) between inner door and tub sides. If spacingis notequal, loosen bracket screwsand shifttub. Tighten bracket screws. Remove newstraper o r towelfrom dishwasher. easily.Ifdoor doses too quicklyor fallsopen, adjust door Openand close door severaltimes.Thedoor should open and close...
- Page 12 Your installation is now complete. Keep Installation Instructions and Use and Care Guide close to dishwasher for easy reference.
- Page 13 Keep cardboard shipping base or hardboard under dishwasher until it is installed. The shipping base or - hardboard will help Io protect floor covering when dishwasher is moved across the floor during installation.
- Page 14 Install a grommet (Part No. 302797) in opening cut in a metal cabinet for power supply cord or power supplycable. Dishwasher must be completely enclosed, sides, top and rear. Side panel ldts are available from your dealer for installing your diswasher at the end of a cabinet.
- Page 15 It must be routed so it does not touch the dishwasher motor or lower portion of the dishwasher tub. A swain relief must be used to secure the power supply cord to the dishwasher terminal box. The power supply cord must be plugged into a mating 3-prong, ground-type oudet, grounded in accordance with all national and local codes and ordinances.
- Page 16 ElectricalShock Hazard Disconnectelectrical power at the fuse box or circuit breakerbox before installing dishwasher. Failure to do so can result in death or electrical shock. 1. Disconnectthe power supply. 2. Putonglovesandsafety glasses. Electrical 3. Pick one method to follow("Directwire" or "Power supplycord"), dependinguponyour dishwasherand local codes.
- Page 17 Tip Over Hazard Do not use dishwasher until completely installed. Do not push down on open door. Doing so can result in serious injury or cuts. Excessive Weight Hazard Use two or more people to move and Install dishwasher. Failureto do so can result in back or other injury.
- Page 18 Connect drainhose to an air gap orwastetee using one of the recommended or alternate methods. Recommended Connection Install Air Gap Kit (Part No. 300096) (A) according to kit instructions. If a different air gap is used, it should be checked to make sure it allows for the same air flow.
- Page 19 Attach watersupplyline (C) to fitting. Do Not allow the water pipe or tubing to contact the motor or Apply Teflontapeto 90° elbowfitting(A) and connectfitting directly dishwasher legs (D). Turnon watersupplyand check forleaks. Check electrical requirements. electrical supply and recommended Page 4.
- Page 20 Thedishwasher M UST be secured to countertop orfloorto keep it fromtippingwhen door is opened. Countertop attachment: Secure dishwasherto counter_p with two, No. 10 x 1/2"Phillips-head screws(it). Do Notdropscrewsinto the bottom of the dishwasher.Screws,if dropped in pumparen,maycausedamage to pumpor motur. Floor attachment: Usefloor attachmentkit (Part No.4378968) availablefrom your dealer.
- Page 21 (A)mfloat onthewater, ffthe water level iscorrect, close the door andallowthe dishwasherto completethe cycle. the dishwasher does not fallto the proper level,check the following: • Is the shutoffvalvein the water supply line completelyopen? • Is the water supplylineblocked or kinked? Check thatthere ure no water leaks.
- Page 22 422-1230. Thecallis freewithinthe continental United Sta_. InCanada, c all 1-(800) 461-5681 for Englishand 1-(800) 461-5703 for French. Call the KitchenAid Consumer Assistance Center when you: • Havequestionsabout dishwasherinstallationor operation. 1_ Need to obtain thename and number of a KitebenAid- authorized servicecompany.
Need help?
Do you have a question about the 9743822 and is the answer not in the manual?
Questions and answers