Table of Contents
Advertisement
Quick Links
Belkin® Secure Desktop Controller Unit (DCU) User Manual
User Manual
Models:
F1DN001R – 4 Buttons DCU for 2-4 ports
F1DN002R – 4 Buttons DCU for 2-4 ports with LCD
F1DN003R – 3 Buttons DCU for 2-16 ports with LCD
Belkin® Secure Desktop Controller Unit (DCU) User Manual
-
8820-00778 Rev. A00
8820-00778 Rev. A00
Advertisement
Table of Contents

Related Manuals for Belkin F1DN001R


Summary of Contents for Belkin F1DN001R
-
Page 1: User Manual
Belkin® Secure Desktop Controller Unit (DCU) User Manual User Manual Models: F1DN001R – 4 Buttons DCU for 2-4 ports F1DN002R – 4 Buttons DCU for 2-4 ports with LCD F1DN003R – 3 Buttons DCU for 2-16 ports with LCD Belkin® Secure Desktop Controller Unit (DCU) User Manual 8820-00778 Rev. - Page 2 Section 3 - Installation ..............14 Before Installation ............... 14 Installation ..................15 Typical system installation diagram with the Belkin Secure DCU 16 Step 3 – Administrator Configuration (F1DN002/3R Only) ..17 Option 1 - System Information ............ 18 Option 2 – Customize Channels ........... 18 Option 3 –...
-
Page 3: Package Contents
DCU, in addition to troubleshooting guidance—in the unlikely event of a problem. Reporting Belkin Product Security Vulnerability If you are aware of potential security vulnerability with any Belkin Government product, we encourage you to contact us immediately at the following email address: gov_security@belkin.com... -
Page 4: Security Features
Common Criteria EAL-4 Listing Below is a summary of some of the key security features incorporated into The Belkin Secure KVM Switch and the Belkin Secure DCUare listed by the the Belkin Secure DCU. Common Criteria organization. Belkin’s DCU is Common Criteria validated to... -
Page 5: Operational Features
The Belkin Secure DCU was designed to enhance the usability and ease of Multilanguage support use of the Belkin secure KVM systems. Below is a summary of some key The F1DN002/3R models support network/resource name customization in operational features incorporated into the Product. -
Page 6: Equipment Requirements
You can connect the DCU only to Belkin’s Secure KVM units that support DCU. For the latest information on product support see the Belkin website http://belkinbusiness.com/ Note that F1DN0001R model is only intended for use with Belkin 2 or 4-port KM/KVM/Windowing KVM. Belkin® Secure Desktop Controller Unit (DCU) User Manual... -
Page 7: Safety Precautions
Power supply overheated, broken, damaged or has a damaged cable. The product should be stored and used only in temperature and humidity controlled environments as defined in the product’s environmental specifications. Belkin® Secure Desktop Controller Unit (DCU) User Manual 8820-00778 Rev. A00... - Page 8 Overview Table of Contents SECTIONS Front Panel Features – F1DN001R Belkin® Secure Desktop Controller Unit (DCU) User Manual 8820-00778 Rev. A00...
- Page 9 Overview Table of Contents SECTIONS Front Panel Features – F1DN002R Belkin® Secure Desktop Controller Unit (DCU) User Manual 8820-00778 Rev. A00...
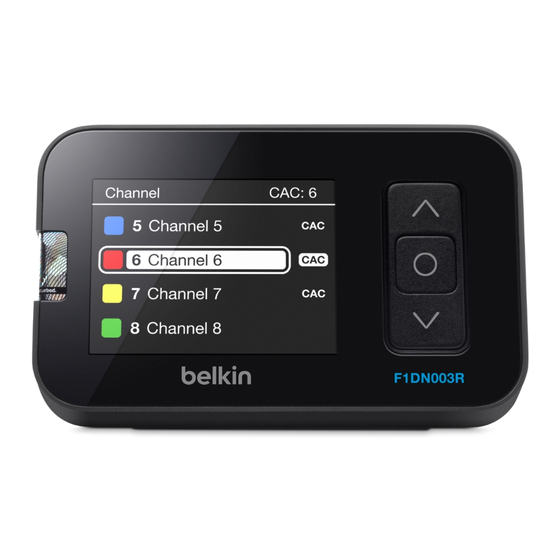
- Page 10 Overview Table of Contents SECTIONS Front Panel Features – F1DN003R 1 – Graphic display 2 – Up illuminated push-button 3 – Select illuminated push-button 4 – Down illuminated push-button Belkin® Secure Desktop Controller Unit (DCU) User Manual 8820-00778 Rev. A00...
- Page 11 2 - Mini-USB Programming Connector 3 – microSD card slot (not assembled in 001R model) 4 – DCU cable RJ-14 jack 5 – AUX port (not assembled in 001R model) Belkin® Secure Desktop Controller Unit (DCU) User Manual 8820-00778 Rev. A00...
- Page 12 1 – Power LED (not assembled in 002R and 003R models) 2 - Mini-USB Programming Connector 3 – microSD card slot 4 – DCU cable RJ-14 jack 5 – AUX port Belkin® Secure Desktop Controller Unit (DCU) User Manual 8820-00778 Rev. A00...
-
Page 13: Tamper Evident Label
Tamper Evident Label Active Anti-Tampering System The Belkin Secure DCU uses a holographic tamper evident label to provide The Belkin Secure DCU is equipped with an always-on active anti- visual indications in case of an enclosure intrusion attempt. This label tampering system. -
Page 14: Product Specifications
- Mini-USB Type A female connector for Product design life-cycle 10 years per MIL-HDBK-217E administrator keyboard connection (adapter cable must ordered separately). microSD card slot. AUX control and monitoring port [available in F1DN002/3R only] Belkin® Secure Desktop Controller Unit (DCU) User Manual 8820-00778 Rev. A00... -
Page 15: Before Installation
8 meters. product. The Belkin Secure DCU must be in the user’s primary field of view. After seal removal inspect packaging content to verify that required components included. See packaging content list in page 2 above. After the Belkin Secure DCU removed from its packaging materials inspect the tampering-evident label to assure that product is properly sealed. - Page 16 Installation Secure DCU again, restart KVM when the product is connected. Step 1 - Connecting the Belkin Secure DCU to the Belkin Secure KVM Switch See figure in page 17 for typical system installation. First Power Up after Belkin Secure DCU changed from another system (models F1DN002/3R) ...
- Page 17 Installation Table of Contents SECTIONS Typical system installation diagram with the Belkin Secure Belkin® Secure Desktop Controller Unit (DCU) User Manual 8820-00778 Rev. A00...
- Page 18 To exit move arrow to Exit key at the bottom and select. Note: If the Belkin Secure DCU is connected after Secure KVM power up or if the Belkin Secure DCU was momentarily disconnected and reconnected, then product will be inoperative (Secure KVM will continue to work without and interaction with the connected Belkin Secure DCU).
-
Page 19: Option 1 - System Information
DCU Setup Lock / Unlock (F1DN002R/3R Only) Note: Don’t forget to remove the unlock card from the Belkin Secure DCU Note: if unlock microSD card is not inserted into the Belkin Secure DCU, only after setup is completed. 3 Setup options are accessible. All other 5 options are grayed out and inaccessible. - Page 20 Important Note: During channel customization or as long as the USB keyboard is connected to the Belkin Secure DCU, communication with the KVM is disabled and KVM will show similar behavior as a tampered product to prevent normal use. After customization is completed – recycle the power to the system to resume normal operation.
- Page 21 Use up/down buttons or keyboard arrows to move up and down in the color palette. To select a color – press keyboard enter or select button (center key). Belkin® Secure Desktop Controller Unit (DCU) User Manual 8820-00778 Rev. A00...
- Page 22 KVM cables connected to disabled computers even if Belkin Secure DCU channel is disabled. When channel is disabled – its line text will be gray in the Belkin Secure From the setup menu navigate to the third menu option – Channels DCU Main menu screen.
-
Page 23: Option 4 - Display Backlight
Table of Contents SECTIONS Option 4 – Display backlight This Belkin Secure DCU setup options allows the user or the administrator to adjust the LCD backlight intensity. Two modes of backlight intensity control are supported: 1. Auto mode – in this mode the backlight intensity is adjusted automatically by the system through ambient light sensing. -
Page 24: Option 5 - Load Configuration
Once in the Load configuration screen, you can scroll up and down to select the proper configuration file from the list. Note: Do not use PC or devices other than Belkin Secure DCU to change the files stored on this microSD or files / card may become unusable! -
Page 25: Option 6 - Save Configuration
Note: Belkin MicroSD card is not included with this product and has to be order separately. Note: Do not use PC or devices other than Belkin Secure DCU to change the files stored on this microSD or files / card may become unusable! ... - Page 26 Note that saved configuration can be loaded only on systems with same configuration. Note that the microSD card supplied by Belkin may store up to 1,000 different configuration files. Belkin® Secure Desktop Controller Unit (DCU) User Manual...
- Page 27 Spanish, French, German and Russian. French Keyboard Layout German Keyboard Layout Selected language appears at the top right corner of the screen when channel text is entered. Russian Keyboard Layout Belkin® Secure Desktop Controller Unit (DCU) User Manual 8820-00778 Rev. A00...
-
Page 28: Option 8 - Reset To Factory Defaults
Setup menu and enter the Reset to Factory Defaults menu. The Belkin Secure DCU will prompt for reset approval. If “Yes” option is selected, the product will reset and return back to factory settings. Belkin® Secure Desktop Controller Unit (DCU) User Manual... - Page 29 Default channel after power up is channel #1 (all KVMs except for Windowing KVMs) as indicated by channel select LED #1 illumination at the Secure KVM front panel and on the Belkin Secure DCU display.
- Page 30 The user may use keyboard shortcuts to switch to another channel. In this example – if the user types Control-Control-4 the KVM switches to channel #4 as indicated in the Belkin Secure DCU display. Belkin® Secure Desktop Controller Unit (DCU) User Manual...
- Page 31 #1 and #4 only. Default display after Belkin Secure DCU and KVM power up. KVM channel selected is #1. CAC port channel selected is #1. Channels 2 and 3 have an unpowered / unconnected CAC interface as indicated by the ...
- Page 32 Operation Table of Contents SECTIONS he user selects select channel #4. The arrow is now pointing to line #4 with CAC port on the same line. Belkin® Secure Desktop Controller Unit (DCU) User Manual 8820-00778 Rev. A00...
- Page 33 The following example will use F1DN108F 8-ports secure KVM to highlight the operational differences. In Belkin Secure DCU Main screen you can scroll down to channel 8. Still Note that in this case, as channel 8 does not have CAC (X), CAC will selected channel (1 in this case) is fixed to the top of the list.
- Page 34 Operation Table of Contents SECTIONS 4. Abnormal Operation This section provides additional information about Belkin Secure DCU abnormal operation. If keyboard or mouse devices are not qualified, the MSG key will blink. Note: Whenever there is a new message that was not yet accessed by the user before –...
- Page 35 CAC is qualified but all four channels are If the KVM anti-tampering system was triggered, the following message will appear in the Belkin Secure DCU display. Belkin Secure DCU can still disabled as indicated by the four X in the CAC area.
-
Page 36: Section 5 - Troubleshooting Guide
Power down the system by disconnecting the Secure KVM DC power and reconnect after 10 seconds. Important Security Note: Problem: The Belkin Secure DCU does not work – The following error If you are aware of potential security vulnerability while installing or message appears:... - Page 37 Go to Setup and change mode to manual. Adjust display brightness to maximum (10). Check Belkin Secure DCU cable length. Must be less than 8 meters. Change to a short cable for testing. Problem: Belkin Secure DCU failed to save current configuration on inserted microSD card.
- Page 38 Change user mouse device. Follow Secure KVM User Manual guidance. Problem: CAC is not working (one channel only). Indicated as X on Belkin Secure DCU display. Solutions: Make sure that connected PC is powered and loaded the OS.
-
Page 39: Section 6 - Information
FCC Statement DECLARATION OF CONFORMITY WITH FCC RULES FOR ELECTROMAGNETIC COMPATIBILITY We, Belkin International, Inc., of 12045 E. Waterfront Drive, Playa Vista, CA 90094, declare under our sole responsibility that the products: F1DN001R ,F1DN002R ,F1DN003R to which this declaration relates: Comply with Part 15 of the FCC Rules. -
Page 40: Section 7 - Warranty
Section 7 - Warranty What is not covered by this warranty? All above warranties are null and void if the Belkin product is not provided Belkin International, Inc., Limited 3-Year Product Warranty to Belkin for inspection upon Belkin’s request at the sole expense of the purchaser, or if Belkin determines that the Belkin product has been improperly installed, altered in any way, or tampered with. - Page 41 Table of Contents SECTIONS If Belkin determines, in its sole discretion, that it is impractical to ship the damaged equipment to Belkin, Belkin may designate, in its sole discretion, an equipment repair facility to inspect and estimate the cost to repair such equipment.
- Page 42 Information Table of Contents SECTIONS Reporting Belkin Product Security Vulnerability If you are aware of potential security vulnerability with any Belkin Government product, encourage contact immediately following email address: gov_security@belkin.com or our technical support line at: 1-800-419-5546 After your communication is received, Belkin Government personnel will contact you to follow up.
- Page 43 © 2013 Belkin International, Inc. All rights reserved. All trade names are registered trademarks of respective manufacturers listed. Windows, Windows Vista, Microsoft, and IntelliMouse are either registered trademarks or trademarks of Microsoft Corporation in the United States and/or other countries. Mac OS and Mac are trademarks of Apple Inc., registered in the U.S. and other countries.
Need help?
Do you have a question about the F1DN001R and is the answer not in the manual?
Questions and answers