Advertisement
■ CAMERA CM-31AH
EIA
1/3" 250,000 pixels B/W CCD
Pick-up device
CCIR
1/3" 290,000 pixels B/W CCD
View of angle
120 degree diagonal
Minimum illumination
0.01LUX
Input Voltage
DC 12V/200mA Max
Operating Temperature
-10℃ to + 55℃ (+14℉ to +131℉)
Camera Weight
0.4Kg(0.88lbs) including bracket
Dimension
70(W) X 44(H) X 57(D)mm
2.7(W) X 1.7(H) X 2.2(D)inch
Accessories
Camera Bracket
Sun Visor
Adhesive tape
Machine screw(Ass'y)(PH) M3x8
Machine screw(PHW) M3x6
Tapping screw(TH)4x10
Spring washer(M3)
Spring washer(M4)
Insulation tape
Extension cable
1
1
1
4
2
3
2
3
1
1
Printed in Korea
20
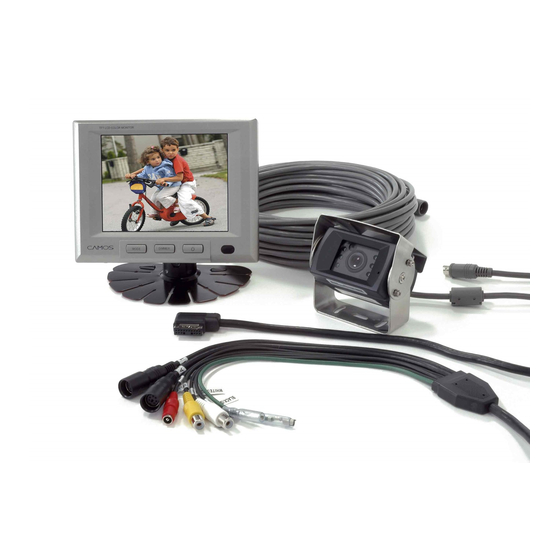
REAR-VIEW SYSTEM
5" TFT LCD MONITOR & CAMERA
INSTRUCTION MANUAL
MODEL : RV-531/532AH
Thank you for choosing this product.
Please read this instruction manual carefully before operating this product.
RECORD YOUR MODEL NUMBER (Now, while you can see it)
The model and serial number of your MONITOR are located on
the back of the cabinet. For your future convenience, we suggest
that you record these numbers here :
MODEL number :
SERIAL number :
Advertisement
Table of Contents

Related Manuals for Camos RV-531


Summary of Contents for Camos RV-531
- Page 1 CCIR 1/3" 290,000 pixels B/W CCD View of angle 120 degree diagonal Minimum illumination 0.01LUX MODEL : RV-531/532AH Input Voltage DC 12V/200mA Max Thank you for choosing this product. Operating Temperature -10℃ to + 55℃ (+14℉ to +131℉) Please read this instruction manual carefully before operating this product.
-
Page 2: Table Of Contents
1. Safety Rules Please read the Safety Rules carefully before using this product. Following of the “ ” safety rules prevents users from any damage related with the misuse of this product. Contents “ ” It is very important that users follow these safety rules. We state Caution and “... - Page 3 Do not place any containers with water or any small metal objects Unplug the product and remove cords when moving. on top of the product or nearby it. --- It may damage cords and cause fire and/or electric shock. --- Unplug the product when water or metal comes in contact with the product. The car engine should be running when you use the product in a car.
-
Page 4: Before Use
2. Before Use 3. Special Features of the Product ■ MONITOR CM-505 To safely use the product, please read the user’s manual carefully before use. Application of 8bit MICRO CONTROLLER Connect all lines as directed in the product connection map in the manual. Application of TFT LCD with high resolution and low reflection Do not touch the LCD panel. -
Page 5: Terms Of Part
4. Terms of part 5. Remote Control ② ① ③ ⑤ ⑥ ⑧ ④ ⑦ ① ② ③ ⑤ ④ ① POWER Power ON/OFF Key ② MODE CAM1/CAM2/AV selection function ① MODE CAM1/CAM2/AV selection function ③ MUTE For muting sound ②... -
Page 6: Functions
6. Functions ① Press VR ▶ ② The monitor shows volume on the screen and POWER volume is up. ON/OFF KEY Push POWER button to on the power ① VOLUME (STAND BY state is OFF) Push POWER button again to off the power ②... - Page 7 MENU ④ DISPLAY does correction and displays revised contents at the same time. ⑤ OSD sign disappears in 6 seconds after the end of use and all work is saved ■ This button is for SETUP, PICTURE USER simultaneously. There are 2 ways ⑥...
-
Page 8: Installation
8. Installation ■ MONITOR CM-505 1. Choose a location where you install the Monitor. Clean the place for the Stand with cleanser and remove the Protective Tape. And then attach it exactly where you want. 2. Fasten the Monitor with Tapping Screw. 3. -
Page 9: Changing Remote Control Battery
Tapping screw(RH)4x10 ■ CAMERA CM-31/32AH Spring washer(M4) 1. Determine a position and a direction of installation so that the rear view can be Machine screw(ASS'Y) effectively seen on the monitor screen. (PH) M3 X 8 Sun visor 2. Fix the camera bracket to the vehicle using the provided adhesive tape and tapping screws with spring washers. -
Page 10: Specifications
10. Specifications ■ MONITOR CM-505 ■ CAMERA CM-32AH SPECIFICATION NTSC 1/3" 250,000 pixels COLOR CCD I T E M Pick-up device NTSC 1/3" 290,000 pixels COLOR CCD SCREEN SIZE 13.0 cm (5.0 INCH) View of angle NUMBER OF PIXELS 120 degree diagonal 320(H) x 240(V) DOT PITCH 0.106(H) x 0.318(V) mm... - Page 11 • Wireless transmission of video and audio signal in a frequency range of 2,4 GHz • 4 channels switchable • Easy connection to CAMOS-rear view systems and cameras • Easy installation • system is automatically activated when using reverse gear...
- Page 12 Installation Usually the transmitter and receiver module must be mounted inside the vehicle. The transmitter should be attached as high as possible in the rear of the vehicle. It can simply be fixed by screw or the enclosed adhesive/Velcro tape. The receiver should be installed, if possible, in the same high like the transmitter, for example on the dashboard close to the monitor.
- Page 13 Connections / Alignment DIP switches Control lamp On/Off switch Receiver: Connect the black cable of receiver module to the camera input of the monitor. Concerning the other connections of the monitor, please see the manual of rear view system. Transmitter: Connect the camera cable to the cable of the transmitter module.
-
Page 14: Technical Data
The Radio Transmitter may be operatet in the following countries: Germany, France, Great Britain, Netherlands, Italy, Austria, Switzerland (incl. Liechtenstein), Belgium and Spain. IMC GmbH • Carl-Zeiss-Str. 3 • 22946 Trittau Tel. 04154 - 8083-0 • Fax 04154 - 8083-20 www.camos-mulltimedia.com.
Need help?
Do you have a question about the RV-531 and is the answer not in the manual?
Questions and answers