Advertisement
Quick Links
Download this manual
See also:
User Manual
T
L
P
YOUR ADVENTURE UNFOLDS
HE
EGENDARY
ERFORMANCE OF
Wisper
TM
FOLDING KAYAKS
Feathercraft Products Ltd. 4-1244 Cartwright Street on Granville Island, Vancouver, British Columbia, Canada V6H 3R8
Toll Free: 1-888-681-8437 Tel: (604) 681-8437 Fax: (604) 681-7282 www.feathercraft.com info@feathercraft.com
Advertisement

Related Manuals for Feathercraft wisper


Summary of Contents for Feathercraft wisper
- Page 1 YOUR ADVENTURE UNFOLDS EGENDARY ERFORMANCE OF Wisper FOLDING KAYAKS Feathercraft Products Ltd. 4-1244 Cartwright Street on Granville Island, Vancouver, British Columbia, Canada V6H 3R8 Toll Free: 1-888-681-8437 Tel: (604) 681-8437 Fax: (604) 681-7282 www.feathercraft.com info@feathercraft.com...
-
Page 2: Table Of Contents
Contents Wisper Folding Kayak ............Page 2 Specifications ................Page 3 Wisper Frame ................Page 4 Care and Maintenance ............Page 5 Wisper Assembly Instructions ..........Page 7 The Feathercraft Sea Sock............Page 19 Using Strap on Skeg ..............Page 20 Disassembly ................Page 21 Feathercraft Wisper... -
Page 3: Wisper Folding Kayak
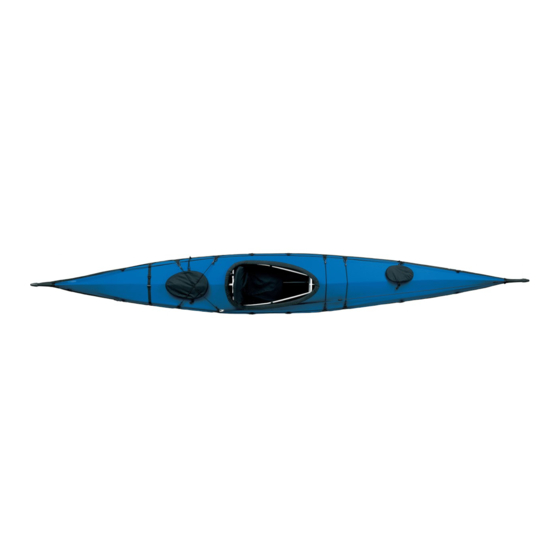
Wisper Folding Kayak Comfortable sling seat Built in coaming Optional bow hatch Hull reinforced on outside over Removeable air sponsons inside keel and chine bars skin along gunwales Feathercraft Strap-on skeg Wisper... -
Page 4: Specifications
6063 - T832 Extruded Aluminum Repair Kit Magnesium Tubing with clear Pack Bag Anodized Coating Assembly Video Crossribs: 1/2" High Density Polyethylene Illustrated Instructions Skin Material: Welded Urethane Strap-on Skeg Options: Small Bow Hatch Neo-nylon spray skirt Calf plates Feathercraft Wisper... -
Page 5: Wisper Frame
Wisper Frame stern deck bar/lever bar bracing bars chines, gunwales and deckbars through-bolted permanently to keel plate (same for bow and stern) shockcorded tubing crossribs are 1/2" high 5 extension bars: chines, gunwales, keel density polythylene Feathercraft Wisper... -
Page 6: Care And Maintenance
Apply the Bo-Shield lubricant to frame tube inserts, spring but- tons and sliding pieces prior to assembly. If you should leave your boat assembled for a maximum of two months, this will assist in preventing tubes seizing. Feathercraft Wisper... - Page 7 Due to the tight fit of the skin, the sponsons are under tape works well on the sponsons. considerable pressure and some seepage of air may occur. It is advisable to periodically reinflate the sponsons. After paddling on hot days, release air from sponsons. Feathercraft Wisper...
-
Page 8: Wisper Assembly Instructions
Wisper Frame Parts Bracing bars Foot brace platform Keel extension bar Stern deck bar / vertical lever bar Seat Sling with chine and gunwale extension bars* Bow deck bar / horizontal lever bar Seat Rim inserts Skin Bow section Stern deck bar with double band of tape... - Page 9 SET OUT FRAME PARTS AS ILLUSTRATED ON THE PREVIOUS PAGE BOW SECTION • “Shake” out bow section. Shock corded tubes take shape. • Attach bow deck bar with single band of black tape. Bow deck bar Gunwales Chines Keel Feathercraft Wisper...
- Page 10 Shake out stern section as you did the bow. Bow section complete • Attach stern deck bar with double band of black tape. ATTACH SMALL STERN CROSSRIB #4 AS YOU DID WITH THE BOW Snap chines, gunwales and deck bar onto crossrib. Attach stern deck bar Feathercraft Wisper...
- Page 11 UNFOLD SKIN. INSERT BOW AND STERN FRAME SECTIONS Insert bow frame section • Feathercraft logo is located at the bow. There are three velcro tab closures along the inside keel of the skin. Open the velcro tabs. Slide the bow and stern sections into the skin.
- Page 12 Do the same for the gunwale extension bars. Complete opposite side. Slide the seat sling towards the stern so you have easy access to the spring buttons and lever hole. Feathercraft Wisper...
- Page 13 The spring button position can, and probably will, vary slightly depending on the weight of the skin, as well as over time. This is normal and acceptable. (Remember to situate yourself across from the parts you are installing.) Feathercraft Wisper...
- Page 14 “twister” is mounted with one screw, and should be in block the open position. Insert the pin on the base of the crossrib into stationary black block (with two rivets). Close the “twister”. Stern crossrib Bow crossrib twist to close Feathercraft Wisper...
- Page 15 Adjust distance for leg length with this buckle. C: This tension lock adjusts the angle of the bracing platform. To load the bow of the kayak, unclip one side of the platform at buckle A for easy access. Feathercraft Wisper...
- Page 16 • Connects to bow deck bar on bow frame section. Rotate deck bar to lock INSTALL STERN DECK BAR • Connects to stern deck bar on stern frame section. Once connected, rotate deck bar to lock in crossrib Feathercraft Wisper...
- Page 17 (b) through hole in large bow crossrib. Slide over- sleeve towards stern till snug and spring button appears. Rim insert Thigh brace Bow has white spacer. Stern has oversleeve. Stern Gunwale bar Thigh brace Thigh brace is secured with web strap. pull tightly Feathercraft Wisper...
- Page 18 Keep blowing until the skin is tight. Twist cap to close. Tuck sponson tubes and valves out of the cockpit area. Avoid stepping on the hose and valve, and try to keep the valve free of sand. Note: After paddling on hot days, release air from sponsons. Feathercraft Wisper...
- Page 19 Roll down inner closure and close with buckle. Place hatch cover over rim and secure with B-lock. • During disassembly, don’t forget to take the plastic rims off. Don’t roll the skin up with the rims still in place. Feathercraft Wisper...
-
Page 20: The Feathercraft Sea Sock
“foot” is loose through the cockpit, • When facing the bow of the kayak, the Feathercraft label creating a “pod”. The paddler then sits in the sock. Legs should be on the right side. -
Page 21: Using Strap On Skeg
TIPS ON WHEN TO USE THE SKEG • The Wisper is designed to work well without a rudder. However, in some conditions you may find it easier to paddle with the skeg installed. This is most likely to occur when the boat is loaded and you are heading downwind. -
Page 22: Disassembly
Take chine and gunwale extension bars apart, leaving one half installed in the seat sling. Roll up the loose sections together in the seat sling. Tuck all additional pieces (ie: sea sock, repair kit) into any available space. Feathercraft Wisper... - Page 23 © Feathercraft Products Limited 2005 Printed in Canada, revised 5/2006 Recycled paper...
Need help?
Do you have a question about the wisper and is the answer not in the manual?
Questions and answers