Table of Contents
Advertisement
Quick Links
Advertisement
Table of Contents

Subscribe to Our Youtube Channel
Related Manuals for Freeform F100


Summary of Contents for Freeform F100
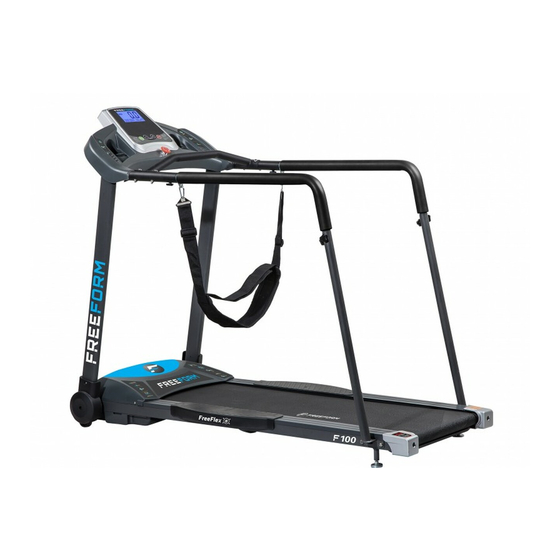
- Page 1 F100 Treadmill Operating Instructions Manual Special tips: Please read this operation manual carefully before installation and operation. Save this manual for future reference. Product may vary slightly from the item pictured due to model upgrades.
-
Page 2: Important Safety Instructions
IMPORTANT SAFETY INSTRUCTIONS WARNING - Read all instructions before using this treadmill. It is important your treadmill receives regular maintenance to prolong its working life. Failing to regularly maintain your treadmill may void your warranty. Danger To reduce the risk of electric shock disconnect the treadmill from the electrical outlet –... -
Page 3: Important Electrical Information
IMPORTANT ELECTRICAL INFORMATION WARNING! 1) NEVER use a ground fault circuit interrupt (RCD) wall outlet with this treadmill. Route the power cord away from any moving part of the treadmill including the elevation mechanism and transport wheels. 2) NEVER operate treadmill on a Generator or UPS power supply. 3) NEVER remove any cover without first disconnecting AC power. -
Page 4: Parts List
Please note: No.1 Fitness takes no responsibility for any injury or illness resulting from the use of this product, as the onus is on the user to ensure that all safety precautions possible are used prior to use ASSEMBLY INSTRUCTIONS When you open the carton, you will find the below parts for assembly: Parts List: DESCRIPTION... -
Page 5: Assembly Tools
Assembly tools: 5#Allen wrench 5mm 1pcs 、 COMBINATION WRENCH W/SCREW DRIVER: 13mm, 14mm, 15mm 1pcs. Notice: Do not power up the unit before assembly is complete. Step 1: Open the carton , and carefully remove all the parts from the box. Step 2: Lift up the Console (A) and upright supports (B) in the direction indicated by the arrows. - Page 6 Step 4: Use the 5# Allen wrench and M8*15 bolt (39) and lock washer (55), lock the console (A) onto the left and right upright tube. Step 5 : Fix the left and right foot pedals (7, 8) to the main frame with screw ST4.2*15(45).
- Page 7 Step 7 : Fix the connecting tube (1) to the console handle bar with Bolt M8*50(44), arc washer (49) and nut (28). Step 8 : Connect Left handlebar (79) with Left support tube (81) and Right handlebar (80) with Right support tube (82). Note: Don’t mix the parts of left and right handlebar.
-
Page 8: Grounding Methods
Step 10 : Connect the safety band (78) to the hooks. ATTENTION :Please confirm complete assembly as above recheck all the bolts are tight. Before you use the treadmill, please make sure you have read the all instructions carefully. GROUNDING METHODS This product must be grounded. -
Page 9: Window Display
OPERATION GUIDE WINDOW DISPLAY 0.3--6km/h 1. “Speed “window: Displays the speed, the speed range is “ Time” window: Displays running time (minutes: seconds). In modes where a time target has not been specifically set the display will count up from 0:00. If the count reaches 99:59 the machine will turn off by slowing the belt smoothly, and the console will return to its initial state. -
Page 10: Range Of Program
THE OPERATION OF EXERCISE PROCESS: 1. Press speed-down will reduce the running speed. 2. Press speed-up will increase the running speed. 3. Press the stop button will stop the machine. RANGE OF PROGRAM Initial Initial Data Set Range Display Range 0:00 -... -
Page 11: Exercise Instructions
EXERCISE INSTRUCTIONS 1. The Warm Up Phase This stage helps get the blood flowing around the body and the muscles working properly. It will also reduce the risk of cramp and muscle injury. Please do not skip the warm up phase as it is important to safely prepare your muscles and cardiovascular system for the workout that is to follow. -
Page 12: Maintenance And Servicing
Maintenance Reasonable cleaning/lubricating should be undertaken to extend the life time of this unit. Performance is maximized when the belt and mat are kept as clean as possible. WARNING: THE MAT/DECK FRICTION PLAYS A MAJOR ROLE IN THE FUNCTION AND LIFE OF YOUR TREADMILL. -
Page 13: Belt/Deck/Roller Lubrication
EVERY MONTH -IMPORTANT! Belt/Deck/Roller Lubrication The mat/deck friction may play a major role in the function and life of your treadmill and that is why we recommend you regularly lubricate this friction point to prolong the useful life of your treadmill. You should apply the lubrication after approximately the first 20 hours of operation. - Page 14 2) Pay particular attention to the fixing knobs and make sure they are tight. 3) Always replace the mat if worn and any other defective parts. 4) If in doubt do not use the treadmill and contact our helpline on 0800 222 190. TAKE CARE TO PROTECT CARPETS AND FLOOR we recommend use of a rubberised equipment mat.
-
Page 15: Walking Belt And Deck Lubrication
WALKING BELT AND DECK LUBRICATION The treadmill is equipped with lubricated running board, which needs regular maintenance. The friction between running board and running belt has a great effect on the treadmills’ life. a) Remove the power cord from the wall socket. b) Wipe any the dust between running board and running belt with a clean cloth. -
Page 16: Exploded Drawing
EXPLODED DRAWING... - Page 17 Connecting tube Bolt M8*50 Main Frame Screw ST4.2*15 Computer Bracket Bolt M6*55 Left Upright Bolt M6*45 Right Upright Bolt M6*35 Motor Bracket Arc washer Left foot pedal Screw M5*8 Right foot pedal Screw S T2.9*8 Front Roller Screw ST4.2*12 Rear Roller Screw ST5*16 S=13 、...
Need help?
Do you have a question about the F100 and is the answer not in the manual?
Questions and answers