DeWalt DCT410 Instruction Manual
12v max cordless inspection camera
Hide thumbs
Also See for DCT410:
- Instruction manual (64 pages) ,
- Original instructions manual (48 pages) ,
- Instruction manual (11 pages)
Table of Contents
Advertisement
Advertisement
Table of Contents

Related Manuals for DeWalt DCT410


Summary of Contents for DeWalt DCT410
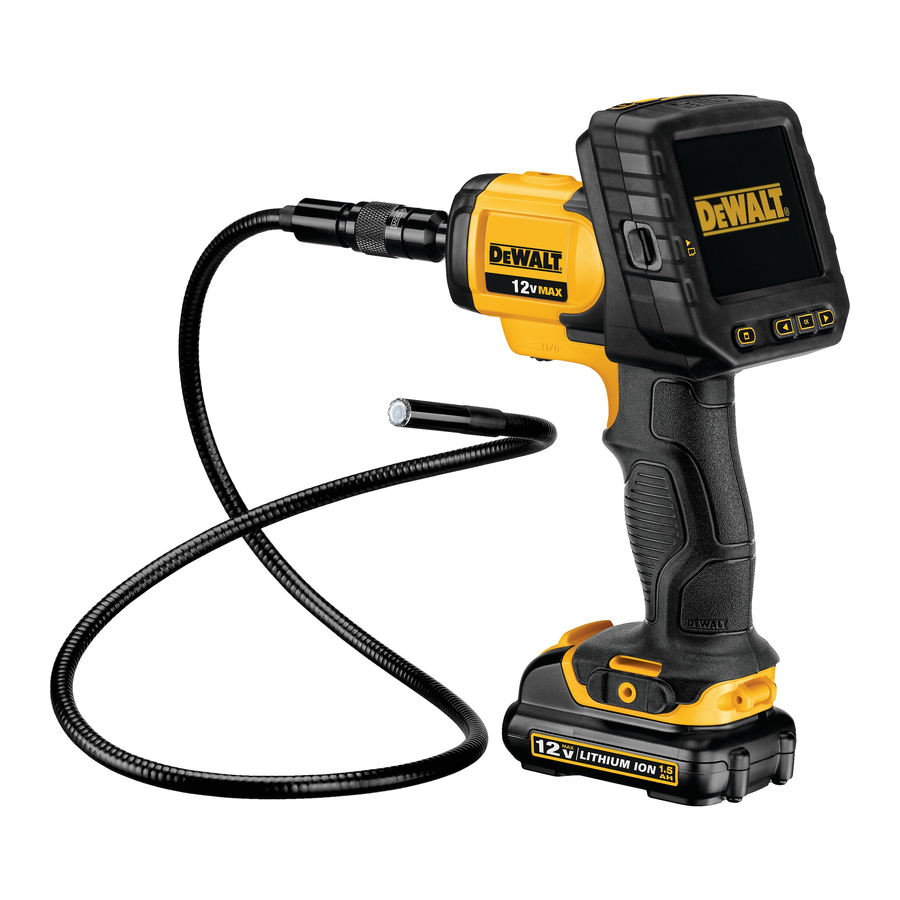
- Page 1 INSTRUCTION MANUAL DCT410, DCT411, DCT412 12V Max* Cordless Inspection Camera...
-
Page 2: For Future Reference
SAVE ALL WARNINGS AND INSTRUCTIONS Defi nitions: Safety Guidelines FOR FUTURE REFERENCE The definitions below describe the level of severity for each signal word. Please read the manual and pay attention to these Work Area Safety symbols. a) Keep work area clean and well lit. Cluttered or dark areas DANGER: Indicates an imminently hazardous situation invite accidents. - Page 3 inspection camera. Inspection cameras are dangerous in the • The inspection camera should only be used with specifically hands of untrained users. designated D WALT batteries. Use of any other batteries may b) Use the inspection camera, accessories and tool bits, create a risk of fire.
-
Page 4: Regulatory Notices
– Connect the equipment into an outlet on a circuit different from CAUTION: Do not use on humans or animals. This is not for that to which the receiver is connected. human or animal use and can cause injury if used. –... -
Page 5: Specific Safety Instructions For Lithium Ion (Li-Ion)
been dropped, run over or damaged in any way (i.e., pierced with a WARNING: Burn hazard. Battery liquid may be flammable if nail, hit with a hammer, stepped on). Damaged battery packs should exposed to spark or flame. be returned to service center for recycling. The RBRC™... - Page 6 • When operating an inspection camera outdoors, use an WARNING: Shock hazard. Do not allow any liquid to get inside extension cord suitable for outdoor use. Use of a cord suitable charger. Electric shock may result. for outdoor use reduces the risk of electric shock. CAUTION: Burn hazard.
-
Page 7: Charge Indicators
• Do not operate charger with damaged cord or plug. 2. Insert the battery pack (A) into the charger, as shown in Figure 1, making sure the pack is fully seated in charger. The red (charging) • Do not operate charger if it has received a sharp blow, been dropped, or otherwise damaged in any way. -
Page 8: Important Charging Notes
charging procedure. You may also charge a partially used pack FAULTY BATTERY PACKS: This charger will not charge a faulty whenever you desire with no adverse affect on the battery pack. battery pack. The charger will indicate faulty battery pack by refusing to light or by displaying problem pack or charger. - Page 9 FIG. 3 FIG. 2 Power button for the screen: Both the screen and the camera cable (F) need to be turned on. Zoom/Delete button: A. 12V Max* Lithium Ion Battery The button has 2 functions: B. Camera with LED’s Zoom: This is to be used when you need a C.
-
Page 10: Intended Use
The inspection camera is a professional tool. DO NOT let children Camera: Press this button for taking a photo. come into contact with the tool. Supervision is required when Record: Press this button to start and stop recording inexperienced operators use this tool. a video. - Page 11 (bent wire) into the hole (X) in the 9mm camera cable. of arrow). FIG. 7 Additional camera cable and extensions are available at additional cost. Hook and Magnet DCT410 (Fig. 6) FIG. 6 The hook is beneficial for retrieving cable or wire located in tight spaces.
-
Page 12: Operation
Belt Hook (Fig. 9) To remove the battery pack from the tool, press the release button (BB) and firmly pull the battery pack out of the tool handle. Insert it into the (Optional Accessory) charger as described in the charger section of this manual. WARNING: To reduce the risk of serious personal injury, DO Getting Started NOT suspend tool overhead or suspend objects from the belt hook. -
Page 13: Basic Operation
4. Press the OK button to save changes (field turns yellow). 2. Press the forward or back arrow to select the Folder option. 5. Repeat above steps to change remaining fields. 6. Press the main menu button to exit. BASIC OPERATION NOTE: At any time during the camera operation, pressing the main menu button will return to the previous menu. - Page 14 7. Press the OK button to view the photo or video. 4. Press the forward or back arrow to select a dated folder. 8. Press the forward or back arrow to advance to the next photo 5. Press the OK button to navigate to the next screen. or video.
- Page 15 To Delete a Photo or Video While Viewing 8. Press the delete button. Select YES to delete the individual photo or video. 1. Press the main menu button to show the Main Menu. 2. Press the forward or back arrow to select the Folder option. To Change Languages 3.
- Page 16 5. Press the OK button to save changes. To Activate the Time Stamp 6. Press the main menu button to exit. 1. Press the main menu button to show the Main Menu. 2. Press the forward or back arrow to select the Time Stamp option. To Change Date/Time 1.
-
Page 17: Operating Tips
To Format Micro SD Card 2. Press the forward or back arrow to select the Default Setup option. NOTICE: Formatting the micro SD card will erase all data. 1. Press the main menu button to show the Main Menu. 2. Press the forward or back arrow to select the Format Disk option. 3. -
Page 18: Maintenance
MAINTENANCE Cleaning WARNING: Blow dirt and dust off with clean, dry air at least once a week. To minimize the risk of eye injury, always wear ANSI Z87.1 approved eye protection when performing this. WARNING: Never use solvents or other harsh chemicals for cleaning the non-metallic parts of the tool. - Page 19 DW9072 DW9048 DW9061 DW9062 DW9057 “X” Indicates that the battery pack is not compatible with that specific charger. All charge times are approximate. Actual charge time may vary. Read the instruction manual for more specific information. DeWalt electric Power tools...
Need help?
Do you have a question about the DCT410 and is the answer not in the manual?
Questions and answers