OneTouch Select User Manual
Blood glucose monitoring system
Hide thumbs
Also See for Select:
- Owner's booklet (148 pages) ,
- Starter manual (12 pages) ,
- Control solution (2 pages)

Related Manuals for OneTouch Select


Summary of Contents for OneTouch Select
- Page 1 Select ™ Blood Glucose Monitoring System USER GUIDE Replaces Owner’s Booklet AW 06659902A Rev. date: 05/2012 AW 06659902A...
-
Page 2: Table Of Contents
Contents: Getting to know your system Setting up your meter Testing your blood glucose Attaching meal flags to your results Reviewing past results and averages Control solution testing Caring for your system Troubleshooting and detailed information about your system LifeScan self-test blood glucose monitoring devices conform to the following EU Directives: IVDD (98/79/EC):... - Page 3 Before you begin Before using this product to test your blood glucose, carefully read this User Guide and the inserts that come with the OneTouch® Select™ Test Strips and OneTouch® Select™ Control Solution. Take note of warnings and cautions throughout this booklet, which are identified with .
-
Page 4: Getting To Know Your System
Getting to know your system The OneTouch® Select™ Meter Blood Glucose Monitoring System INCLUDED WITH YOUR KIT: a. OneTouch® Select™ Meter (battery included) b. OneTouch® Lancing Device If another type of lancing device was included, see the separate instructions that came with that lancing device. -
Page 5: Getting To Know System
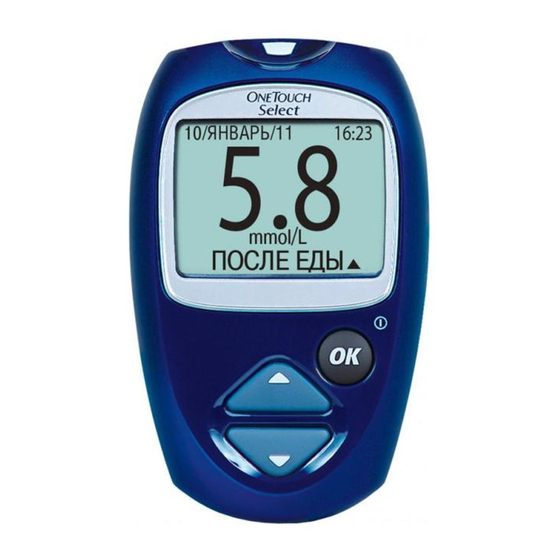
▲▼ available using up or Contact bars down button Insert into test port OK button Turns the meter on/off Up and down buttons Select or change information Confirms menu selections GETTING TO KNOW YOUR SYSTEM... - Page 6 Turning your meter on There are two ways to turn your meter on: CAUTION: If you see any light areas To perform a test, insert a test strip as far as it will go. The meter will briefly within the black start-up screen, there perform system checks, then the display will turn on.
-
Page 7: Setting Up Your Meter
18/OCT/07 press to return to the MAIN MENU. 11:48 AM mg/dL If the language, date, or time are not correct, select CHANGE and press CHANGE Choose a language LANGUAGE Now press to highlight the language of your choice and press FRAN Ç... - Page 8 Set the date DATE AND TIME In the DATE AND TIME screen, press to change the year and press DATE: 18 / OCT / 2007 Press to change the month and press TIME: 11 : 48 AM Press to change the day and press DATE AND TIME ...
- Page 9 Coding your meter Check the code on the test strip vial before inserting the test strip Code numbers are used to calibrate your meter with the test strips you are using. Insert a test strip to turn on the meter Remove a test strip from its vial and recap the vial immediately.
- Page 10 Match the code on the meter with the code on the test strip vial If the code on the meter does not match the code on the test strip vial, press match the code number on the test strip vial. The new code number will flash on the display for three seconds, then briefly stop flashing, after which the display will advance to the APPLY SAMPLE screen.
-
Page 11: Testing Your Blood Glucose
Sterile lancets NOTE: • Use only OneTouch® Select™ Test Strips. • Make sure your meter and test strips are about the same temperature before you test. • Testing must be done within the operating temperature range (10–44°C). For the most accurate results, try to test as close to room temperature (20–25°C) as you can. - Page 12 Release button Cocking control Lancing device cap Depth indicator Clear cap (for fingertip (for forearm and palm sampling) testing) See Testing LANCING DEVICE with a forearm or palm sample in Section 3. Lancet point Sterile lancet Protective cover If the lancing device shown here is not included with your kit, see the user instructions for that lancing device. ...
- Page 13 Insert a test strip to turn the meter on Insert a test strip into the test strip port as shown, with the three contact bars facing you. If the code on the meter does not match the code on the test strip vial, see Coding your meter in Section 2. APPLY SAMPLE When the APPLY SAMPLE screen appears on the display, you can apply your blood sample.
- Page 14 Applying blood and reading results Once you have a blood sample and your meter shows the APPLY SAMPLE screen, you are ready to obtain a blood glucose result. If your meter does not show the APPLY SAMPLE screen, remove the unused test strip and re-start the test process. See Getting a blood sample from the fingertip in Section 3.
- Page 15 Read your result on the meter Your blood glucose level appears on the display, along with the unit of measure, and the date and time of the test. Blood glucose results are automatically stored in the meter’s memory. WARNING: If mg/dL does not appear with the test result, contact Customer Service. Use of the wrong unit of measure may cause you to misinterpret your blood glucose level, and may lead to incorrect treatment.
- Page 16 Testing with a forearm or palm sample The OneTouch® Select™ Meter lets you obtain a blood sample from your CAUTION: Talk to your health care professional before forearm or palm. Getting a drop of blood from these ”alternate sites”...
-
Page 17: Getting A Blood Sample
Choose a sample site • Choose a spot away from bone, veins, and hair. Massage the site to increase blood flow. • Select a spot with no visible veins and avoid deep lines, which may cause your blood sample to smear. Palm... - Page 18 Lance your forearm or palm • Firmly press and hold the lancing device against your forearm or palm for a few seconds. • Wait until the skin surface under the clear cap changes color (as blood collects beneath the skin). This tells you there is enough blood flow for a good sample. Forearm or Palm •...
-
Page 19: Attaching Meal Flags To Your Results
Press to highlight your response MEAL FLAGS Select YES if you wish to change the setting, or NO if you wish to leave it as it is. NOW SET TO: ON Press to confirm your selection and return to MAIN MENU. - Page 20 MEAL FLAGS BEFORE MEAL Press to highlight BEFORE MEAL or AFTER MEAL AFTER MEAL If you decide not to assign a flag to this result, select NO FLAG. NO FLAG To confirm your selection, press 18/OCT/07 11:49AM The meal flag you chose will appear below the result on the result screen.
-
Page 21: Reviewing Past Results And Averages
• the average of all test results, • the average of before-meal results, and MENU • the average of after-meal results. To select the type of result average you want to see, press to highlight your choice, then press REVIEWING PAST RESULTS AND AVERAGES... - Page 22 Get ready to transfer readings Make sure that the meter is turned off. Connect the OneTouch® Interface Cable to the COM or USB port on your computer. Then connect the other end of the cable to the meter data port.
-
Page 23: Control Solution Testing
You may check your meter and test strips using the OneTouch® Select™ Control Solution. OneTouch® Select™ Control Solution contains a known amount of glucose and is used to check that the meter and the test strips are working properly. Remember which control solution you used. - Page 24 Check if the result is in range Each vial of test strips has a OneTouch® Select™ Control Solution range printed on its label. Compare the result displayed on the meter to the OneTouch® Select™ Control Solution range printed on the test strip vial.
-
Page 25: Caring For Your System
Caring for your system Replacing the battery Your OneTouch® Select™ Meter uses one 3.0 Volt CR 2032 lithium battery (or equivalent). Replacement batteries can be found in most stores where batteries are sold. Your meter comes with the battery already installed. - Page 26 Caring for your system Your OneTouch® Select™ Blood Glucose Monitoring System does not need any special maintenance. Storing your system Store your meter, test strips, control solution and other items in your carrying case after each use. Store each item in a cool, dry place below 30°C, but Do Not refrigerate.
-
Page 27: Troubleshooting And Detailed Information About Your System
Troubleshooting The OneTouch® Select™ Meter displays messages when there are problems with the test strip, with the meter, or when your blood glucose levels are higher than 600 mg/dL or lower than 20 mg/dL . Messages do not appear in all cases when a problem has occurred. -
Page 28: Low Battery
Message What it means What to do Error message could be caused either by a used Repeat the test with a new test strip; see WARNING test strip or a problem with the meter. Section 3, Testing your blood glucose. ERROR 2 METER OR STRIP PROBLEM... - Page 29 Comparing meter and laboratory results Test results with the OneTouch® Select™ Meter are plasma-calibrated. This helps you and your health care professional to compare your meter results with laboratory tests. If you have been using another type of meter—one that provides whole blood-calibrated results—you may notice that your test results with the OneTouch®...
- Page 30 7,250,105, 7,468,125. Purchase of this device does not act to grant a use license under these patents. Such a license is granted only when the device is used with OneTouch® Select™ Test Strips. No test strip supplier other than LifeScan is authorized to grant such a license. The accuracy of results generated with LifeScan meters using test strips manufactured by anyone other than LifeScan has not been evaluated by LifeScan.
Need help?
Do you have a question about the Select and is the answer not in the manual?
Questions and answers
My meter is showing wrong readings looks need calibration how we can do it