OneTouch Select Owner's Booklet
Hide thumbs
Also See for Select:
- User manual (30 pages) ,
- Owner's booklet (148 pages) ,
- Starter manual (12 pages)
Chapters
Table of Contents

Subscribe to Our Youtube Channel
Related Manuals for OneTouch Select


Summary of Contents for OneTouch Select
- Page 1 Blood Glucose Monitoring System Sistema de control de glucosa en sangre Easy to Use. Results You Can Trust. Fácil de usar. Resultados confiables. Owner’s Booklet Manual del propietario...
- Page 3 Welcome to the OneTouch ® family! ® OneTouch is committed to creating a world without limits for people with diabetes. The OneTouch ® Select ™ Meter makes it simple to get a test result and review past results. This owner’s booklet will help you learn how to use your meter properly.
-
Page 4: Table Of Contents
Table of Contents Setting up your system Pg. 1 Starting the test process Pg. 8 Getting a blood sample Pg. 12 Applying blood and reading results Pg. 24 Reviewing past results and averages Pg. 32 Control solution testing Pg. 38 Caring for your system Pg. - Page 5 Before you begin Before using this product to test your blood glucose, carefully read this booklet ® ™ ® and the inserts that come with the OneTouch Select Test Strips and OneTouch ™ ® ™ Select and OneTouch Select High Control Solutions. Take note of warnings and cautions throughout this booklet, which are identified with .
-
Page 6: Blood Glucose Monitoring System
OneTouch ® ™ Clear Cap ® ® d OneTouch UltraSoft Sterile Lancets e Carrying Case You will also need OneTouch ® Select ™ Control Solution and OneTouch ® Select ™ Test Strips. Control solution and test strips are sold separately. -
Page 7: Setting Up Your System
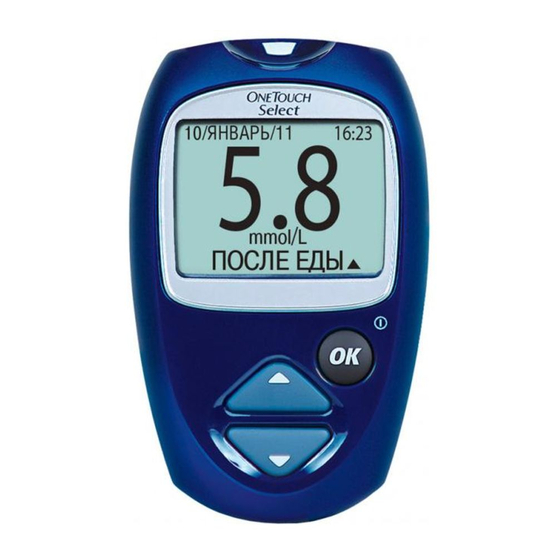
Setting up your system Getting to know your OneTouch ® Select ™ Blood Glucose Meter and test strips Front Back Test strip with battery door open Test port Edge to Insert test strip here to Battery apply sample Display Meter battery... - Page 8 Turning your meter on CAUTION: If you see There are two ways to turn your meter on: any light areas within To perform a test, insert a test strip as far as it the black start-up screen, will go. The meter will briefly perform system there may be a problem checks, then the display will turn on.
- Page 9 SETTINGS When using the meter for the first time, or after changing the meter battery, you will automatically start in the screen. SETTINGS In other cases, from the MAIN MENU press to select To confirm SETTINGS. your selection, press...
- Page 10 To confirm your selection, press The display now shows the screen. DATE AND TIME NOTE: If you select the wrong language, press and hold for three seconds to turn the meter off. Then, turn the meter back on and re-start from step 1.
- Page 11 4. Set the date In the screen, DATE AND TIME press to change the year. To confirm your selection, press Press to change the month. To confirm your selection, press Press to change the day. To confirm your selection, press...
- Page 12 5. Set the time of day Press to set the hour. To confirm your selection, press Press to set the minutes. To confirm your selection, press Press to set AM or PM. To confirm your selection, press The display now shows the screen.
- Page 13 6. Confirm your settings OK will be highlighted near the bottom of the screen. If your settings are correct, press to confirm and save the settings and return to the MAIN MENU. WARNING: The unit of measure mg/dL must be displayed here.
-
Page 14: Starting The Test Process
Customer Service. • Sterile lancets with protective disks Failure to test could delay treatment decisions and lead NOTE: to a serious medical ® ™ • Use only OneTouch Select Test Strips with condition. your OneTouch ® Select ™ Meter. • Make sure your meter and test strips are about the same temperature before you test. - Page 15 1. Check the code on the test strip vial before inserting the test strip Code numbers are used to calibrate your meter with the test strips you are using. 2. Insert a test strip to turn on the meter Start with the meter off. If you have turned the meter on to change settings or review past results, turn it off.
- Page 16 3. Match the code on the meter with the code on the test strip vial If the code on the meter does not match the code on the test strip vial, press match the code number on the test strip vial. The new code number will flash on the display for three seconds, then briefly stop flashing, after which the display will advance to the...
- Page 17 NOTE: • If the APPLY SAMPLE screen appears before you are sure the codes match, remove the test strip, and re-start from step 1, see page 9. • If you change APPLY SAMPLE to APPLY CONTROL by mistake, press to change it back to APPLY SAMPLE.
-
Page 18: Getting A Blood Sample
• Never share a lancet or a lancing device with anyone. • Always use a new, sterile lancet—lancets are for single use only. • Keep your meter and lancing device clean. See pages 45–46. NOTE: If you do not have a OneTouch ® Lancing Device, please refer to the... - Page 19 Choosing the right sampling site at the right time ® ™ The OneTouch Select Meter allows you to sample blood from your fingertip, forearm or palm. Forearm and palm sampling is also referred to as “alternate site testing” (AST). At times, results obtained at the forearm or palm may be different from a fingertip measurement.
- Page 20 CAUTION: Do Not test on your forearm or palm when: • You think your blood glucose is rapidly falling, such as within two hours of exercise or a rapid-acting insulin injection or insulin pump bolus. Testing with a fingertip sample may identify hypoglycemia or an insulin reaction sooner than testing with a forearm or palm sample.
- Page 21 Choose a different puncture site each time you test. Repeated punctures in the same spot may cause soreness and calluses. If bruising occurs at an alternate site or you have difficulty getting a sample, consider sampling from a fingertip instead. You may want to review the choice of sites with your health care professional.
- Page 22 ® 2. Insert a sterile lancet into the OneTouch Lancing Device Insert the lancet into the holder and push in firmly. Twist the protective disk until it separates from the lancet and save the disk for later use. Do Not twist the lancet.
- Page 23 If it does not click, it may have been cocked when you inserted the lancet. 6. Puncture your finger Hold the OneTouch ® Lancing Device firmly against the side of your finger. Press the release button. Remove the OneTouch ® Lancing Device from your finger.
- Page 24 7. Get a round drop of blood Gently squeeze and/or massage your fingertip until a round drop of blood forms on your fingertip. If the blood smears or runs, Do Not use that sample. Wipe the area and gently squeeze another drop of blood or puncture a new site.
- Page 25 Forearm Palm sampling Choose a fleshy area on the palm below your thumb or pinky finger. Select a spot with no visible veins and away from deep lines which may cause your blood sample to smear. Palm...
- Page 26 Blue cap for fingertip sampling only 1. Remove the blue cap by snapping it off ® 2. Insert a sterile lancet into the OneTouch Lancing Device Insert the lancet into the holder and push in firmly. Twist the protective disk until it separates from the lancet and save the disk for later use.
- Page 27 Clear Cap on the OneTouch ® Lancing Device by snapping it on 4. Adjust the depth setting You may have to adjust the OneTouch ® Lancing Device to a deeper setting to get a large enough drop of blood from your forearm ®...
- Page 28 Forearm continuing to apply pressure. Keep holding the lancing device against your skin until a round drop of blood forms under the cap. 7. Remove the OneTouch ® Lancing Device Carefully lift the lancing device away from your skin. Do Not smear the blood sample.
- Page 29 NOTE: • You may need to wait a little longer to get a large enough drop of blood from the forearm or palm. Do Not squeeze the site excessively. • If the sample drop of blood runs or spreads due to contact with hair or with a line in your palm, Do Not use that sample.
-
Page 30: Applying Blood And Reading Results
Applying blood and reading results Once you have a blood sample and your meter shows the APPLY SAMPLE screen, you are ready to obtain a blood glucose result. If your meter does not show the screen, remove the unused test strip APPLY SAMPLE and re-start the test process. - Page 31 When applying a drop of blood from your forearm or palm, keep your palm or forearm steady and bring the top edge of the test strip to the drop of blood with your other hand. Forearm Palm 2. Apply the sample Line up the test strip with the blood drop so that the narrow channel on the edge of the test strip is almost touching the edge of the blood drop.
- Page 32 Gently touch the channel to the edge of the blood drop. Be careful not to push the test strip against your fingertip or the test strip may not fill completely. NOTE: • Do Not smear or scrape the drop of blood with the test strip. •...
- Page 33 3. Wait for the confirmation window to fill completely The blood drop will be drawn into the Confirmation narrow channel and the confirmation window Window should fill completely. When the confirmation window is full, this means you have applied enough blood. Now you can move the test strip away from the blood drop and wait for the meter to count down from 5 to 1.
- Page 34 WARNING: If mg/dL does not appear with the test result, call Customer Service. Use of the wrong unit of measure may cause you to misinterpret your blood glucose level, and may lead to incorrect treatment. CAUTION: If you test at the low end of the operating range (50°F) and your glucose is high (over 180 mg/dL), the reading on your meter may be lower than your actual glucose.
- Page 35 CAUTION: Dehydration and low glucose results You may get false low glucose results if you are severely dehydrated. If you think you are severely dehydrated, contact your health care professional immediately. CAUTION: Low glucose results If your test result is lower than 70 mg/dL or is shown as , it LOW GLUCOSE may mean hypoglycemia (low blood glucose).
- Page 36 CAUTION: Repeated unexpected glucose results • If you continue to get unexpected results, check your system with control solution. See Control solution testing, pages 38–43. • If you are experiencing symptoms that are not consistent with your blood glucose results and you have followed all instructions in this booklet, call your health care professional.
- Page 37 After getting a result Once you have read your result, you may: • Review your meter memory by pressing to go to MAIN MENU see page 32, or • Turn the meter off by removing the test strip. Removing the used lancet Remove the lancing device cap by snapping it off.
-
Page 38: Reviewing Past Results And Averages
Reviewing past results and averages If you have just completed a test, press get to the screen. If your meter is off, MAIN MENU press and hold to turn it on. From the MAIN screen you can choose: MENU • to view your most recent result, LAST RESULT •... - Page 39 All results The meter will display four results at a time, in the order the tests were done, starting with the most recent. For each test result, the meter will display the date and time of the test. Results may also contain the following symbols: HI if the result was above 600 mg/dL LO if the result was below 20 mg/dL...
- Page 40 To view more recent results, continue to press after the top result on the display is highlighted. To view older results, press after is highlighted. Pressing and MENU holding allows you to move more quickly through the results. To return to the main menu, highlight , then press MENU Averages...
- Page 41 To see averages for different parts of the day or over a different number ® of days, you can use OneTouch Diabetes Management Software and your home computer. See the next section, on page 36.
- Page 42 DMS puts information downloaded from the meter into charts and graphs. 1. Obtain the required software and cable ® For order information and to learn more about OneTouch Diabetes Management Software, visit www.OneTouchDiabetesSoftware.com. 2. Install the software on a computer Follow the installation instructions provided with OneTouch ®...
- Page 43 3. Get ready to transfer readings ® Make sure that the meter is turned off. Connect the OneTouch Interface Cable to the COM or USB port on your computer. Then connect the other end of the cable to the meter data port.
-
Page 44: Control Solution Testing
Control solution testing You may check your meter and test strips using either the OneTouch ® ™ ® ™ Select or OneTouch Select High Control Solutions. OneTouch ® Select ™ and OneTouch ® Select ™ High Control Solutions contain a known amount of glucose and are used to check that the meter and the test strips are working properly. - Page 45 NOTE: • Use only OneTouch ® Select ™ or OneTouch ® Select ™ High Control ® ™ Solution with your OneTouch Select Meter. • Control solution tests must be done at room temperature (68–77°F). Make sure your meter, test strips, and control solution are at room temperature before testing.
- Page 46 3. Match the code on the meter with the code on the test strip vial If the code on the meter does not match the code on the test strip vial, press match the code number on the test strip vial. The new code number will flash on the display for three seconds, then briefly stop flashing, after which the display will advance to the...
- Page 47 5. Prepare and apply control solution Shake the control solution vial before each test. Remove the cap and squeeze the vial to discard the first drop. Then wipe the tip with a clean tissue or cloth. Hold the vial upside down and gently squeeze out a hanging drop.
- Page 48 Each vial of test strips has both OneTouch ® Select ™ and OneTouch ® ™ Select High Control Solution ranges printed on its label. Compare the result displayed on the meter to either the OneTouch ® Select ™ on the test strip ® ™ OneTouch Select...
- Page 49 • expired or damaged test strip, • ® use of a test strip or control solution past OneTouch • 105–158 mg/dL Select ™ its discard date, or ® OneTouch 288–432 mg/dL Select ™ High a problem with the meter.
-
Page 50: Caring For Your System
Caring for your system ® ™ Your OneTouch Select Blood Glucose Monitoring System does not need any special maintenance. Storing your system Store your meter, test strips, control solution and other items in your carrying case after each use. Store each item in a cool, dry place below 86°F, but Do Not refrigerate. - Page 51 Checking for expiration or damage to test strips and control solution Test strips and control solution have expiration dates printed on their vials. When you first open a test strip or control solution vial, you must record the discard date (date opened plus three months) in the space provided on the label.
- Page 52 ® ™ Clear Cap To clean these items, wipe them with a soft cloth dampened with water and mild detergent. Do Not immerse the OneTouch ® Lancing Device in any liquid. To disinfect these items, prepare a solution of one part household bleach to ten parts water.
- Page 53 Battery ® ™ Your OneTouch Select Meter uses one 3.0 Volt CR 2032 lithium battery (or equiva- Meter lent). Replacement batteries can be found in battery most stores where batteries are sold. Your meter comes with the battery already installed.
- Page 54 Start with the meter off. Open the battery door and pull up on the battery ribbon. Meter battery WARNING: To avoid a possible shock, Do Not change the battery ® while the meter is connected to a computer with the OneTouch Interface Cable.
- Page 55 2. Insert the new battery With the “+” side facing up toward you, place the battery in the compartment within the fold of the ribbon. Push the battery until it snaps into the battery clasp. Insert the two battery door tabs into the matching holes on the meter, and push down until you hear the door click into place.
-
Page 56: Understanding Error And Other Messages
Understanding error and other messages ® ™ The OneTouch Select Meter displays messages when there are problems with the test strip, with the meter, or when your blood glucose levels are higher than 600 mg/dL or lower than 20 mg/dL. Messages do not appear in all cases when a problem has occurred. - Page 57 Message What it means What to do Re-check your glucose level. You may have a very high blood glucose If the result is HIGH GLUCOSE level (severe again, obtain and follow hyperglycemia), over instructions from your health 600 mg/dL. care professional without delay. Test again with control solution Your control solution and a new test strip.
- Page 58 Message What it means What to do Your control solution Test again with control solution test result is above and a new test strip. If the result 600 mg/dL. again, Do Not HIGH GLUCOSE use the meter. Contact Customer Service. Wait a few minutes and insert Meter is too hot a new test strip.
- Page 59 Message What it means What to do Meter is too cold Wait a few minutes and insert a new test strip. If you do not (below 50°F) to work get another correctly. TEMPERATURE ERROR message, the meter is now within the operating range. Do Not use the meter.
- Page 60 Message What it means What to do The sample was Repeat the test with a new test applied before the strip. Apply a blood or control meter was ready. solution sample only after APPLY SAMPLE APPLY CONTROL appears on the display. If this message continues to appear, contact Customer Service.
- Page 61 Message What it means What to do If you tested in a normal or warm There may be a environment, repeat the test problem with the test with a new test strip; see pages strip. For example, it 24–27. If the error message may have been appears again, contact Customer damaged or moved...
- Page 62 Message What it means What to do The meter has detected Repeat the test with a new test a problem with the test strip. Refer to information on strip. Possible causes blood application (see pages are test strip damage or 24–27) or control solution testing an incompletely filled (see pages 38–43).
- Page 63 Message What it means What to do Meter battery is low Once the LOW BATTERY/REPLACE but still has enough message is BATTERY SOON power to perform displayed, this icon will continue a test. to appear on screens until you replace the battery. When the battery icon first appears, there is enough power for a minimum of 100 more tests.
- Page 64 Message What it means What to do No result in memory, You can still perform a blood such as the first time glucose test and get an accurate use of the meter or result. Contact Customer Service after a download of all to report this occurrence if this data to a computer.
-
Page 65: Detailed Information About Your System
This helps you and your health care professional to compare your meter results with laboratory tests. If you have been using another type of meter—one that provides whole blood-calibrated results—you may ® ™ notice that your test results with the OneTouch Select Meter are approximately 12% higher. OneTouch ®... - Page 66 Your hematocrit (percentage of your blood that is red blood cells) • is high (above 55%) or low (below 30%). You are severely dehydrated. • You tested at a temperature near the low end of the operating • range (50°F ) and you get a high glucose result (i.e., greater than 180 mg/dL).
- Page 67 Technical specifications Reported result range 20–600 mg/dL Calibration Plasma-equivalent Sample Fresh capillary whole blood Test time 5 seconds Assay method Glucose oxidase biosensor Meter power source One replaceable 3.0 Volt CR 2032 lithium battery (or equivalent) Unit of measure mg/dL 350 blood glucose or control solution test results Memory Automatic shutoff...
- Page 68 Direct current Guarantee ® ™ LifeScan guarantees that the OneTouch Select Meter will be free of defects in material and workmanship for three years, valid from the date of purchase. The guarantee extends only to the original purchaser and is not transferable.
- Page 69 Electrical and safety standards This meter complies with CISPR 11: 2003, Class B (Radiated Only). Emissions of the energy used are low and not likely to cause interference in nearby electronic equipment. The meter has been tested for immunity to Level 3 electrostatic discharge as specified in IEC 61000-4-2.
-
Page 70: Index
............® Cable, OneTouch Interface 36, 37... - Page 71 Settings ........Software, OneTouch ®...
- Page 72 U.S. patents: 6,413,410, 6,733,655. Purchase of this device does not act to grant a use license under these patents. Such a license is granted only when the device is used with OneTouch ® Select ™...
- Page 75 ¡Bienvenido a la familia OneTouch ® El objetivo de OneTouch ® es crear un mundo sin límites para las personas con diabetes. ® ™ El medidor OneTouch Select permite obtener nuevos resultados y revisar resultados anteriores de manera sencilla. Este manual del propietario le explicará...
- Page 76 Contenido Configuración del sistema Pág. 1 Inicio del proceso de prueba Pág. 8 Obtención de una muestra de sangre Pág. 12 Aplicación de la sangre y lectura de los resultados Pág. 24 Revisión de resultados anteriores y promedios Pág. 32 Prueba con solución de control Pág.
- Page 77 Antes de comenzar Antes de utilizar este producto para determinar su nivel de glucosa en sangre, lea detenidamente este manual y los prospectos incluidos con las tiras reactivas OneTouch ® ™ ® ™ ® ™ Select y las soluciones de control OneTouch...
- Page 78 El sistema de control de glucosa en sangre OneTouch ® Select ™ Su nuevo kit del sistema OneTouch ® Select ™ incluye: a Medidor OneTouch ® Select ™ (incluye batería) b Dispositivo de punción OneTouch ® Si se incluye algún otro tipo de dispositivo de punción, consulte las instrucciones que se...
-
Page 79: Configuración Del Sistema
Configuración del sistema Información acerca de las tiras reactivas y del medidor de glucosa en sangre OneTouch ® Select ™ Vista delantera Vista trasera Tira reactiva con la puerta de la batería abierta Puerto de análisis Inserte aquí la tira reactiva... - Page 80 Encendido del medidor PRECAUCIÓN: Si ve Existen dos formas de encender el medidor: algunas áreas claras dentro Para realizar una prueba, inserte una tira reactiva de la pantalla inicial negra, hasta que no avance más. El medidor realizará es posible que haya un algunas verificaciones breves del sistema y luego problema con el medidor.
- Page 81 Configuración del idioma, la fecha y la hora del medidor Puede modificar muchas de las configuraciones que ya venían definidas en su medidor. Antes de utilizarlo por primera vez o si cambia la batería del medidor, debe revisar estas configuraciones y actualizarlas. Asegúrese de seguir los pasos del 1 al 6 para guardar las configuraciones deseadas.
- Page 82 El idioma, la fecha, la hora y la unidad de medida predefinidos aparecerán en la pantalla. Si son correctos, presione para regresar al MENÚ PRINCIPAL. Si el idioma, la fecha o la hora no son correctos, seleccione CAMBIAR y presione A continuación, se visualizará...
- Page 83 4. Ajuste la fecha. En la pantalla FECHA Y HORA , presione para cambiar el año. Para confirmar su selección, presione Presione para cambiar el mes. Para confirmar su selección, presione Presione para cambiar el día. Para confirmar su selección, presione...
- Page 84 5. Ajuste la hora del día. Presione para ajustar la hora. Para confirmar su selección, presione Presione para ajustar los minutos. Para confirmar su selección, presione Presione para elegir AM o PM. Para confirmar su selección, presione Ahora se visualizará la pantalla CONFIGURACIÓN. NOTA: Los formatos de fecha y hora han sido predefinidos.
- Page 85 6. Confirme sus configuraciones. ACEPTAR aparecerá resaltado en la parte inferior de la pantalla. Si sus configuraciones son correctas, presione para confirmarlas y guardarlas y regresar al MENÚ PRINCIPAL. ADVERTENCIA: La unidad de medida mg/dL se debe visualizar aquí. Si su pantalla muestra mmol/L en vez de mg/dL, comuníquese con Servicio al cliente.
-
Page 86: Inicio Del Proceso De Prueba
Servicio al cliente. Si • Lancetas estériles con discos protectores no se realiza la prueba, NOTA: podría demorarse el ® • Utilice solamente tiras reactivas OneTouch inicio del tratamiento Select ™ con su medidor OneTouch ® Select ™... - Page 87 1. Revise el código del frasco de tiras reactivas antes de insertar la tira. Se utilizan números de código para calibrar el medidor con las tiras reactivas que está empleando. 2. Inserte una tira reactiva para encender el medidor. Comience con el medidor apagado. Si encendió el medidor para cambiar las configuraciones o revisar resultados anteriores, apáguelo .
- Page 88 3. Haga coincidir el código del medidor con el código del frasco de tiras reactivas. Si no coinciden, presione para hacer coincidir los códigos del medidor y del frasco de tiras reactivas. El nuevo número de código se iluminará de forma intermitente en la pantalla durante tres segundos.
- Page 89 NOTA: • Si aparece la pantalla APLIQUE LA MUESTRA antes de que se haya asegurado de que coincidan los códigos, retire la tira reactiva y vuelva a empezar desde el paso 1; consulte la página 9. • Si cambia APLIQUE LA MUESTRA a APLIQUE CONTROL por error, presione para volver a APLIQUE LA MUESTRA.
-
Page 90: Obtención De Una Muestra De Sangre
• Siempre utilice una lanceta nueva y estéril. Las lancetas son exclusivamente para un solo uso. • Conserve limpios el medidor y el dispositivo de punción. Consulte las páginas 45 y 46. ® NOTA: Si no posee un dispositivo de punción OneTouch , consulte las instrucciones que acompañan al dispositivo que usted tiene. - Page 91 Cómo elegir el lugar adecuado para extraer una muestra en el momento indicado El medidor OneTouch ® Select ™ le permite extraer muestras de sangre de la punta del dedo, del antebrazo o de la palma de la mano. A las muestras extraídas del antebrazo y de la palma de la mano también se las denomina “pruebas en sitios...
- Page 92 PRECAUCIÓN: No se realice la prueba en el antebrazo o en la palma de la mano en los siguientes casos: • Cuando considere que su nivel de glucosa está bajando rápidamente, como sucede dentro de las dos horas de realizar algún ejercicio físico o de haberse administrado una inyección de insulina de rápida acción o un bolo con una bomba de insulina.
- Page 93 Elija un lugar diferente cada vez que realice una prueba. Los pinchazos repetidos en el mismo lugar pueden producir dolor o inflamación y callosidades. Si apareciera un hematoma en un lugar alternativo o si tiene dificultad para obtener la muestra, considere la posibilidad de extraer la muestra de la punta del dedo.
- Page 94 ® 2. Inserte una lanceta estéril en el dispositivo de punción OneTouch Inserte la lanceta en el sujetador y empújela hacia adentro con firmeza. Haga girar el disco protector hasta que se separe de la lanceta y guarde el disco para su uso posterior.
- Page 95 5. Arme el dispositivo de punción OneTouch ® Deslice el control de carga hacia atrás hasta que oiga un clic.
- Page 96 7. Extraiga una gota de sangre. Apriete suavemente o masajee la punta del dedo hasta que se forme en ella una gota redonda de sangre. Si la sangre se corre o se extiende, no utilice esa muestra. Limpie el área y extraiga suavemente otra gota de sangre o haga una punción en un lugar distinto.
- Page 97 Cómo utilizar el dispositivo de punción y extraer muestras de un lugar alternativo La extracción de muestras de sangre de la palma de la mano o del antebrazo le permite utilizar con menos frecuencia la punta de los dedos. Es posible que note que al obtener una muestra de un lugar alternativo siente menos dolor que al utilizar la punta del dedo.
- Page 98 La tapa transparente OneTouch ® ™ sólo se utiliza para obtener muestras del antebrazo o de la palma de la mano. Reemplace la tapa azul por la tapa transparente Tapa azul solamente para extracción de OneTouch ® ™ muestras de la punta de los dedos 1.
- Page 99 ® de la mano. Gire la tapa transparente OneTouch ™ hacia los números más altos para aumentar la profundidad. ®...
- Page 100 ® 7. Quite el dispositivo de punción OneTouch Palma de la mano Levántelo con cuidado alejándolo de la piel. No extienda la muestra de sangre.
- Page 101 NOTA: • Posiblemente necesite esperar un poco más para obtener una gota de sangre lo suficientemente grande del antebrazo o de la palma de la mano. No apriete excesivamente el área. • Si la gota de sangre se corre o se extiende debido al contacto con vello o una línea de la palma de la mano, no utilice esa muestra.
-
Page 102: Aplicación De La Sangre Y Lectura De Los Resultados
Aplicación de la sangre y lectura de los resultados Una vez que tenga una muestra de sangre y que el medidor muestre la pantalla APLIQUE LA MUESTRA, estará en condiciones de obtener un resultado del nivel de glucosa en sangre. Si el medidor no muestra la pantalla APLIQUE LA MUESTRA, retire la tira reactiva que no utilizó... - Page 103 Cuando aplique una gota de sangre del antebrazo o de la palma de la mano, mantenga firme la palma de la mano o el antebrazo y con la otra mano acerque el borde superior de la tira reactiva a la gota de sangre. Antebrazo Palma de la mano 2.
- Page 104 Toque suavemente el borde de la gota de sangre con el canal. Asegúrese de no empujar la tira reactiva contra la punta del dedo ya que, de lo contrario, es posible que no se llene por completo. NOTA: • No extienda ni raspe la gota de sangre con la tira reactiva. •...
- Page 105 3. Espere a que la ventana de confirmación se llene completamente. La gota de sangre se absorberá hacia el canal Ventana de angosto y la ventana de confirmación se llenará confirmación completamente. Cuando la ventana de confirmación esté llena, significa que ha aplicado la cantidad de sangre suficiente.
- Page 106 ADVERTENCIA: Si no aparece mg/dL con el resultado de la prueba, comuníquese con Servicio al cliente. Si usa la unidad de medida incorrecta, puede interpretar mal el nivel de glucosa en sangre y, en consecuencia, el tratamiento puede ser incorrecto. PRECAUCIÓN: Si usted realiza la prueba a una temperatura cercana al extremo inferior del rango de funcionamiento (50°F) y su glucosa está...
- Page 107 PRECAUCIÓN: Deshidratación y resultados de nivel bajo de glucosa Es posible que obtenga falsos resultados de nivel bajo de glucosa si se encuentra seriamente deshidratado. Si cree que está seriamente deshidratado, comuníquese con el profesional médico que lo atiende. PRECAUCIÓN: Resultados de glucosa baja Si el resultado de su prueba es inferior a 70 mg/dL o aparece como GLUCOSA BAJA , posiblemente se trate de hipoglucemia (bajo nivel de glucosa en sangre).
- Page 108 PRECAUCIÓN: Resultados de glucosa inesperados repetidos Si continúa obteniendo resultados inesperados, verifique el sistema con • la solución de control. Consulte Prueba con solución de control, en las páginas 38 a 43. Si experimenta síntomas que no condicen con los resultados de la prueba •...
- Page 109 Después de obtener un resultado Una vez que haya leído su resultado, puede: • Revisar la memoria del medidor presionando para trasladarse al MENÚ PRINCIPAL; consulte la página 32, o • Retirar la tira para apagar el medidor. Cómo retirar la lanceta utilizada Quite la tapa del dispositivo de punción tirando de ella hacia afuera.
-
Page 110: Revisión De Resultados Anteriores Y Promedios
Revisión de resultados anteriores y promedios Si acaba de realizar una prueba, presione para acceder a la pantalla MENÚ PRINCIPAL. Si el medidor está apagado, mantenga presionado para encenderlo. Desde la pantalla MENÚ PRINCIPAL puede escoger: • ÚLTIMO RESULTADO para ver su resultado más reciente, •... - Page 111 Todos los resultados El medidor mostrará cuatro resultados a la vez, en el orden en que se realizaron las pruebas, comenzando con el resultado más reciente. Para cada resultado, el medidor mostrará la fecha y la hora en que se realizó la prueba. Los resultados también pueden tener los siguientes símbolos: HI si el resultado fue superior a 600 mg/dL LO si el resultado fue inferior a 20 mg/dL...
- Page 112 Para ver resultados más recientes, continúe presionando después de que se resalte el primer resultado en la pantalla. Para ver resultados anteriores, presione después de que se resalte MENÚ. Si mantiene presionada la flecha , podrá desplazarse más rápidamente por los resultados. Para volver al menú...
- Page 113 7, 14 y 30 días que finalizan en la configuración de fecha actual. Para ver promedios de diferentes horas del día o por una cantidad diferente ® de días, puede utilizar el programa de control de la diabetes OneTouch y su computadora personal. Consulte la siguiente sección, en la página 36.
- Page 114 ® el programa de control de la diabetes OneTouch , visite el sitio www.OneTouchDiabetesSoftware.com. 2. Instale el programa en una computadora. Siga las instrucciones de instalación suministradas con DMS OneTouch ® ® el cable de interfaz OneTouch ADVERTENCIA: Para evitar una posible descarga eléctrica, no inserte una tira reactiva mientras el medidor esté...
- Page 115 3. Prepárese para transferir las lecturas. ® Asegúrese de tener apagado el medidor. Conecte el cable de interfaz OneTouch puerto COM o USB de su computadora. A continuación, conecte el otro extremo del cable al puerto de datos del medidor.
-
Page 116: Prueba Con Solución De Control
™ Alto. ® ™ ® ™ Las soluciones de control OneTouch Select y OneTouch Select Alto contienen una cantidad conocida de glucosa y se utilizan para verificar que el medidor y las tiras reactivas funcionen correctamente. Recuerde cuál es el tipo de solución de control que utiliza. - Page 117 NOTA: ® ™ ® • Utilice únicamente la solución de control OneTouch Select o OneTouch Select ™ Alto con su medidor OneTouch ® Select ™ • Las pruebas con solución de control se deben realizar a temperatura ambiente (68 a 77°F). Asegúrese de que el medidor, las tiras reactivas y la solución de control estén a temperatura ambiente antes de la prueba.
- Page 118 3. Haga coincidir el código del medidor con el código del frasco de tiras reactivas. Si no coinciden, presione para hacer coincidir los códigos del medidor y del frasco de tiras reactivas. El nuevo número de código se iluminará de forma intermitente en la pantalla durante tres segundos.
- Page 119 5. Prepare y aplique la solución de control. Agite el frasco de solución de control antes de cada prueba. Retire la tapa y apriete el frasco para desechar la primera gota. Luego, limpie la punta con un trapo o un pañuelo de papel limpio. Sostenga el frasco hacia abajo y apriete con cuidado para extraer una gota que cuelgue.
- Page 120 VENTANA DE CONFIRMACIÓN 7. Compruebe si el resultado está dentro del rango. Cada frasco de tiras reactivas tiene impreso en su etiqueta los rangos de las soluciones de control OneTouch ® Select ™...
- Page 121 38 a 42, • la solución de control está vencida o contaminada, ® OneTouch • la tira reactiva está vencida o dañada, 105–158 mg/dL Select ™ • se usó una tira reactiva o solución de control ® OneTouch 288–432 mg/dL Select ™...
-
Page 122: Cuidado Del Sistema
Cuidado del sistema El sistema de control de glucosa en sangre OneTouch ® Select ™ no necesita ningún mantenimiento especial. Cómo guardar su sistema Guarde el medidor, las tiras reactivas, la solución de control y demás elementos en su estuche después de cada uso. Guarde todos los elementos en un lugar fresco y seco, a una temperatura por debajo de los 86°F, pero no... - Page 123 Cómo comprobar si las tiras reactivas y la solución de control están vencidas o dañadas Las tiras reactivas y la solución de control tienen fechas de vencimiento impresas en sus frascos. Cuando abre por primera vez un frasco de tiras reactivas o de solución de control, debe registrar la fecha de descarte (fecha en la cual se abrió...
- Page 124 ® ™ Para limpiar estos elementos, utilice un paño suave humedecido en agua y un ® detergente suave. No sumerja el dispositivo de punción OneTouch en ningún líquido. Para desinfectar estos elementos, prepare una solución que contenga una parte de blanqueador de uso doméstico y diez partes de agua. Limpie el dispositivo de punción OneTouch...
- Page 125 Batería ® ™ El medidor OneTouch Select utiliza una batería de litio CR 2032 de 3 voltios (o su equivalente). Batería Puede adquirir baterías de repuesto en la mayoría de las tiendas que venden baterías. El medidor medidor viene con la batería ya instalada.
- Page 126 Batería del medidor ADVERTENCIA: Para evitar una posible descarga eléctrica, no cambie la batería mientras el medidor esté conectado a una computadora con el cable de interfaz OneTouch ®...
- Page 127 2. Inserte la nueva batería. Con el lado “+” cara arriba hacia usted, coloque la batería en el compartimiento dentro del pliegue de la cinta. Empuje la batería hasta que quede apretada en el gancho. Introduzca ambas lengüetas de la puerta del compartimiento de la batería en las ranuras correspondientes del medidor y empuje hacia abajo hasta oír un clic, que indica que la puerta se ha fijado en su lugar.
-
Page 128: Mensajes De Error Y Otros Mensajes
Mensajes de error y otros mensajes ® ™ El medidor OneTouch Select muestra mensajes cuando existen problemas con la tira reactiva, con el medidor o cuando sus niveles de glucosa en sangre son superiores a 600 mg/dL o inferiores a 20 mg/dL. No en todos los casos aparecen mensajes cuando se presenta un problema. - Page 129 Mensaje Qué significa Qué hacer Realice una nueva prueba de su Es posible que tenga un nivel de glucosa en nivel de glucosa. Si el resultado es sangre muy alto otra vez GLUCOSA ALTA , consulte (hiperglucemia grave), y siga las instrucciones del superior a 600 mg/dL.
- Page 130 Mensaje Qué significa Qué hacer El resultado de su prueba Repita la prueba con la solución de con solución de control control y una nueva tira reactiva. Si es superior a 600 mg/dL. el resultado es nuevamente GLUCOSA ALTA, no use el medidor. Comuníquese con Servicio al cliente.
- Page 131 Mensaje Qué significa Qué hacer Espere unos minutos e inserte una El medidor está tira reactiva nueva. Si no obtiene demasiado frío (menos otro mensaje ERROR de 50°F) para que TEMPERATURA, significa que el funcione correctamente. medidor se encuentra ahora dentro del rango de funcionamiento aceptado.
- Page 132 Mensaje Qué significa Qué hacer Repita la prueba con una tira La muestra se aplicó reactiva nueva. Aplique una antes de que estuviera muestra de sangre o de solución de listo el medidor. control únicamente después de que aparezca APLIQUE LA MUESTRA o APLIQUE CONTROL en la pantalla.
- Page 133 Mensaje Qué significa Qué hacer Si realizó la prueba en un ambiente Es posible que haya un normal o cálido, repita la prueba con problema con la tira una nueva tira reactiva; consulte las reactiva. Por ejemplo, páginas 24 a 27. Si aparece de nuevo podría estar dañada o el mensaje de error, comuníquese con haberse movido durante...
- Page 134 Mensaje Qué significa Qué hacer Repita la prueba con una tira reactiva El medidor ha detectado nueva. Consulte la información sobre un problema con la tira la aplicación de sangre (consulte las reactiva. Las posibles páginas 24 a 27) o sobre las pruebas causas son que la tira con solución de control (consulte las reactiva está...
- Page 135 Mensaje Qué significa Qué hacer Una vez que aparece el mensaje La batería del medidor BATERÍA BAJA/SUSTITUYA PRONTO está baja, pero queda LA BATERÍA, este icono seguirá carga suficiente para apareciendo en todas las pantallas realizar una prueba. hasta que cambie la batería. Cuando aparece el icono de batería por primera vez, significa que queda suficiente energía para realizar como...
- Page 136 Mensaje Qué significa Qué hacer Todavía puede realizar una prueba No hay ningún resultado de glucosa en sangre y obtener un en memoria, tal como resultado preciso. Comuníquese con cuando se utilizó por Servicio al cliente para informar primera vez el medidor o sobre este problema si no es: después de descargar 1.
-
Page 137: Información Detallada Acerca Del Sistema
OneTouch ® Select ™ son aproximadamente un 12% más altos. Tanto los resultados de las pruebas realizadas con el medidor OneTouch ® Select ™ como los resultados de laboratorio se expresan en unidades equivalentes a plasma. Sin embargo, el resultado que usted obtenga en su medidor podría ser diferente del resultado del laboratorio debido a una variación normal. - Page 138 • Su hematocrito (porcentaje de la sangre que corresponde a glóbulos rojos) es alto (más del 55%) o bajo (menos del 30%). • Está seriamente deshidratado. • Hizo la prueba a un temperatura cercana al extremo inferior del rango de funcionamiento (50°F ) y obtiene un resultado de glucosa alta (es decir, superior a 180 mg/dL).
- Page 139 Especificaciones técnicas Rango de resultados 20–600 mg/dL informados Calibración Equivalente a plasma Muestra Sangre entera capilar de reciente extracción Tiempo de la prueba 5 segundos Método de ensayo Biosensor de glucosa oxidasa Fuente de alimentación Una batería de litio CR 2032 reemplazable de del medidor 3 voltios (o equivalente) Unidad de medida...
- Page 140 Corriente continua Garantía ® ™ LifeScan garantiza que el medidor OneTouch Select estará libre de defectos en sus materiales y fabricación por tres años; esta garantía es válida a partir de la fecha de compra. La garantía se extiende únicamente al comprador original y no es...
- Page 141 Normas eléctricas y de seguridad Este medidor cumple con la norma CISPR 11: 2003, Clase B (solamente radiado). Las emisiones de energía utilizadas son bajas y es poco probable que causen interferencias en los equipos electrónicos cercanos. El medidor se ha sometido a pruebas para determinar su inmunidad con respecto a descargas electrostáticas de nivel 3, según se especifica en la norma IEC 61000-4-2.
-
Page 142: Índice
. 13, 14, 23 ® Cable, interfaz OneTouch ....36, 37 Fecha de descarte, solución de control ..45 Calibración con plasma . - Page 143 Unidad de medida....7, 28, 61 ® OneTouch ......36 Uso recomendado .
- Page 144 Estados Unidos: 6,413,410, 6,733,655. La compra de este dispositivo no otorga una licencia de uso conforme a estas patentes. Dicha licencia se otorga únicamente cuando el dispositivo se utiliza con las tiras reactivas OneTouch ® Select ™...
- Page 148 Call Customer Service toll-free, 24 hours a day, 7 days a week English 1 800 227-8862 Español 1 800 381-7226 Visit us at www.LifeScan.com Llame al número gratuito de Servicio al cliente, las 24 horas del día, los 7 días de la semana Inglés 1 800 227-8862 Español 1 800 381-7226 O bien,...
Need help?
Do you have a question about the Select and is the answer not in the manual?
Questions and answers