
Related Manuals for Steinberg CI 1


Summary of Contents for Steinberg CI 1
- Page 1 Quick Start Guide With CI1, everyone can enjoy recording sounds and creating music easily!
- Page 2 The CI series is made up of three outstanding USB-powered audio interfaces, delivering a complete system solution for creating and recording music. Together with the included Steinberg software each unit in its own right covers a broad range of applications, be it in the studio, rehearsal room or on the go.
-
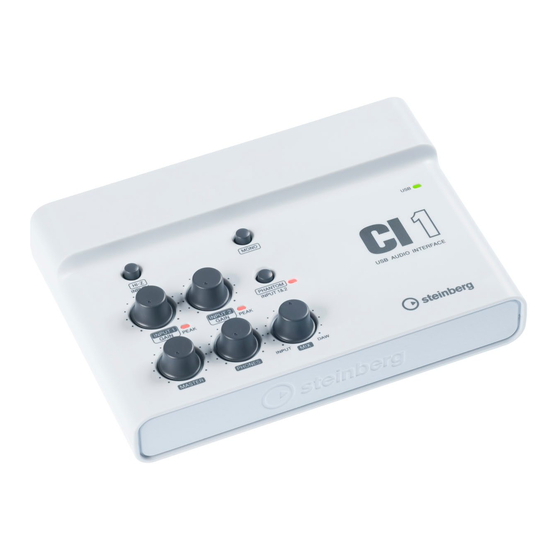
Page 3: Transport Control
AI Knob. The features that are essential to tasks such as as Cubase 5 and is included with Steinberg be used to record and edit audio. Sequel LE AI Knob... - Page 4 Chapter My computer is at the center of my musical life So, what's an "Audio Interface"? When I want to listen to my favorite music while I’m on the move, I copy music from my audio When I asked my friend this question he replied, "it's a device that is used to record and play back CDs to my computer, and then transfer this data to my portable music player.
- Page 5 USB cable. "You're kidding me! It's really that cheap?" I asked. "I recommend that you buy the CI1 audio interface. It was made by Steinberg, a world-famous Let's check the I/O jacks manufacturer that is located in Germany and has been producing music creation software and hardware for more than 25 years.
- Page 6 Chapter Controller • MONO button, for switching between stereo and mono signals By default, the CI1 handles stereo signals. When you want to record • GAIN, for adjusting the input sensitivity when mono signals from sources such as guitars or vocals, press this MONO recording external sound button.
- Page 7 The following software is included with the CI1. I heard that Steinberg is a German company; this doesn't mean that the installation language is German, does it? You don’t need to worry about this at all. Insert the included DVD, "STEINBERG SOFTWARE PACKAGE FOR CI1 DVD-ROM" into WaveLab LE 7 your computer's DVD drive.
- Page 8 Start “Sequel LE 2”, click the "Program Settings Page" icon in the lower left of the screen and then "Audio Connection". Then select "Yamaha Steinberg USB ASIO". A dialog box will appear Let's try to capture the music on an analog record! By the way, the output signal generated by a with the message "Do you want to switch the ASIO driver?"...
- Page 9 Chapter Starting WaveLab LE 7 Checking the volume level of the recording After you connect the record player to the CI1, double-click the Next, click the Record button to display the "Recording" dialog box. Begin playing a record on the "WaveLab LE 7"...
- Page 10 Chapter Edit the recording On the "Edit" menu, click "Remove". This is all you have to do to delete the part that you don't - step 1: Delete unnecessary parts need. When the recording is complete, the recorded sound is displayed as a waveform. The waveform is displayed in two parts of the screen.
- Page 11 Chapter Edit the recording Let’s compare waveforms before and after gain normalization. The difference is very clear. If you - step 2: Adjust the overall volume level play back these waveforms, you’ll also be able to notice the difference in their volume levels. What’s more, WaveLab LE 7 automatically makes adjustments so that the sound does not You used the CI1 GAIN controls to carefully set the volume level, but if you look at the waveform, become distorted even when the volume is increased.
- Page 12 Right now, we want to listen to the demo song right away, so click "Cancel". We recommend that you register the product later, because this will enable you to receive e-mail newsletters that have information about Steinberg products, and other services such as upgrade and support.
- Page 13 Chapter Click the Play button in the upper right of the This audio data is called a loop. Loops contain parts made by professional musicians. Because screen to begin playing the song. It sounds loops already contain amazing parts, anyone can easily make great-sounding music just by really good, doesn't it? arranging loops.
- Page 14 Chapter At this point, we'd like to focus your attention on the Drag "Rush" to the position labeled as "1". "1" is the first measure. This means that it is the start key at the top of the screen. Currently, it is not set of the song.
- Page 15 Chapter Chapter Record an electric guitar • Use the "Duplicate" feature to repeat these parts OK. Now we have our three parts: drums, bass, and electric piano, but, at the moment they only last for four measures. That's hardly enough to call this a song. To make the parts longer, let's use Sequel LE doesn't just let you create loop accompaniments;...
- Page 16 "Okay, I'm ready to go! But wait. Just what should I play?" you may be thinking. At the moment, Click "Stereo In", and then select "Steinberg CI1 - the song's key is "A". And, we've selected minor keys for the bass and electric piano loops. So, 1"...
- Page 17 The "Vox-Male Dance Lead" track is created, so let's configure its input device settings as well. For the guitar, we set this to "Steinberg CI1 - 1", but the microphone is connected to 2/R, so select "Steinberg CI1 - 2".
- Page 18 Chapter • Adjusting the left and right balance Let's try to adjust each of the tracks People who have been to live band performances before probably know this, but a band is typically arranged in a certain configuration: the drums Turn the metronome off, and then give the song a listen.
- Page 19 Chapter Chapter Next, click the "Track Inspector Page" icon. Click "Track Effects" to display the screen that is used It's finally time to save the song to a .wav file and create to adjust the effect parameters. the CD! But before we do... Alright, we have a song that we copied from a record and a song that we created and recorded.
- Page 20 Chapter • Using Sequel LE to master the songs and save them to files When you are ready, click "Save". On the "Output Effects" page, increase the "Maximizer" effect's "Optimise" parameter. If you set this parameter to a value close to 100%, the volume and sound pressure will increase, but the sound will also take on a rough feeling.
- Page 21 www.steinberg.net...
Need help?
Do you have a question about the CI 1 and is the answer not in the manual?
Questions and answers