
Related Manuals for Kenwood KDC-W534U


Summary of Contents for Kenwood KDC-W534U
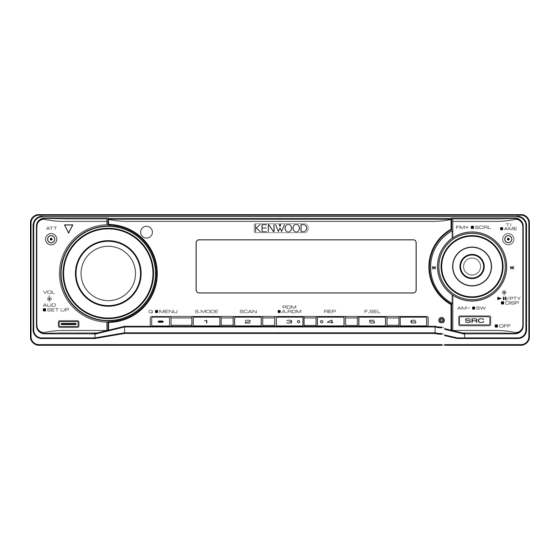
- Page 1 CD-RECEIVER KDC-W6534U KDC-W5534U KDC-W534U INSTRUCTION MANUAL © B64-3346-00/00 (EW/E2W)
-
Page 2: Table Of Contents
Contents Safety precautions Notes About CDs About USB device About AAC, MP3 and WMA General features Power Selecting the Source Volume Attenuator System Q Audio Control Audio Setup Speaker Setting Subwoofer Output Switching Display Theft Deterrent Faceplate TEL Mute Tuner features Tuning Station Preset Memory Auto Memory Entry... -
Page 3: Safety Precautions
Kenwood disc changers/ CD players released in 1998 or later can be connected to this unit. Refer to the catalog or consult your Kenwood dealer for connectable models of disc changers/ CD players. Note that any Kenwood disc changers/ CD players released in 1997 or earlier and disc changers made by other makers cannot be connected to this unit. -
Page 4: Notes
• If you experience problems during installation, consult your Kenwood dealer. • When you purchase optional accessories, check with your Kenwood dealer to make sure that they work with your model and in your area. • If the unit fails to operate properly, press the Reset button. -
Page 5: About Dab Tuner Control
About DAB Tuner control Refer to A group on the Instruction manual of DAB Tuner KTC-9090DAB (optional accessory) for the control method of DAB Tuner function. However, the following control methods of the function for this unit may be differed from the Instruction manual;... -
Page 6: About Cds
About CDs Handling CDs • Do not touch the recording surface of the CD. • CD-R and CD-RW are easier to damage than a normal music CD. Use a CD-R or a CD-RW after reading the caution items on the package etc. •... -
Page 7: About Usb Device
• USB devices whose maximum current consumption is 500 mA or less. For the supported formats and USB device types, refer to http://www.kenwood.mediamanager.jp/. • USB Mass Storage Class: USB devices that the PC can recognize as an external storage without using any special driver or application software. -
Page 8: About Aac, Mp3 And Wma
• The unit may not be compatible with upgrade of compression format standard and additional specifications. • For details on the formats used for USB devices and restrictions, refer to http://www.kenwood. mediamanager.jp/. Playable AAC file • ".m4a" file encoded by AAC-LC format. - Page 9 Playing order of the Audio file • The Audio file plays in the order which is written by CD writing software. You may be able to set the playing order by writing the play sequence numbers such as "01" to "99" at the beginning of the file name.
-
Page 10: General Features
General features Release button Power Turning ON the Power Press the [SRC] button. • When the power is ON, the <Security Code> (page 28) is displayed as "CODE ON" or "CODE OFF". Turning OFF the Power Press the [SRC] button for at least 1 second. Selecting the Source Press the [SRC] button. -
Page 11: Attenuator
Attenuator Turning the volume down quickly. Press the [ATT] button. Each time you press the button, the Attenuator turns ON and OFF. When the Attenuator is ON, the "ATT" indicator blinks. System Q Selecting the best sound setting preset for different types of music. -
Page 12: Audio Setup
General features Audio Setup Setting the Sound system, such as Cross over Network. Select the source to adjust Press the [SRC] button. Enter Audio Setup mode Press the [VOL] knob for at least 1 second. Select the Audio Setup item to adjust Press the [VOL] knob. -
Page 13: Changing The Information Displayed
Switching Display Changing the information displayed. Enter Switching Display mode Press the Control knob for at least 1 second. "DISP SEL" is displayed. Select the Display item Push the Control knob towards [4] or [¢]. In Tuner source Information Display Program Service name or Frequency "FREQ/PS"... -
Page 14: Theft Deterrent Faceplate
General features Theft Deterrent Faceplate The faceplate of the unit can be detached and taken with you, helping to deter theft. Removing the Faceplate Press the Release button. Drop open the faceplate. Drawing the faceplate to left side pull it to forward and remove it. -
Page 15: Tuner Features
Tuner features Band display ST indicator Tuning Selecting the station. Select tuner source Press the [SRC] button. Select the "TUNER" display. Select the band Push the Control knob towards [FM] or [AM]. Each time you push the knob toward [FM], it switches between the FM1, FM2, and FM3 bands. -
Page 16: Auto Memory Entry
Tuner features Auto Memory Entry Putting stations with good reception in the memory automatically. Select the band for Auto Memory Entry Push the Control knob towards [FM] or [AM]. Open Auto Memory Entry Press the [AME] button for at least 2 seconds. "A-MEMORY"... -
Page 17: Rds Features
RDS features RDS indicator Traffic Information Changing to traffic information automatically when a traffic bulletin starts even when you are not listening to the radio. Press the [TI] button. Each time you press the button, the Traffic information function turns ON and OFF. When traffic information is ON, "TI"... -
Page 18: Pty (Program Type)
RDS features PTY (Program Type) Selecting the Program Type and searching for a station. Enter PTY mode Press the Control knob. During PTY mode the "PTY" indicator is ON. • This function cannot be used during a traffic bulletin or AM reception. Select the Program Type Push the Control knob towards [FM] or [AM]. -
Page 19: Changing Language For Pty Function
Changing Language for PTY Function Selecting the Program Type display language. Enter PTY mode Refer to <PTY (Program Type)> (page 18). Enter Changing Language mode Press the [TI] button. Select the language Push the Control knob towards [FM] or [AM]. Each time you push the knob, the language alternates between the languages shown in the table below. -
Page 20: 2
CD/USB device/Audio file/External disc control features Release button Track number IN indicator Playing CD & Audio file When there is no disc inserted Drop open the faceplate Press the Release button. Insert a disc. Push the faceplate on the left side, and return it to its former position. -
Page 21: Playing Usb Device
Playing USB device Playing USB device Select a source other than the USB device Press the [SRC] button. Connect the USB device. Select USB source Press the [SRC] button. Select the "USB" display. • For the types of available USB devices and how to connect USB devices, refer to <About USB device>... -
Page 22: Fast Forwarding And Reversing
CD/USB device/Audio file/External disc control features Fast Forwarding and Reversing Fast Forwarding Hold down toward [¢] with the Control knob. Release to resume the playback. Reversing Hold down toward [4] with the Control knob. Release to resume the playback. • There is no sound while the Audio file is being searched. -
Page 23: Random Play
Random Play Play all the songs on the disc or Audio file folder in random order. Press the [RDM] button. Each time you press the button, Random Play turns ON or OFF. When the Random mode is ON, "DISC RDM"/ "FOLD RDM"/"RDM ON"... -
Page 24: File Select Mode
CD/USB device/Audio file/External disc control features Function of Audio file File Select mode You can select an audio file in the folder currently being played by file name. Enter File Select mode Press the [F.SEL] button. Select the "FILE SEL" display. Refer to <Select mode>... -
Page 25: Folder Select 2 Mode
Function of Audio file Folder Select 2 mode Select the target folder within the folders containing audio files. The folder which contains playable audio files is only displayed. Enter Folder Select 2 mode Press the [F.SEL] button. Select the "FLD SEL2" display. Refer to <Select mode>... -
Page 26: Letter Seek
CD/USB device/Audio file/External disc control features Function of the KDC-W6534U Function of ACDrive media Letter Seek You can search for the song, you want to play, by selecting the initial of Genre name, Artist name, or Album name. Enter the Letter Seek mode Press the [S.MODE] button for at least 1 second. -
Page 27: Menu System
Menu system NEWS indicator Menu System Setting beep sound during operation, etc. functions. The Menu system basic operation method is explained here. The reference for the Menu items and their setting content is after this operation explanation. Enter Menu mode Press the [MENU] button for at least 1 second. -
Page 28: Security Code
Menu system Function of the KDC-W6534U/KDC-W5534U In Standby mode Security Code Activating the Security Code disables the usage of audio unit by someone else. Once the Security Code is activated, the entry of authorized Security Code is required to turn on the audio unit when it is removed from the vehicle. -
Page 29: Manual Clock Adjustment
In Standby mode Manual Clock Adjustment • You can do this adjustment when the <Synchronize Clock> (page 29) is set as OFF. Select Clock Adjustment mode Push the Control knob towards [FM] or [AM]. Select the "CLK ADJ" display. Enter Clock Adjust mode Press the Control knob for at least 1 second. -
Page 30: Dimmer
Menu system In Standby mode Dimmer Dimming this unit’s display automatically when the vehicle light switch is turned ON. Display Setting "DIM ON" The display dims. "DIM OFF" The display doesn’t dim. Function of the KDC-W6534U In Standby mode Switching preout Alternating the preout between the rear and subwoofer. -
Page 31: Amp Control
Function of the KDC-W6534U When LX AMP unit connecting AMP Control You can control the LX AMP connected to the unit. Select AMP Control mode Push the Control knob towards [FM] or [AM]. Select the "AMP CTRL" display. Enter AMP Control mode Press the Control knob for at least 1 second. -
Page 32: Af (Alternative Frequency)
Menu system AF (Alternative Frequency) When the reception is poor, automatically alternate to another frequency broadcasting the same program in the same RDS network with better reception. Display Setting "AF ON" The AF function is ON. "AF OFF" The AF function is OFF. When the AF function is ON, the "RDS"... -
Page 33: Auxiliary Input Display Setting
Function of the KDC-W6534U/KDC-W5534U Auxiliary Input Display Setting Selecting the display when alternating to Auxiliary input source. Select Auxiliary input source Press the [SRC] button. Select the "AUX"/"AUX EXT" display. Enter Menu mode Press the [MENU] button for at least 1 second. "MENU"... -
Page 34: Cd Read Setting
Menu system In Standby mode CD Read Setting When there is a problem with playing a CD with special format, this setting plays the CD by force. Display Setting "CD READ1" Play CD and Audio file. "CD READ2" Play CD by force. •... -
Page 35: Audio Preset Recall
• When you press the Reset, all the sources will be the setting value which is registered. • The following items cannot be registered. Volume, Balance, Fader, Loudness, Volume offset Function of the KDC-W6534U Other than Standby mode Audio Preset Recall Recalling the sound setup registered by <Audio Preset Memory>... -
Page 36: Accessories/ Installation Procedure
Therefore, the speaker wire should be checked. • If your car is not prepared for this special connection- system, consult your Kenwood dealer..2 • Only use antenna conversion adapters (ISO-JASO) when the antenna cord has an ISO plug. -
Page 37: Connecting Wires To Terminals
Rear left output (White)/Sub Woofer left output (White) Rear right output (Red)/Sub Woofer right output (Red) Fuse (10A) To Kenwood disc changer/ External optional accessory Wiring harness (Accessory1) TEL mute wire (Brown) If no connections are made, do not let the wire come out from the tab. - Page 38 Steering remote control Steering remote control (Light Blue/Yellow) REMO. CONT Rear left output (White)/ Rear right output (Red) Fuse (10A) To Kenwood disc changer/ External optional accessory (KDC-W5534U only) Wiring harness (Accessory1) TEL mute wire (Brown) If no connections are made, do not let the wire come out from the tab.
- Page 39 Connecting Wires to Terminals Connector Function Guide Pin Numbers for Cable Colour ISO Connectors External Power Connector Yellow Blue/White Orange/White Black Speaker Connector Purple Purple/Black Gray Gray/Black White White/Black Green Green/Black 2WARNING Functions Connecting the ISO Connector The pin arrangement for the ISO connectors depends on the type of vehicle you drive.
-
Page 40: Installation
Installation Installation Metal mounting strap (commercially available) Firewall or metal support Bend the tabs of the mounting sleeve with a screwdriver or similar utensil and attach it in place. Self-tapping screw (commercially available) Screw (M4X8) (commercially available) • Make sure that the unit is installed securely in place. If the unit is unstable, it may malfunction (for example, the sound may skip). -
Page 41: Removing The Unit
Removing the Unit Removing the hard rubber frame Engage the catch pins on the removal tool and remove the two locks on the upper level. Upper the frame and pull it forward as shown in the figure. Accessory2 Removal tool When the upper level is removed, remove the lower two locations. -
Page 42: Troubleshooting Guide
Troubleshooting Guide What might seem to be a malfunction in your unit may just be the result of slight misoperation or miswiring. Before calling service, first check the following table for possible problems. General The power does not turn ON. ✔... -
Page 43: Disc Source
Tuner source Radio reception is poor. ✔ The car antenna is not extended. ☞ Pull the antenna out all the way. ✔ The antenna control wire is not connected. ☞ Connect the wire correctly, referring to the section on <Connecting Wires to Terminals> (page 37, 38). -
Page 44: Troubleshooting Guide
• The file system of the connected USB device is broken. ➪ Copy the files and folders for the USB device again referring to www. kenwood.mediamanager.jp. If the error message is still displayed, initialize the USB device or use other USB devices. E-05: The CD is upside-down. -
Page 45: Specifications
: AAC-LC ".m4a" files Audio section Maximum output power : 50 W x 4 (KDC-W6534U/W5534U) : 45 W x 4 (KDC-W534U) Output power (DIN 45324, +B=14.4V) : 30 W x 4 (KDC-W6534U/W5534U) : 28 W x 4 (KDC-W534U) Speaker impedance : 4 - 8 Ω...
Need help?
Do you have a question about the KDC-W534U and is the answer not in the manual?
Questions and answers