Table of Contents
Advertisement
Quick Links
Advertisement
Table of Contents

Related Manuals for La Crosse WT521IT


Summary of Contents for La Crosse WT521IT
- Page 1 WT521IT 915 MHz Projection Alarm Clock Instruction Manual...
- Page 2 « Instant Transmission+» is the up and coming state-of-the-art new wireless transmission technology, exclusively designed and developed by LA CROSSE TECHNOLOGY. “IT +” offers you an immediate update of all your outdoor data measured from...
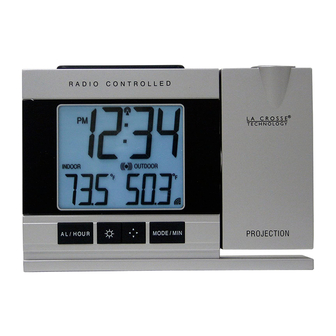
- Page 3 PROJECTION ALARM CLOCK Battery Display compartment Function keys Stand Adaptor socket FEATURES Manual setting option 12/24 hours time display (hour, minutes, seconds) Time projection (hour and minute) Projection with adjustable brightness and projection orientation possible Calendar display Alarm setting with snooze function Time zone setting ±12hours Temperature display in ºC or ºF Indoor and outdoor temperature display...
-
Page 4: Temperature Transmitter
E.L. back-light Wireless transmission at 915 MHz Signal reception intervals at 4 seconds Low battery indicator TEMPERATURE TRANSMITTER: Remote transmission of outdoor temperature to weather station by 915 MHz signal Wall mounting case Mount in a sheltered place. Avoid direct rain and sunshine... - Page 5 TO INSTALL AND REPLACE BATTERIES IN THE TEMPERATURE TRANSMITTER The Temperature Transmitter uses 2 x AA, IEC, LR6, 1.5V batteries. To install and replace the batteries, please follow the steps below: Remove the cover. Insert the batteries, observing the correct polarity (see marking). Replace the battery cover on the unit.
- Page 6 Replace compartment cover. In addition or instead of inserting batteries, the AC adaptor can be used: Connect the power adaptor to a wall socket Insert the adaptor into the jack at the bottom of the clock Important! Use only the adaptor provided with the projection clock and make sure that your household voltage is appropriate to the working voltage...
- Page 7 SETTING UP The Projection clock can be battery operated or powered by the provided AC/DC adaptor. First, insert 2 x AA, IEC LR6, 1.5V batteries into the transmitter. Within 1 minute of activating the remote transmitter, insert 2 x AA, IEC LR6, 1.5V batteries into the projection clock (or use the A/C adaptor to power up).
-
Page 8: Battery Change
reception problems may occur. If the temperature is not being received, then see "915MHZ RECEPTION", before resetting the units. In the event of changing batteries to the transmitter, the projection clock needs to be reset. (See RESETTING THE PROJECTION CLOCK) Press the SET key to manually enter a time initially. - Page 9 PROJECTION OF TIME / OUTDOOR TEMPERATURE Note: The projection is a red light, not harmful under normal usage, yet care should be taken to avoid looking directly into the light. When plugged into an AC outlet, the projection alarm can continuously project the time and the outdoor temperature When operating on batteries alone, the projection alarm will only project when the SNOOZE button is pressed or the alarm is sounding.
- Page 10 If the Projection clock is battery operated, the projection will be ON at the highest brightness level only when the SNOOZE key is pressed. The intensity of the brightness level of the projection cannot be changed. If the SNOOZE is released, the projection will be turned OFF. TOGGLE BETWEEN THE DISPLAY OF TEMPERATURES, SECONDS, PRESET ALARM TIME AND CALENDAR With a short press of the MODE/MIN key, you will toggle between the following displays:...
-
Page 11: Function Keys
FUNCTION KEYS There are 4 function keys located on the front of the projection alarm and one on the top. The function keys are: AL/HOUR, MODE/MIN, Projection Direction, Brightness, and SNOOZE. SNOOZE MODE/ MIN AL / HOUR Brightness key SNOOZE key: Projection Direction key Activate snooze function Activate the projection brightness at the highest level when battery operated or... -
Page 12: Mode/Min Key
Set the hours, day or month (depending on 12/24 hour time format) E.L.Back-light-On MODE/MIN key: Enter time zone, manual time, year, day, month, 12/24 hour time display, ºC / ºF temperature format, DST ON/OFF setting modes Set the minutes, year, day or month (depending on 12/24 hour time format), 12/24 hour time format, ºC / ºF temperature format, DST ON/OFF Toggle between temperatures, seconds, alarm time, and date display Stop alarm and snooze function... -
Page 13: Manual Settings
MANUAL SETTINGS: The following manual settings can be changed when pressing the MODE/MIN key for: Time zone setting Manual time setting Calendar setting 12/24-Hour setting °C/°F setting DST ON/OFF (daylight saving time) TIME ZONE SETTING The time zone default of the Projection clock is “-5h”. To set a different time zone: Flashing Press and hold the MODE/MIN key for about 3 seconds. -
Page 14: Manual Time Setting
MANUAL TIME SETTING The time can be manually set. The clock works as a normal Quartz clock. Hour flashing Minutes flashing The hour and the minute digits will start flashing. Use the AL/HOUR key to set the hour; MODE/MIN key to set the minute. Confirm with the SNOOZE key and enter the Calendar setting. - Page 15 Flashing Flashing Flashing The year starts flashing. Use the MODE/MIN key to set the year (between year 2001 to 2029 Press the SNOOZE key to confirm and to enter the month and day setting. The month and day digits will start flashing. Use the AL/HOUR key to set the day (or month) and MODE/MIN key to set the month (or day).
- Page 16 12/24 HOUR TIME DISPLAY SETTING Flashing “12h” or “24h” flashes in the LCD. Press the MODE/MIN key to select the “12h” or “24h” display mode. Confirm with the SNOOZE key and enter the °C/°F temperature setting. °C/°F TEMPERATURE SETTING: The default temperature reading is set to °F (degree Fahrenheit). To select °C (degree Celsius): Flashing The “°F”...
- Page 17 Use the MODE/MIN key to toggle between “°C” and “°F”. Confirm with the SNOOZE key and enter the DST ON/OFF setting. DST ON/OFF SETTING (DAYLIGHT SAVING TIME): Note: This facility is not available in Australia and New Zealand. ALARM SETTING THE ALARM Alarm-ON icon Flashing Press and hold “AL/HOUR”...
-
Page 18: Activating / Deactivating The Alarm
ACTIVATING / DEACTIVATING THE ALARM After entering the alarm setting mode, the alarm is activated. To toggle between activating and deactivating the alarm, press the “AL/HOUR” button briefly. Alarm-on icon, “(((•)))” will be displayed next to the time display when the alarm is activated. -
Page 19: 915Mhz Reception
TEMPERATURE TRANSMITTER The outdoor temperature is measured and transmitted every 4 seconds. The range of the Temperature transmitter may be affected by the temperature. At cold temperatures the transmitting distance may be decreased. Please bear this in mind when placing the transmitter. 915MHz RECEPTION If the outdoor temperature data is not being received within three minutes after setting up (or outdoor display always show “- -. - Page 20 force a false reset. Should this happen accidentally then reset all units (see “Setting up” above) otherwise transmission problems may occur. The transmission range is around 100 metres (330 feet) from the Temperature transmitter to the projection alarm clock (in open space). However, this depends on the surrounding environment and interference levels.
- Page 21 To wall mount: 1. Secure the bracket onto a desired wall using the screws and plastic anchors. 2. Clip the transmitter onto the bracket. Note: Before permanently fixing the transmitter wall base, place all units in the desired locations to check that the outdoor temperature readings are receivable.
-
Page 22: Care And Maintenance
CARE AND MAINTENANCE: Extreme temperatures, vibration and shock should be avoided as these may cause damage to the unit and give inaccurate forecasts and readings. Precautions shall be taken when handling the batteries. Injuries, burns, or property damage may be resulted if the batteries are in contact with conducting materials, heat, corrosive materials or explosives. -
Page 23: Specifications
SPECIFICATIONS: Temperature measuring range: Indoor : 14.2ºF to 99.9ºF with 0.2ºF resolution -9.9ºC to +37.7ºC with 0.1°C resolution (“OF.L” displayed if outside this range) Outdoor : -39.8ºF to +139.8ºF with 0.2ºF resolution -39.9ºC to 59.9ºC with 0.1°C resolution (“OF.L” displayed if outside this range) Indoor temperature checking intervals : every 15 seconds Outdoor Temperature reception... -
Page 24: Liability Disclaimer
LIABILITY DISCLAIMER: Please ensure that all discarded packaging and unwanted electrical items are discarded in a correct and responsible manner. All recyclable material should be deposited at relevant recyclable waste collection points. As stated on the gift box and labelled on the product, reading the “User manual” is highly recommended for the benefit of the user. - Page 25 Distributed by: Sontax Australia Phone: 1800 653 238 Email: sales@sontax.com.au Website: www.sontax.com.au...
Need help?
Do you have a question about the WT521IT and is the answer not in the manual?
Questions and answers