Advertisement
Quick Links
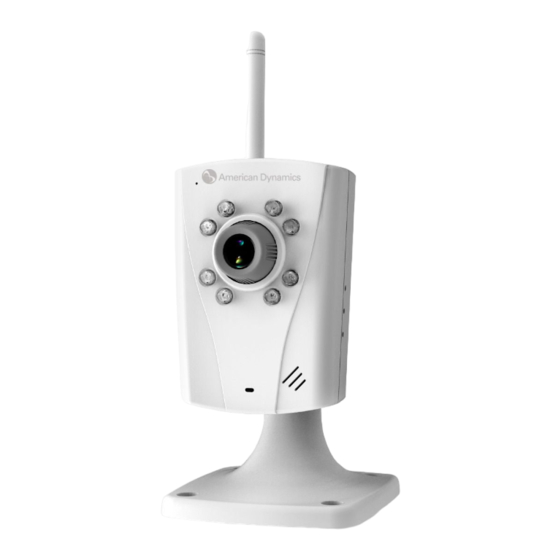
Illustra Flex Series
1MP Wireless Cube
**
ADCi600F-W012
/ ADCi600F-W012n
1.
Product Overview
Unit: mm
F
1-1: P
A
IGURE
HYSICAL DIMENSION
F
1-2: P
B & P
I
*
IGURE
HYSICAL DIMENSION
ICTORIAL
NDEX
*Refer to table 1-1 for definitions
T
1-1: P
I
D
ABLE
ICTORIAL
NDEX
EFINITION
Index #
Name
Description
1
WIFI antenna
Sending/receiving radio signals from computers
or other WIFI facilities for wireless
communication
2
MIC
Audio IN
3
Infrared LED*
Illumination for night vision
4
Lens
Fixed lens
5
Speaker
Audio OUT (Optional)
Resetting the unit to factory default (press and
6
Default Button
hold for 5 seconds)
This button also has WPS function. Please
press and hold this button around 2 sec then
WPS will be connecting.
7
Reset Button
Rebooting the system.
8
RJ-45
Wired network connection socket
Ethernet
Connector
9
Power
Inlet for the power adaptor (DC 5V±10%, 1.5A)
Terminal
10
Unit stand
The unit's body support
11
LED Indicator
Red Light
Wired Network Ready With
On
Networking
Red Light
Wired Network Ready Without
Blinks
Networking
Wireless Network Ready With
Blue Light
On
Networking and AP connection
When ad hoc of WIFI mode is
enabled and networking, the
blue light will turn on.
WPS ready and connection
Blue Light
Wireless Network Ready Without
Blinks
Networking and AP connection
Blue Light
WPS ready without networking
Blinks rapid
8200-1027-02 B0 © 2014 Tyco Security Products. All rights reserved
* D/N mode setting is auto. Cube network camera with IR ON will
automatically switch to B/W mode when the illumination is under a
certain threshold.
Once wired networking is unavailable, please press
Note
and hold the default Button for 5 seconds to restore
the unit to factory default settings so you may reach
the unit at its default IP address for good. Please use
Illustra Connect to find the IP address again.
If you want to use wireless network, you can press and
hold Default (WPS) button a few seconds to connect
the network. The LED status will turn blue after WPS
successful connection. Otherwise, the blue light will
always blink rapid. When WPS can't success
connection, please repeat the operation.
2.
Installation and Connection
2.1
Unpack Everything
Check everything in the packing box matches to the order form and
the packing slip. In addition to this manual, items below are included
in the packing box.
One unit of Megapixel Wireless Cube Day/Night Network
Camera
One set of WIFI antenna & unit stand
Four TP4×15mm tapping screws
Four screw anchors
One CD containing the Illustra Connect, user manual and quick
installation guide
One mounting template
**
One power adaptor
(ADCi600F-W012)
One printed quick installation guide
Please contact your dealer if any item missing.
2.2
Installation
Following tools might help you complete the installation:
a drill
screwdrivers
wire cutters
2.2.1
Checking Appearance
When first unboxing, please check whether if there is any visible
damage to appearance of the unit and its accessories. The
protective materials used for the packaging should be able to protect
the unit from most of accidents during transportation.
Please remove the protective part of the unit when every item is
checked in accordance with the list in 2.1 Unpacking Everything.
2.2.2
Connecting the wires
1.
Connect the DC 5V power adaptor to camera.
2.
Connect the network cable to the RJ-45 terminal of a switch.
2.2.3
Mounting
The WIFI antenna and the unit stand are the necessity to mount a
complete unit.
1
1. WIFI antenna
2. Camera's body
3. Unit stand
2
3
F
IGURE
2-1: A
CCESSORY
A
SSEMBLY
E
XPLODED
V
IEW
This unit has two ways to mount. You can attach the stand to one of
holes at either end, one is at the back of the unit; the other, bottom,
of the unit as the following figures.
Unit: mm
F
2-2: A
A
S
V
IGURE
CCESSORY
SSEMBLY
IDE
IEW
After the unit assembled, mount the unit to the ceiling or wall by
steps below.
1. Attach the mounting template to the ceiling or wall.
2. Drill four holes, and then insert the screw anchors into the holes.
3. Secure the bottom case of the unit to the ceiling or wall with the
TP4×15mm tapping screws.
Depending on the material of your mounting surface, you
Note
may require different screws and anchors than those
supplied.
1. Screw anchors(×4)
tapping
2. TP4×15
screws(×4)
F
IGURE
2-3: M
OUNTING
D
IAGRAM
2.3
Connection
2.3.1
System Requirements
Below table lists the minimum requirement to implement and operate
A100WIRF unit. No hardware/software component underestimated
is recommended.
T
2-1: S
R
ABLE
YSTEM
EQUIREMENTS
System Hardware
CPU
Intel Pentium 4 2.4GHz or equivalent
RAM
1 GB
Display
NVIDIA GeForce 6 Series or ATI Mobility
Radeon 9500 (DirectX 9 compatible)
System Software
Operating System
Microsoft Windows XP, Windows Vista, or
Windows 7
Browser
Microsoft Internet Explorer 8 or above
Unit
Power Supply
DC 5V
Networking
Wired
10/100BASE-T Ethernet (RJ-45 connector)
Wireless*
Wi-Fi wireless networking (based on IEEE
802.11n specification); IEEE 802.11 b/g/n
compatible
*Effective wireless connection speed varies from environments and
distances between access points.
All the installation and operations should comply with
Note
your local electricity safety rules.
2.3.2
Connecting from a computer
The camera can deliver video images and audio in real time using
the Internet and Intranet. It's equipped with Ethernet RJ-45 network
interface.
There are two kinds of connection methods for your selection. One is
wired connection and the other one is wireless connection.
Way 1: Wired connection
F
2-4: W
IGURE
IRED CONNECTING FROM A COMPUTER
The status LED of camera will turn red when obtaining
Note
an IP address and the network connection is
processing.
Way 2: Wireless connection
Press and hold the WPS button on your Camera for 2 seconds.
The LED should blink blue light rapid.
Within one minute, press the WPS button on your router.
The status LED of camera will turn blue when obtaining
Note
an IP address and the network connection is processing.
F
2-5: W
IGURE
IRELESS CONNECTING FROM A COMPUTER
2.3.3
Default IP address
Since this is a network-based unit, the unit's default IP address was
assigned by Router in DHCP server mode. Please enabled a DHCP
server in your network, the unit would obtain an IP address
automatically from the DHCP server so that you don't need to
change the camera's IP address.
2.3.4
Internet options setting from PC
Please open network connection status and then click Properties.
F
2-6:I
1/3
IGURE
NTERNET OPTIONS
Advertisement

Related Manuals for American Dynamics Illustra Flex Series ADCi600F-W012**


Summary of Contents for American Dynamics Illustra Flex Series ADCi600F-W012**
-
Page 1: Product Overview
* D/N mode setting is auto. Cube network camera with IR ON will This unit has two ways to mount. You can attach the stand to one of 2.3.2 Connecting from a computer automatically switch to B/W mode when the illumination is under a holes at either end, one is at the back of the unit;... - Page 2 【Automatic prompting for ActiveX controls】 Enable In the window, please enter the default user name: admin and 2.3.7 Viewing Preparation Enable IPv4 in Internet options. Images of the unit can be viewed through Microsoft Internet Explorer set password/password (confirm) to login window. ...
Need help?
Do you have a question about the Illustra Flex Series ADCi600F-W012** and is the answer not in the manual?
Questions and answers