Table of Contents
Advertisement
Advertisement
Table of Contents

Related Manuals for Progression Fitness iFold7


Summary of Contents for Progression Fitness iFold7
- Page 1 WNER’ S ANUAL iFold7...
-
Page 2: Table Of Contents
TABLE OF CONTENTS SAFETY PRECAUTIONS ------------------------------------------------------- BEFORE BEGINNING ------------------------------------------------------- FEATURES ------------------------------------------------------- EXERCISE GUIDELINES ------------------------------------------------------- WARM-UP & COOL-DOWN ------------------------------------------------------- ASSEMBLY PART LIST ------------------------------------------------------- -------------------------------------------------------- HARDWARE PACK ASSEMBLY STEPS ------------------------------------------------------- 12-15 FOLDING & MOVING INSTRUCTIONS ------------------------------------------------------- 16-17 MAINTENANCE ------------------------------------------------------- 18-19 COMPUTER INSTRUCTION ------------------------------------------------------- GENERAL OPERATION -------------------------------------------------------... -
Page 3: Safety Precautions
§ SAFETY PRECAUTIONS Thank you for purchasing the Progression iFold7. Even though we made great efforts to ensure the quality of each product, occasional errors, and/or omissions do occur. In any event should you find this product to be defective or missing a part please contact the Flaman Fitness location you purchased it from. - Page 4 Ø Please make sure enough space is available around the item for set-up and use. Please make sure that levers or other adjusting mechanisms do not interfere with the moving area during exercise. Ø Ø Turn the switch off and unplug the power cord when the treadmill is out of use. Ø...
-
Page 5: Before Beginning
3. Whenever moving or setting up the treadmill, the deck must be in the upright position with the deck safety lock securely engaged. 4. To place the iFold7 in operating position, release the deck safety lock then lower the deck with the end caps until it rests completely on the ground. - Page 6 IMPORTANT TREADMILL WARNINGS AND CAUTIONS In order to reduce the risk of fire, electric shock, burns or injury, please read and understand the following precautions before operating. DANGER: To reduce the risk of electric shock, always unplug this appliance from the electrical outlet immediately after use and before cleaning. WARNING: To reduce the risk of burns, fire, electric shock or injury to persons, an appliance should NEVER be left unattended when plugged in.
-
Page 7: Features
§ FEATURES - 5 -... -
Page 8: Exercise Guidelines
§ EXERCISE GUIDELINES Check with your physician before beginning any type of exercise program. People who have diabetes or high blood pressure, a family history of heart disease, high cholesterol or have led a sedentary lifestyle should get a medical check-up and a stress test before working out. Medical research has shown us that there is an amount of exercise which is enough to condition the cardio respiratory system and the muscles of the body. - Page 9 EXERCISE IN YOUR TARGET HEART RATE ZONE BEGINNER TREADMILL PROGRAM Exertion level Duration Exertion level Duration WEEK 1 Easy 6~12minutes WEEK 5 Moderate 22~28minutes Slightly higher or WEEK 2 Easy 10~16minutes WEEK 6 20 minutes slightly lower 3 minutes at moderate WEEK 3 Moderate 14~20minutes...
-
Page 10: Warm-Up & Cool-Down
§ WARM-UP & COOL-DOWN A successful exercise program consists of a warm up, aerobic exercise and a cool down. Warming up is an important part of your workout and should start off every session. It prepares your body for more strenuous exercise by heating up and stretching out your muscles. At the end of your workout, repeat these exercises to reduce sore muscles. - Page 11 QUADRICEPS STRETCH With one hand against a wall for balance, reach behind you and pull your right foot up. Bring your heel as close to your buttocks as possible. Hold for 15 counts and repeat with left foot up. INNER THIGH STRETCH Sit with the soles of your feel together with your knees pointing outward.
-
Page 12: Assembly Part List
§ ASSEMBLY PART LIST... -
Page 13: Hardware Pack
§ HARDWARE PACK... -
Page 14: Assembly Steps
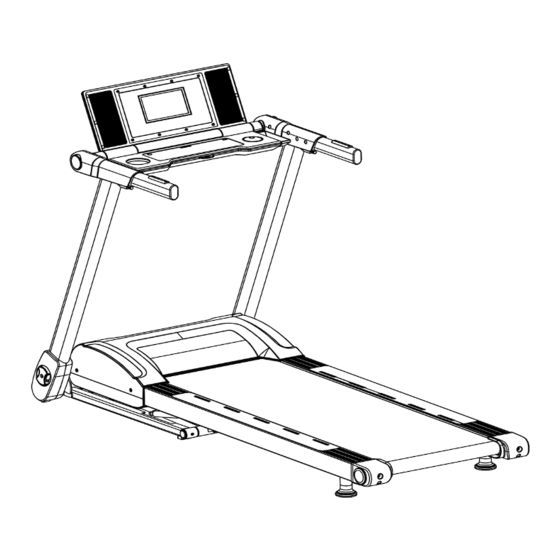
§ ASSEMBLY STEPS STEP 1 :Remove the treadmill from the box and place on a level ground. Pull out the left and right column mast knob respectively. According to the direction of the arrow, rotate the knob to unlock position. Pull out column mast knob Rotate column mast knob... - Page 15 STEP 2 Hold the A and B handlebars and raise them until they lock. Important: You will hear a “click” sound when it is : locked. Release your hands when column mast has been locked and rotate the column mast knob at the bottom to stabilize.
- Page 16 STEP 3 : Rotate the console downward by bringing handlebars A and B towards the back of the treadmill. (See diagram below). Once in the proper position use the handlebar lock device to stabilize the console. Console lock device...
- Page 17 Step 4. The final step is to revolve the anti-overturn knob to stabilize.
-
Page 18: Folding & Moving Instructions
§ MOVING & FOLDING INSTRUCTION MOVING: A: To move to another spot and store upright or use in new location: Fold the running deck up by grabbing the end of the running deck and lifting up. Make sure the pedal is locked. Hold the handlebars, then you can move the treadmill. B: To fold the treadmill down for storage: 1. - Page 19 4. Revolve the column as the direction of arrow 5.Folding the treadmill Once the treadmill is folded as above, grasp the end of the running deck, lift it and let so the front wheel is still on the ground and rolled to desired location.
-
Page 20: Maintenance
§ BELT ADJUSTMENT All running belts are properly set at the factory. It may stretch or be off-center after use. Stretching is normal during the break-in period. The iFold7 is equipped with auto-rectify so you should not have to adjust the running belt as it should adjust the running belt according to running belt position. If you notice any rubbing, noises or burning smells please call for maintenance. - Page 21 HOW TO CHECK RUNNING BELT FOR PROPER LUBRICATION Lift one side of the tread belt and feel the top surface of the running board If the surface is slick to the touch, then no further lubrication is required If the surface is dry to the touch, apply one packet of lubricant or 30 -40ml of lubricant. HOW TO APPLY LUBRICANT If you need to lubricate the running belt by yourself, start the treadmill and then press and hold the ”START”...
-
Page 22: Computer Instruction
§ COMPUTER INSTRUCTION... -
Page 23: General Operation
§ GENERAL OPERATION Display type: LCD Display Feedback as follow: § [TIME]:Displays exercise time or target time, display range:0:00—99:59; § [SPEED]:Displays exercise speed, display range:1—18.0 Km/h; § [INCLINE]: Displays exercise incline, display range:0%—15%; § [DISTANCE]:Displays exercised distance or target distance, display range:0.0—99.9Km; §... - Page 24 2. MANUAL MODE Insert the safety key to the safety key position on the console, press “MODE” to enter into manual mode’s normal mode in the stop condition. There are three kinds of function on the manual mode: time mode, distance mode, calories mode, see as follow: :...
- Page 25 PROGRAM MODE Press the program button or program shortcut to select between 8 programs, P1~P8, Each program is set at 30 minutes as a default time. To change turn the knob to increase or decrease the time. Press[START] to start treadmill, program will start automatically, the time will start to countdown. [SPEED] shortcut or speed knob can change the speed during your workout.
- Page 26 Preset program 5 (aim program) level speed incline Preset program 6(aim program) level speed incline Preset program 7( fat blast program 100 carlories) level speed incline 3012345654346545642 Preset program 8 (fat blast program 200 carlories ) level speed incline...
- Page 27 3. CUSTOMER PROGRAM a. When treadmill is stopped, press [USER PROG] to enter user program, set speed and incline first and then adjust the time. b. There is 1 user program, it divides into 16 sections. Set the first sections speed and incline then advance to set the next sections. c.
-
Page 28: Troubleshooting
TROUBLESHOOTING 1. Control Unit error messages and solving methods a. Display:E01 § E01:Console is sending command to controller, and controller feedback information to console is obstructed § Solving method:Check if the console is connected to the control unit or if the 4-wire connector is loose or damaged. b. -
Page 29: Exploded Drawing
§ EXPLODED DRAWING... -
Page 32: Parts List
§ PARTS LIST ITEM ITEM LCD window right handlebar inner cover ST3X8 cross recess head self-taping screw right stowage box upper display front cover right stowage box lower ST3X12 cross recess head self-taping screw display cover fix seat prevent grind pad table frame hifi net left stowage box upper... - Page 33 ITEM ITEM base frame M10X105 hexagonal pan head bolt running deck cushion pad Φ10 washer roller cover decoration M10 nut running deck buffer seat M10X45 inner hexagonal pan head bolt J12.7X38.1 tube cover lifting motor running deck washer low controller rubber cushion pad power cover taut spring bearer plate...
- Page 34 ITEM QTY No ITEM lifting wheels plastic screw lifting frame base frame wheels M10X40 inner hexagonal pan head bolt rotating cover of console mast washer ground frame lifting connecting sleeve high ground cushion connecting frame ST4.8X15 cross recess head self-taping screw M10X25 inner hexagonal pan head bolt Φ32 tube cover pneumatic cylinder...
-
Page 35: Circuit Diagram
§ CIRCUIT DIAGRAM... - Page 36 12 months from the date of purchase. All other obligations or liabilities, including liability for consequential damages are hereby excluded. All of the parts for the Progression iFold7 Treadmill can be ordered from: Flaman Fitness, 120 Robin Cres, Saskatoon, Saskatchewan, S7L 6M7. When ordering parts, the parts will be sent and billed at the current prices.
- Page 37 Toll F ree 1 -‐866-‐978-‐1999 www.progressionfitness.ca www.flamanfitness.com ...
Need help?
Do you have a question about the iFold7 and is the answer not in the manual?
Questions and answers