Table of Contents

Related Manuals for LG VC5404PF


Summary of Contents for LG VC5404PF
-
Page 1: Vacuum Cleaner
Internal Use Only Website http://biz.lgservice.com VACUUM CLEANER SERVICE MANUAL MODEL : VC5404PF CAUTION BEFORE SERVICING THE UNIT, READ THE "SAFETY PRECAUTIONS" IN THIS MANUAL. P/NO : MFL57903919 Dec, 2008 Printed in China... -
Page 2: Table Of Contents
CONTENTS SAFETY PRECAUTIONS..........................3 CAUTIONS ..............................3 DESCRIPTION..............................4 SPECIFICATIONS ............................4 DISASSEMBLY ............................5~6 TROUBLE SHOOTING GUIDE........................7~9 SCHEMATIC DIAGRAM..........................10 CIRCUIT DIAGRAM............................11 EXPLODED VIEW ..........................12~16... -
Page 3: Safety Precautions
SAFETY PRECAUTIONS BEFORE OPERATING THIS VACUUM CLEANER, READ THIS SERVICE MANUAL THOROUGHLY, AND OBSERVE EACH POINT CAREFULLY. 1. Motor filter(Air Cleaner) 3. Avoid suction such materials as : 1) This filter is reusable. 1) Liquid or wet dust : 2) Never use the vacuum cleaner without filter. Clogs the ventilation holes, reduces the suction It may damage the motor. -
Page 4: Description
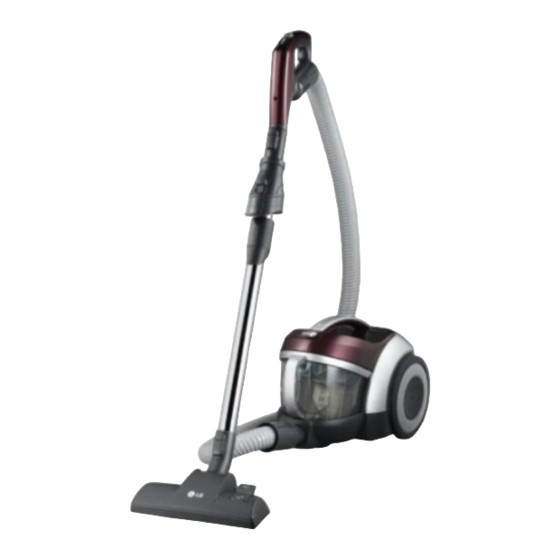
DESCRIPTION Cord Reel Button Hose Assembly, Flexible Pipe Assembly, Telescopic Power Cord Dust Tank Nozzle Nozzle Assembly,Floor Assembly,Floor ATTACHMENTS BRUSH ASSEMBLY, DUST NOZZLE,CREVICE SPECIFICATIONS • MODEL : REFER TO THE COVER PAGE • PACKING DIMENSION : 330 x 565 x 335 (D x W x H) •... -
Page 5: Disassembly
Methods for Disassembly, Assembly and Repair of Main Parts Need-to-know for disassembly Pull out the plug before disassembly and adjustment. 3) Remove the back (filter cover for exhaust) 1. All the parts are almost connected by screws or assembled by insertion. Disassemble in order with reference to the disassembly diagram. - Page 6 3. Replacement of motor 2. Lift the motor housing assembly Disassemble the motor assembly as shown in the figure (with TPL4*16:4 pieces, type drive) For re-assembly after disassembling the motor cover, do so in the reverse sequence and insert the packing seal, motor and mount packing. During the assembly, make sure to prevent the packing seal and motor mount packing from Housing assembly...
-
Page 7: Trouble Shooting Guide
TROUBLE SHOOTING GUIDE 1. SWITCH ON BUT MOTOR DOSE NOT TURN. CHECKING CAUSE SOLUTION CHECK THE POWER The fuse is melt down Exchange the fuse SOURCE in the coverknife switch Poor plug insertion Insert again Power cord cut Repair or exchange Interior lead wire cut Exchange the lead wire Motor(stator armature) coil cut... - Page 8 3. SWITCH OFF BUT MOTOR TURNS Poor connection Repair. 4. WEAK SUCTION POWER Motor armature cut Exchange the motor Foreign matters attached to Low rotation speed Remove the foreign matters the impeller Inquire to the power utility Low voltage company Hose and extension wands Remove the foreign matters are clogged with foreign...
- Page 9 5. VIBRATION NOISES Loose parts Secure firmly Unbalanced motor assembly Exchange or repair the motor Foreign matters are attached Remove the foreign matters to the impeller Armature is cut or foreign Exchange the motor matters attached Remove foreign matters 6. RADIO, TV RECEPTION DISTURBANCE Poor cord, lead wire Exchange cord, lead wire Poor electric connector or...
-
Page 10: Schematic Diagram
SCHEMATIC DIAGRAM -10-... -
Page 11: Circuit Diagram
CIRCUIT DIAGRAM -11-... -
Page 12: Exploded View
#EV# EXPLODED VIEW BASE ASSEMBLY, BODY AANBB1 AHDBR1 AJWBA1 MAMBB1 MCKAT1 MDSBM1 MJHTB1 MGECB1 EADBS1 AJWBA1 AGRBS1 AHJBA1 -12-... - Page 13 #EV# COVER ASSEMBLY, BODY ACQAA1 ABNCA1 MCKCH1 MFGCA1 MHYCC1 MEBCC1 MBGCR1 MCKCT1 MHYCC2 MFCCA1 MFGCA2 MCKCS1 MCKCA1 MBGCS1 MHYCC3 MHJCF1 MCKCB1 -13-...
- Page 14 #EV# TANK ASSEMBLY, DUST AJLTD1 MCKTS1 MBLTD1 MDSTA1 MJMTC1 MBLDC1 MDJTA1 MDSTA2 MGEAC1 MJMTD1 MCKTH1 MDSTA3 MFGTA1 -14-...
- Page 15 #EV# ACCESSORIES EADBS2 MCQBM1 EAUBA1 EBRBM1 ACVBA1 MCKBZ1 MDSBS1 MDSCM1 MEKBM1 ADQBE1 MCKBE1 -15-...
- Page 16 #EV# ACCESSORIES ADQBC1 MJHFF1 MDJBM1 MDQBF1 -16-...
- Page 17 #EV# ACCESSORIES AEMAF1 AGBN62 AGBN63 Nozzle Nozzle Assembly,Floor Assembly,Floor AGRPT1 MFVCN1 ABCAD2 -17-...
Need help?
Do you have a question about the VC5404PF and is the answer not in the manual?
Questions and answers