Table of Contents
Advertisement
FOOD WASTE
DISPOSERS
GUIDE FOR EASY, TROUBLE-FREE
INSTALLATION,
CARE AND USE.
HOW THIS GUIDE
WILL HELP YOU.
This guide describes everything you need to know
to install your new food waste disposer, including
care and use information.
If you take your time,
follow the instructions
and drawings, you should
have no trouble making a first-rate installation.
NOTE: Read through the entire guide before you
start installation so you can get all the tools and
materials you will need with one trip to the store.
II
I I! II!1
These
are the tools
and
materials
you
will
need.
ADJUSTABLE
("CRESCENT")
WRENCH
_
PIPE
WRENCH
WIRE NUTS
PLUMBER'S PULP(
(2 - Size 54)
(% lb.)
WP71865
HACK
SAW
These
are
the
tools
and
materials
you
may
need.
_
ON-OFFELECTRICAL
SWITCH 120 amp, rating)/_,_"
-
DRAIN
_
HAMMER
AUGER
ELECTRICAL CABLE
CONNECTOR
(1/2inch)
o o I /
DISHWASHER
/
DRAIN CONNECTIN
COPPER
WIRE
HOSE CLAMP
(7_ inch)
(12 or 14 gauge )
Advertisement
Table of Contents

Related Manuals for Kenmore Garbage Disposal


Summary of Contents for Kenmore Garbage Disposal
- Page 1 FOOD WASTE DISPOSERS GUIDE FOR EASY, TROUBLE-FREE INSTALLATION, HOW THIS GUIDE This guide describes everything you need to know to install your new food waste disposer, including care and use information. If you take your time, follow the instructions and drawings, you should I I! II!1 These are the tools...
-
Page 2: Dimensions
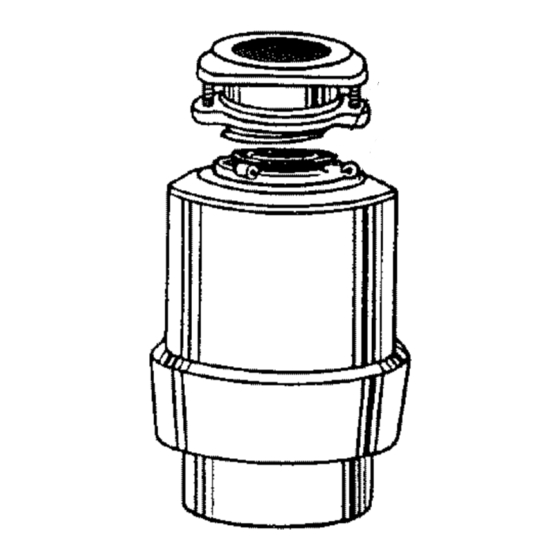
INSTALLATION DIMENSIONS DRAWING REPRESENTATIVE OF A FOOD WASTE DISPOSER IMPORTANT:PLUMB WASTELINE TO PREVENTSTAND- ING WATER IN DISPOSERMOTOR HOUSING. OKAY, LET'S START THE INSTALLATION STEP AT A TIME. AND MAKE SURE EVER,..YTHING IS THERE. (your new CHECK THE PARTS AGAINST THE DRAWINGS BELOW disposer may not look hke the one pictured.) "WRENCHETTE"... - Page 3 Kenmore You can do the job yourself drain trap and, using the auger, pipe that runs from the trap to the main wasle POWER at the service...
- Page 4 HERE IS WHAT TO DO IF YOU ARE INSTALLING YOU R SINK'S FIRST DISPOSER, Now, remove the large nut at the base of the sink strainer by placing the tip of your screwdriver on the edge of the nut. (There are usually ridges to hold your screwdriver,) Then strike the head of the screwdriver with a hammer in a counterclockwise direction.
- Page 5 LET'S KEEP GOING...IT'S NOW WE'RE GETTING INTO THE ACTUAL INSTALLATION. SEPARATE THE PARTS IN THE MOUNTING ASSEMBLY. Mounting Lower Assembly _Mounting " Ring Then loosen the screws First, remove the mounting assembly from the dower mounting ring, Holding ting assembly the mounting assembly with one hand, with the surface of the mounting ring.
- Page 6 WE'RE READY TO MAKE THE ELECTRICAL CONNECTIONS. NOTE: Ifusing armored cable, we recommend installing an anti-short or insulation bushing in the end of the cable, Do not fold or remove the brown paper from inside the wiring compartment, Install the cable connector. Then loosen the connector screw(s).
- Page 7 NEXT, MAKE If the cable leading to the disposer has three wires, at- tach the green ground wire to the green ground screw. Attach the other end of this ground wire to the metal cold water pipe. NOTE: Be sure that this cold water pipe is continuous metal pipe from...
- Page 8 _r_- NOW, ATTACH THE DISPOSER DISCHARGE TUBE TO YOUR SINK'S DRAIN TRAP. First, check inside the Turn the disposer disposer grinding chain- Some models use a rubber washer that must be assem- ber to remove any objects bled to the discharge or dirt that might have flange over the discharge...
- Page 9 DISPOSER IN PLACE. NOW, LOCKTHE Place the end of your "wren- chette" or a screwdriver into the left side of one of the mounting ring lugs at the top of the dispose_ Then, turn the "wren- chette" or screwdriver to the right until the disposer locks in place.
-
Page 10: Troubleshooting
INSTRUCTIONS PERTAINING IMPORTANT SAFETY INSTRUCTIONS WARNING: When using electric appliances, basic precautions should always be followed, including following: 1.Read all the instructions before using appliance. 2.To reduce the risk of injury, close supervision necessary when an appliance is used children, 3.
Need help?
Do you have a question about the Garbage Disposal and is the answer not in the manual?
Questions and answers